 Fellow Canadians: All inFlow plans are available in Canadian dollars



 Home
Home


How to import stock transfers into inFlow
Need to move a lot of stock to several locations at once? You can import stock transfers from a CSV file instead of creating each transfer by hand. inFlow can create the transfers as open, or complete them and move your stock right away. See below for full details.
Please note: Stock transfers are only available on select plans or add-ons with multiple locations.
Before you start
- Check your location and product names before you import. If a location or product in your CSV import file isn’t in inFlow yet, the import creates it for you. A typo can create an extra location or product you didn’t mean to add. Learn more about managing multiple locations.
- To import completed transfers, make sure the stock is already in the From location. If the From location doesn’t have enough stock, inFlow skips that transfer.
- You’ll need the Transfer Stock edit right to import stock transfers. If you don’t see the option, ask your inFlow administrator.
- To import to sublocations, make sure sublocations are enabled first.
Set up your stock transfer CSV
Create a spreadsheet with one row for each product you want to transfer. Add the column headings (as seen in the Stock transfer CSV template breakdown below) and fill in your transfer details.
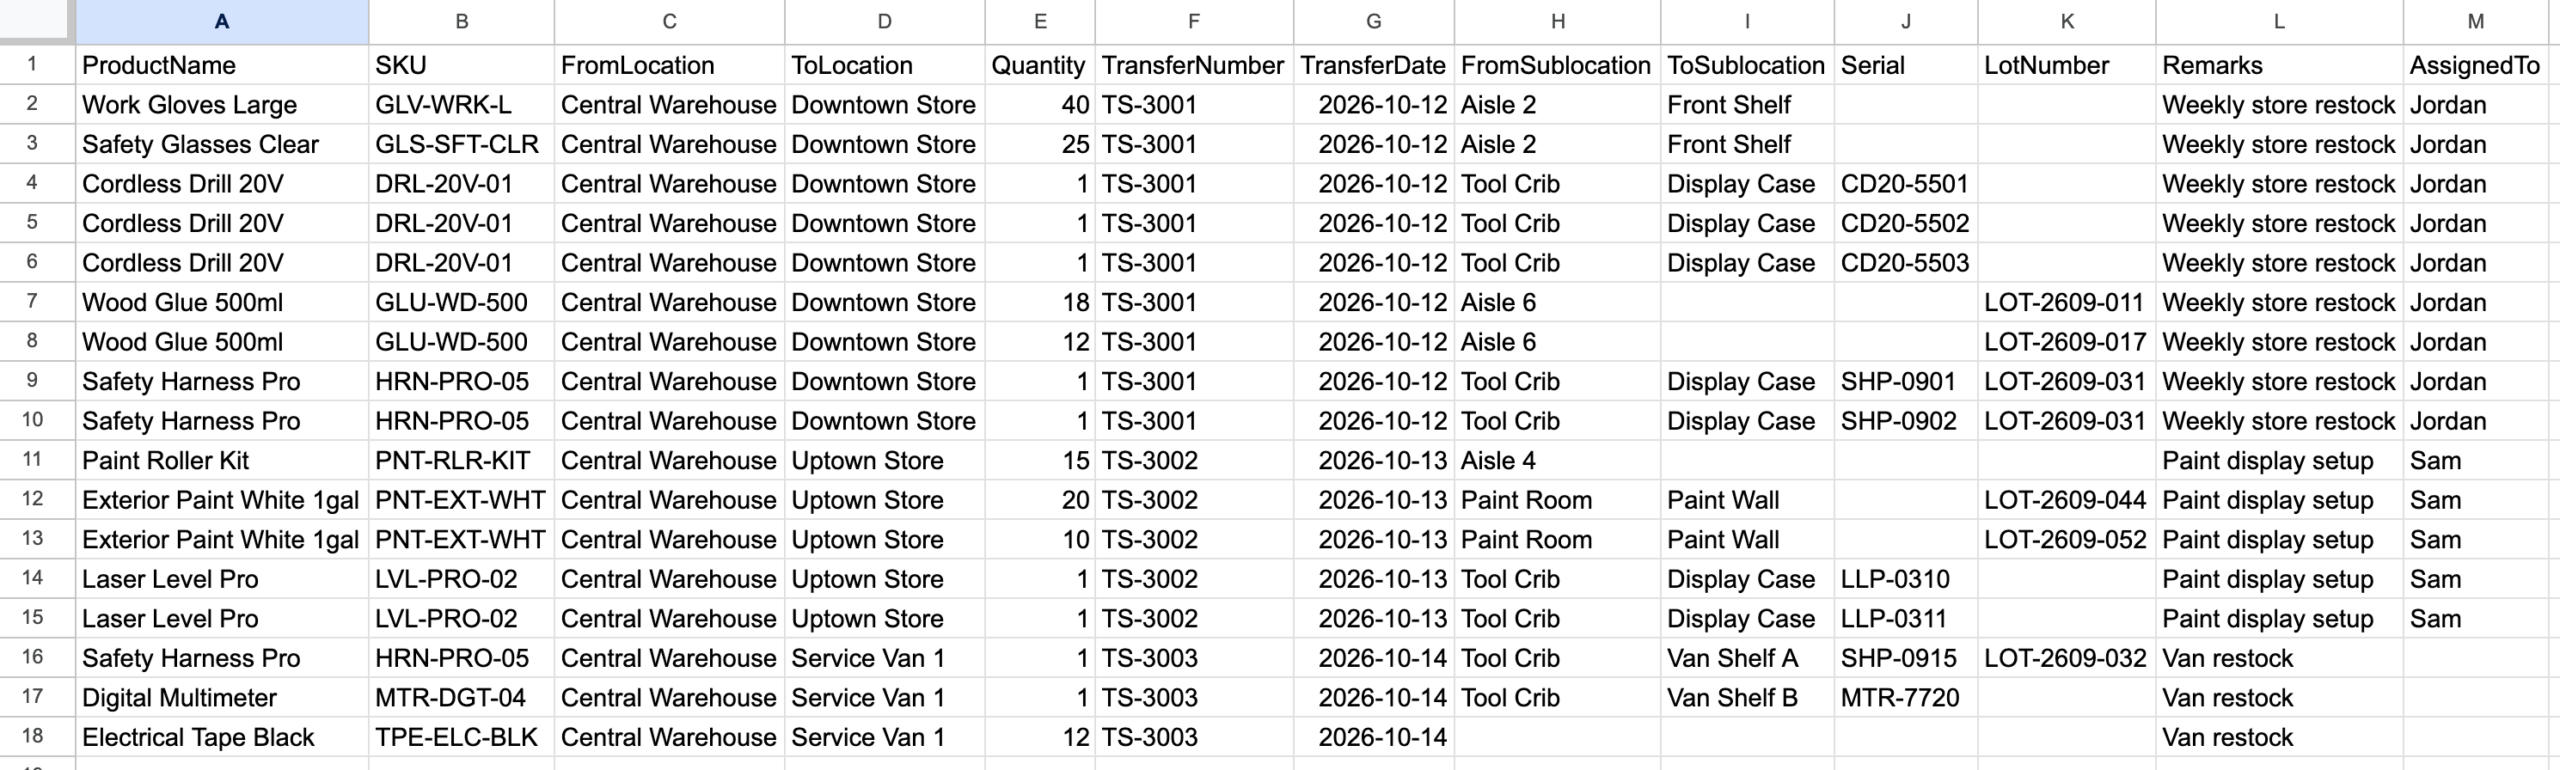
Save your spreadsheet as a CSV UTF-8 (comma-delimited) file if your data contains special characters.
Stock transfer CSV template column breakdown
| CSV column heading | Required? | What to enter |
|---|---|---|
| ProductName | Required (or SKU) | The name of the product to transfer. If the product isn’t in inFlow yet, the import creates it. |
| SKU | Required (or ProductName) | The product’s SKU. You need either a product name or a SKU on every row. |
| FromLocation | Required | The location the stock is leaving. If the location isn’t in inFlow yet, the import creates it. |
| ToLocation | Required | The location the stock is going to. It must be different from the From location. If the location isn’t in inFlow yet, the import creates it. |
| Quantity | Required | The number of units to transfer. It must be more than 0. |
| TransferNumber | Optional | The stock transfer number. Rows with the same number are combined into one transfer, so they must have the same From and To locations. Each number must be new to inFlow. |
| TransferDate | Optional | The date of the transfer. |
| FromSublocation | Optional | The sublocation the stock is leaving. If blank, inFlow uses the default sublocation. |
| ToSublocation | Optional | The sublocation the stock is going to. If blank, inFlow uses the default sublocation. |
| Serial | Required for completed transfers of serialized products | The serial numbers being transferred. Put all the serial numbers for that row in one cell, separated by commas. |
| LotNumber | Required for lot-tracked products | The lot number being transferred. If the lot number doesn’t exist yet, inFlow creates it. |
| Remarks | Optional | Any notes you want to add to the transfer. |
| AssignedTo | Optional | The team member assigned to the transfer. Enter the user’s name or email exactly as it appears in inFlow. |
| Custom fields | Optional | Any stock transfer custom fields you’ve set up in inFlow. |
How inFlow groups rows into transfers
inFlow turns the rows in your file into one or more stock transfers:
- With a TransferNumber column: Rows with the same transfer number become one transfer with multiple products. Each different transfer number creates its own transfer. Every row in a transfer must have the same From and To locations.
- Without a TransferNumber column: inFlow groups rows by their From and To locations. Each different pair of locations creates its own transfer.
For example, if your file moves stock from Warehouse A to Store 1 and from Warehouse A to Store 2, inFlow creates two transfers.
Importing serialized and lot-tracked products
Serialized and lot-tracked products each need their own row in your CSV. Repeat the product name, locations, and transfer number on every row.
Serialized products
Put each serial number on its own row and set the Quantity to 1. For example, to transfer three cordless drills, add three rows for the same product, each with its own serial number.

You can leave serial numbers blank on an open transfer and add them later. A completed transfer needs a serial number for every unit, or the import will fail.
Lot-tracked products
Put each lot number on its own row, with the quantity you’re transferring from that lot. For example, to transfer 30 bottles of wood glue from two lots, add one row with 18 units from the first lot and another row with 12 units from the second lot.

To learn more about tracking lot numbers and expiration dates, see this guide.
Products that track both lots and serial numbers
Put each serial number on its own row, with the lot number that serial belongs to, and set the Quantity to 1. If the serials come from different lots, enter the matching lot number on each row.

How to import your stock transfers
- From the Main Menu, hover over the Settings icon, then click Import.
- In the Data type drop-down menu, select Stock transfers.
- Select your CSV file from your computer, then click Next.
- Choose the status for your imported transfers:
- Open: inFlow creates the transfers but doesn’t move any stock yet. Send and receive them when you’re ready.
- Completed: inFlow completes the transfers and moves the stock right away.
- To check how your columns are matched, click Edit data mapping. Match the inFlow fields on the left to your CSV columns in the drop-down menus.
- Click Import.
- You’ll see an Import is in progress message, and you’ll get an email with the results when the import finishes.
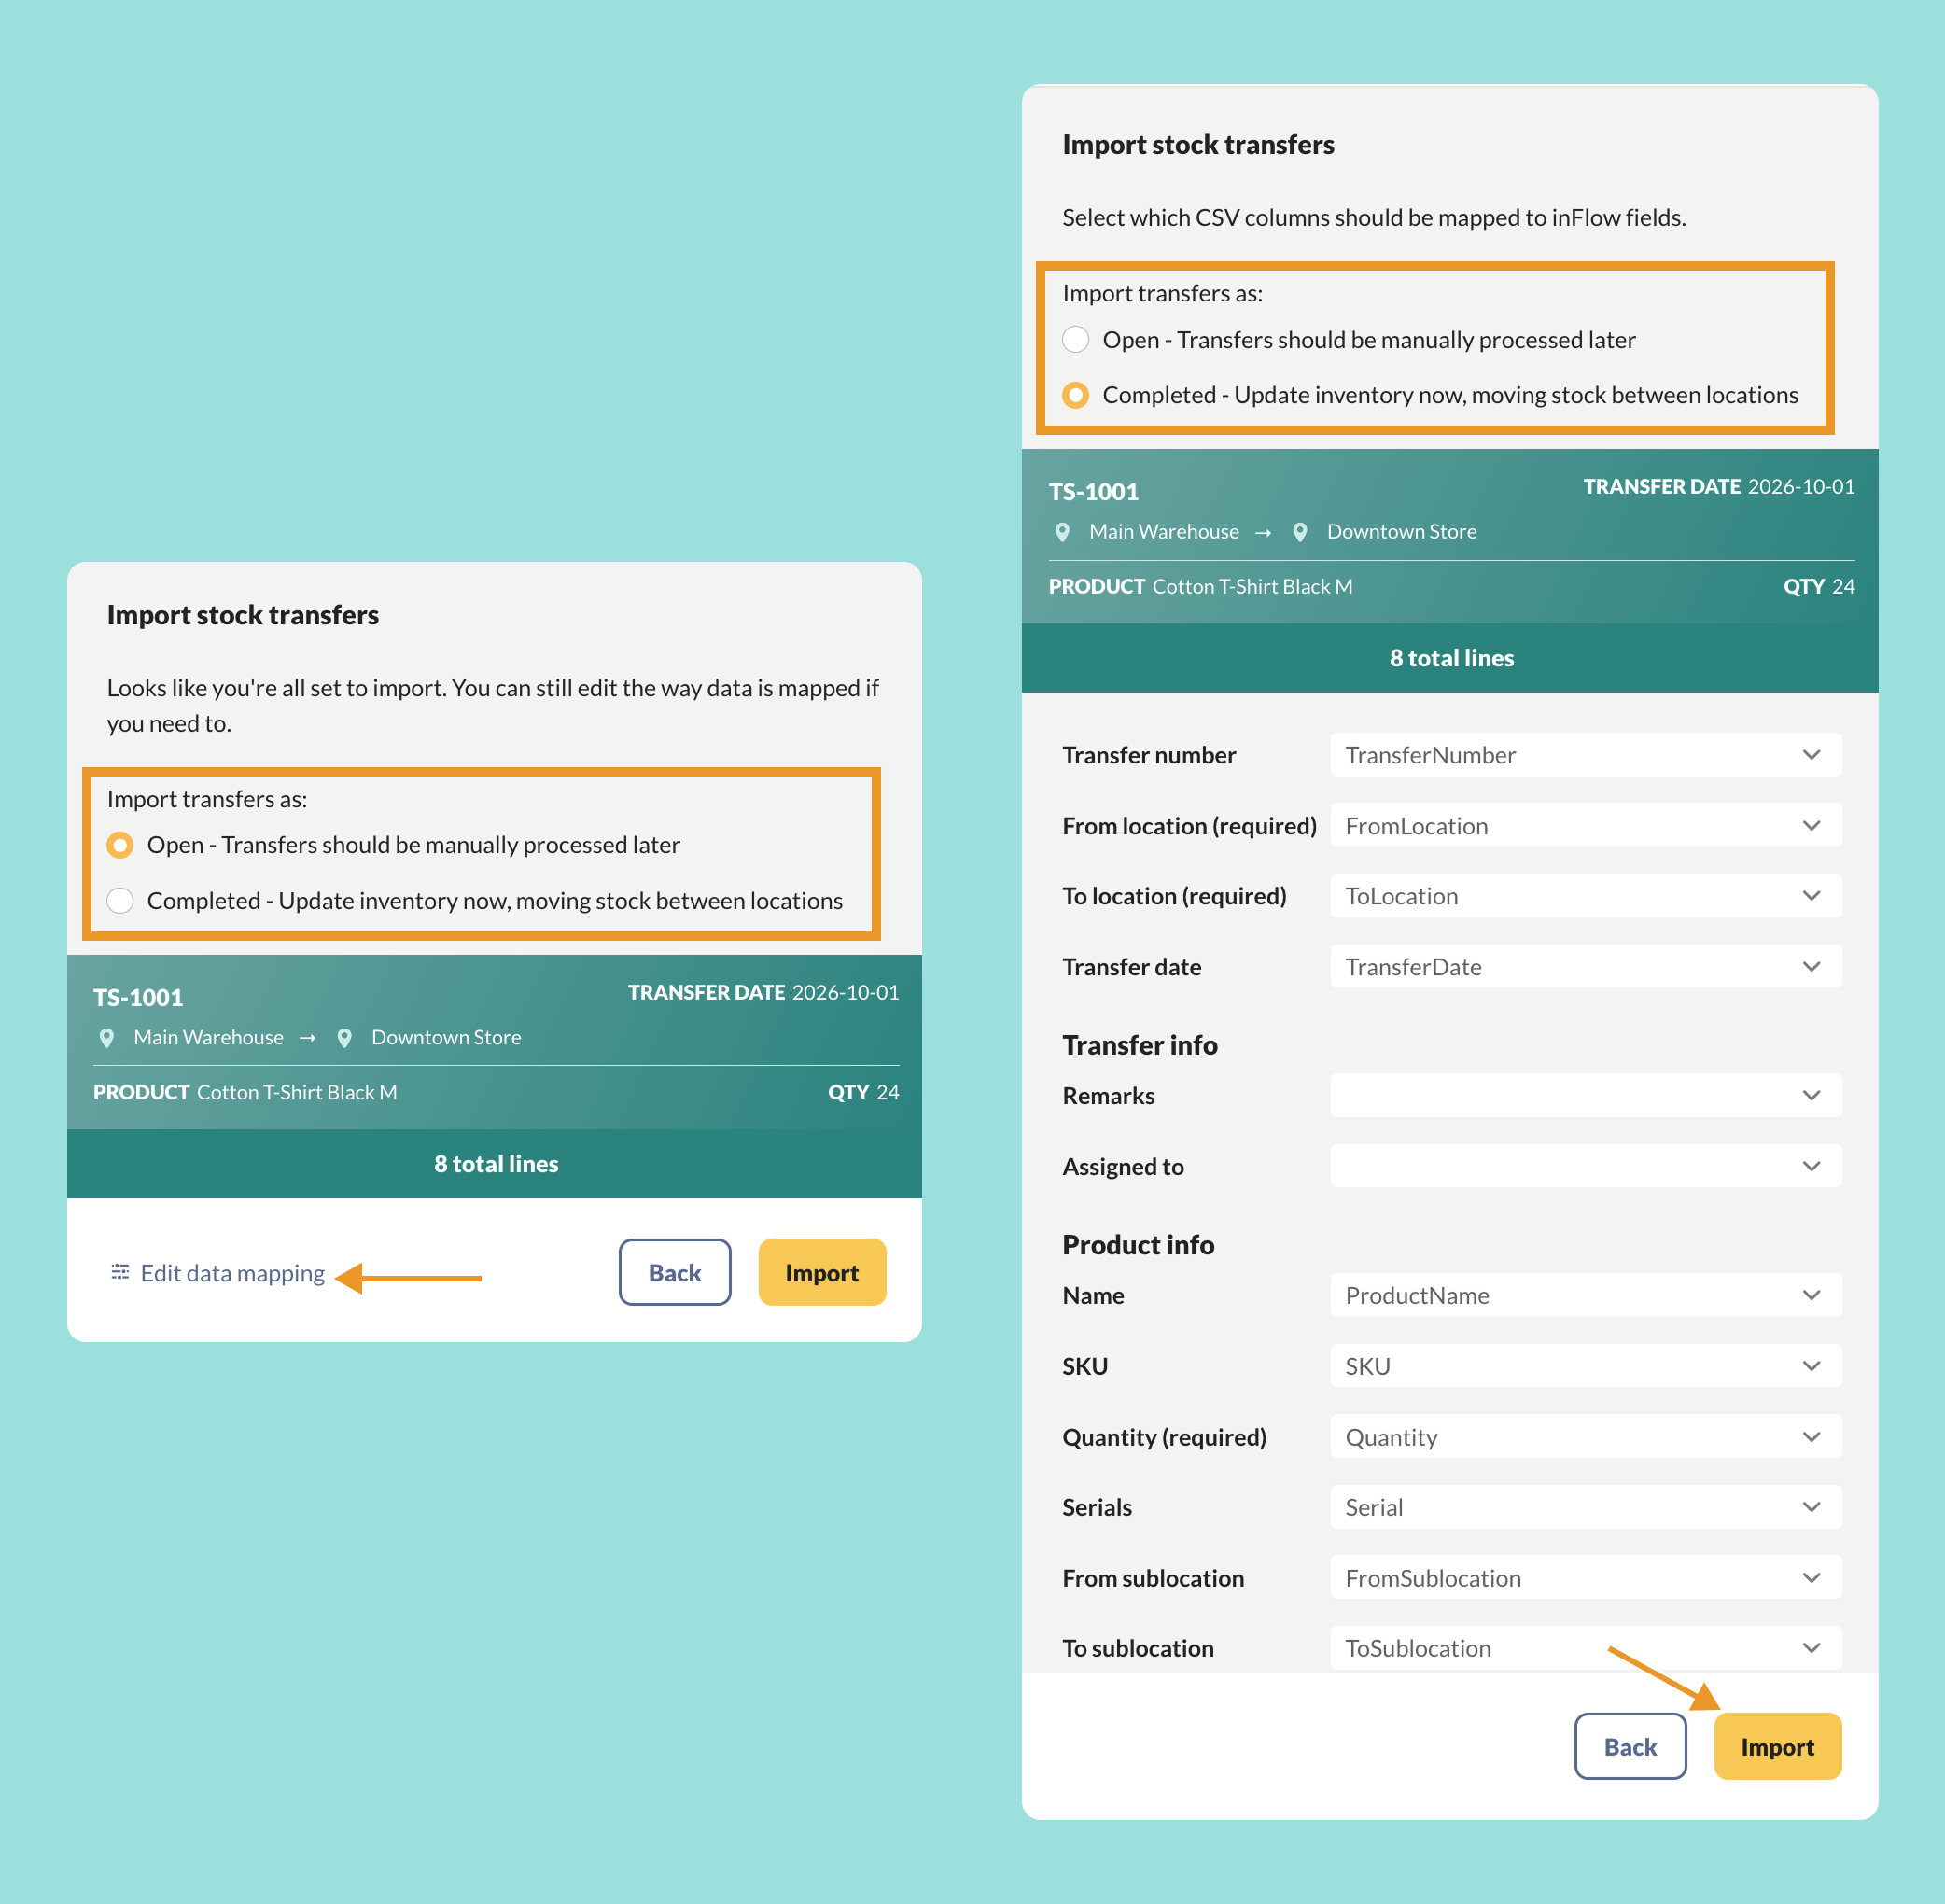
When you import completed transfers, inFlow sets the sent and received dates to the transfer date. If your file has no date, inFlow uses today’s date.
To view your new transfers, open the stock transfer list. Learn more about working with transfers in the how to transfer stock between locations guide.
 Yes, thanks!
  Not really

0 Comments