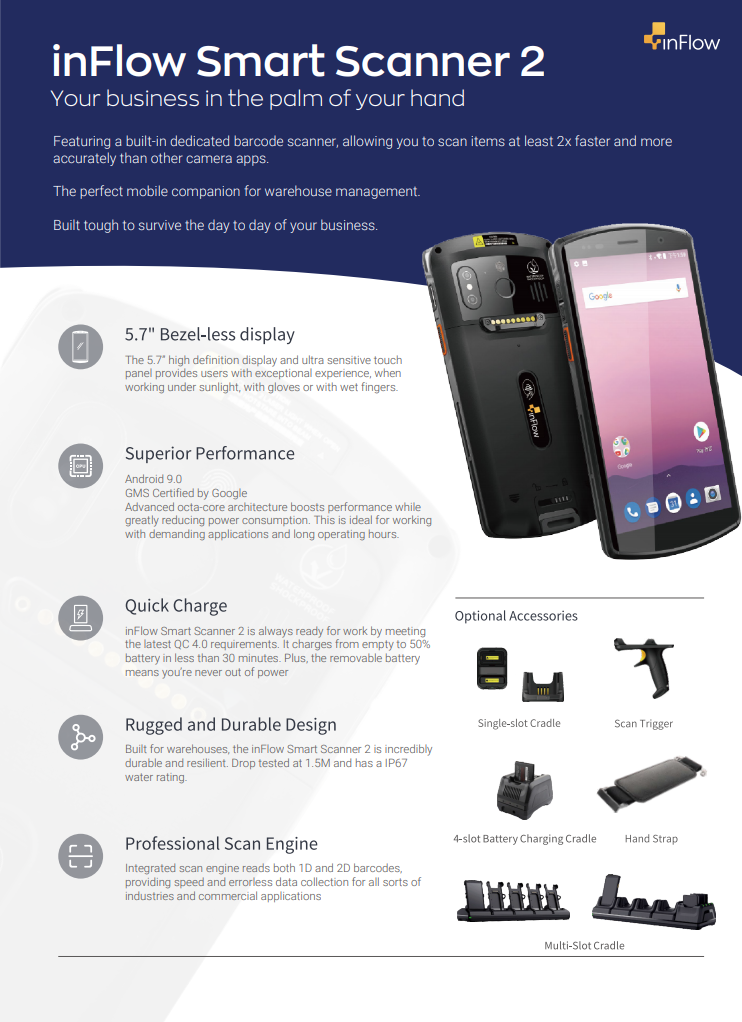
inFlow Smart Scanner 2
inFlow’s very own smart scanner is here! Featuring a built-in dedicated barcode scanner, you’ll be able to instantly scan your items at least 2x faster and more accurately than any camera app.
Perfect for warehouse management, mobile picking, counting inventory, mobile sales orders, easy stock adjustments, and more. It’s built tough to survive the day-to-day of your business.
Purchased a Smart Scanner recently? If so, take a look at the Smart Scanner 3 article.
Scanner info
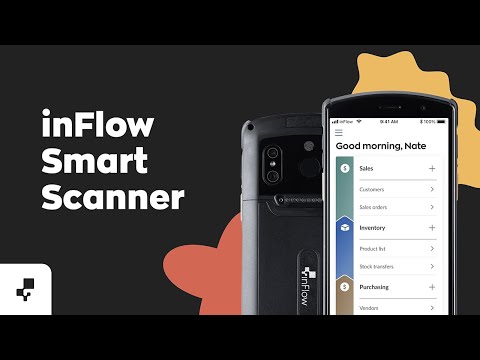
Here’s a two-minute overview of the Smart Scanner and its accessories:
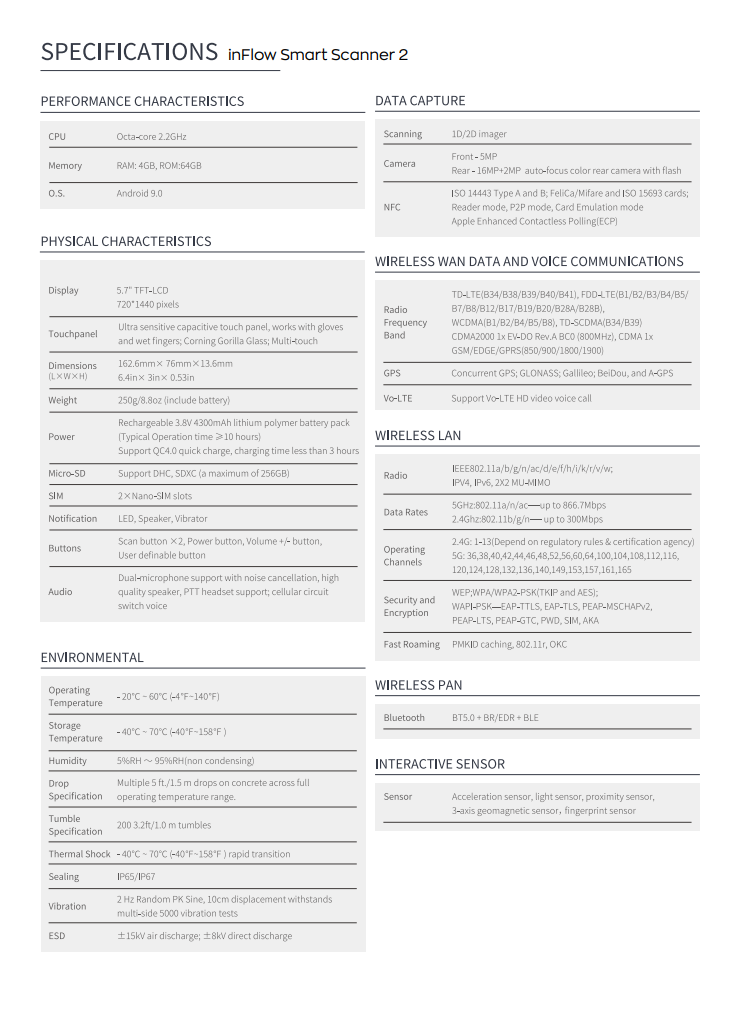
Scanner specifications
Find all the information you need to know about inFlow’s Android Smart Scanner here.
Basic Characteristics
- Octa-core 2.2 GHz 64-bit processor
- RAM – 4GM
- ROM – 64GB
- O.S. – Android 8.0 and more.
For a complete list of Smart Scanner 2 features take a look here.
Peripherals
- Camera – 16MP auto-focus color rear camera with flash, 2MP front-facing camera
- RFID – Supports 13.56Mhz, ISO 14443A&B and ISO15693 standard, supports NFC
- GPS – GPS, A-GPS, Bei-Dou satellite navigation system, GLONASS
- Sensor – Light sensor, range sensor, acceleration sensor, compass, gyroscope, barometer
- Slots – Micro SD/TF x 1, Micro SIM x 2
- Interfaces – Type-C USB, 3.5mm Audio port, POGO PIN
- Audio – Loudspeaker, microphone, earpiece
- Includes – Power adapter, data cable, one battery
Radio Communication
- Wi-Fi – 802.11 a/b/g/n
- Bluetooth – BT 4.1 BLE
- Cellular –
4G TDD-LTE (B38/B39/B40/B41), FDD-LTE (B1/B3)
3G TD-SCDMA (B34/B39), WCDMA (B1/B2/B5/B8), CDMA2000 1x EV-DO Rev. A Bc0 800MHz
2G CDMA 1x, GSM/EDGE/GPRS (850, 900, 1800, 1900MHz)
User Environment
- Operating Temperature – -10~50°C (14~122°F)
- Storage Temperature – -40~70°C (-40~158°F)
- Humidity 5% ~ 95%
- Drop Durability – 1.5m
- IP Sealing – 65
Warranty
- Software support – Ongoing with a subscription to inFlow Inventory
- Hardware (including all accessories) – 1 year limited warranty*
*Bonus: Your hardware is covered for a full 2 years as long as you maintain an active inFlow subscription.
Complete list of features
Installing the inFlow Inventory App
You can find a direct link to the inFlow Inventory Android app in the Google Play Store by clicking this link here, or take a look at the steps below.
- Search for the inFlow Inventory app in the Google Play Store. (You’ll need to log in or create a Google/Gmail account (if you haven’t already).
- Tap Install to download the app on your Android Device.
- Tap Open when done.
For more info about the inFlow Inventory mobile app, check our Full Guide.

Using the app and scanner
- Open the inFlow Inventory app.
- Login to your inFlow Inventory account.
- Click into any field you would search for a product (ie. Products search field)
- Use the orange button on either side to activate the scanner.
- Scan a barcode, an on-screen indication will show you the results.
Scanner Debug App
The smart scanner comes preloaded with an app called Scanner. This app can be used to configure the way the built in barcode scanner behaves and make any needed changes for your region/barcodes that you may be using.
Note: Most people will not need to modify these settings, these are strictly for people who want to change the default scanning behaviors.

Changing the Coding format
- Open the scanner app.
- Click the gear icon in the top right of the screen.
- Scroll down to find Coding format header and click it.
- Choose a new coding format and click it (default is UTF-8).
- Your changes are saved right away.
Adding a prefix or suffix to your scanned barcodes
This will allow you to add a prefix or suffix to barcodes you scan, for example if you have a product with a barcode ‘12345′, but you want all your barcodes to start with an ‘M’, you would add ‘M’ as a prefix and then when you scan a barcode, it would be input like ‘M12345′.
- Open the scanner app.
- Click the gear icon in the top right of the screen.
- Scroll down to find Label formatting header and click it.
- To add a prefix, click on Label prefix and enter your desired prefix.
- To add a suffix, click on Label suffix and enter your desired suffix.
- Click Append formatting header, and select which labels you want to add to your barcodes (Label prefix for only a prefix, Label suffix for only a suffix, Label prefix and suffix for both etc).
- Your changes are saved right away.
Reset scanner options to default
- Open the scanner app.
- Click the gear icon in the top right of the screen.
- Scroll down to find Reset Configuration header and click it.
- Click OK when prompted.
- Scanner settings will reset back to default.
Enabling the Hand Grip
- On the inFlow Smart Scanner swipe up to open up all your apps
- Go to “Scanner”
- Hit the Gear icon in the upper right-hand corner
- Under Scan Handle make sure the box is checked off
Troubleshooting
Google/Android
The inFlow Smart Scanner uses the Android operating system. For general questions and articles related to how to use your new Android device, please visit: https://support.google.com/android/
Which Smart Scanner do I have?
The inFlow Smart Scanners have continued to improve over the years. Most of the improvements from the two Smart Scanners are internal. A quick way to know which scanner you’re using is by turning the Smart Scanner around and looking at the camera lens.
The Smart Scanner 3 has a single camera lens, whereas the Smart Scanner 2 has two lenses.
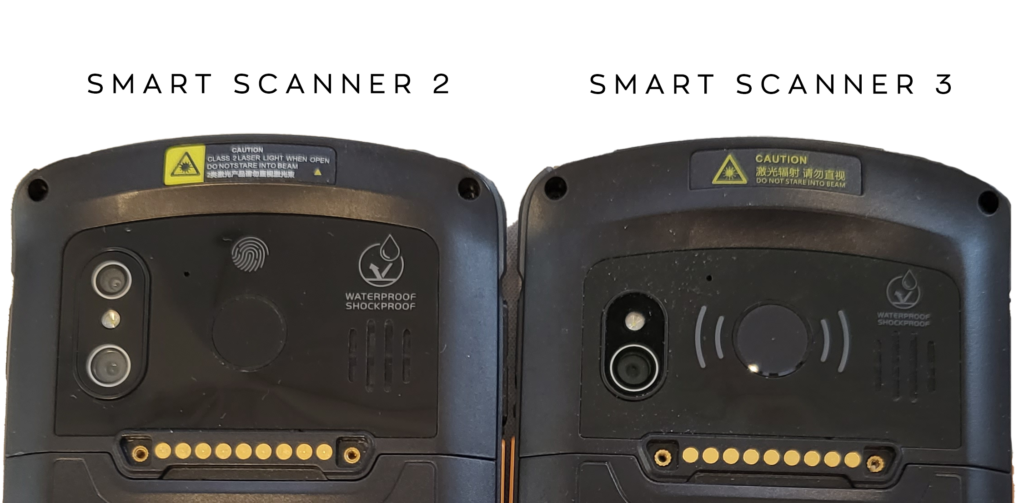
If you’re not using the Smart Scanner 2, you can read more about the Smart Scanner 3 here.
Update your Smart Scanner 2 to the latest Operating System
Update your Smart Scanner 2 to the latest Operating System
This article will show you the steps on how to update your Smart Scanner 2 to the latest firmware.
It’s the first step in troubleshooting issues since it eliminates the chance of any previous bugs or known issues being the cause of the problem.
To do the update, you’ll need a microSD card. Chances are, you might have one handy already. But, if not, any MicroSD card over 8 GB should work. You can find them for under $15 on Amazon.com or at most big box stores.
Step 1 Charge
Charge your device. Before you begin the process, make sure you have at least 30% battery. Also, make sure you know your Google login/password since you’ll need it after the update.
Step 2 Download
Download the latest firmware for the Smart Scanner 2. You can download it by clicking the following file name:
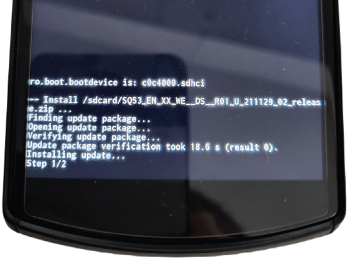
SQ53_EN_XX_WE__DS__R01_U_211129_02_release.zip
Step 3 Transfer
Copy the zip file from above to a micro SD card. You can do this in two ways.
Option 1: Use your Computer
Most MicroSD cards come with an adapter to make them fit regular SD cards. Some computers might have an SD card slot where you can place the SD card directly, or you may have an SD to USD adaptor. If so, plug it into your computer and simply drag and drop the zip file onto the card (do not unzip it).
Option 2: Connect your smart scanner to a computer
- Insert the micro SD card into your Smart Scanner. If you don’t know how to do this, there are further instructions below.
- In your notifications panel, if you see “There’s a problem with this SD card” or “Tap to setup” tap it and then select Portable Storage (this will format the micro SD card correctly).
- Connect the Smart Scanner to your computer with a USB-C cable. You should see a “Charging this device via USB” text box pop up in your notifications. Tap it and then select “Use USB for File Transfer”
- On your computer, look for “My PC” and you should see “DT50“. Click that, and you’ll see “Internal shared storage” as well as your SD card.
- Drag and drop the zip file to the SD card and let it transfer.
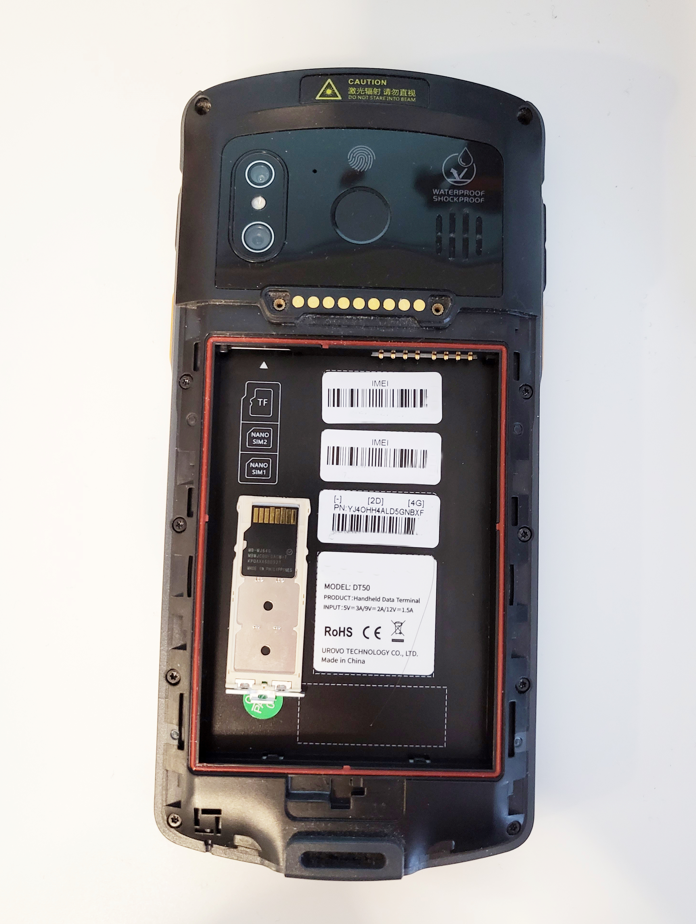
How to put a micro SD card in the Smart Scanner
- Take off the back cover and remove the battery.
- In the upper left corner, you’ll see a metal tray you can pull out. Here’s where you can put in your microSD card. Note: It’s also the same place where you can put a sim card if you’d like to use your Smart Scanner as a phone.
- Place the microSD card in the orientation shown (metal contacts facing up) and slide it back in Side note, microSD is also known as “transflash” so that’s why you see “TF” in the designated spot.
Step 4 Get your device into recovery mode
Remember when you played video games and you’d enter cheat codes by pressing a sequence of buttons? Well, this is basically the same thing 🙂
To get the device into recovery mode, here’s what you do:
- Power off the device.
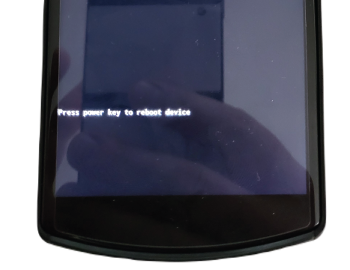
- Press the volume up button and power button at the same time for about 2 seconds.
- As soon as the device turns on, release the power button, but keep the volume up button held for another 5 seconds. If done correctly, you’ll see a message “Press power key to reboot device“.
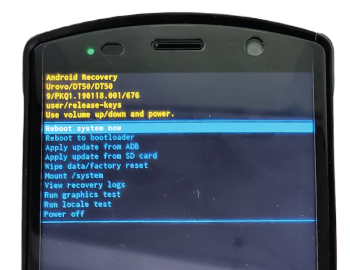
- Press volume up, down, up, down, up, up, down, down.
If done correctly, you should now see an “Android recovery screen” with a bunch of options.
Step 5 Install the update
The good news is that the hardest part is over. Now, you’ll be able to navigate the menu with the volume / down keys and press the power button to select an option.
- Choose Apply update from SD card.
- Choose the Zip file located on the SD card.
- Wait for it to complete.
- Once the update is done, select Wipe data/factory reset and select Yes.
- When prompted to wipe cache partition also select Yes.
- Finally, select Reboot system now and that’s it, you’re done.


0 Comments