Labeling made easy: go anywhere with the inFlow Portable Printer!
inFlow Portable Printer
Labeling your products is crucial for any business, and the inFlow Portable Printer makes it effortless! Print barcodes to organize your inventory on the go, free from the limitations of a single printer location. Enhance your operations with convenience today!
What’s included?
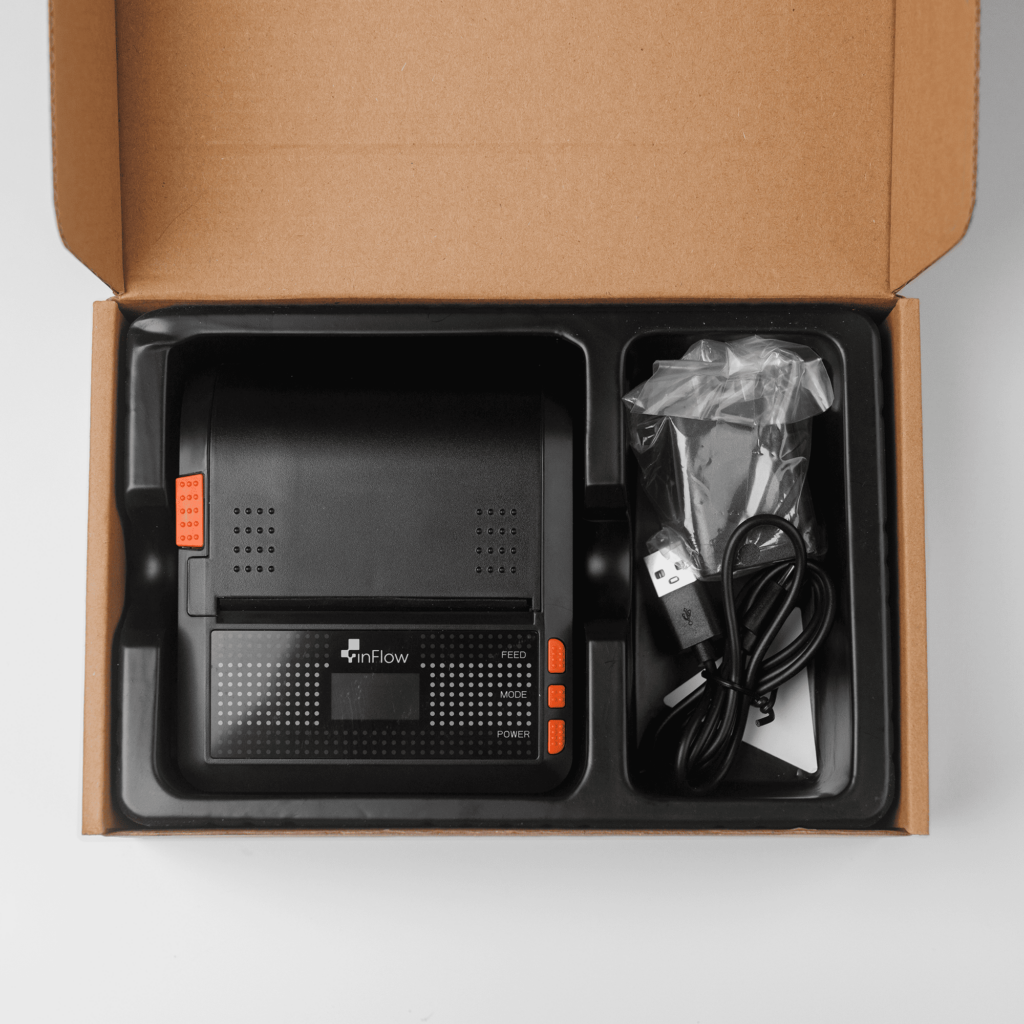
In the package, you’ll receive:
- Portable Printer
- Label spool
- USB-C charging cable
- AC charger
- Sample printing labels 3” x 1” (76mm x 25mm) labels
Warranty
- Software support – Ongoing with a subscription to inFlow Inventory
- Hardware (including all accessories) – 1 year limited warranty*
Your hardware is covered for a full 2 years as long as you maintain an active inFlow subscription.
Compatible labels
The portable printer supports thermal labels of up to 3″ wide like our 3″ x 1″ (76 mm x 25 mm) labels, ensuring high-quality printing for your needs. Feel free to explore even taller labels for your products.
Other important specifications of compatible label rolls:
- Maximum label roll outer diameter: 50mm (1.97″)
- Minimum inner core diameter: 12.3mm (0.48″)
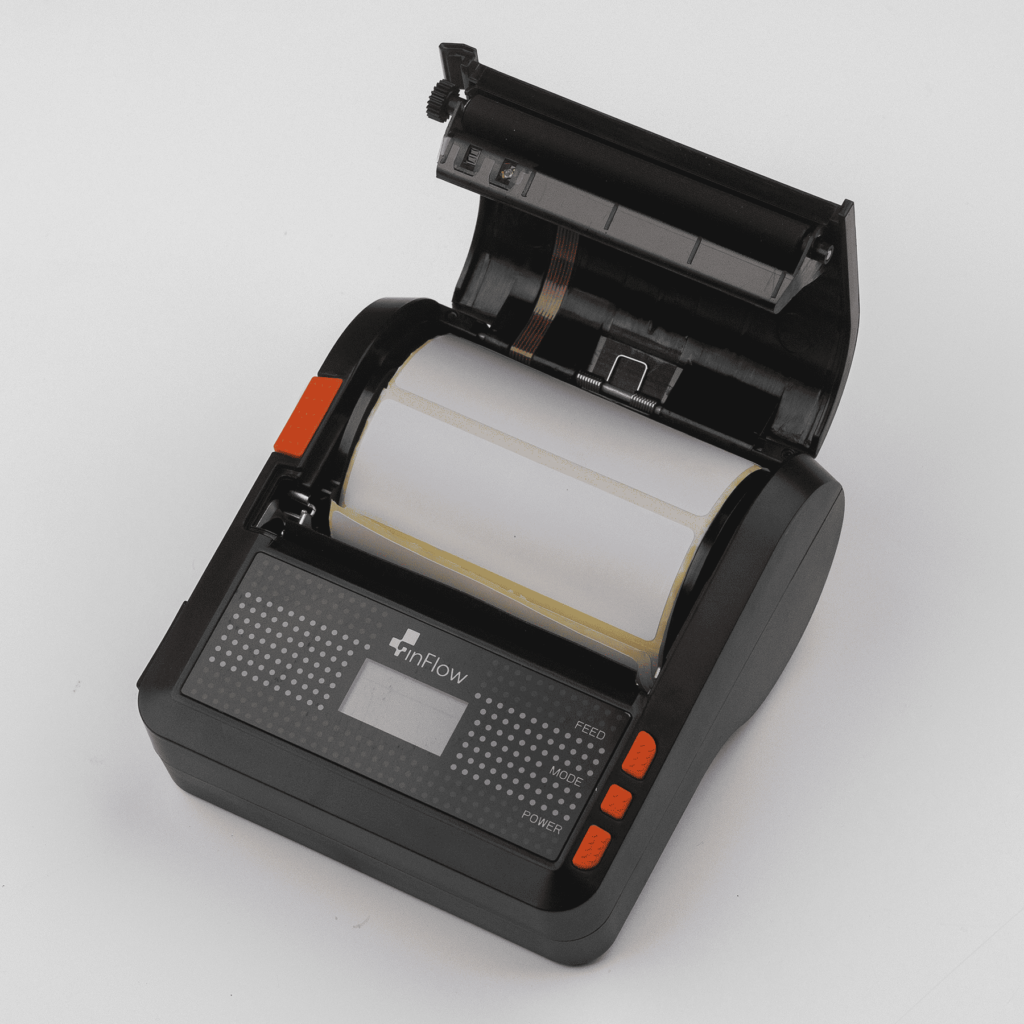
Printer setup
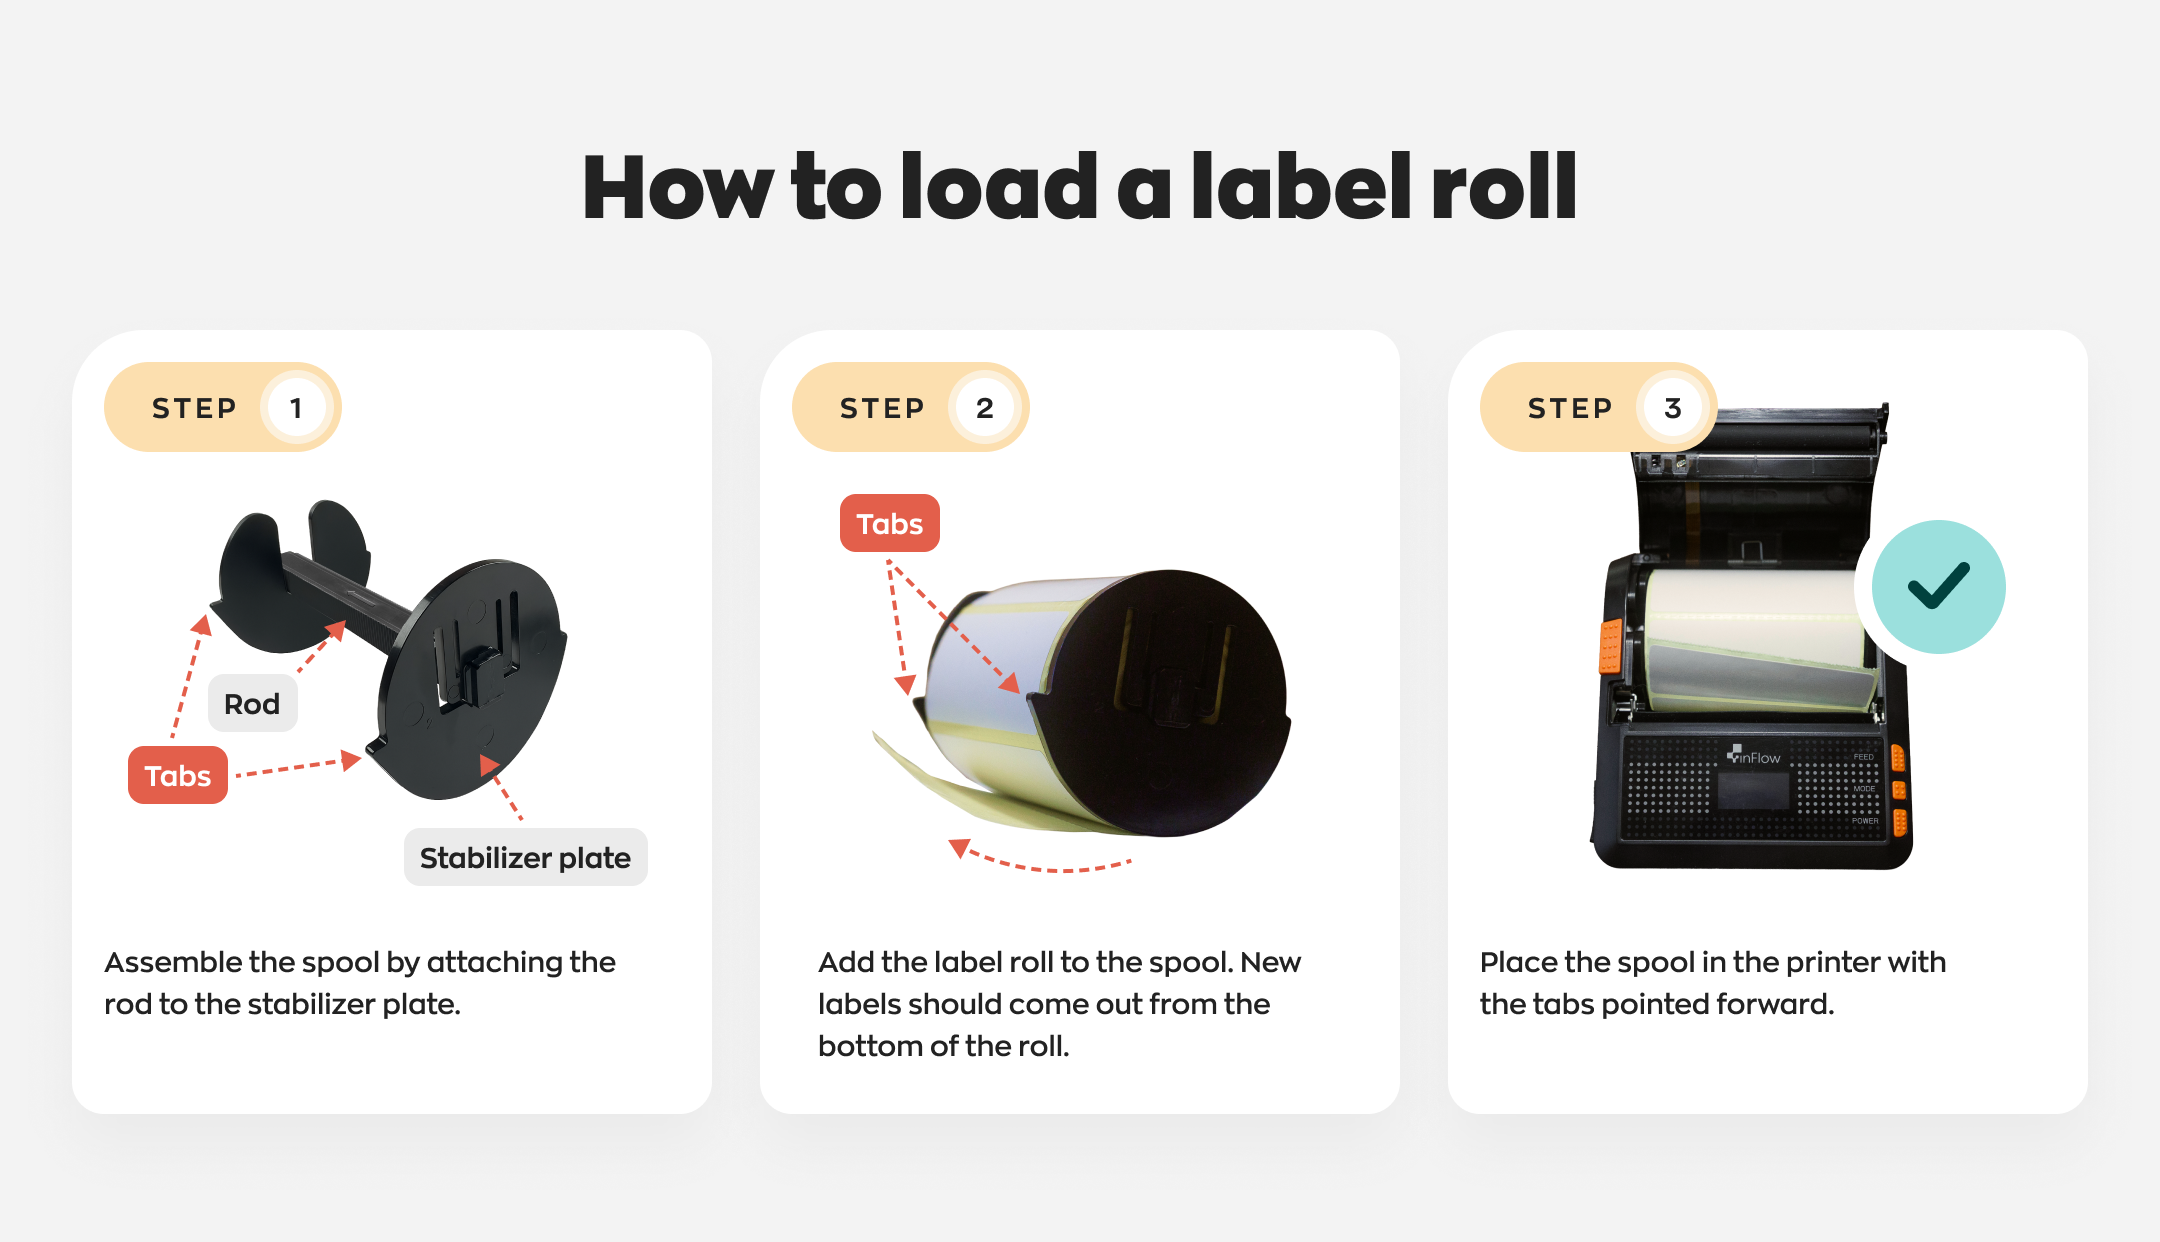
- To open the paper cover, press the [Cover Open] button.
- Assemble the spool (as seen in the image below)
- Add the labels to the spool. The labels should unroll from the bottom.
- Place the spool in the printer.
- Once the paper is in place, close the cover. Then, press and hold the [Feed] button until the printer begins to feed the paper. When the feeding stops, tear off any excess paper.
Now you’re ready to install the printer driver to start printing labels!
Before installing the Portable Printer driver
Take a moment to review the list below to confirm you’re all set to set up label printing with inFlow.
Which computer should you use?
When deciding which computer to install the portable printer driver on, make sure that the computer meets the following criteria:
- Operating systems: Windows or macOS.
- A computer with a reliable internet connection.
System requirements
- Windows 10 and higher.
- macOS 14+, Intel or Apple Silicon.
Installing the printer driver (Windows)

To start, you’ll need to download and install a driver on a Windows computer to set up the printer:
- Download the inFlow Portable Printer driver file.
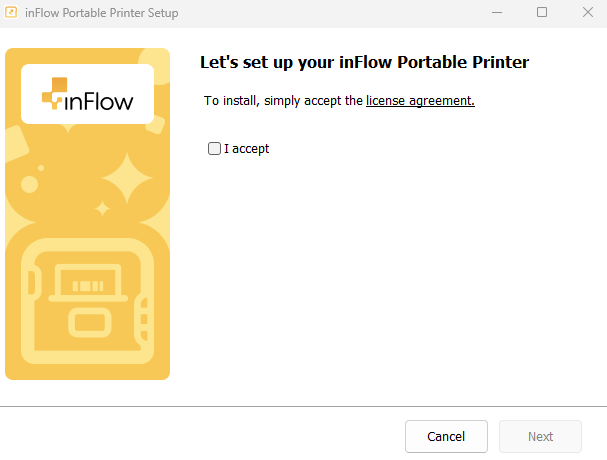
- Once downloaded, double-click on inFlow Printer Setup.exe.
- If prompted Do you want to allow this app to make changes to your device select Yes.
- Continue the setup process:
- Plug in the printer when prompted and ensure it is powered on. For best results, use a USB-C to USB-A cable.
- Select your connection type: Choose a wired or wireless connection for your printer.
- Your printer will print your internet connection details during this stage.
- Optionally, click Test printout to view a sample printed label.
- When done, click Close.
- Disconnect the printer from your computer if you selected the wireless option.
- To print labels in inFlow, be sure to also install and run the inFlow Print Helper (IPH), which enables printing labels using inFlow’s Label Designer.
Congratulations! Now you can print labels from any computer or mobile device when the IPH is running!
inFlow Print Helper download files
Select the appropriate inFlow Print Helper installation file for your operating system to print labels using inFlow’s Label Designer.
Installing the printer driver (Mac)

- Download the inFlow Portable Printer driver file.
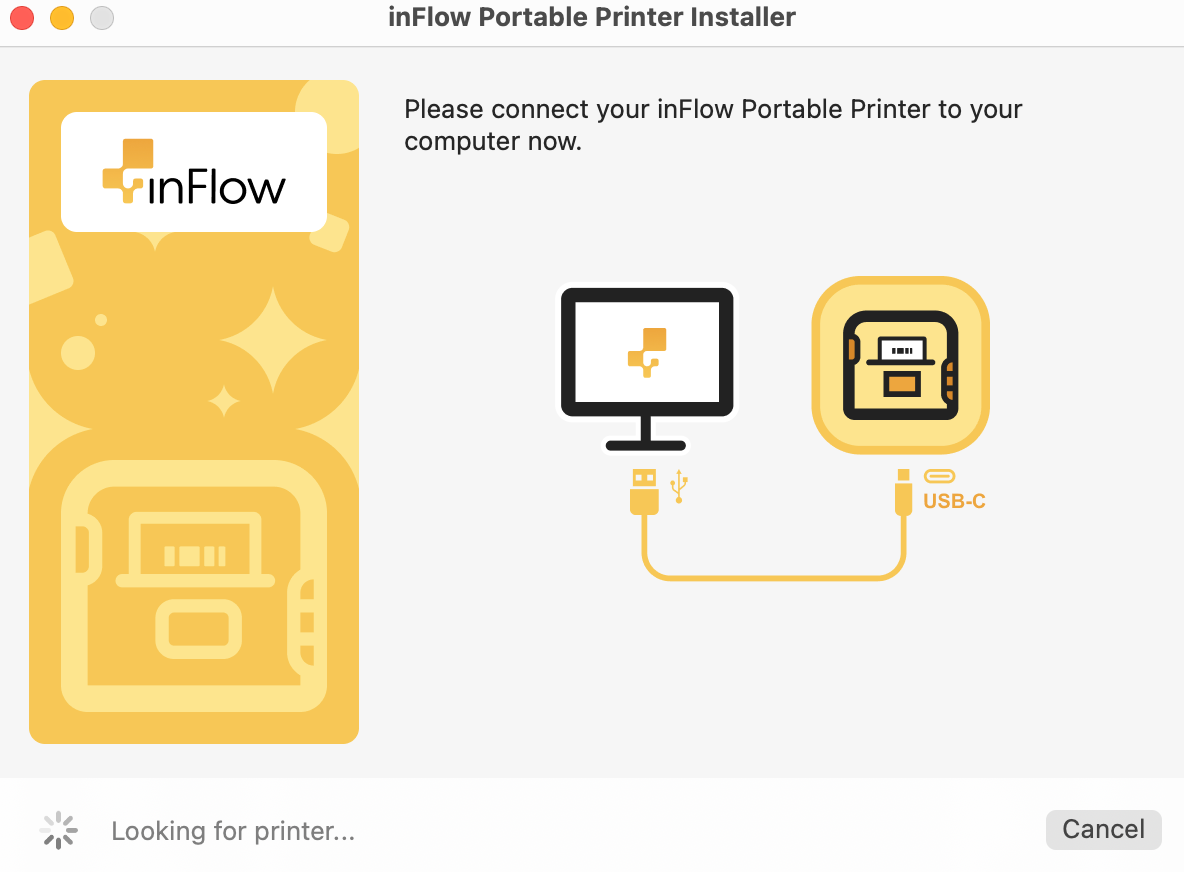
- Once downloaded, double-click the inFlow Portable Printer Installer file.
- You may get a warning that the inFlow Portable Printer Installer was downloaded from the internet. Click the Open button to continue.
- Continue the setup process:
- Plug in the printer when prompted and ensure it is powered on. For best results, use a USB-C to USB-A cable.
- Select your connection type: Choose a wired or wireless connection for your printer.
- You’ll be prompted for additional administrator access to continue the installation. Enter your macOS password to proceed.
- When the setup is complete, the printer will print a test label. You can print additional test labels by selecting Print Test Page.
- When done, click Finish.
- Disconnect the printer from your computer if you selected the wireless option.
- To print labels in inFlow, be sure to also install and run the inFlow Print Helper (IPH), which enables printing labels using inFlow’s Label Designer.
Congratulations! Now you can print labels from any computer or mobile device when the IPH is running!
inFlow Print Helper download files
Select the appropriate inFlow Print Helper installation file for your operating system to print labels using inFlow’s Label Designer.
Connecting multiple Portable Printers
Do you need to use more than one printer? You can connect multiple printers to the same computer or network by following these steps:
- To add each new printer, rerun the inFlow Portable Printer driver.
- During installation, assign a unique name to each printer, such as “Warehouse Printer 1” or “Receiving Station Printer.” This makes it easier to select the correct printer when printing labels.
Once everything is set up, all printers will be listed in your inFlow print options, allowing you to direct labels to the appropriate printer based on your workflow.
Consider this setup if you have multiple workstations or need to print various types of labels from different locations.
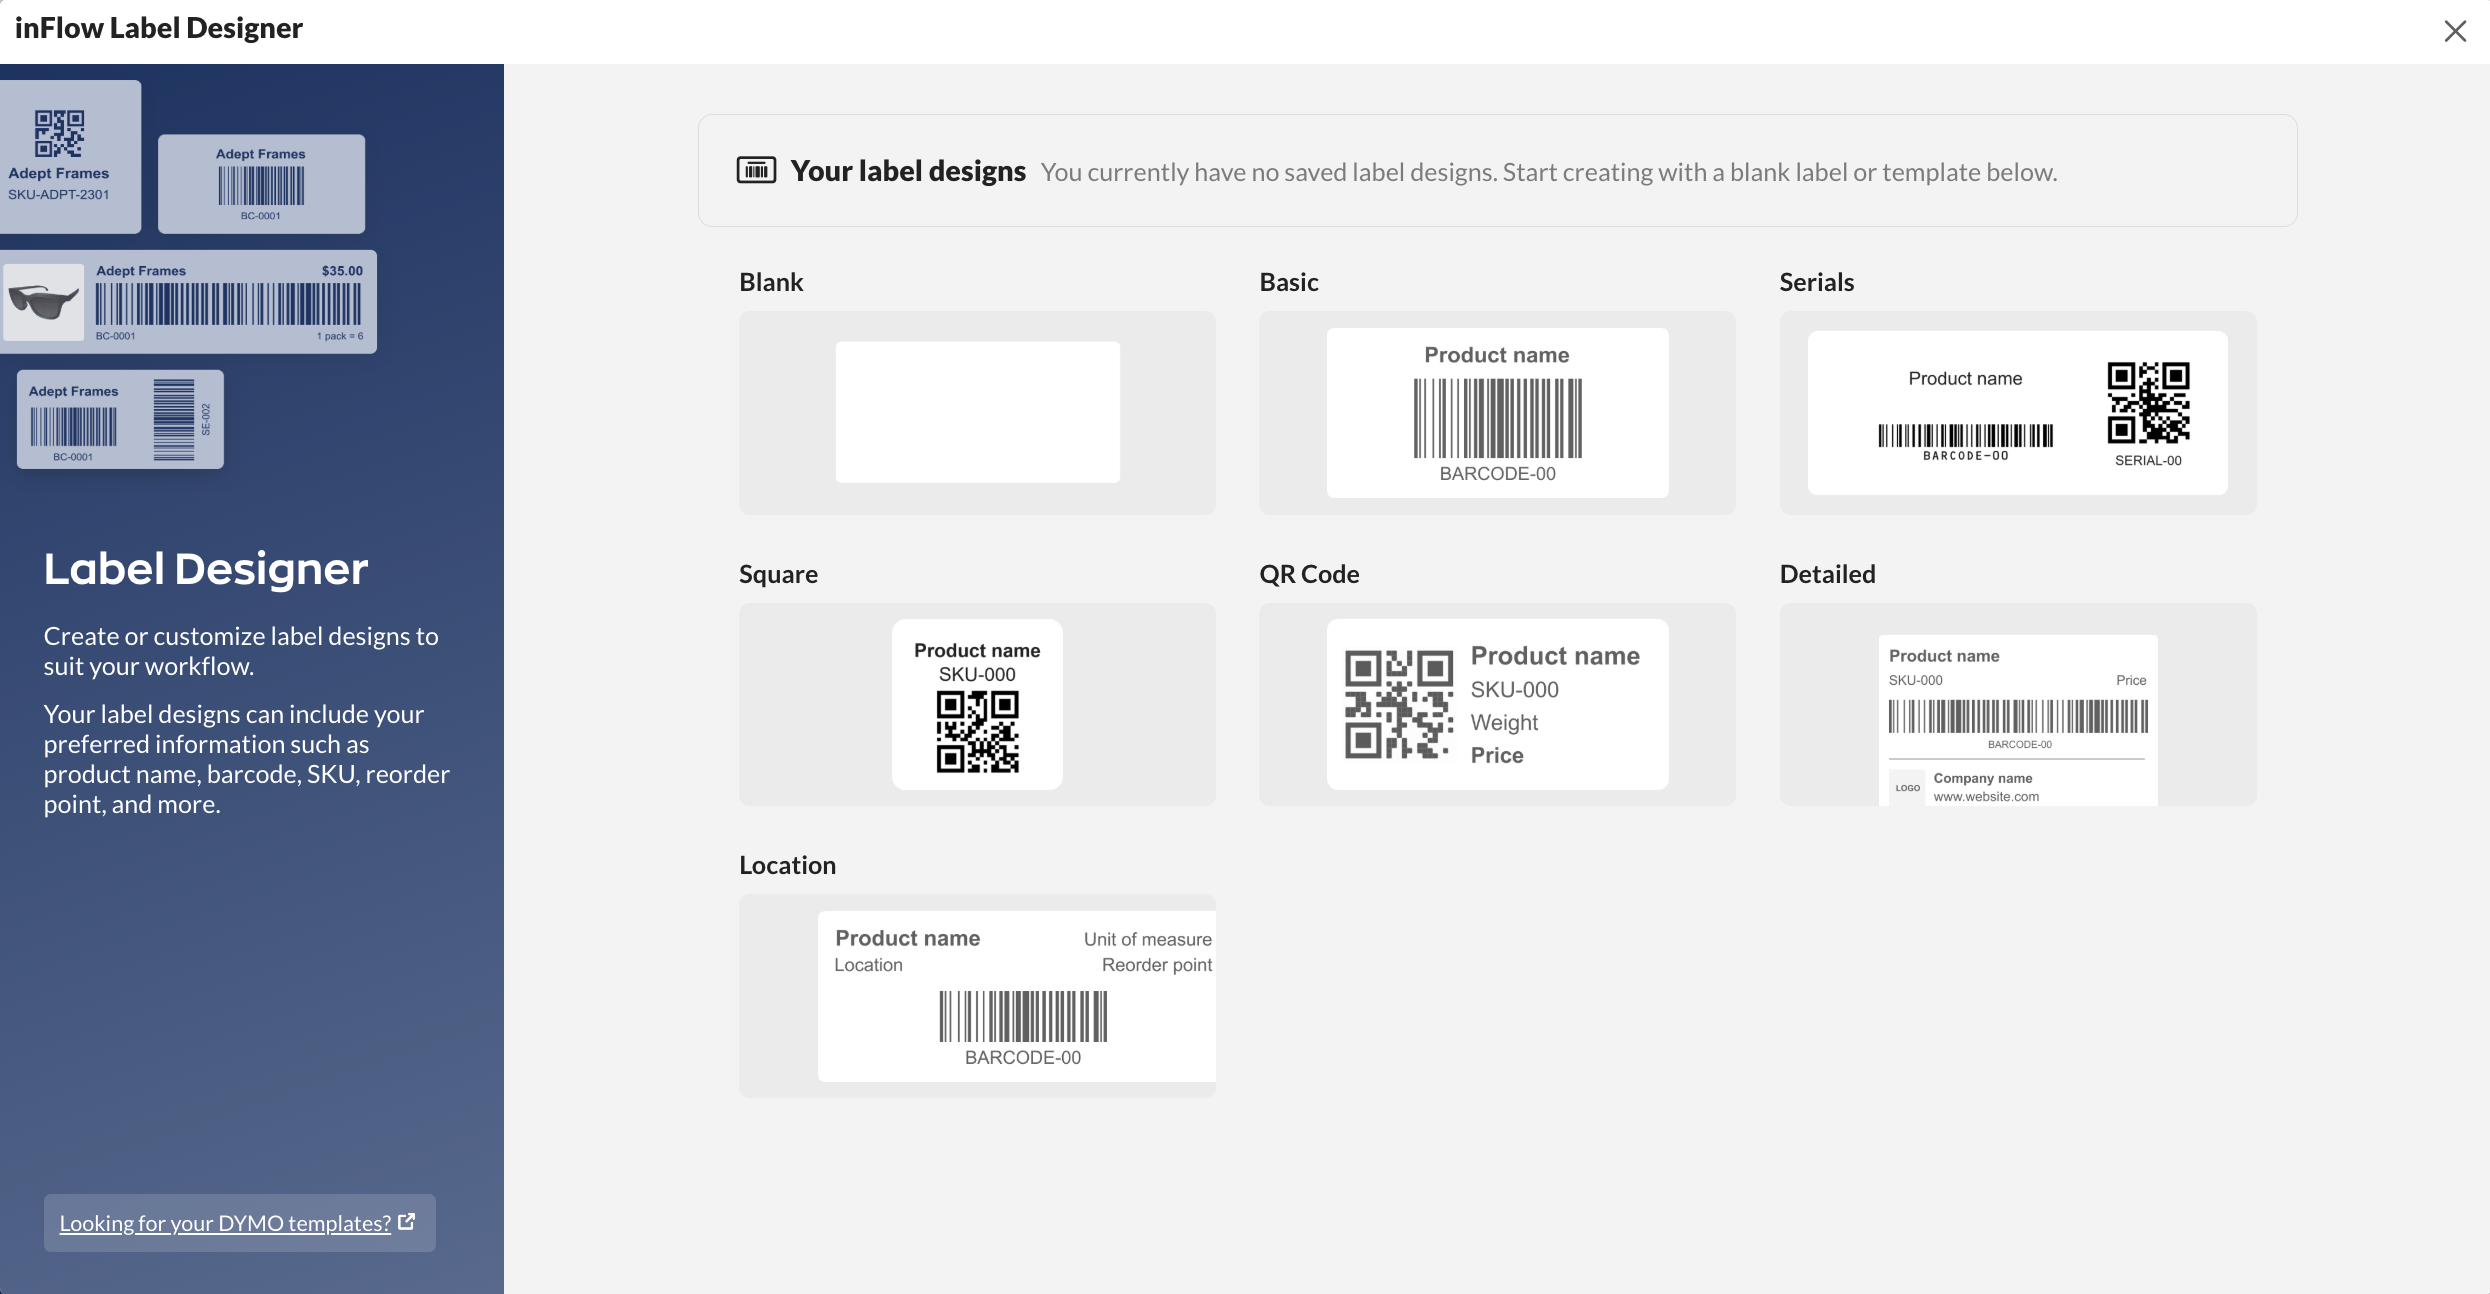
Printing labels from inFlow
Now you’re ready to print the labels made from inFlow’s Label Designer from anywhere, without being tied to a specific printer location. Print labels as you go, using any computer, Smart Scanner, or mobile device.
Use the following specifications in the Label Designer when using one of our label rolls:
| Label Rolls | Label Size | Margins | Paper Size |
| 3″ x 1″ (76mm x 25mm) | 2.83″ x 0.98″ (72mm x 25mm) | 4mm each side | 2.83″ x 0.98″ (72mm x 25mm) |
| 3″ x 3″ (76mm x 76mm) | 2.83″ x 2.83″ (72mm x 72mm) | 4mm each side | 2.83″ x 2.83″ (72mm x 72mm) |
| Triple 1″ Squares in a 3″ x 1″ roll (76mm x 25mm) | 2.83″ x 0.98″ (72mm x 25mm) | 2mm each side | 2.83″ x 0.98″ (72mm x 25mm) |
For the triple 1″ squares label roll, you can use the label designer’s Copy and Alignment tool to quickly fit the elements nicely in the three squares:
- ensure the label is 2.83″ x 0.98″ (72mm x 25mm) and margins are 2mm for all sides
- add in your 1st element (eg. QR Code)
- assign what product field you want the element to represent (eg. Barcode)
- while the 1st element is still highlighted, click Left align and then Vertical center align
- click the Copy button, this is the 2nd element
- while the 2nd element is highlighted, click Horizal center align and then Vertical center align
- click the Copy button, this is the 3rd element
- while the 3rd element is highlighted, click Right align and then Vertical center align
- click the arrow facing left Back button
- Save & close
You can easily print labels from various areas in inFlow! Ensure that the InFlow Print Helper (IPH) is installed and running, and you’re all set!
Refer to the lists below to determine which inFlow areas you can print labels from per device.
inFlow for Web (Windows or Mac)
- inFlow Designer
- Product records
- Purchase orders
- Sales orders
- Manufacture orders
inFlow for Windows
- Product records
- Current Stock
- Manufacture orders
- Purchase orders
inFlow for Mobile
- Purchase orders
- Product records
inFlow Print Helper download files
Select the appropriate inFlow Print Helper installation file for your operating system to print labels using inFlow’s Label Designer.
Quick Guide document
The printer comes with a Quick Guide. If you’d like to take another look, simply check out the image and download the link below.

Appearance
| 1. Paper Cover | 6. LCD Screen |
| 2. Dust-proof baffle | 7. USB Charging and Communication |
| 3. Feed Button | 8. Rubber Plug |
| 4. Mode Button | 9. Reset Switch |
| 5. Power Button | 10. Cover Release |
| 11. Battery Cover |
Install the print paper
- Press the [Cover Open Button] to open the paper compartment cover. (as shown in Figure 1)
- Place the print paper into the paper cabin, with the printing side facing down. (as shown in Figure 2)
- Close the cover and tear off the excess paper. (as shown in Figure 3)
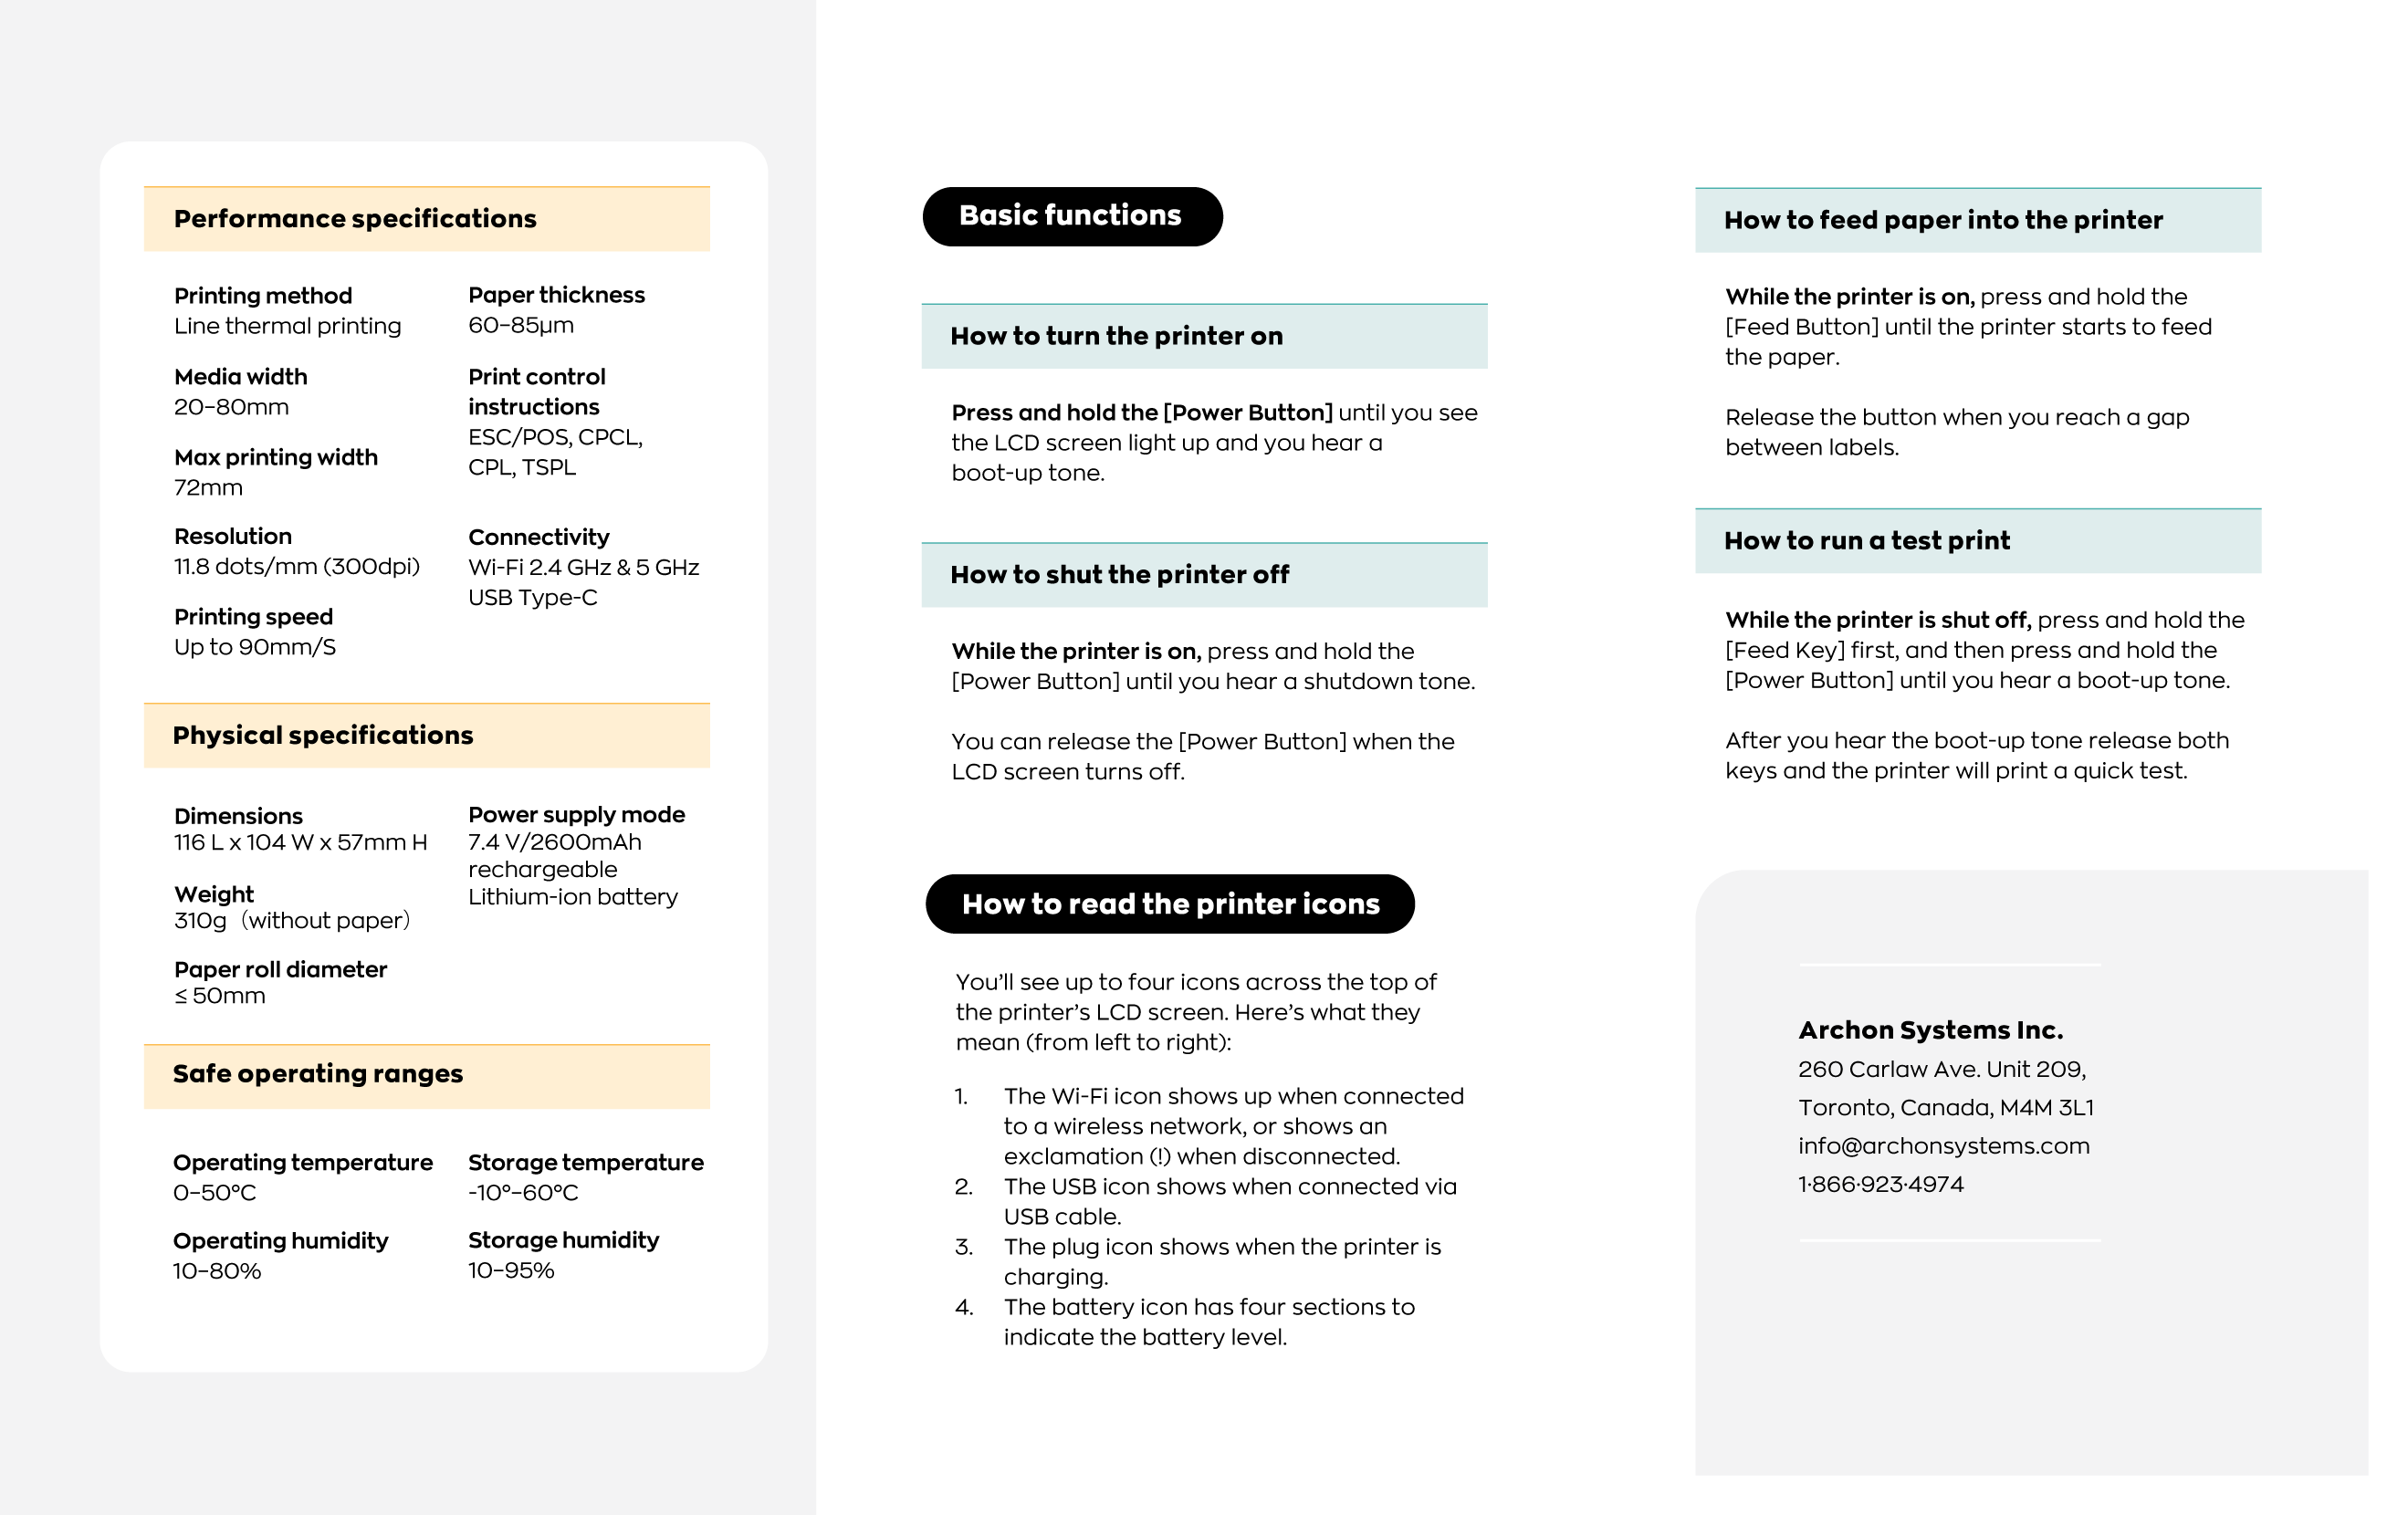
Performance specifications
| Printing method Line Thermal Printing | Paper thickness 60~ 85 m |
| Media width 20-80 mm | Print control instructions ESC/POS, CPCL, CPL, TSPL |
| Max printing width 72mm | Supported characters – All GB18030 Chinese characters – All BIG5 Traditional Chinese characters – ASCII characters – Custom characters |
| Resolution 11.8 dots/mm (300dpi) | |
| Printing speed up to 90mm/S |
Basic functions introduction
Boot/Power-on
- Press and hold the Power button for at least two seconds; the power indicator will brighten, and the printer will play the boot-up tone.
- Next, release the [Power Button]. The printer will enter the Ready mode, and the battery indicator light will show the battery power.
Shutdown
- With the printer powered on, press and hold the power button for at least two seconds.
- The printer will play the shutdown tone, and the power indicator will turn off.
- Release the power button.
Paper feed
Continuous paper:
- In the powered-on state, press the [Feed Button].
- The printer will start to feed paper.
- Release the [Feed Button] to stop the paper feed.
Black mark and gap paper:
- In the powered-on state, press the [Feed Button] for more than 1 second; the printer starts feeding the paper and stops at the position of the black mark/gap.
- If continuous paper is installed in the printer, which will automatically stop after feeding 26cm, the printer will prompt an error. This error can be cleared by opening and closing the paper compartment cover again.
Self-test
- When powered off, press and hold down [Feed Key].
- Then press the [Power Button] until the printer powers on; it will then play the boot/power-on tone.
- Release the [Power Button] and [Feed Key] to print the printer configuration.
Indicator
Battery charging indicator
- Green light: Charging completed.
- Red light: Battery charging.
- Green and red Light: Charging Error. Please check the battery and ensure the battery temperature is normal.
- Green light flashing: Low battery.
Power error indicator
- Green light: In ready mode.
- Red light on: Out of paper
- Red light flashing: Printer error.
- Detection checks from S310 specifications.
Troubleshooting
Labels are printing between the label gaps
If the label prints in the gaps, refer to the suggestions below to resolve this issue.
- Double-check that the label size you’re printing matches the physical size of the label paper. The default label size for this printer is 3″ x 1″ (72 mm x 25mm) labels.
- Press and hold the feed button to set the starting point for the next label.
Labels are cut off on the left or right side
If your labels are getting cut off while printing, take a moment to check the printing settings on the computer where the inFlow Portable Printer driver is installed.
- On your computer, search for Printer & scanners.
- Select Printer preferences, then Label settings.
- In the Offset section, adjust the measurements, then print a test label. Adjust the offset setting until the labels print correctly.
I’m unable to reconnect to the Wi-Fi network I was previously using
When installing the printer driver for wireless use, you entered your network details. If you no longer have access to that network, you can reinstall the printer driver to connect to a new network. Follow the steps below for guidance.
- On your computer, search for Printers & scanners>Remove printer.
- On the Printers & scanners screen, select Print Server Properties > Driver tab > Find printer > Remove driver and driver package. (If unable to, restart your computer, then repeat this step.)
- Reinstall the printer driver with your current Wi-Fi connection.
Can I use the same printer on multiple Wi-Fi networks?
Yes, you can use the same printer with multiple wireless networks by reinstalling the printer driver. This will establish a connection between the printer and the desired Wi-Fi network you’re using.
Do the printer and computer have to be on the same Wi-Fi?
Yes, they both need to be on the same network.
If a printer is connected to Wi-Fi, does it still require a computer to be turned on and connected to the inFlow Printer Helper (IPH)?
Yes, the computer with IPH connects inFlow’s label printing features to the printer, whether connected via Wi-Fi or USB.


0 Comments