How to create and complete a stock count (Web)
Sometimes, you’ll want to physically count what’s in your warehouse to check it against inFlow’s recorded stock levels. You can do this and set your stock levels with Stock counts.
Looking for Stock counts in inFlow for Windows?
Stock counts

Stock counts on inFlow for Web allow you to organize your counts for you and your team members. Some of the features include
- Multiple count sheets within one Stock count (that can be assigned to team members).
- Visibility on which team members are viewing and working on a stock count.
- Review status to double-check stock counts.
Creating a new stock count
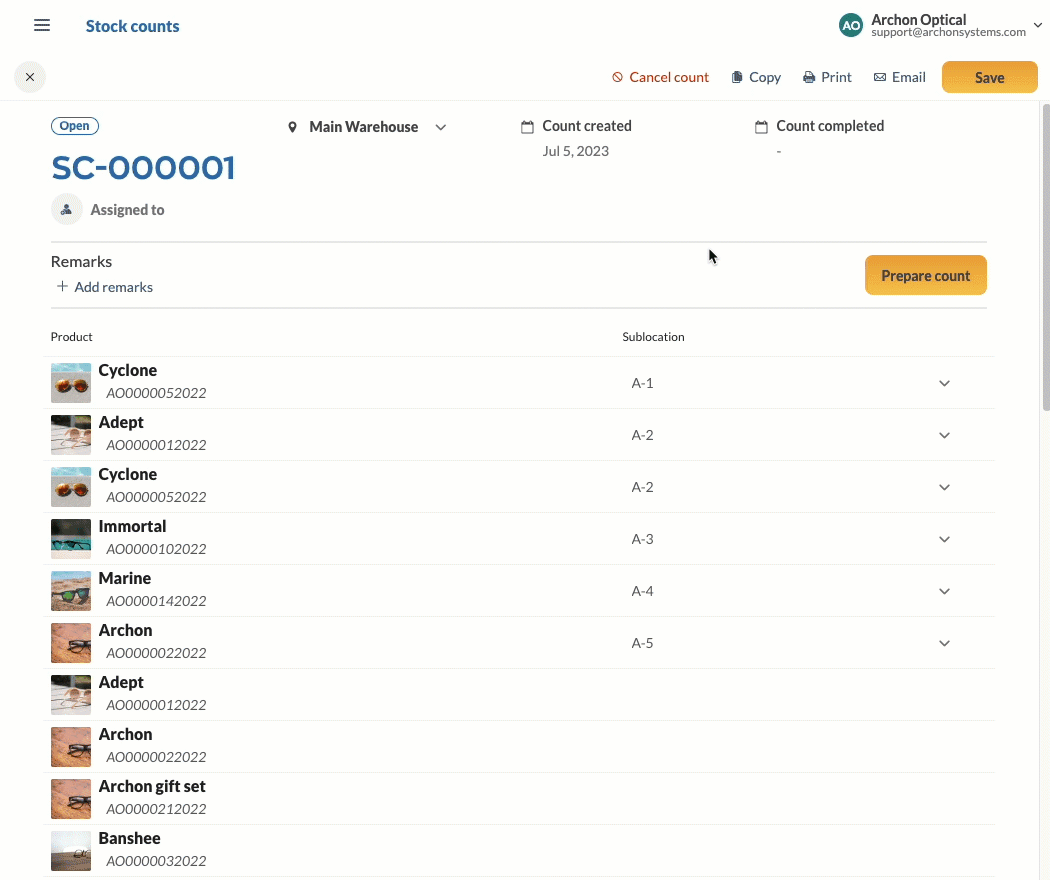
- Go to Main Menu>Create>Count. (From the Homepage> Stock count.)
- Select the location of the stock count, then click on Create.
- There are several options you can choose to quickly add products you want to count.
- To count all products at this location, select + Add all products at this location. This will list all products currently in stock at this location. Products at 0 quantity will not be added.
- To count only products of a certain category, select + Add products by category. This list will include products at 0 quantity.
- Or, select + Add products if you want to select individually products manually.
- Click Save to save the stock count without counting, or to proceed, click on Prepare count.
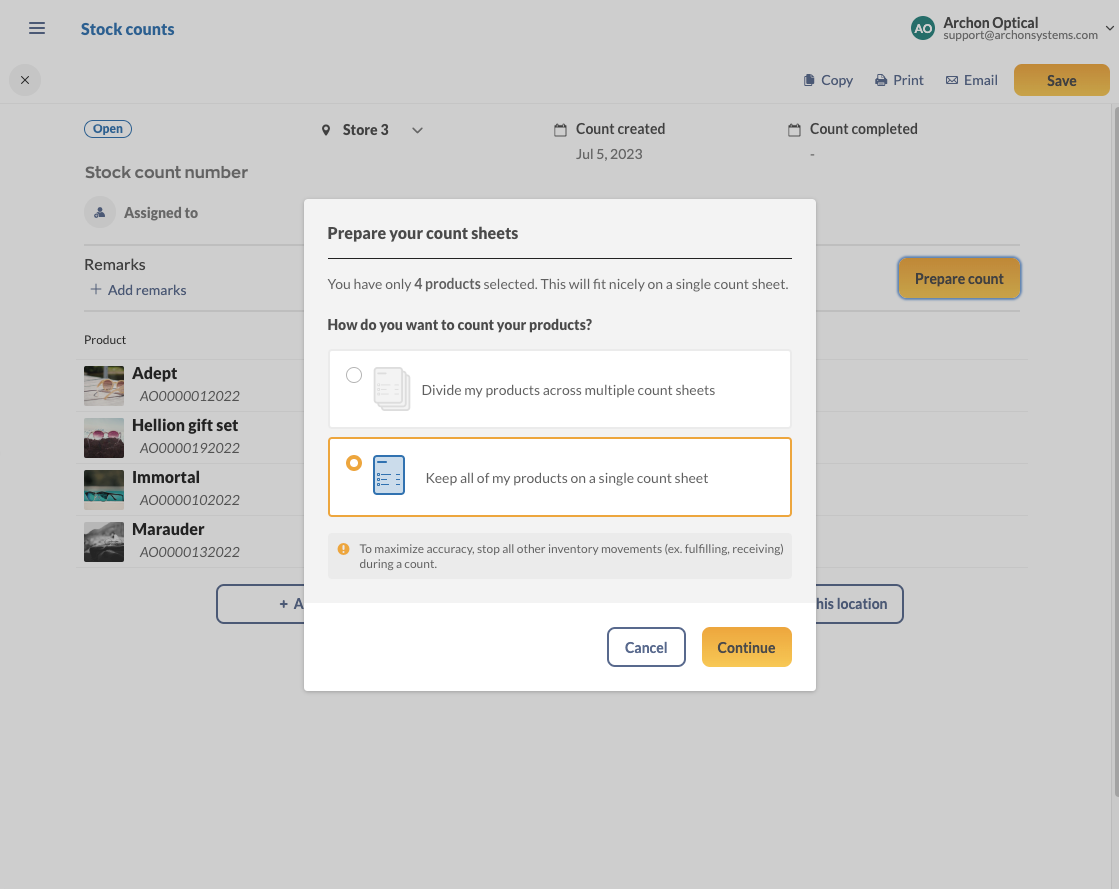
Prepare count
When it’s time to start counting, you have two stock count options.
- Divide my products across multiple sheets
- Keep all of my products on a single count sheet.
Stock counts provide a snapshot of your inventory. This means the System quantity will not update if back-dated orders are added to inFlow after the count has been completed.
To avoid inventory errors, stop processing orders and inventory movements once you’ve started your count.
| Count option | Explanation |
|---|---|
| Divide my products across multiple sheets | This option is best when multiple team members work on the count. The products in the stock count are split evenly for every team member helping. You can add products to the count sheet during the counting process if needed. Team members can assign count sheets, and each sheet has a Sheet status to view the progress of the count. |
| Keep all of my products on a single count sheet | This option is best if you prefer to count all products on a single sheet. |

Note: If your stock count has 15 products or less, inFlow will auto-select the single count sheet option. You still have the option to split up the stock count into multiple sheets if needed.
To continue, take a look at the multi-sheet stock count or single-sheet stock count tab in this article.
Stock count webinar
Check out the webinar below to learn about new features added to inFlow, including Stock counts on inFlow for Web. Complete details are available at the 21:06 minute mark.

Multi-sheet stock counts
Multiple sheet stock counts
- Select Divide my products across multiple sheets from the Prepare your count sheets screen. Then click Continue.
- Next, you’ll see all of the created count sheets.
- Select a sheet, and click on Start counting.
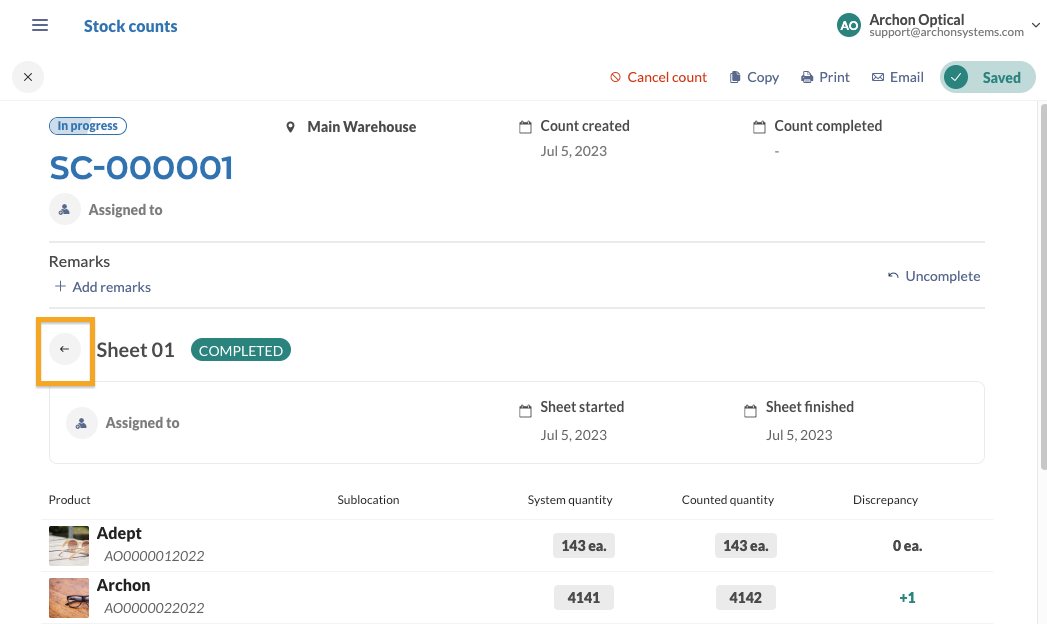
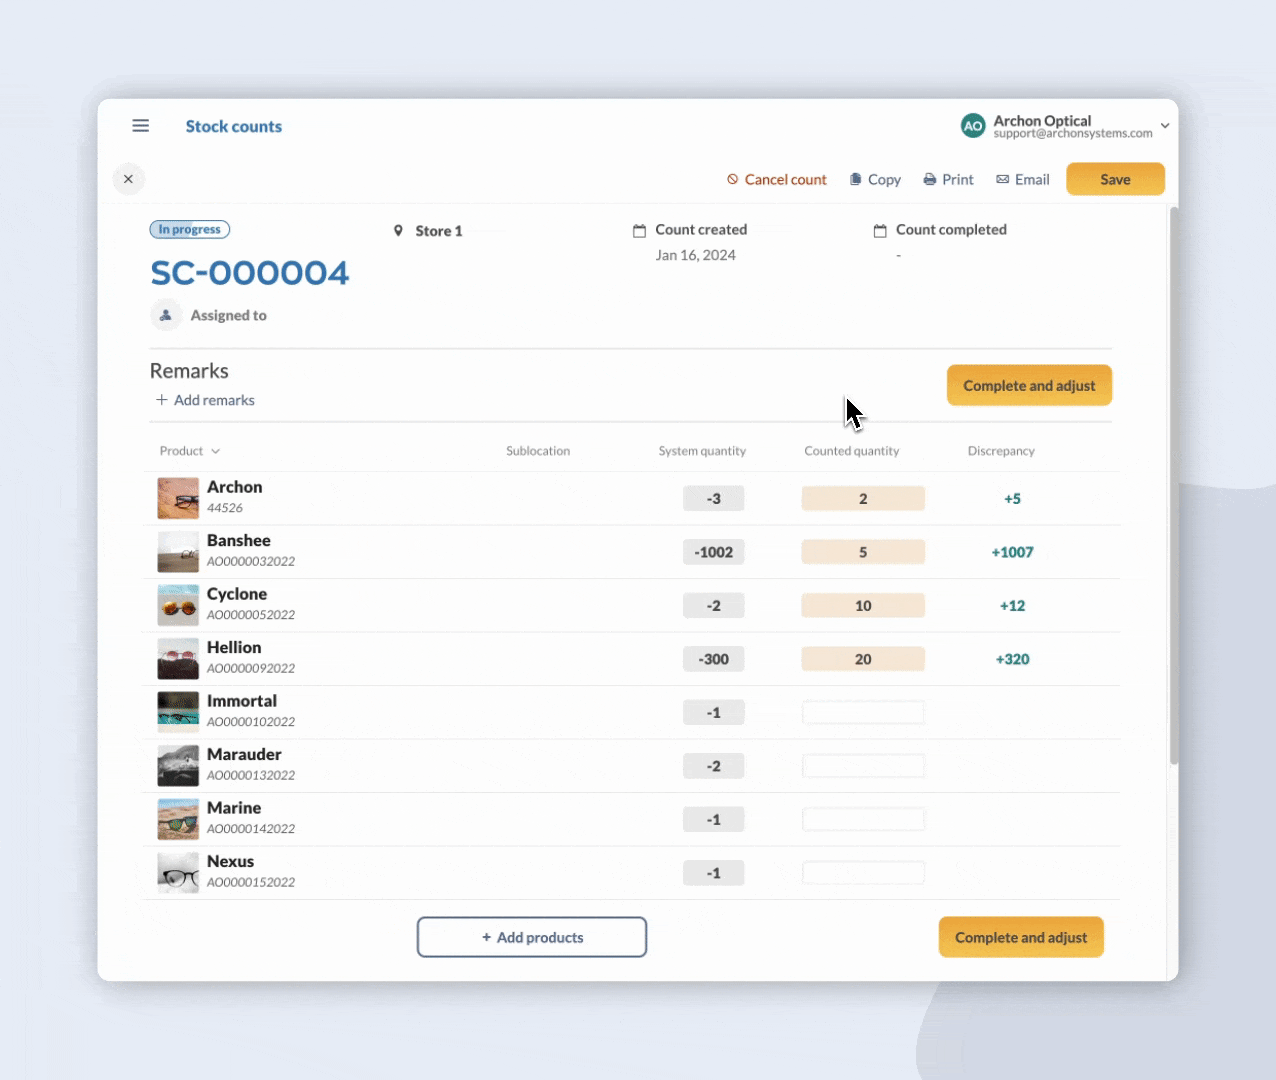
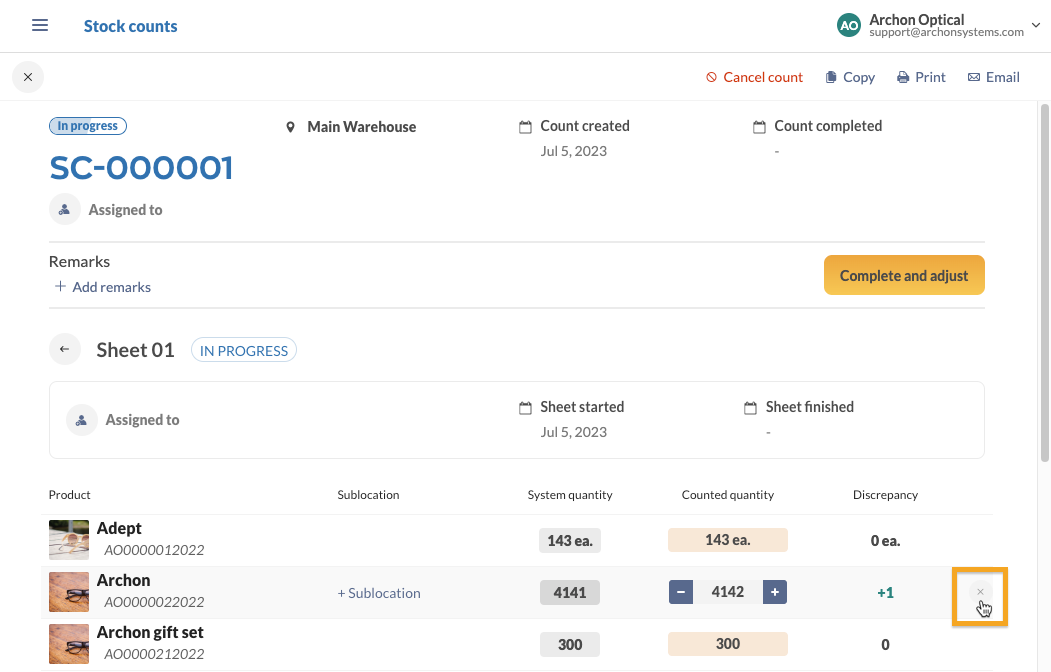
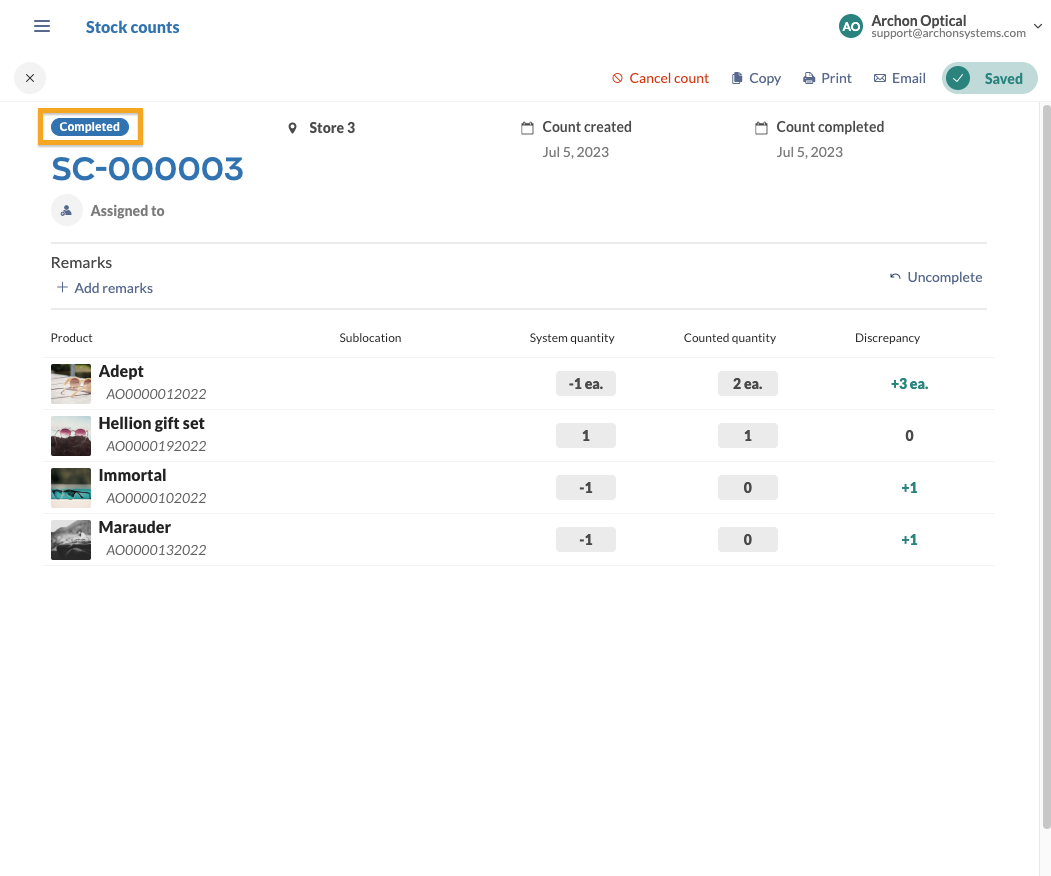
- Enter the quantity in the Counted quantity field. In real-time, the Discrepancy column will update to show the difference between what you’ve counted and inFlow’s quantity levels.
- When done, select Complete and adjust. The status of the sheet will change from In progress to Completed.
Click on the arrow next to the sheet number to view the other count sheets within the stock count. Repeat the counting process until all sheets in the stock count are complete.
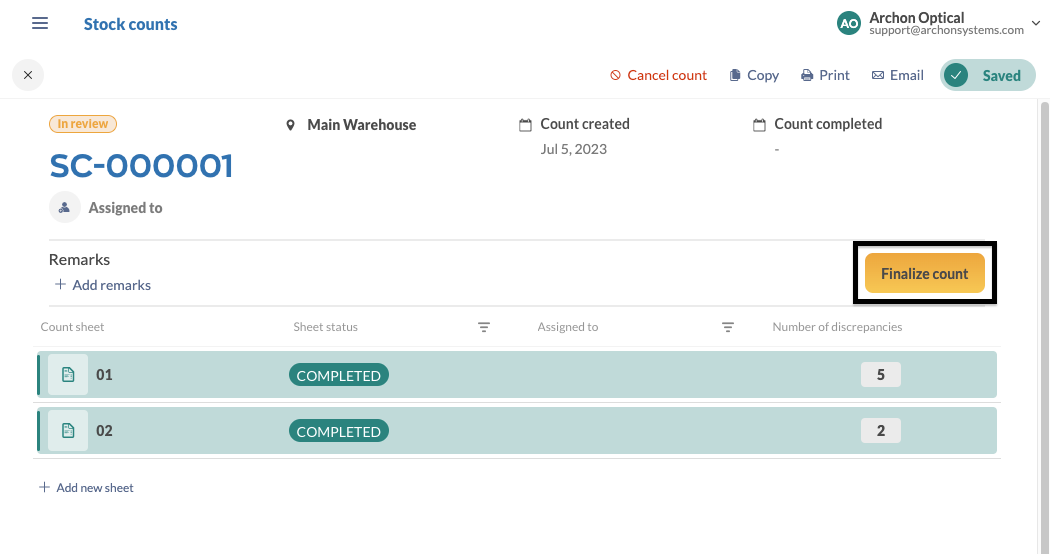
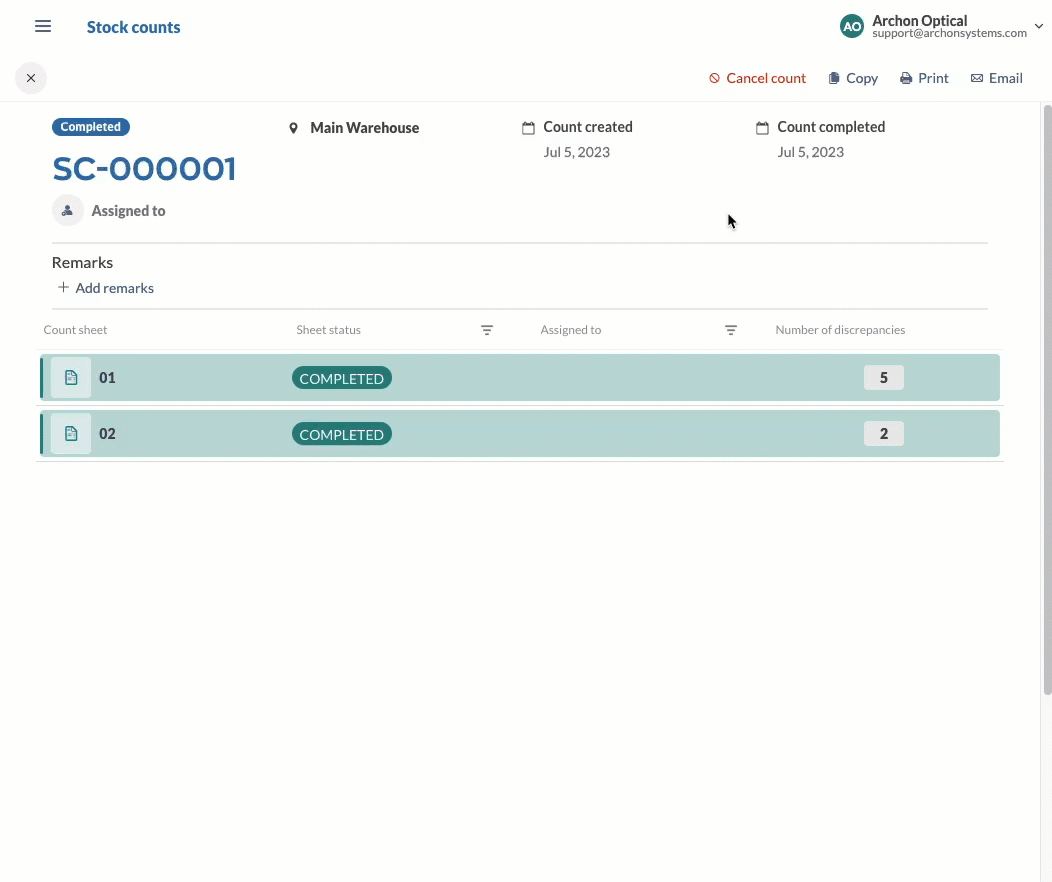
Finalizing the stock count
When all of the count sheets are complete, the stock count status will change to In review. This status allows you to double-check all the count sheets to ensure the quantities are correct.
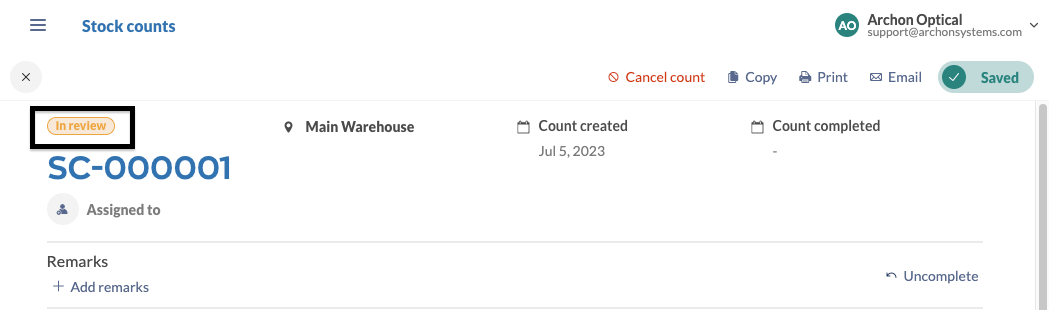
While looking at a count sheet, if you need to make any changes:
- Select Uncomplete.
- Enter your changes.
- Then, click on Save and complete.

When you’ve completed the review of the stock count, click on Finalize count.
Customizing the stock count product list
Sorting products
After you’ve started counting, you can sort the products in the product table by clicking on the headers that match the filter you want to apply.
Rearranging products
After the count has started, you can click and drag the grab handles to the left of the product on the table to rearrange the products once you’ve started counting.
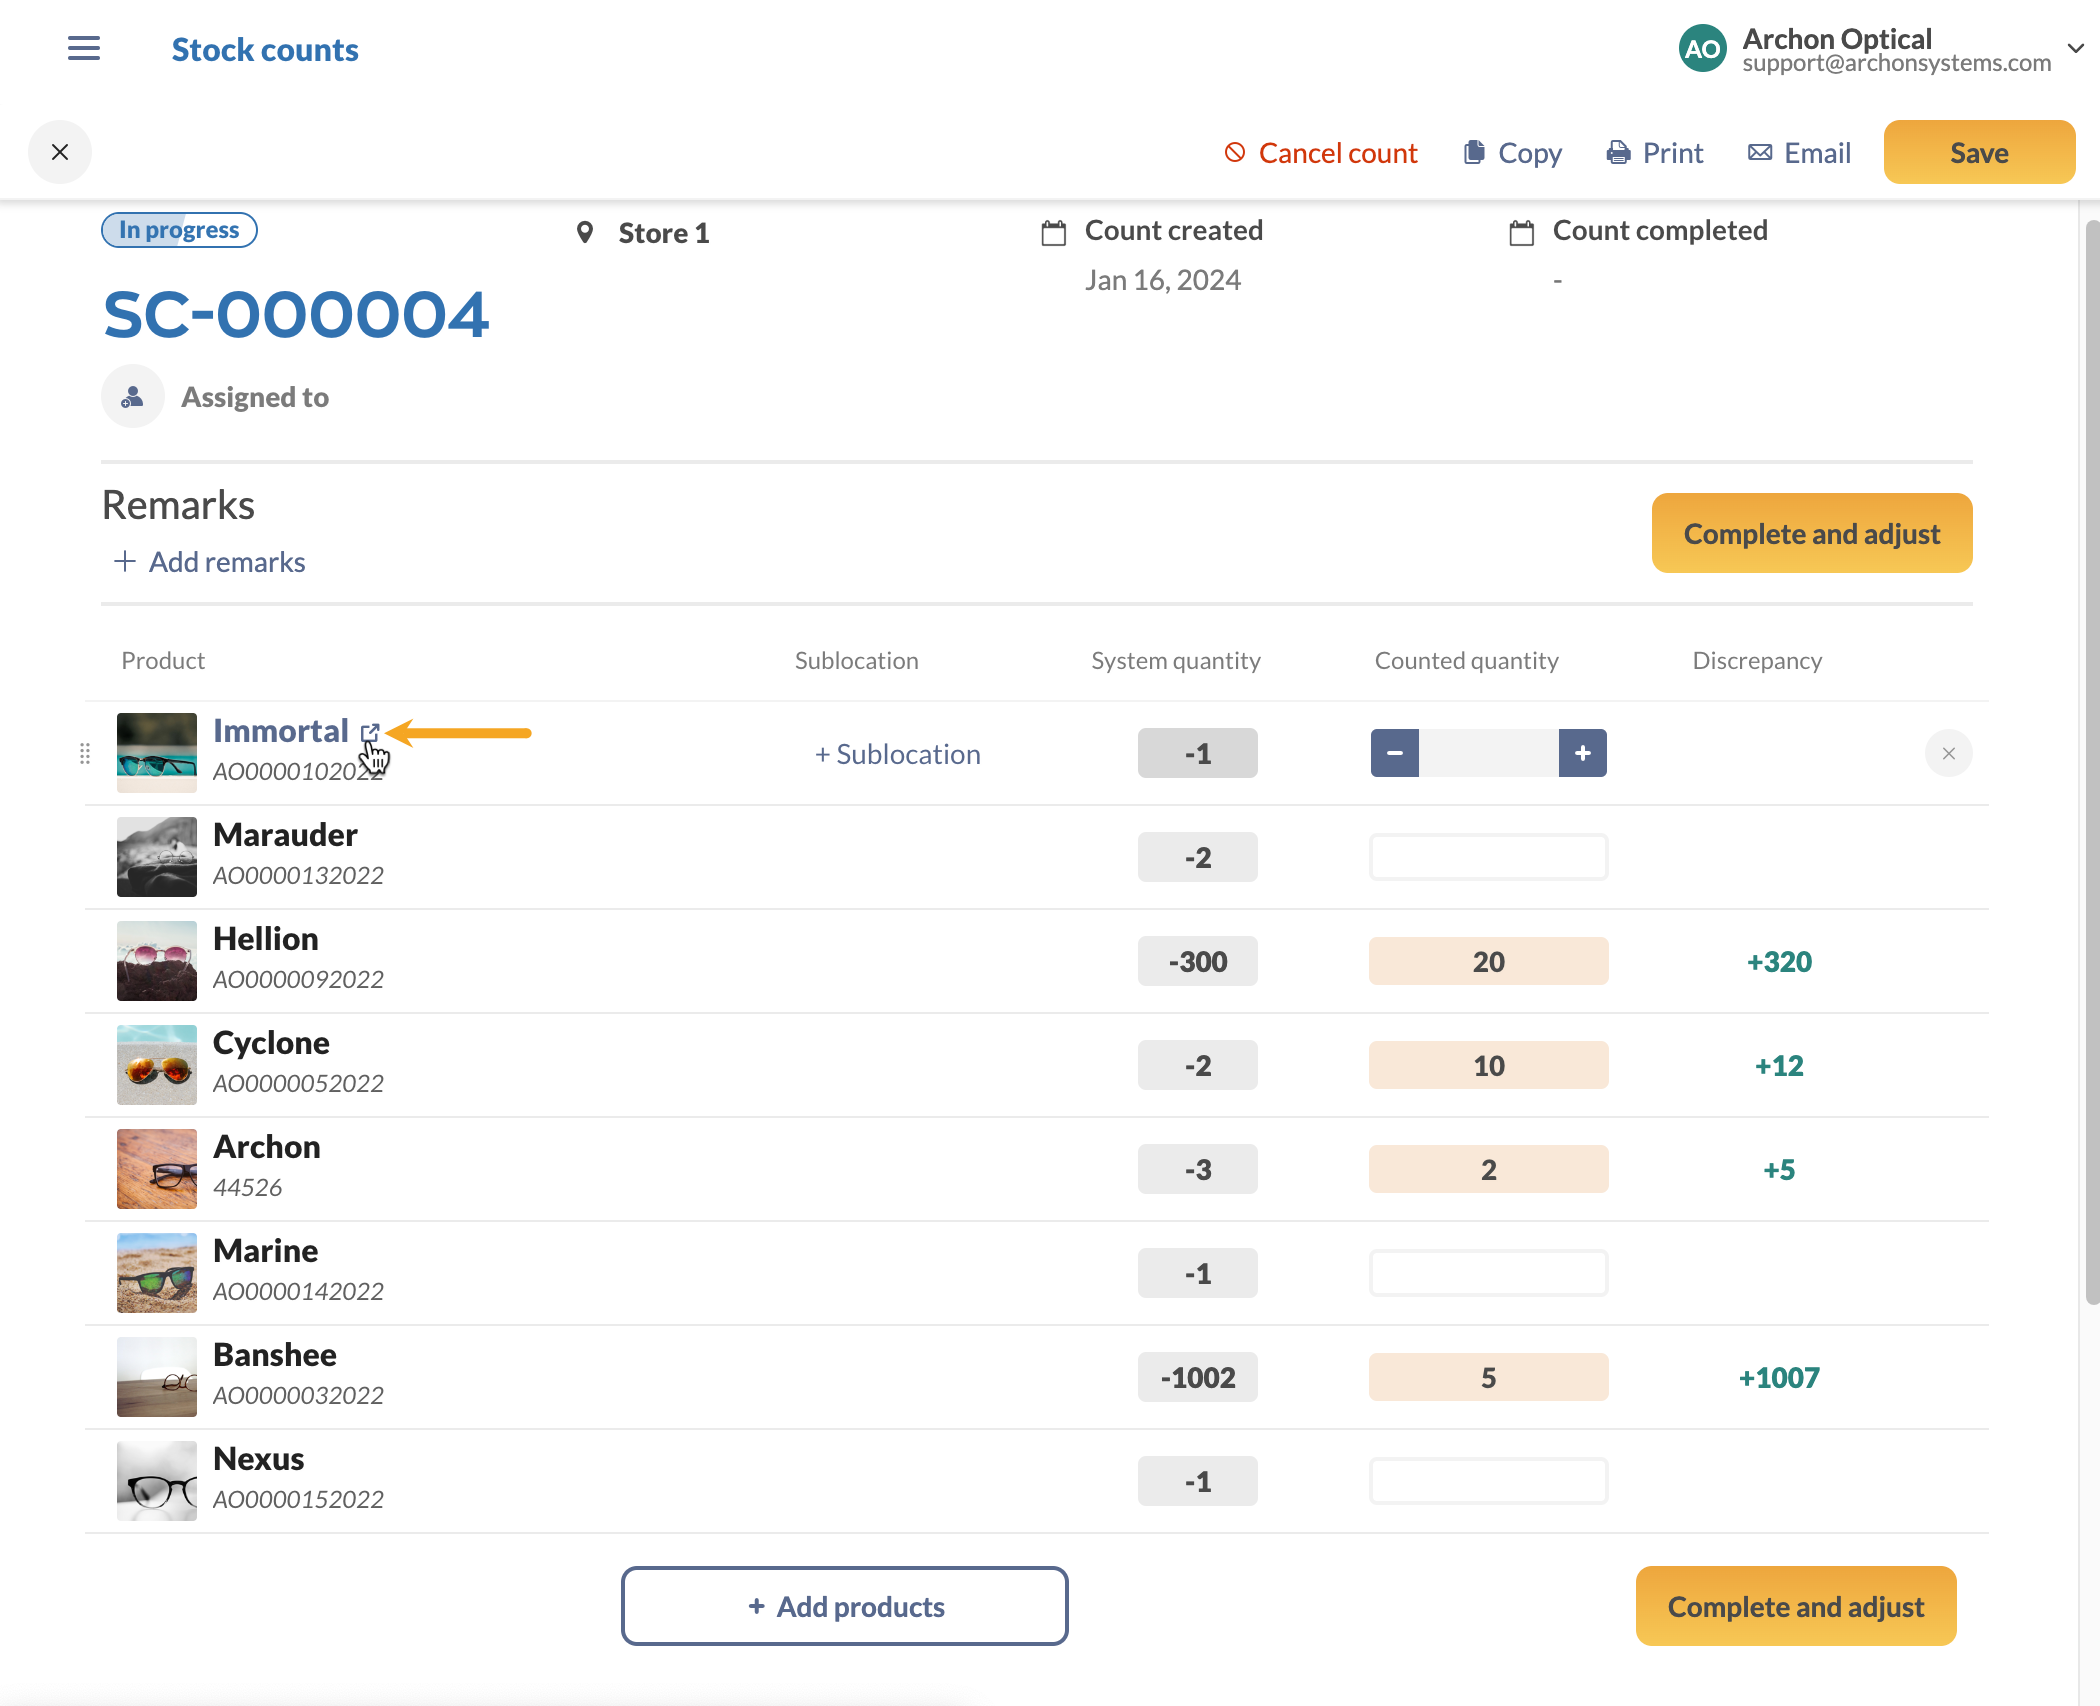
Viewing product records
After the count has started, if you want to view a product record from the stock count product list, hover over it and click on the link to open it in a new tab.
Additional information
Can I add or change products while counting?
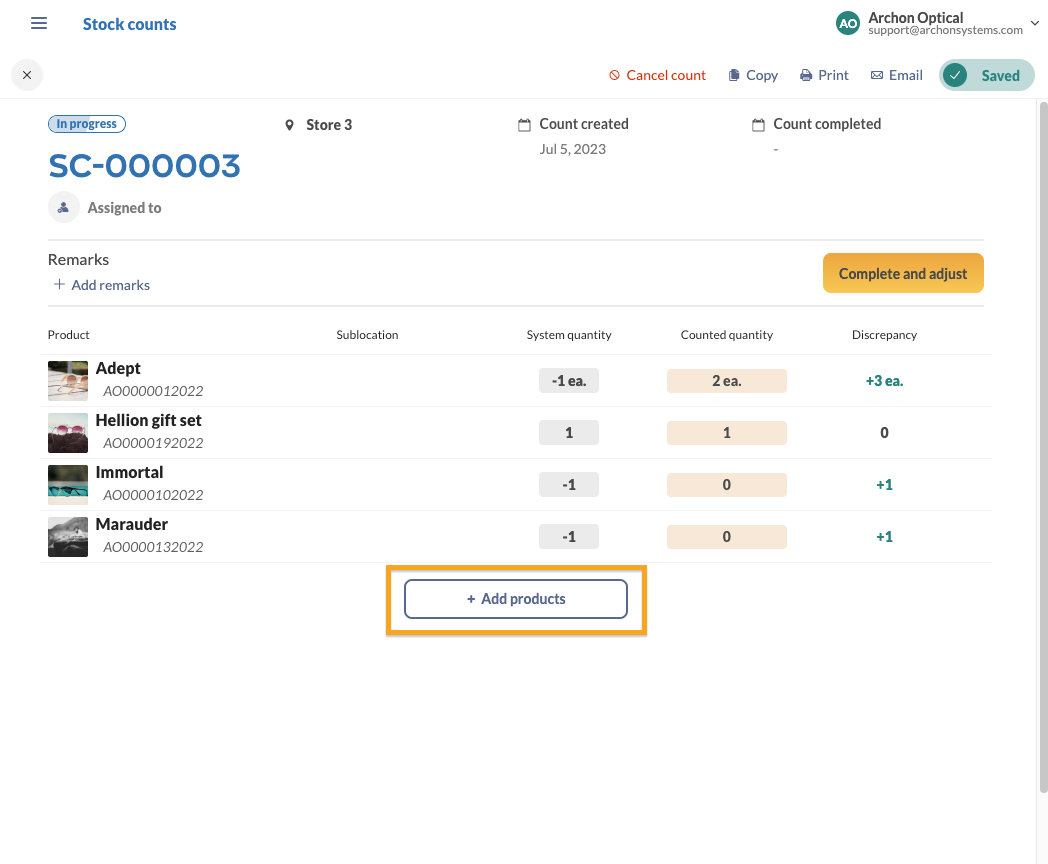
Yes! You can select the + Add products button at any time during the count. Adding products during the count is helpful when you come across a product not originally on your count sheet.
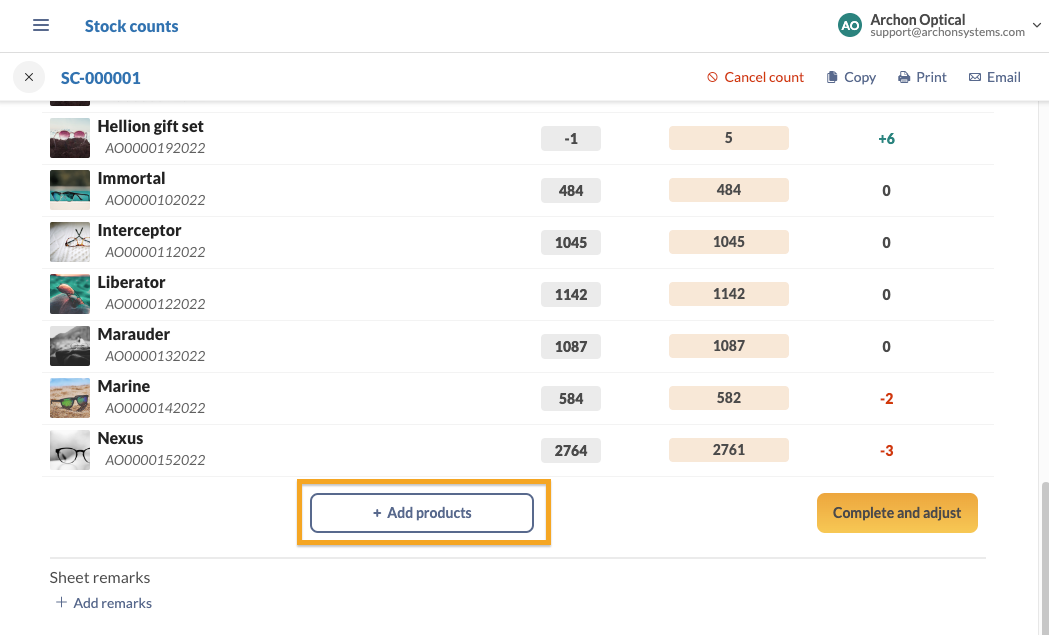
Click the X when hovering over a product to remove it from your count sheet.
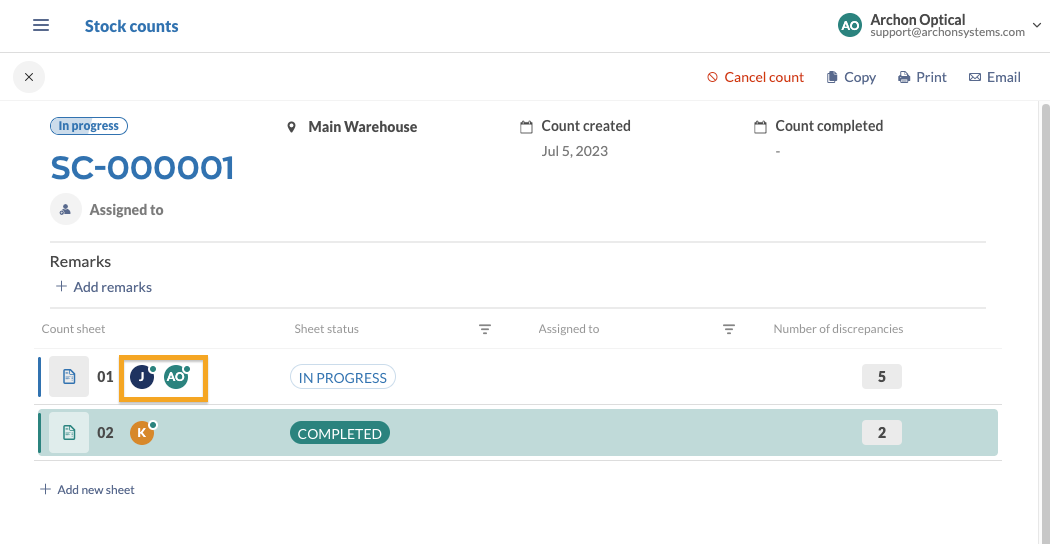
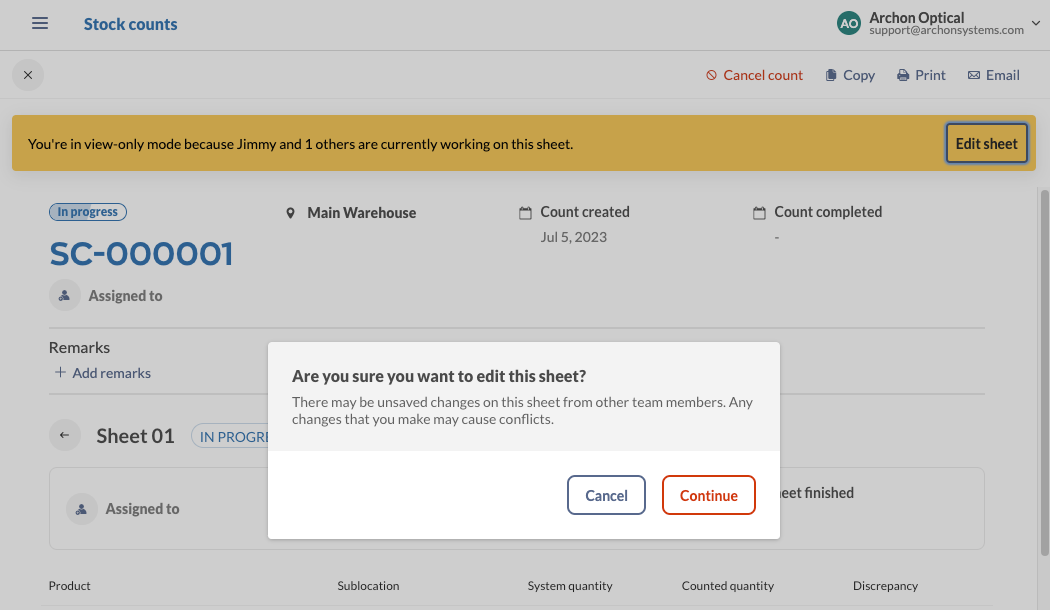
How do I know if a team member is also counting?
When looking at the count sheets within a stock count, you’ll see team member icons next to the sheets that they’re working on.
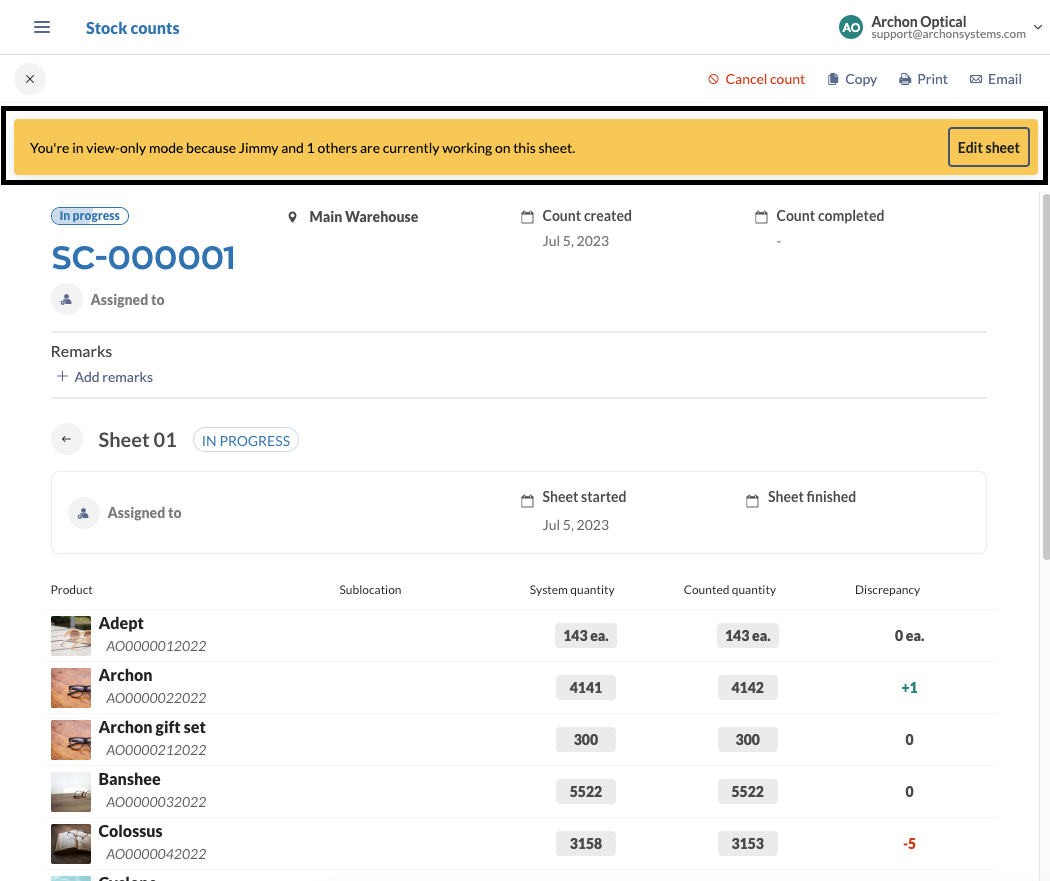
When you open a stock count, you’ll see a banner at the top of the page with the full name of the team member working on that count sheet.
We advise only one team member to work on a count sheet at a time to avoid quantity-level conflicts. But if multiple team members want to work on a sheet, select Edit sheet. After reviewing the conflict warning select Continue.
Can inFlow Inventory for Windows view stock counts with multiple sheets?
No, this feature is only available on inFlow Inventory for the Web. Any team member who opens a multiple-sheet stock count won’t be able to view it.
Windows app team members will see an error message telling them to view the order on the Web app.
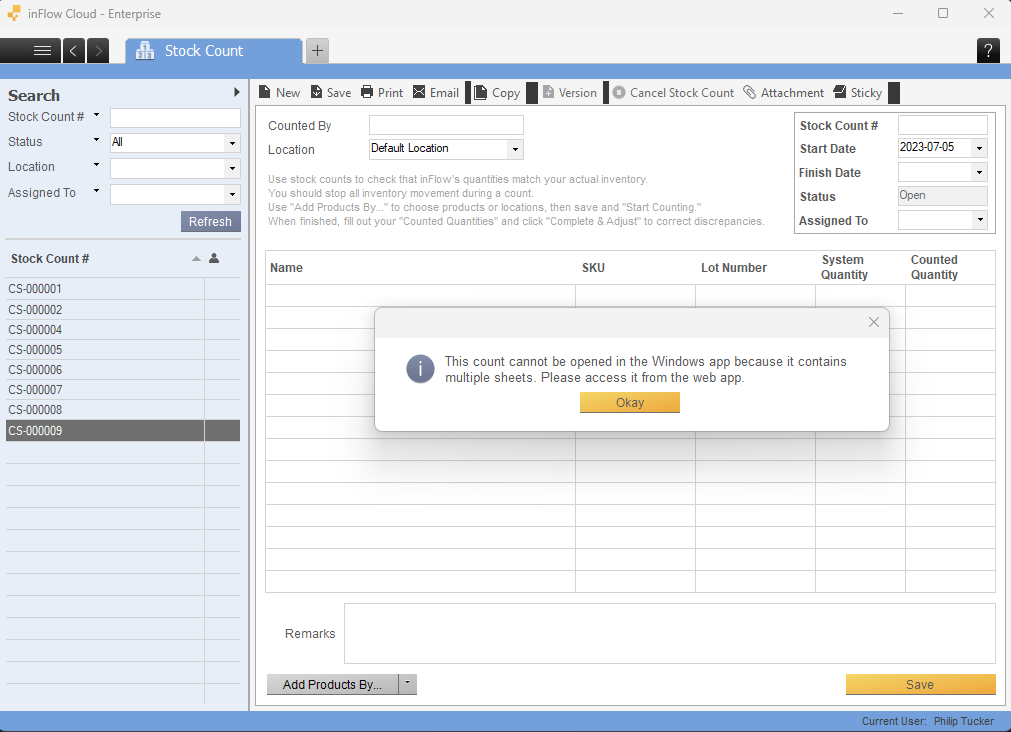
Note: Only team members with full access to stock counts will be to access stock counts on inFlow Inventory for Windows.
I’ve been using inFlow for years. Will the change from count sheets to stock counts change my historical counts?
No, we’ve ensured that all historical count sheets will be maintained as they are. This means
- Documents with the CS prefix will only change if you change it yourself.
- You can continue to use count sheets (now renamed to stock counts) as you always have. If you’d like to use multiple sheets within a stock count, create a stock count on inFlow cloud for Web.
Single-sheet stock counts
Single-sheet stock counts
- From the Prepare your count sheets screen, select Keep all of my products on a single count sheet, then click Continue.
- Select Start counting.
- Enter the quantity in the Counted quantity field. In real-time, the Discrepancy column will update to show the difference between what you’ve counted and what inFlow’s quantity levels are.
- When done, select Complete and adjust. The status of the sheet will change from In progress to Completed.
Customizing the stock adjustment product list
Sorting products
After you’ve started counting, you can sort the products in the product table by clicking on the headers that match the filter you want to apply.
Rearranging products
After the count has started, you can click and drag the grab handles to the left of the product on the table to rearrange the products once you’ve started counting.
Viewing product records
After the count has started, if you want to view a product record from the stock count product list, hover over it and click on the link to open it in a new tab.

Additional information
Can I add or change products while counting?
Yes! You can select the + Add products button at any time during the count. This is helpful when you come across a product not originally on your count sheet and you’d like to include the correct quantities.
Can inFlow Inventory for Windows view single-sheet stock Counts?
Yes! All stock counts with only one sheet can be viewed in inFlow Inventory for Windows.
Options
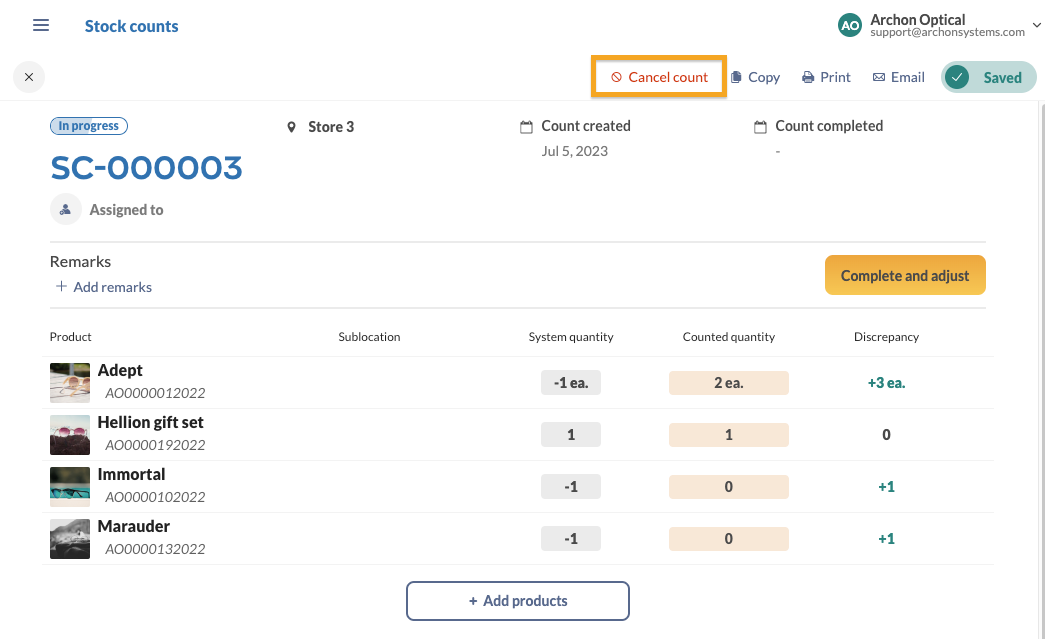
Canceling a stock count
At any point, you can cancel a single or multiple sheet stock count by clicking on Cancel count at the top right corner of the screen.
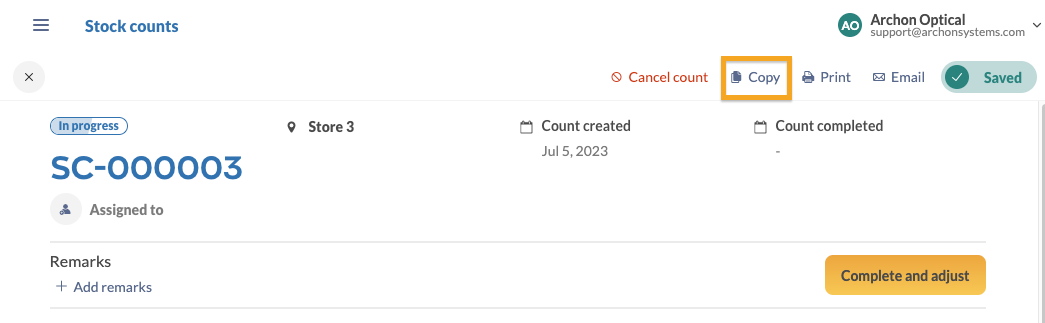
Copying a stock count
To copy a stock count, select the Copy button at the top right-hand corner of the screen.
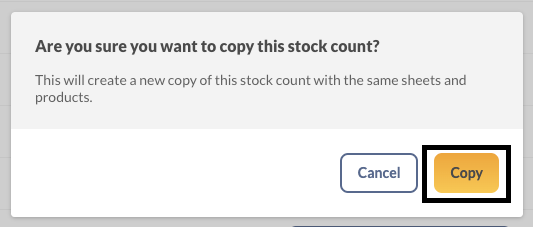
You’ll see a pop-up asking Are you sure you want to copy this stock count? Select Copy to proceed.
Note: Team members with count sheet-only access can aren’t able to copy stock counts. They’re restricted to emailing and printing count sheets.
Printing a stock count
To print a product list of your single or multiple-sheet stock count, click the Print button at the top right corner of the screen.
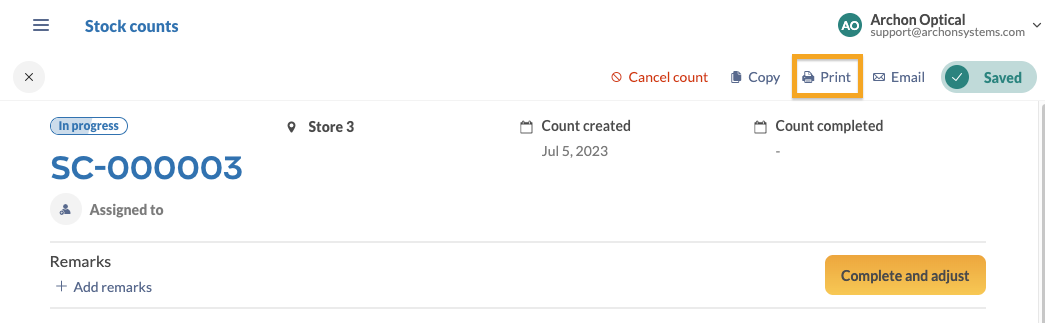
Select the sheet you want to print from the drop-down menu when printing a stock count with multiple sheets.
Emailing a stock count
To email the stock count, select the Email button at the top right of the screen.
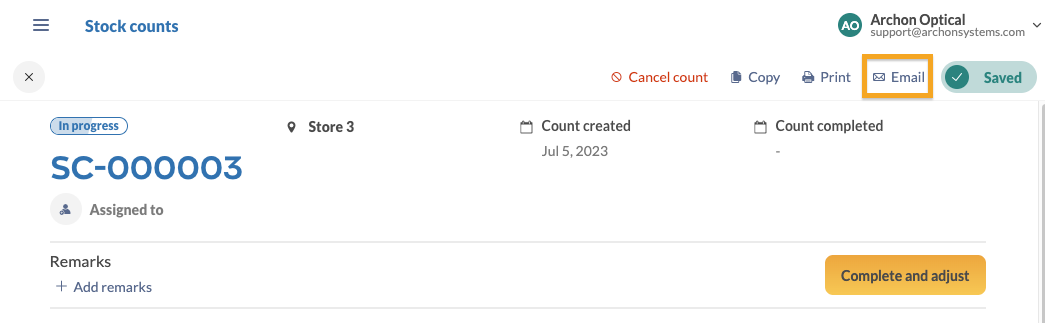
For multiple sheet stock counts, the email recipient can toggle through the sheets by the drop-down menu at the top of the page.
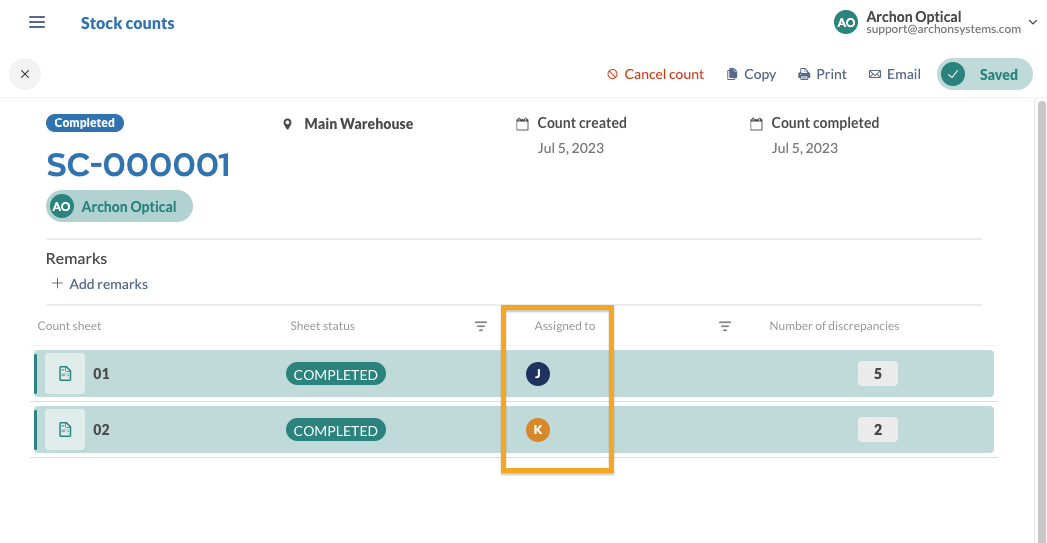
Assigning a stock count to a team member
Select Assigned to under the stock count order number to add a team member to the stock count.
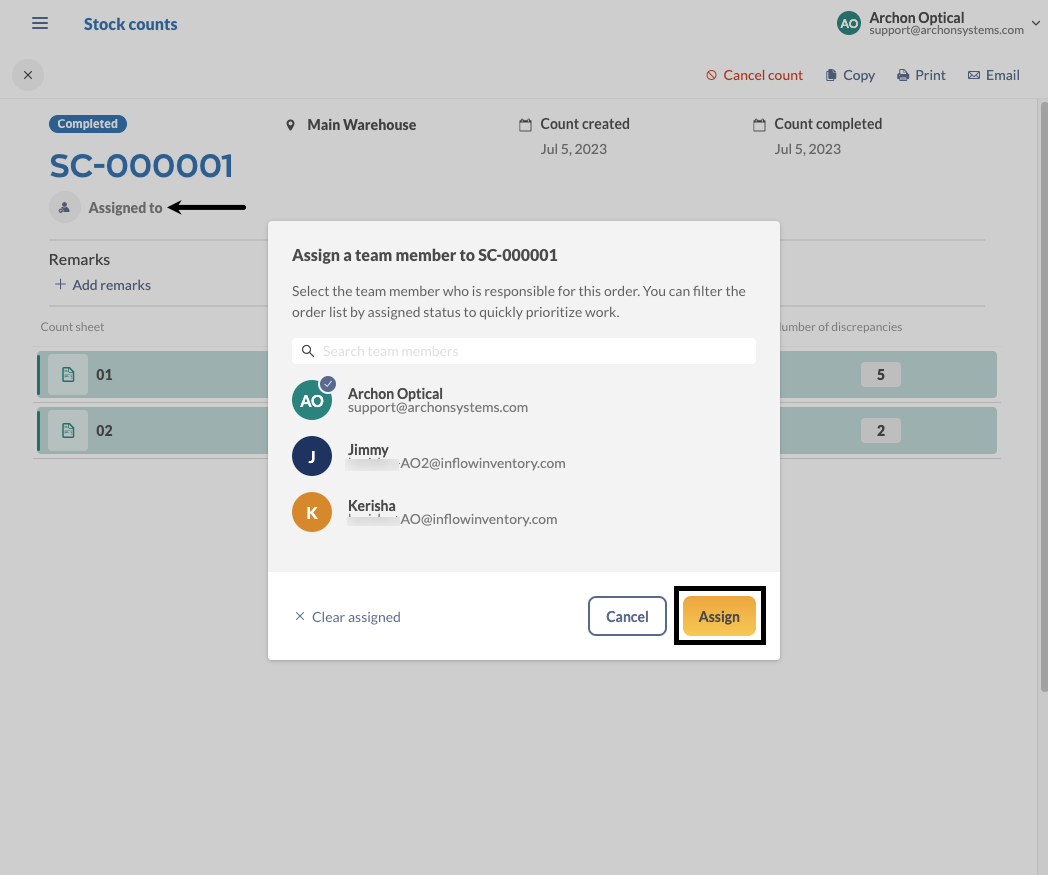
For stock counts with multiple sheets, you can assign the overall stock count to one team member and assign other team members to the count sheets.
Stock count remarks
Click on the Remarks field to leave comments on the stock count. There’s no character limit; you can write all the details here.
Remarks are available to any team member with access to view or edit stock counts.
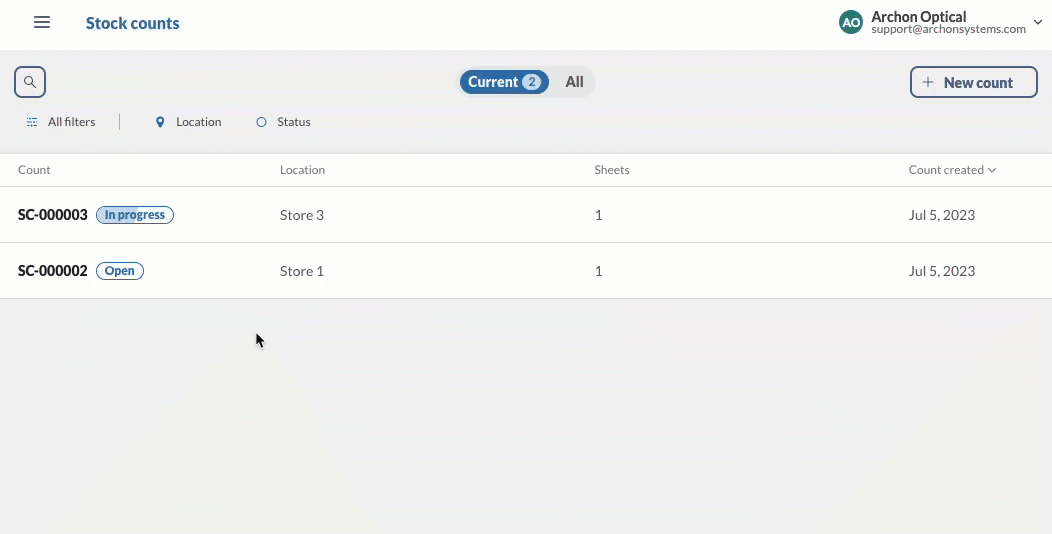
Stock count list view
The stock count list is where you can view all your stock counts. There are two views:
- Current
- All
| View | Explanation |
|---|---|
| Current | The default view shows all open, in-progress, and in-review stock counts. You can use the Status button to narrow the stock counts further. |
| All | This view is where you can view stock counts of any status. By default, canceled stock counts are hidden. You can view them by selecting Status then Cancelled. Below the Current and All view menus, you’ll see the filters that you can use to narrow down the results. You can click on All filters to add or remove filters. |
Access rights
Stock count access rights
The stock count feature has four team member access options for stock counts:
- No access
- View only
- Count sheet only
- Full access
| Access option | Explanation |
|---|---|
| No access | The team member won’t be able to view or access stock counts |
| View only | The team member can view stock counts in a read-only mode. |
| Count sheet only | The team member can edit products on count sheets. They aren’t able to edit the details in the stock count header or create, prepare, copy, or cancel stock counts. Team members with count sheet-only access are restricted to emailing and printing count sheets. |
| Full access | This allows the team member to access all the features of the stock counts, including creating, canceling, etc. |
Location-restricted access rights
Along with other features, stock counts will work for team members with location-restricted access rights.
This means:
- A team member who has access to all locations can view and access stock counts in all locations.
- A team member with restricted location access can only view stock counts in the locations they have access to.
Note: Currently, higher tier plans have access to the Restrict access by location add-on. Contact the inFlow team if you have any questions about this feature.


0 Comments