 Fellow Canadians: All inFlow plans are available in Canadian dollars



 Home
Home


How to import lot-tracked products into inFlow
If you have a list of lot-tracked products and the batches you have in stock, you can import both into inFlow via CSV instead of adding them one at a time. See below for full details.
Please note: Lot tracking is only available on select plans or add-ons.
Before you start
Lot-tracked products need two separate imports, and the order matters.
- Product details import. This creates the product records and turns on lot tracking for them.
- Stock levels import. This creates each lot and adds the quantity you have on hand to it.
Lot tracking becomes permanent once a product is created. You must activate it in the product details import before adding any stock for that product. It is not possible to enable lot tracking for an existing stocked product later using an import.
If you’re already tracking batches using sublocations or product names, see the transitioning to inFlow’s lot-tracked products guide before you import.
Only stocked products can use lot tracking. Non-stocked products and services can’t track lots. For more on this, see guide on product types.
Step 1: Import your lot-tracked product details
Set up your product details CSV
You can start from an inFlow export or build the file yourself. Whichever you prefer, the table below has everything you’ll need.
Option A — export a template from inFlow (recommended)
- From the Main Menu, hover over the Settings icon, then Export.
- In the Data type list, select Product details.
- Click Export and save the file to your computer.
- Open the CSV in the spreadsheet software of your choice.
The exported template includes every product field inFlow supports, which is a lot to scroll through. Delete the columns you aren’t importing and keep the ones listed in the table below. Deleting a column won’t erase that data in inFlow — any field you leave out simply stays as it is.
Option B — build the file yourself
Create a new spreadsheet and add the column headings exactly as they appear in the table below. Type them without spaces so inFlow can match your columns automatically.
You can include other product information in the same file, like a description, category, or pricing. The table below covers the lot-tracking columns, and you’ll find the full list of product columns in the How to import product details guide.
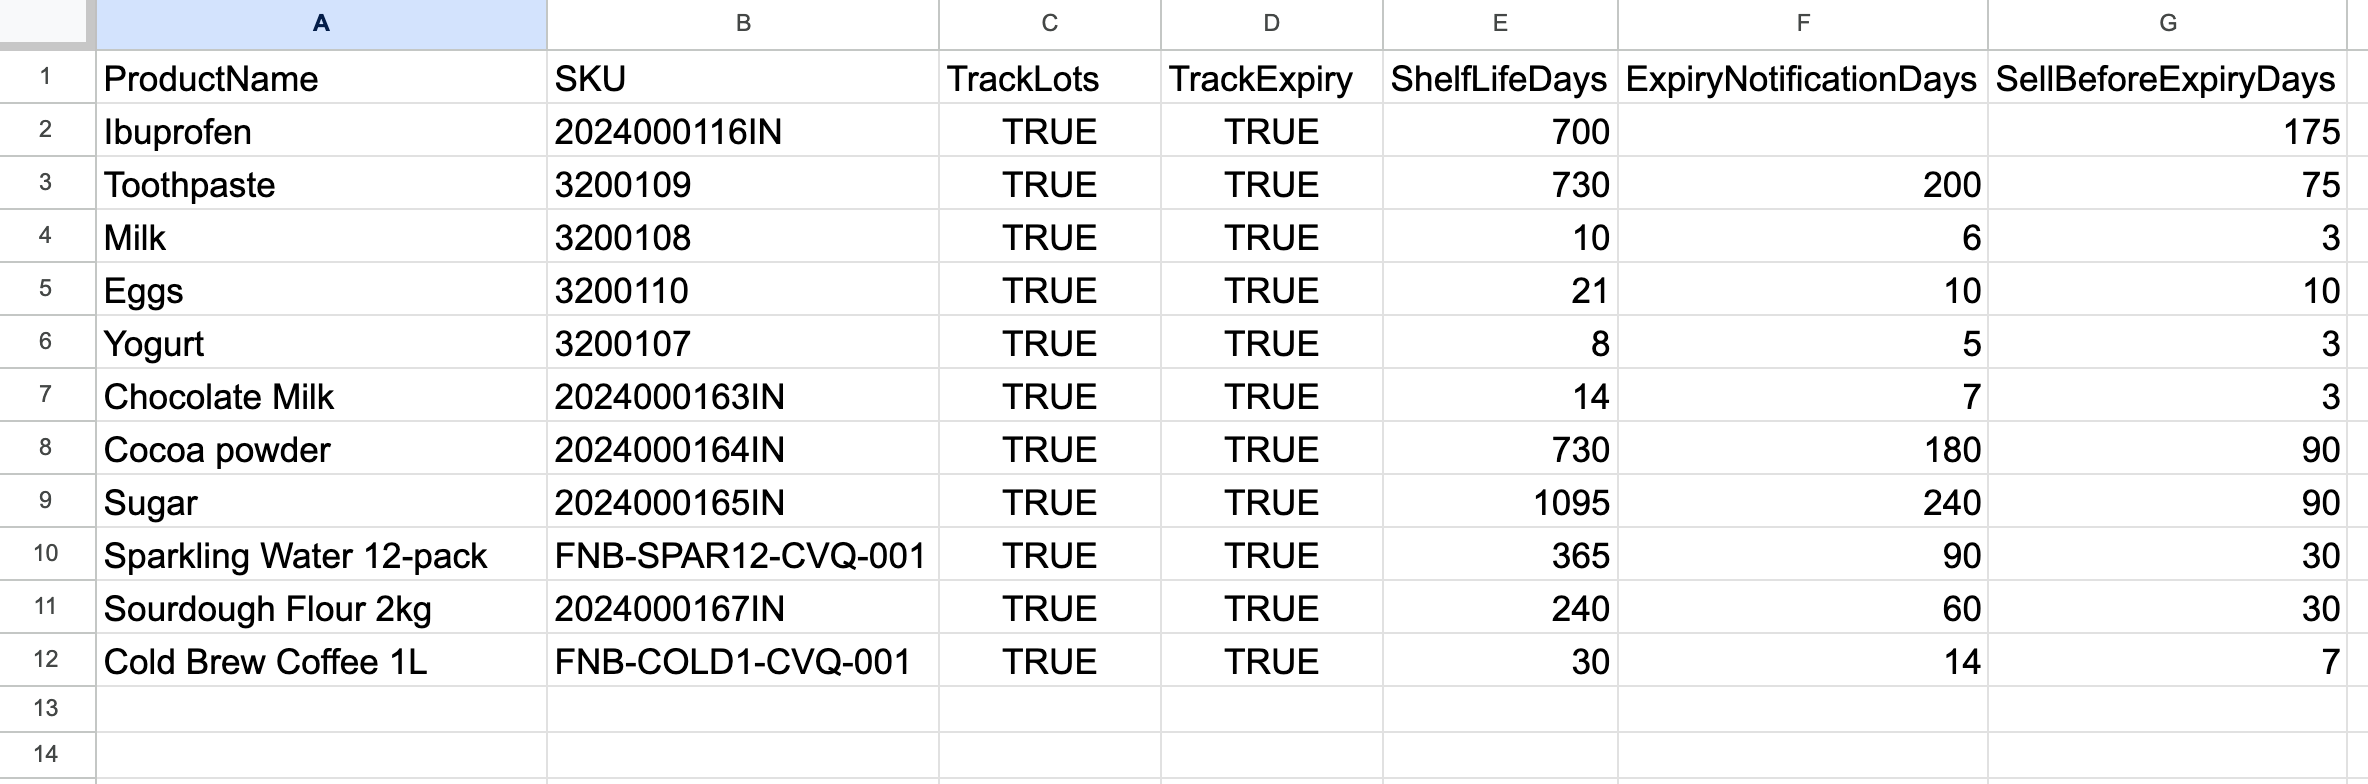
Product details fields for lot tracking
Fill out the following fields in the CSV. See below for a breakdown of each lot-tracked import column and what to enter in your spreadsheet.
| CSV column heading | Required? | What to enter |
|---|---|---|
| ProductName | Required | The name of the product. Each product name must be unique in inFlow. |
| SKU | Optional | The product’s SKU, if you use them. |
| TrackLots | Required for lot tracking | Turns lot tracking on for the product. Enter TRUE for lot-tracked products, FALSE for products that don’t track lots. This can only be set when the product is created. |
| TrackExpiry | Optional | Turns expiry date tracking on for the lot-tracked product. Enter TRUE or FALSE. Only applies when TrackLots is also set to TRUE, and can only be added when the product is first created in inFlow. Only applies when TrackLots is also set to TRUE, and can only be added when the product is first created in inFlow. Enter FALSE if the product doesn’t track expiry dates. |
| ShelfLifeDays | Optional | The shelf life in days. inFlow uses this to calculate the expiry date for each new lot you receive. Only applies when TrackExpiry is TRUE. If a lot-tracked product has no shelf life, inFlow uses the receive date as the expiry date instead. |
| SellBeforeExpiryDays | Optional | The number of days before a product’s expiry date when it should no longer be sold. inFlow uses this setting to calculate the lot’s sell-by date based on its expiry date. Only applies when TrackExpiry is TRUE. |
| ExpiryNotificationDays | Optional | The number of days before a lot’s expiry date when inFlow will notify you that the lot is approaching its expiration. Only applies when TrackExpiry is TRUE. |
Importing products that track both lots and serials
A product can track lot and serial numbers. These products need a lot number and a serial number for every inventory movement.
To set this up, add the TrackSerials column to the same CSV and enter TRUE in the TrackSerials column alongside TrackLots.
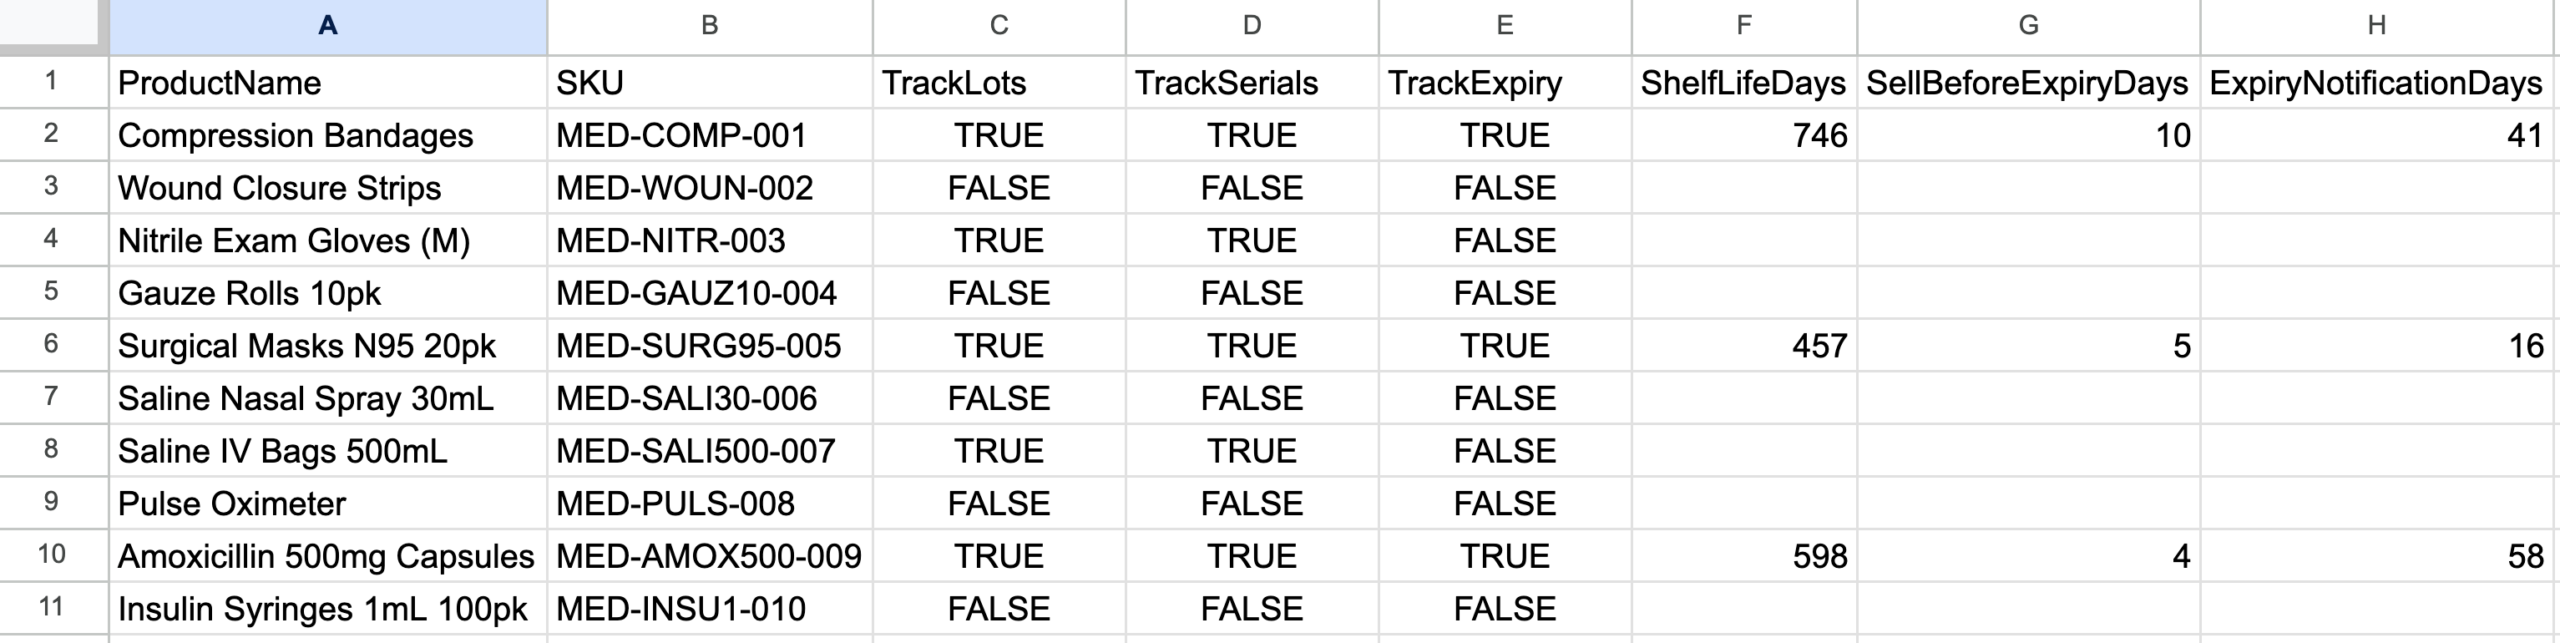
| CSV column heading | Required? | What to enter |
|---|---|---|
| TrackSerials | Required for serial tracking | Enter TRUE to enable serial tracking for the product; enter FALSE for products that don’t track serials. Like TrackLots, this can only be set when the product is created. |
| SerialPrefix | Optional | The text inFlow adds to the front of each serial number it auto-generates. For example, MD- gives you MD-00001. |
| SerialNextNumber | Optional | The number inFlow starts counting from the next time it generates a serial number for this product. |
| SerialSuffix | Optional | The text inFlow adds to the end of each serial number it auto-generates. |
Serial number tracking is a separate feature from lot tracking, so your plan will need both add-ons. See inFlow’s Account settings to see what’s included in your plan.
Importing your product details
- From the Main Menu, hover over the Settings icon, then Import.
- In the Data type drop-down menu, select Product details.
- Select the CSV file from your computer, then click Next.
- Match the Product name and any inFlow fields you want to import to the matching fields from the CSV that are in the drop-down menu. Scroll to the Lot numbers section to check Track lot numbers, Track expiry dates for lots, Shelf-life (days), Sell before expiry (days), and Days before notifying.
- Click Import.
- You’ll see a message that your import is in progress, and you’ll get an email when it finishes.
inFlow tries to match your columns for you, and you don’t have to map every field on this screen. Only the fields matched to a column will be imported. Blank fields stay exactly as they are in inFlow. If a match looks wrong, you can change that field from its drop-down menu before you import.
Viewing your products in inFlow
Once the import finishes, you can view a list of your lot-tracked products from the product list.
- From the Main Menu, hover over the Inventory icon, then select Products.
- Select the Product type filter.
- Check With lot tracking, then click Apply.
The list now shows only your lot-tracked products. For more on what you can set up from there, take a look at the lot numbers and expiry dates guide.
Step 2: Import stock levels for your lots
Now that your lot-tracked products exist in inFlow, you can import the lots/batches you have on hand.
Set up your stock levels CSV
As with your product details, you can start from an inFlow export or build the file yourself.
Option A — export a template from inFlow (recommended)
- From the Main Menu, hover over the Settings icon, then Export.
- In the Data type list, select Stock levels.
- Click Export and save the file to your computer.
- Open the CSV in the spreadsheet software of your choice.
Option B — build the file yourself
Create a new spreadsheet and add the column headings exactly as they appear in the table below. Type them without spaces so inFlow can match your columns automatically.
Stock levels fields for lot tracking
Fill out the following fields in the CSV. See below for a breakdown of each lot-tracked import column and what to enter in your spreadsheet.

| CSV column heading | Required? | What to enter |
|---|---|---|
| ProductName | Required | The name of the product. This is how inFlow finds it. If it doesn’t match an existing product, inFlow creates a new product record. |
| SKU | Optional | The product’s SKU. You need either a product name or a SKU on every row. |
| Location | Required | The main location where the stock is held. |
| Quantity | Required | The number of units in this lot at this location. |
| LotNumber | Required for lot tracking | The lot or batch code. If the lot number already exists for that product, inFlow adds to that lot instead of creating a new one. |
| ExpiryDate | Optional | The lot’s expiry date. inFlow only sets this when it creates a new lot. If you leave it blank and the product has a shelf life, inFlow calculates the date for you. |
| SellByDate | Optional | The date by which you want to sell the lot. If you leave it blank, inFlow calculates it from the expiry date and the product’s sell-before-expiry setting. |
| ManufactureDate | Optional | The date the lot was manufactured. |
| CreatedDate | Optional | The date the lot was created. |
| Sublocation | Optional | The aisle, bin, or shelf holding the lot. You’ll need to enable sublocations; otherwise, they won’t appear after the import. |
| Serial | Optional | The serial number, but only if the product tracks both lots and serial numbers. |
| Lot custom fields | Optional | Any lot custom fields you’ve set up. These use the field name you gave them in inFlow. |
Listing more than one lot per product
Each row in your file is one lot. If a product has several lots in stock, repeat the product name on a separate row for each lot number, and give each row its own quantity.
In the example below, Surgical Masks N95 20pk is listed once for each of its three lots — 2608-004, 2608-007, and 2608-008 — all held at Central Pharmacy, with a different quantity and sublocation on each row.

A stock levels CSV with the same product repeated on a separate row for each of its three lot numbers.
Importing serialized lot-tracked products
If a product tracks both lots and serials, each row in your file represents one serial number within one lot. Follow these steps to learn more.
- Add a Serial column to your CSV, alongside the LotNumber column.
- Repeat the product name on a separate row for each serial number you have in stock.
- On each row, enter the serial number and the lot number that the serial belongs to.
- Set the Quantity to 1 for each row.
- Check that each serial number appears only once in the file.
In the example below, Compression Bandages is stocked in three lots — 2608-001, 2608-002, and 2608-003 — with two serial numbers in each. The product is repeated on six rows, each with its own serial number and a quantity of 1.
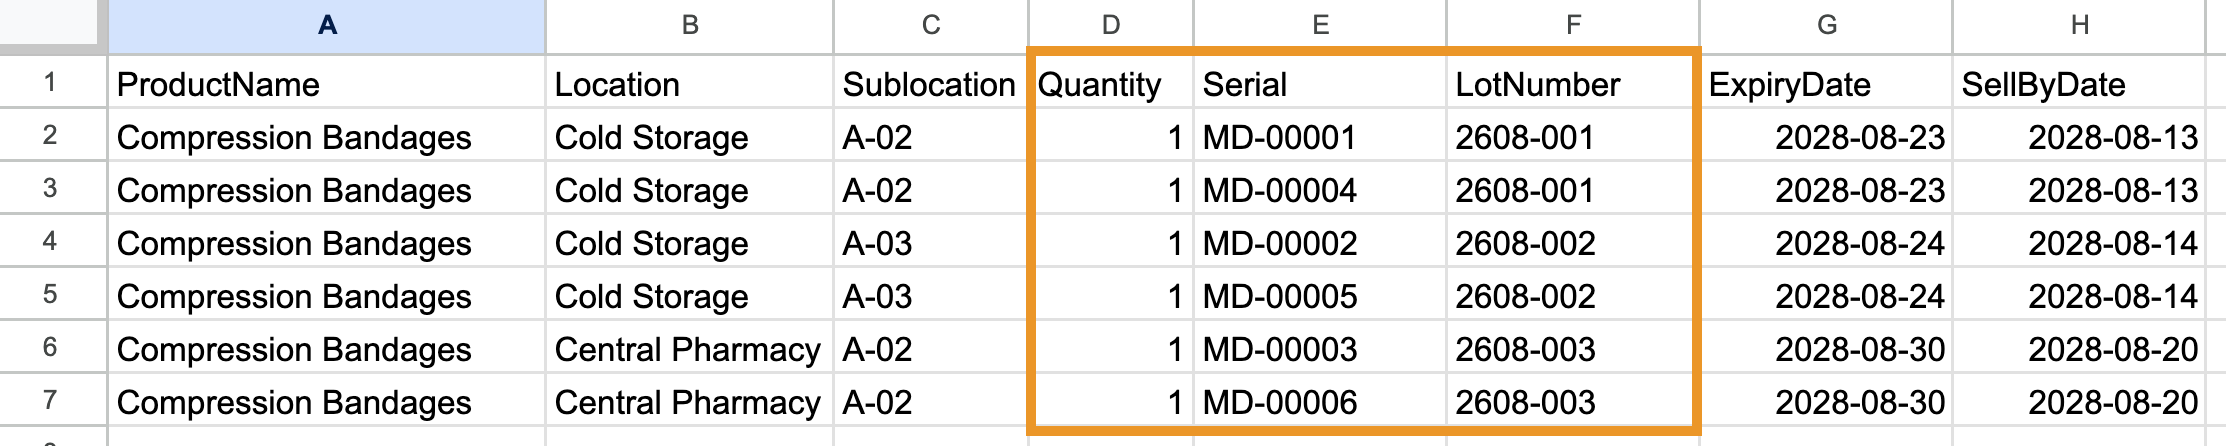
A stock-levels CSV for a lot- and serial-tracked product, with one row per serial number and a quantity of 1 on each row.
Serial numbers must be unique for the product across your entire inventory, even when the serials are in different lots. inFlow can only hold one of each serial number at a time.
Importing lot custom fields
Lot custom fields let you track additional details for each lot, such as a best-before date or a supplier’s batch number. You can fill them in during your stock levels import, but the fields have to exist in inFlow first.
Lot custom fields aren’t in inFlow’s Global settings with your other custom fields. You manage them from the Lot details on a product record instead.
Once you’ve added your lot custom fields, you can include them in your CSV.
- In your stock levels CSV, add a column for each lot custom field. Use the same field name you entered in the Name box as the column heading.
- Fill in a value on each lot’s row. Match the format to the field type you chose: dates follow your computer’s regional settings, and checkbox fields take TRUE or FALSE.
- Import the file as usual. On the mapping screen, your lot custom fields appear under the Lot custom fields heading, each listed by its field name.
For more on setting these up, see the section on adding custom fields to your lots.
Importing a blank value in the CSV file won’t clear a lot’s custom field. If a lot already has a value and you import an empty cell, the original value remains. To empty the field, edit the lot from the product record instead. Keep in mind that you can’t create a custom field by importing a column for it either — if a column doesn’t match any of the custom fields you’ve already set up, inFlow won’t have anywhere to put the values.
Importing your stock levels
- From the Main Menu, hover over the Settings icon, then Import.
- In the Data type drop-down menu, select Stock levels.
- Select your CSV file from your computer, then click Next.
- Choose how you want inFlow to apply the quantities:
- Set inventory levels to what’s being imported
- Add it to the existing inventory levels
- Subtract it from existing inventory
- Optionally, select an Adjustment reason from the drop-down menu.
- To check how your columns are matched, click Edit data mapping. The Lot details section covers Lot number, Expiry date, Sell-by date, Manufacture date, and Created date, and any lot custom fields appear under Lot custom fields.
- Click Import.
- You’ll see an Import is in progress message, and you’ll get an email when the import is complete.
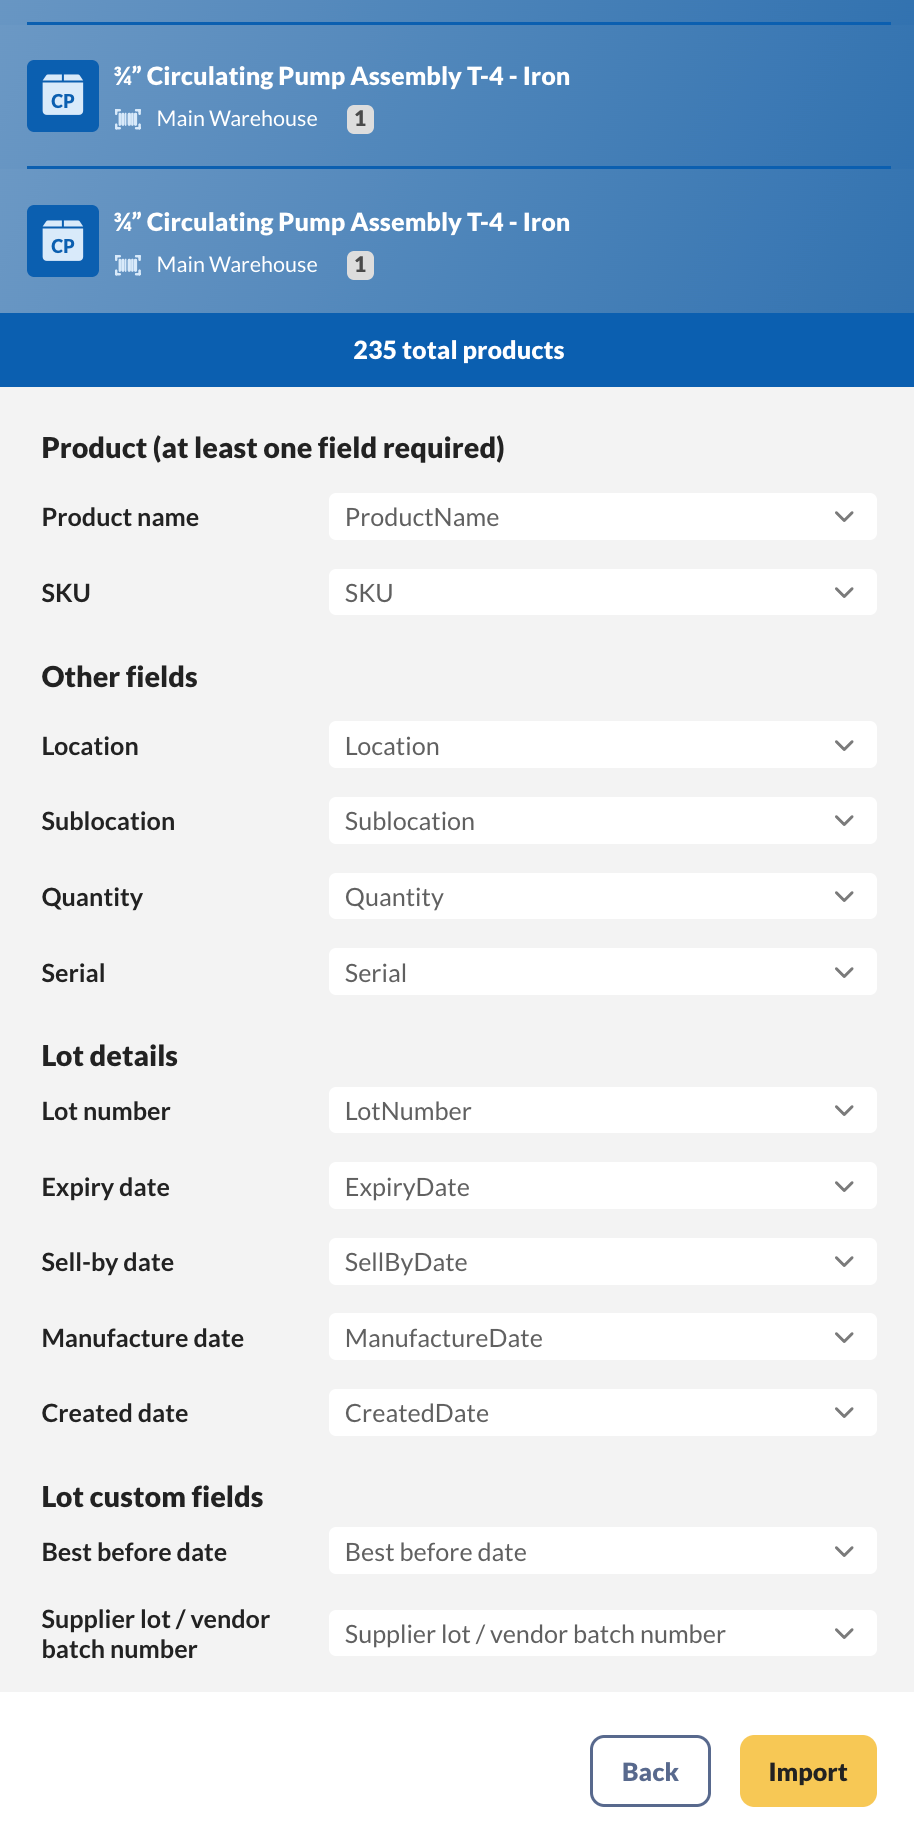
The Lot details section of the stock levels import mapping, showing the lot number and date fields.
Things to know about importing lots
A few rules will save you a second round of edits:
- Expiry dates import only once. inFlow sets a lot’s expiry date when the lot is created. Re-importing a stock levels file won’t overwrite an existing lot’s expiry date. To change it, edit the lot from the product record.
- The other dates can be updated. Sell-by, manufacture, and created dates can all be changed by re-importing.
- Only lot-tracked products can have lot numbers. Adding a lot number to a regular stocked product will cause an error.
What’s next
Once both imports are complete, your lots are ready to use in inFlow. Check out these guides to continue.
 Yes, thanks!
  Not really

0 Comments