 Fellow Canadians: All inFlow plans are available in Canadian dollars



 Home
Home


How to track lot numbers in inFlow for Mobile
Track lot numbers and expiry dates right from your phone. With inFlow for Mobile, you can create lot-tracked products, receive and pick stock by lot, and scan lot barcodes as you work. See below for full details.
Please note: Lot tracking is only available on select plans or add-ons.
How to create lot-tracked products in inFlow for Mobile
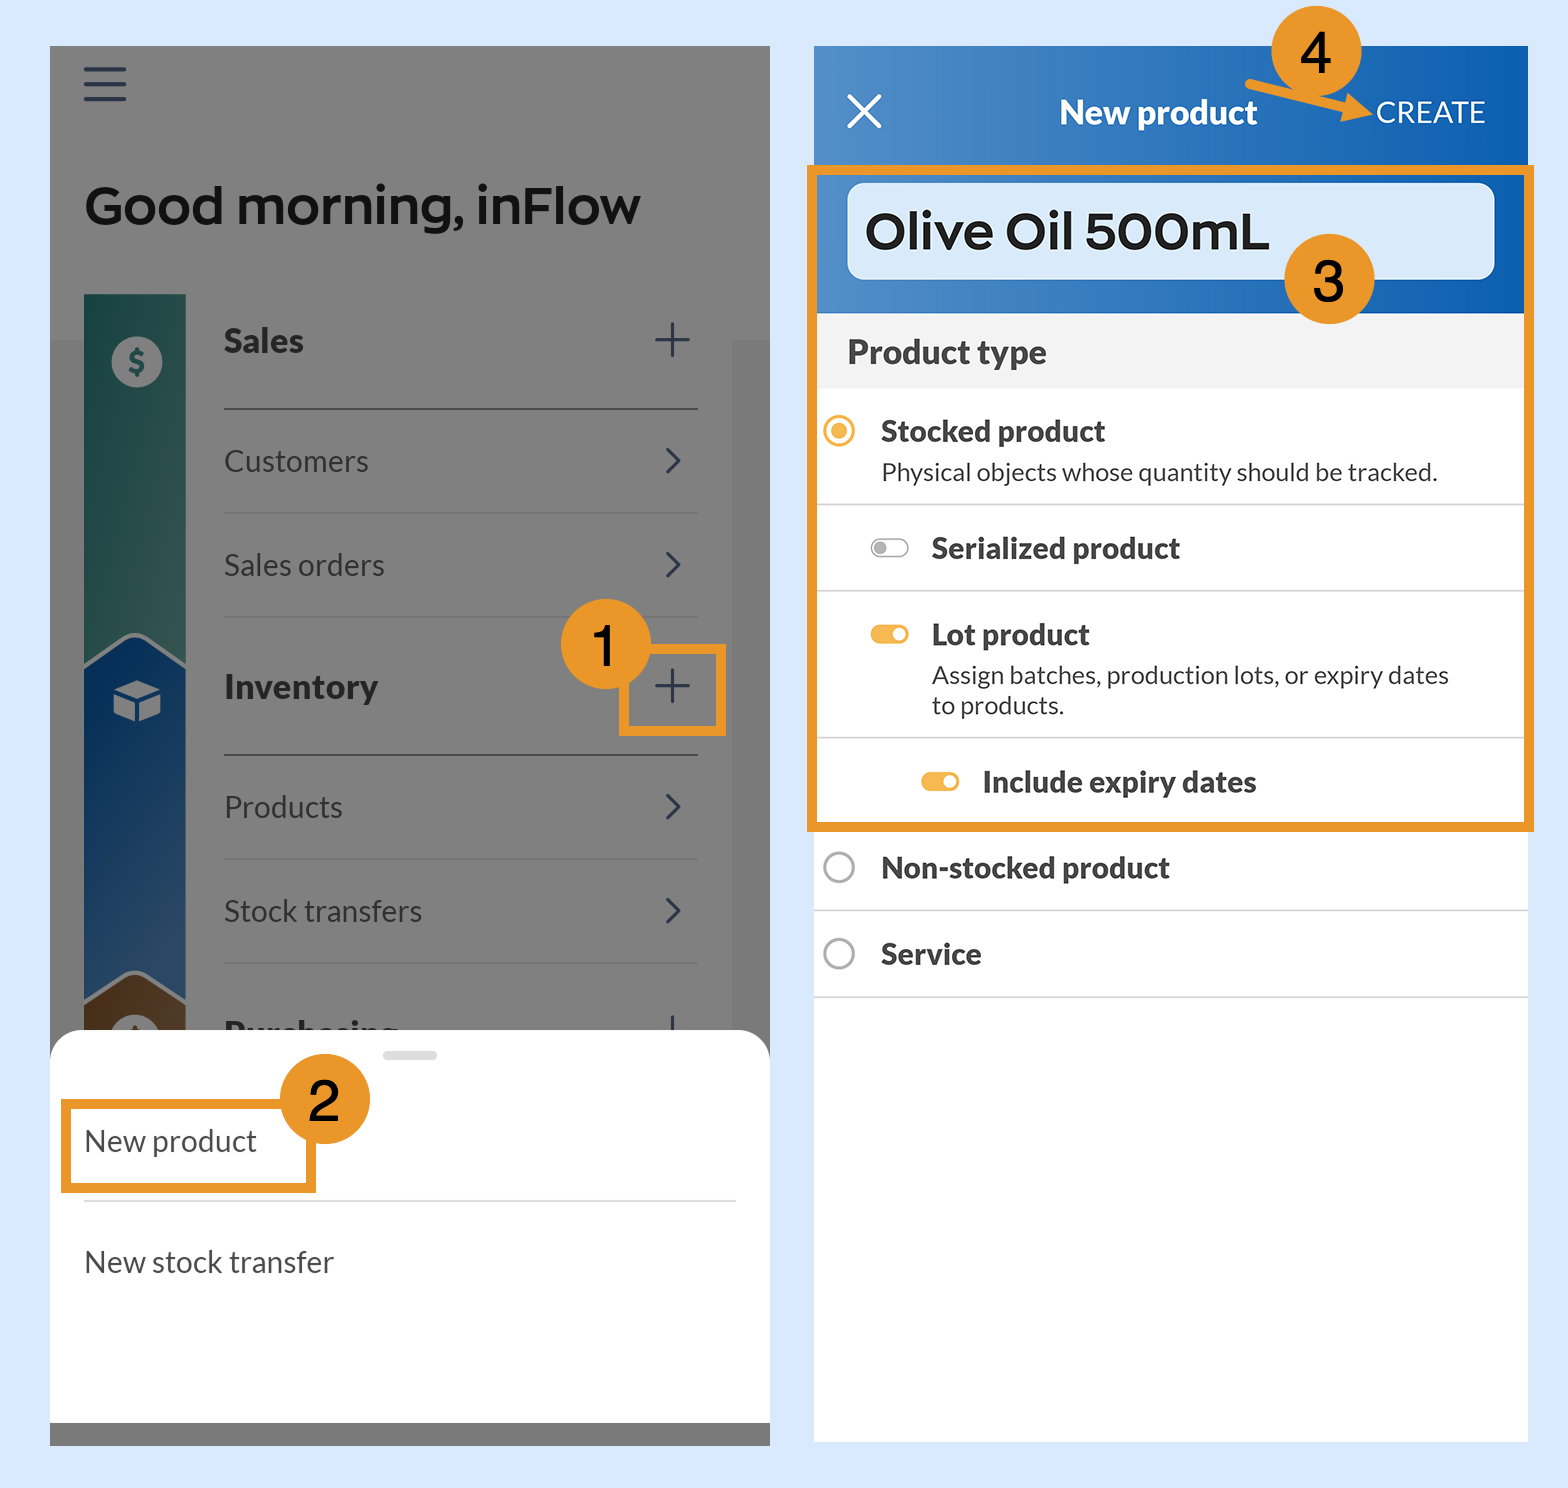
- From the mobile app Homepage, tap the plus icon next to Inventory.
- Tap New product.
- Fill out the product name, keep the Stocked product option selected, then turn on Lot product and Include expiry dates if needed.
- Tap Create to make the new product.
The product type is permanent once you save. If you picked the wrong type, see how to change product types.
How to view and edit lot details on a product
You can check the lots you have on hand for any lot-tracked product.
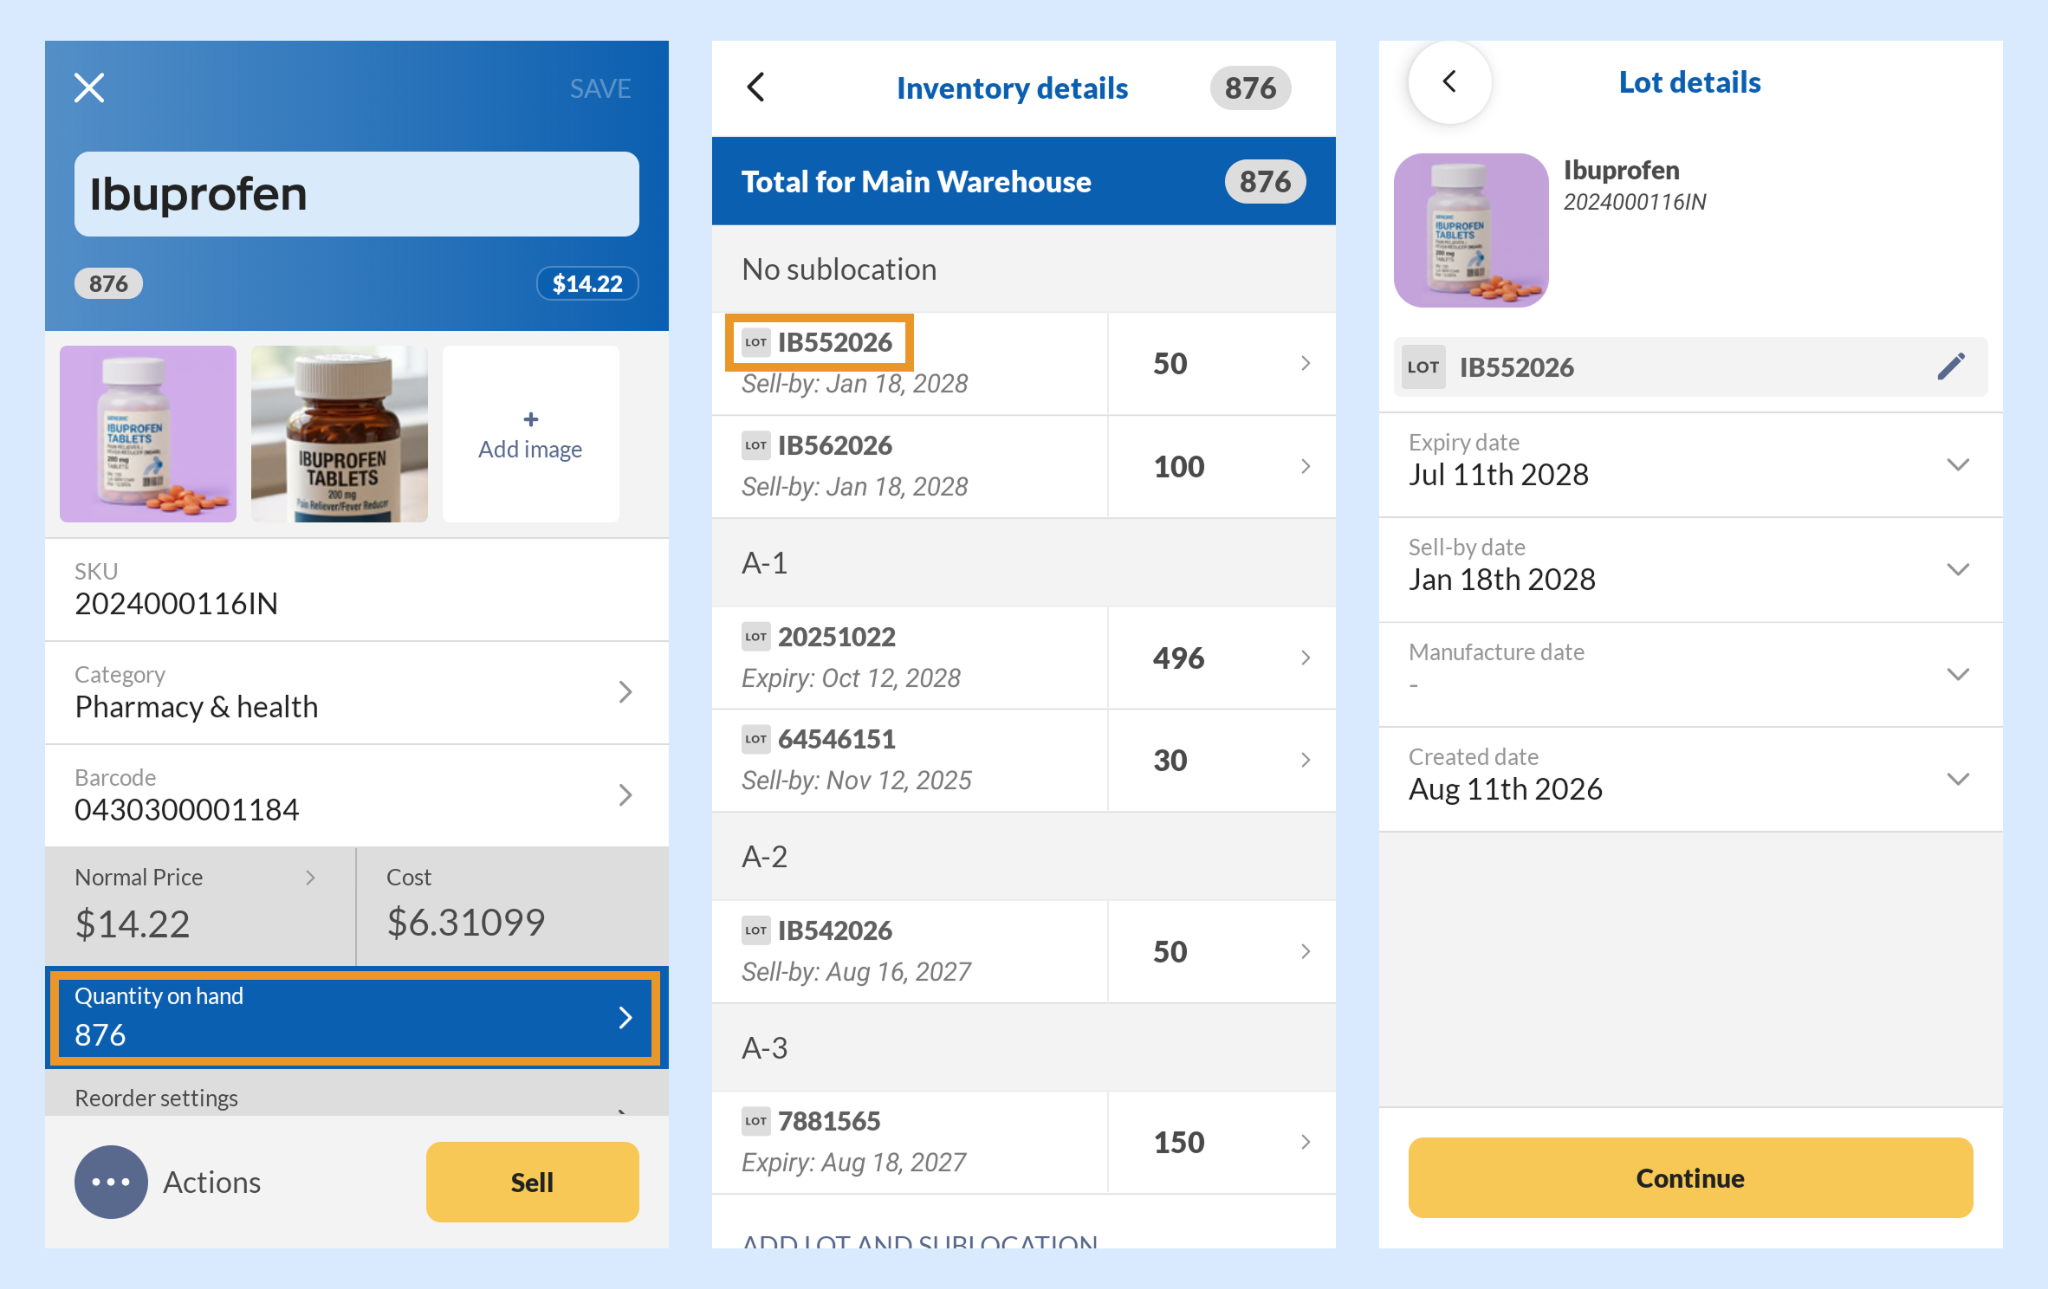
- From the Homepage or Main Menu, tap Products. Then open a lot-tracked product.
- Tap on Quantity on hand.
- inFlow lists each lot under its sublocation, along with its sell-by or expiry date.
- Tap a lot to open the lot details. From here, you can edit the lot number, sell-by date, manufacture date, and created date. Tap Save when done.
Lot number formats and default shelf life are set in inFlow for Web. See the Manage lot number details section of the main lot tracking guide.
Adding new lots to a product
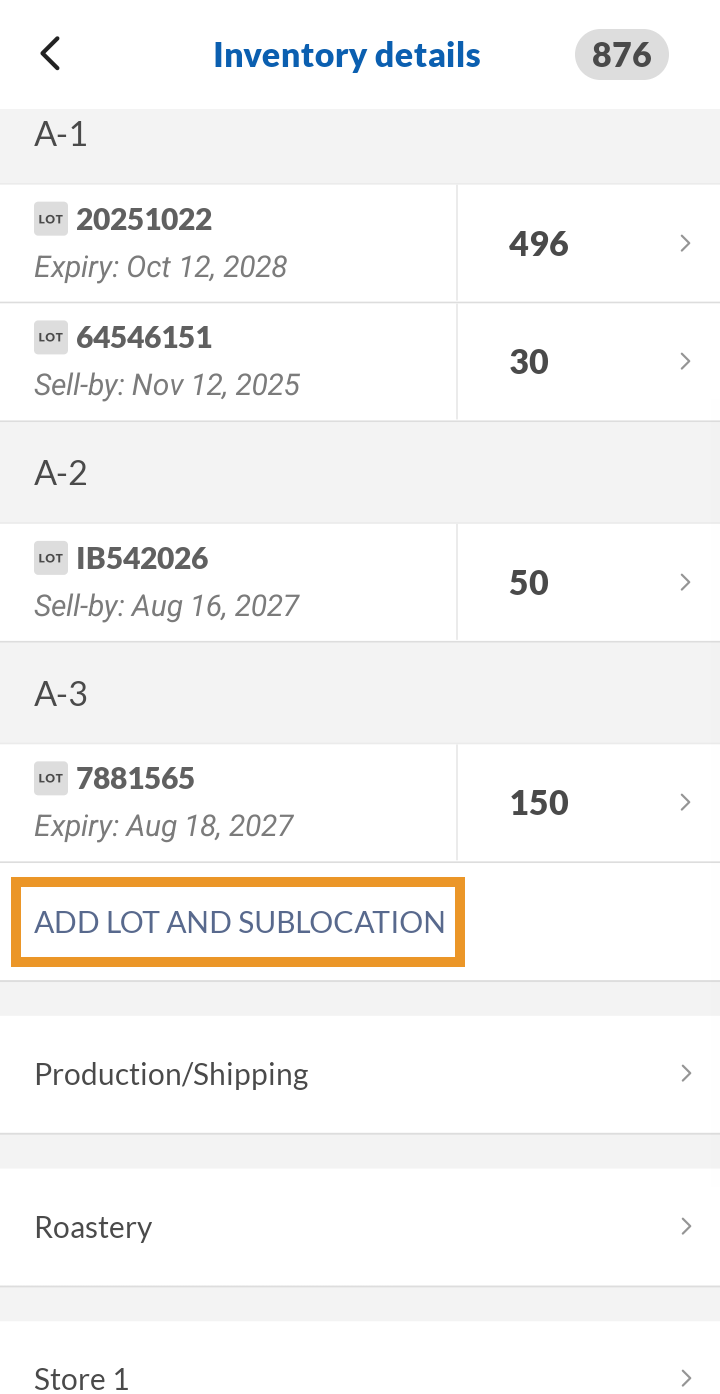
To add stock for a brand-new lot, tap Add lot and sublocation and enter the lot details.
How to buy lot-tracked products on a purchase order
Buying lot-tracked products works the same way as any other purchase order. The difference comes at receiving, when inFlow asks for the lot number so every unit is traceable from day one.
Create the purchase order
- From the Homepage or Main Menu, tap Purchase Orders, then tap the plus icon.
- Select a new or existing vendor.
- Tap Add products to choose products from your list, or tap Scan products to scan a barcode.
- Once products have been added, you’ll return to the main order screen.
- Tap Order details to set the location, payment terms, and any remarks.
You don’t pick the lot number here. inFlow asks for it when you receive the stock, since that’s when you know which batch actually arrived.
Receive by scanning
- On the order tap Receive.
- Tap Scan to fulfill and scan the barcode.
- Each scan of the same lot barcode increases the quantity by 1. Tap the edit icon to enter a quantity manually instead.
Receive without scanning
- Open your purchase order and tap Receive.
- Tap the checkbox next to a lot-tracked product.
- Assign the lot number for the stock you’re receiving, then confirm the quantity.
- Repeat for each product, then save.
You can receive part of an order now and the rest later. Each receipt gets its own lot number, so a single purchase order can bring in several lots of the same product.
Once done, you can process the purchase order as usual.
How to sell lot-tracked products on a sales order
Selling works like any other sales order. inFlow asks which lot you’re shipping when you pick the order.
Create the sales order
- From the Main Menu, tap Sales Orders, then tap the plus icon.
- Select a new or existing customer.
- Tap Add item to choose products from your list, or tap Scan item to scan a barcode.
- Tap the products you’re selling, tap Add, then tap Done to return to the order.
- Tap or swipe to the Details tab to set the location, shipping details, payment terms, and any remarks.
Pick by scanning
- On the picking screen, tap the scan button and scan the product barcode.
- The scanning card shows the lot inFlow expects you to pick. Scan the lot barcode to confirm — each scan picks one unit.
- Use Partial pick or Pick all to pick some or all of the line at once.
Pick without scanning
- Open your sales order and tap Fulfillment (or Pick order if shipping is turned on).
- Tap the checkbox next to a lot-tracked product.
- Select the lot to pick from. inFlow sorts lots by their nearest expiry date, so the oldest stock goes out the door first.
- Confirm the quantity, then save.
Sorting by nearest expiry date is called FEFO (first expired, first out). It helps you sell products before they expire.
Scanning a different lot
Sometimes the lot in your hands isn’t the one inFlow suggests. That’s okay! Scan the lot you actually have, and inFlow picks from that lot instead. The message You’ve scanned a new lot. appears on the scanning card so you know the lot changed.
Ship and pay for the order
- Once every line is picked, the order is fulfilled. If shipping is turned on, tap Ship order to record the shipment.
- Tap or swipe to the Order tab, then tap the Paid field to enter the customer’s payment.
- Tap Save in the top right.
The lots you picked stay attached to the order, so you can trace that batch back to the customer later using the sales traceability report in inFlow for Web.
How to return a lot-tracked product
- Open the sales order and tap the product line you’re returning.
- Tap the ellipsis (…) in the top right, then tap Return product.
- Enter the quantity your customer is returning. You can return part of the line or all of it.
- Select the lot the products are going back into, or tap Assign a new lot to create one.
- If the product is serialized too, select or scan the serial numbers.
inFlow restocks the products into that lot right away.
In inFlow for Web, you return the product and then restock it from the Restock tab. On inFlow for Mobile, assigning the lot restocks the products at the same time, so there’s no separate step.
To start a return on an order with nothing picked, tap Add product and enter a negative quantity.
For refunds and customer credits, see how to process returns and issue credits.
Lot numbers on manufacture orders
Please note: Manufacture orders are only available with an inFlow Manufacturing plan.
Lot tracking works the same way on manufacture orders:
- Picking components works like picking a sales order. Select or scan the lot for each component.
- Putting away finished products works like receiving a purchase order. Assign a lot number to the stock you built.
You can also scan an unexpected lot while picking or putting away, just like on sales orders.
How to adjust or transfer stock with lot numbers
Stock adjustments
- From the Main Menu, tap Adjust stock, then choose Add stock or Remove stock.
- Tap Scan products and scan the product barcode.
- Scan the lot barcode to select the lot. Each scan of the same barcode adds one to the quantity, or tap the edit icon to enter it manually.
If the lot barcode doesn’t match an existing lot, inFlow displays a “No matching lot number found” prompt with the option to assign it as a new lot.
Stock transfers
- Open a stock transfer, tap the scan button, and scan the product barcode.
- inFlow lists the available lots in the “from” location, sorted by the nearest expiry date. Lots with zero stock are hidden, and expired lots appear at the bottom of the list.
- Select a lot, then scan the lot barcode to add quantity, or tap the edit icon to enter it manually.
If you scan the product barcode instead of the lot barcode, inFlow displays a “Please scan the lot barcode” message.
Products with both lot and serial numbers
Some products track a lot number and a serial number. For these products, inFlow always asks for the lot first, then the serials.
For example, when picking a sales order:
- Tap the checkbox next to the product.
- Select the lot.
- Select or scan the serial numbers.
When picking or transferring stock out, inFlow only accepts serial numbers that are in stock at that location.
You can’t enter lot or serial numbers on the order line itself for these products. inFlow assigns them when you pick or receive.
Where to go next
- How to track lot numbers & expiry dates in inFlow — lot formats, shelf life, expiry notifications, write-offs, and lot reports
- inFlow Inventory mobile app: full guide — everything else you can do from your phone
- inFlow Smartphone Scanner 3 — scan lots faster with a dedicated hardware scanner
 Yes, thanks!
  Not really


0 Comments