 Fellow Canadians: All inFlow plans are available in Canadian dollars



 Home
Home


Enhance your operations and labor efficiency with Production management
As a supervisor on the production floor, there can be a lot to keep track of. inFlow’s Production Management features help you stay organized on the manufacturing floor.
What is production management?
Production management is a feature available for inFlow Manufacturing that allows your team to track detailed manufacturing operations, oversee processes, streamline tooling, and accurately monitor labor costs for manufacture orders (MOs).
Features include:
- Add manufacturing operations to the product bill of materials.
- View all operations that are set to start and planned across open and ongoing manufacture orders.
- Track employee hourly rates (labor).
- Track hourly cost for each operation (hourly wage & operation time).
- Track labor timesheets per operation.
- Track flat-rate operation fees (per-unit cost)
- Report on operation/labor timesheets.
- Run reports on operation variances (differences between assemblies for the same product).
Setup/workflow
Here are all the pieces you’d need to make the most of this feature.
Tracking labor costs:
- Ensure your products with a bill of materials have a list of operations you’d want to track labor for.
- Set the estimated hourly cost and estimated duration for the operation.
- Set up your operators with their logins and set their labor hour cost.
- When your operators work on a manufacture order, they should record their labor time by clicking the available Start timesheet button, and Complete operation when they are finished with that operation. Timesheets can be adjusted later if necessary.
- Once the manufacture order is marked completed, inFlow will calculate the labor cost using the associated per-hour labor cost and the time recorded for each operation. All those calculations will be folded into the finished product’s cost.
Labor costs only contribute to the cost of goods sold.
Creating a bill of materials (BOM)
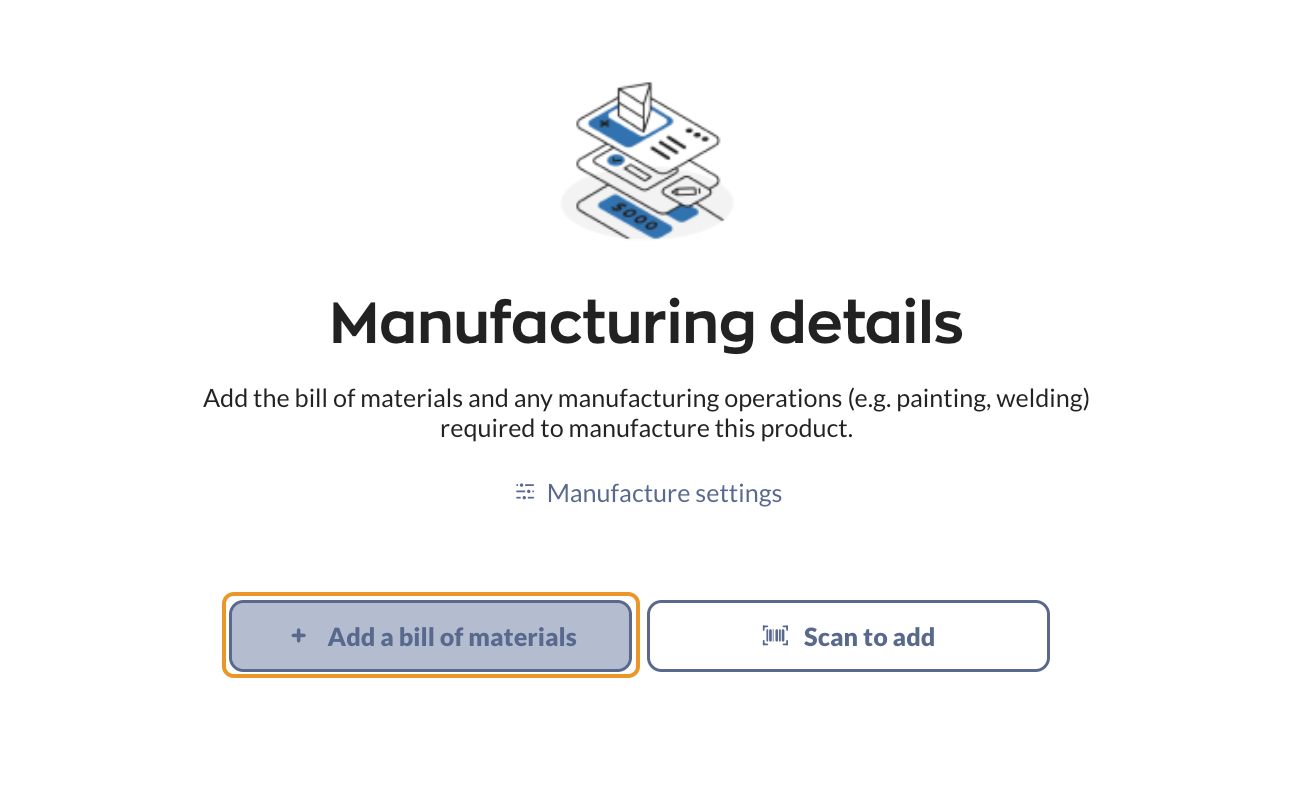
To get started, add a bill of materials to each product your team assembles.
- Open a product, and select the Manufacturing tab.
- Click Add a bill of materials.
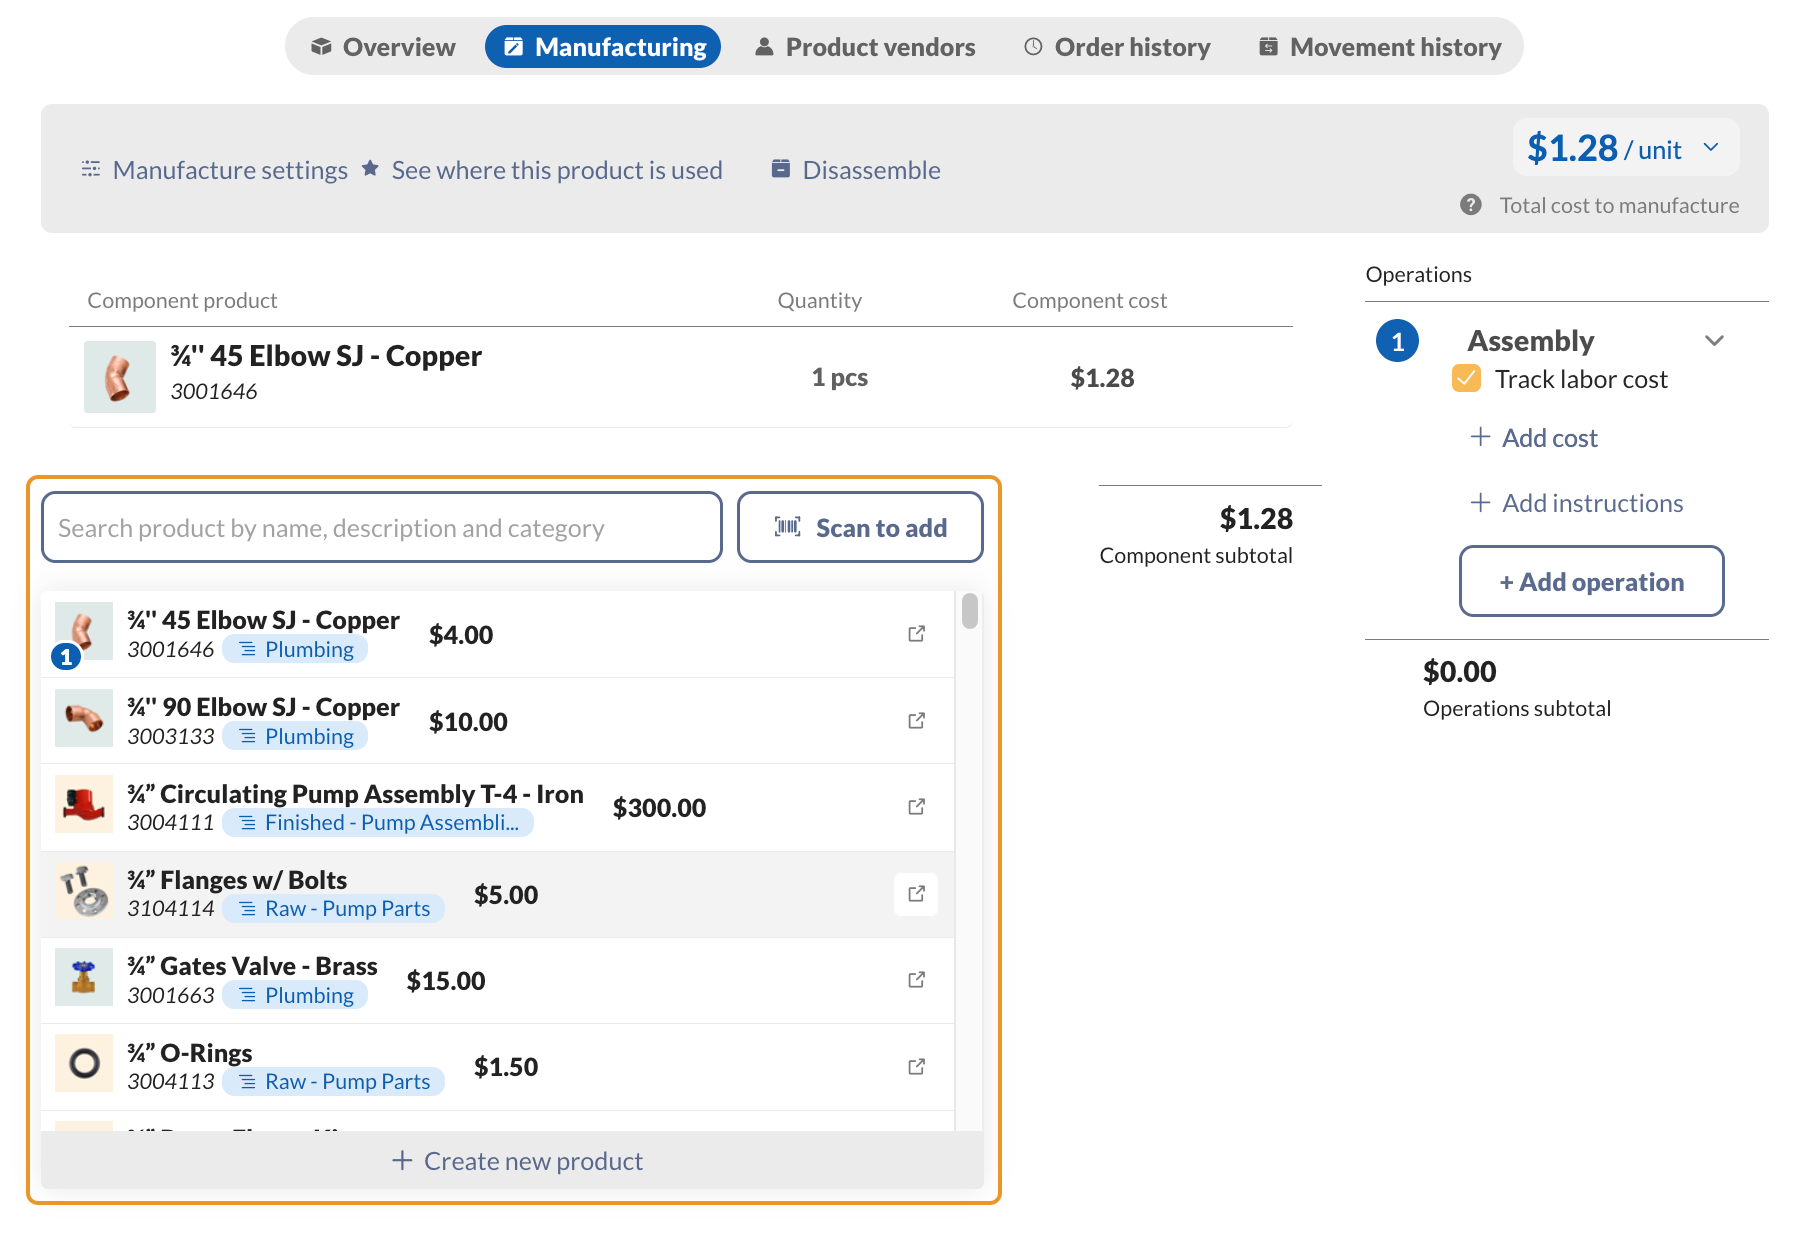
- Select the products from the product list. You can scan or click on the same product multiple times to increase the quantity of the component product. Click outside of the product list to close it.
- Click Save when done.
To add bill of materials lists in bulk, see the bill of materials importing guide.
Creating operations on the bill of materials
Next to the bill of materials component list, you can enter the manufacturing operations to assemble the product.
This section allows you to track estimated costs and instructions for each stage of the manufacturing process.
- On the Manufacturing tab, the default operation will be added alongside the bill of materials.
- To add a new operation, start typing in the Operation field, then select the plus icon to add the operation to your inFlow settings.
- Keep Track labor costs selected if you track the hourly labor cost for the operation.
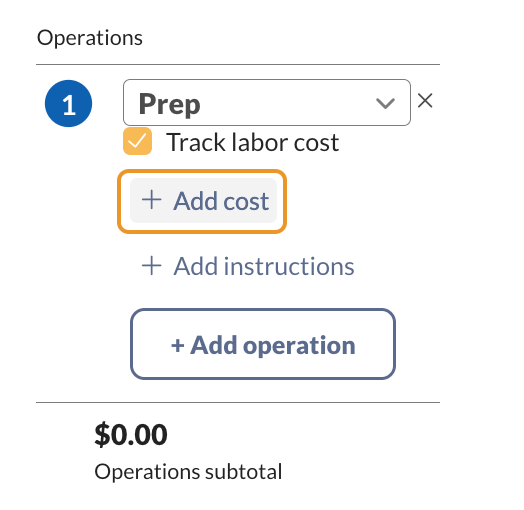
- Click on Add cost to enter the estimated per-hour cost and duration. If you’ve deselected Track labor cost, enter the fee for this operation in the Per-unit cost field.
- Optionally, click Add instructions to add assembly steps for this operation.
- Click Add operations to add more manufacturing operations to the product, then repeat steps 2 to 4.
- Save the product record when done.
Operation types
The default operation type is Assembly. You can type in new operation types in this field, or you can edit/add operation types in the Inventory settings.
Add instructions
This field is where you can add written instructions for how to assemble the components in the bill of materials.
Instructions can be simple text or include URLs to link to more complex instructions elsewhere. All URLs must start with either http:// or https://.
Operation cost tracking
By default, the option to track labor costs is enabled when a new operation is created. This feature allows you to monitor hourly labor costs for the operation.
These labor costs will contribute to the overall manufacturing expenses. To enter the hourly rate, click Add cost, then enter the Estimated per-hour cost. Additionally, specify the Estimated duration to indicate the expected time for the operation.
If you are not tracking labor costs, you can input a flat fee in the “Per-unit cost” field.
Note: Labor cost, Estimated duration, and Per-unit cost are optional fields.
| Track labor cost/Est. per-hour cost | This tracks the hourly rate of the labor used to perform a specific operation. |
| Estimated duration | Enter the time in minutes for how long this operation should take. This field holds up to 4 decimal points for precise time tracking. Estimated duration and Labor cost are used to calculate the cost for the specific operation. |
| Per-unit cost | This field is used for any fees that are associated with the particular operation. Helpful for tracking costs if the operation is outsourced and you’re charged on a per-unit basis. |
Operations on the manufacture orders
Now that your operations have been added to the assembly product, whenever you create a manufacture order for that product, those operations will be listed on the assembly screen.
- To start recording work on an operation, click the Start timesheet button. A timer will start recording the work under your login. Multiple operators can start their own timesheets for the same operation, and they will be tracked separately.
- Clicking “Stop timesheet” stops your current timesheet. Use this for breaks or handing off to others. The progress is still recorded and can be viewed in the Details modal in the top-right corner.
- Click on “Complete operation” to mark the operation as completed. This will also stop all ongoing timesheets for anyone else on the same operation in that manufacture order.
Timesheet details
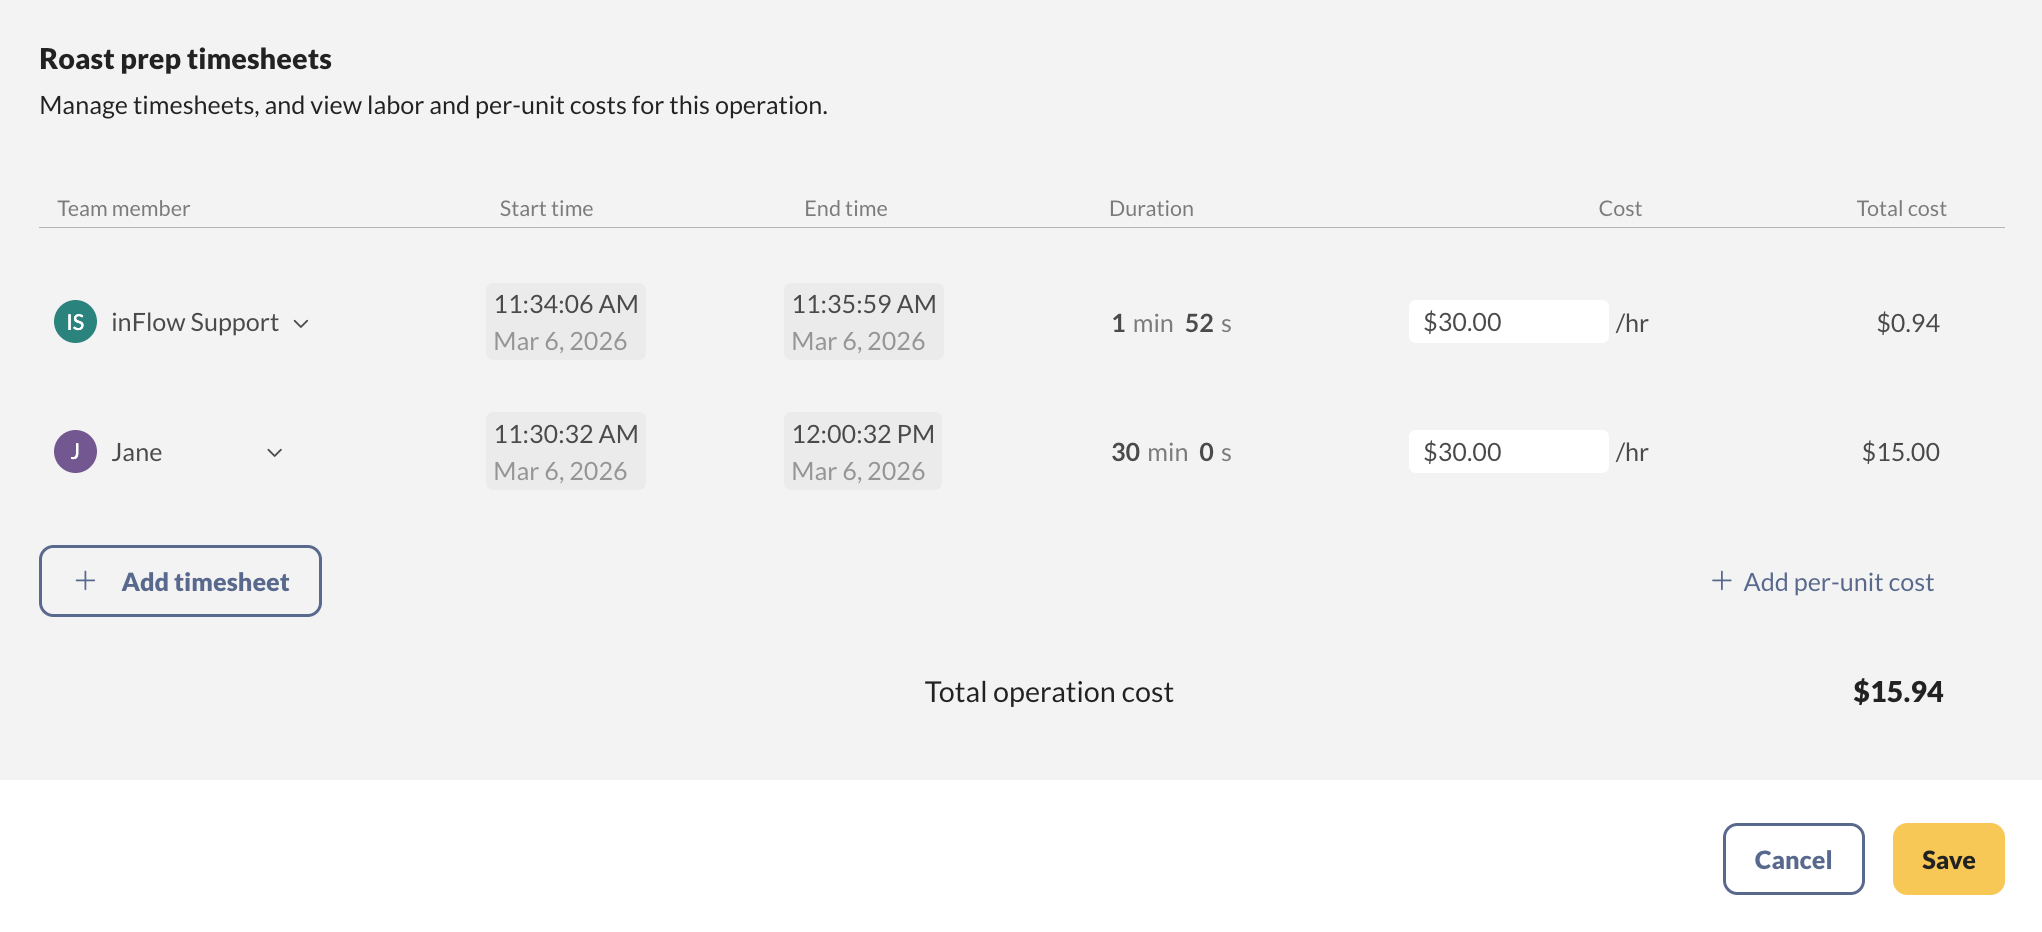
Admins can view the timesheets for any given operation by clicking the Details modal. This shows any past or ongoing timesheets, along with the team member, start and end times, and duration. Cost and total cost may be viewable depending on specific access rights.
Your operators can now track their work on manufacture orders directly from the floor with inFlow for Mobile. Floor workers can open the app, find a job, follow the assembly instructions, and record their labor as they go.
Finding current manufacture orders (Mobile)
inFlow for Mobile now includes a dedicated Manufacture orders view so your team can see what work is available.
- Open inFlow for iOS/Android. On the homepage or the Main Menu, tap Manufacture orders.
- Review the list of open manufacture orders. inFlow sorts orders by due date, with the earliest first.
- To change locations, tap the location filter at the top of the screen, then select a different location. The list updates to show all open orders for that location. You can narrow the results by assignee by tapping the user icon in the top-right corner of the screen.
Lot-tracked finished products aren’t supported in inFlow Mobile yet. Use inFlow for Web to modify those orders.
Viewing tasks for a manufacture order (Mobile)
Tap a manufacture order to see the tasks that are ready.
- From the Manufacture orders list, tap a manufacture order.
- By default, inFlow shows the assembly products for that order that have tasks ready to start. Tasks can be picking, an operation, or put away.
- Picking is always ready to start.
- Operations are sequential, so inFlow shows only the current available operation for each assembly.
- Put away appears only after all picking and all operations for the finished product are complete.
- To see all tasks, including those that aren’t ready yet, toggle to All tasks. inFlow shows the not-yet-ready tasks greyed out, but you can still tap them to view the task.
- Tap a task to open the relevant screen (the picking screen, the operation details screen, or the put away screen).
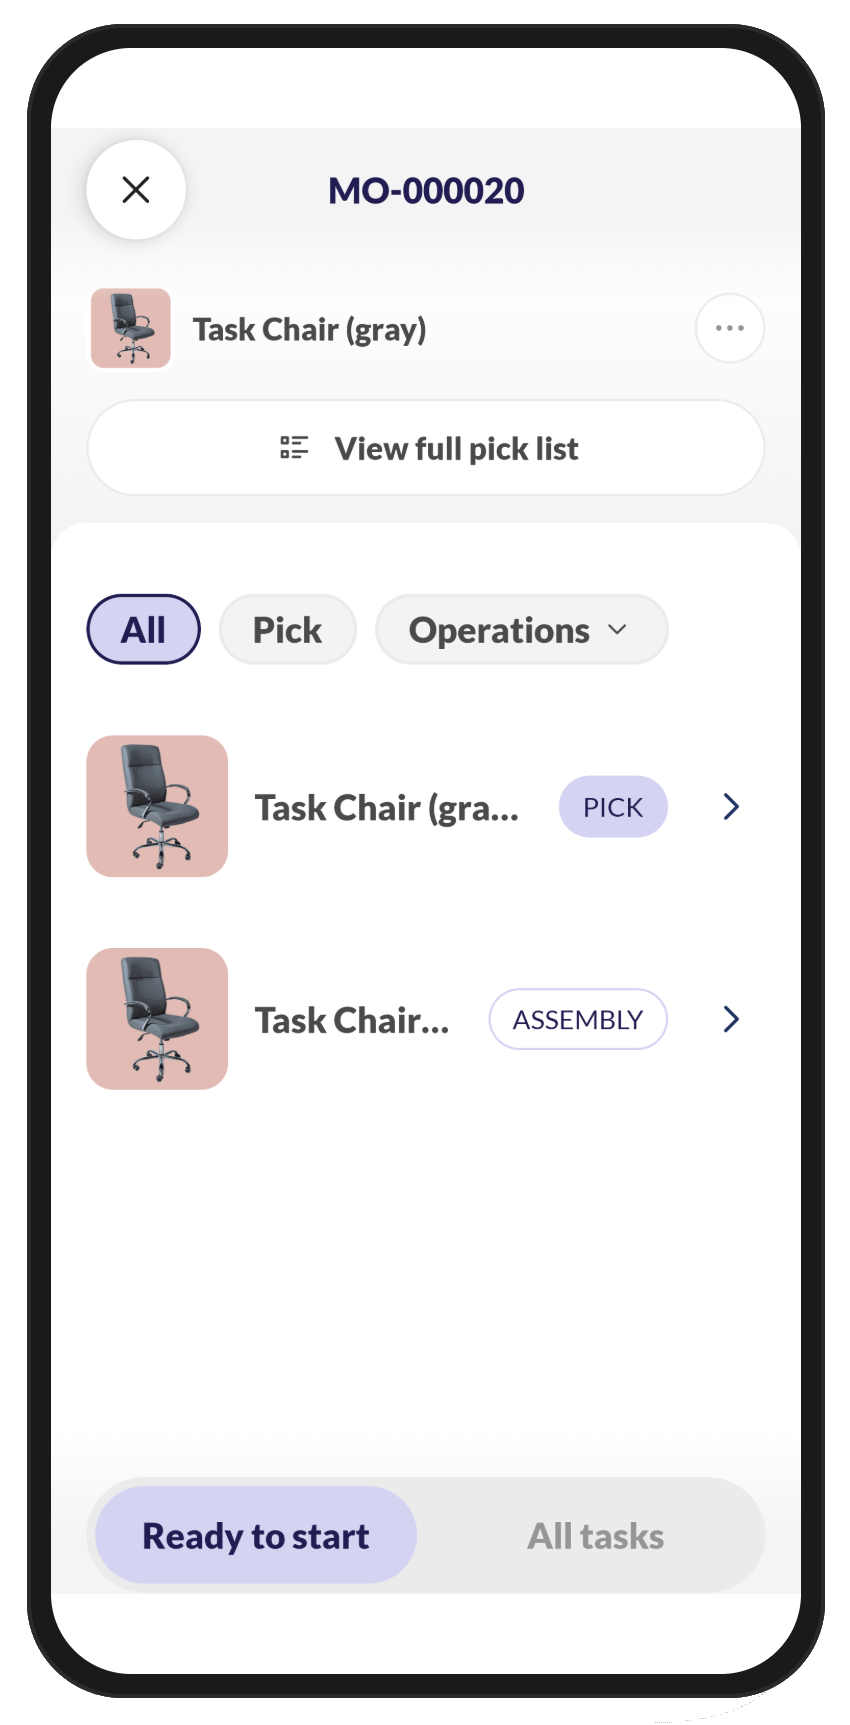
Filtering operations by type
When a manufacture order has several operation types, you can narrow the list to a single type.
- Open a manufacture order and view its task list.
- Use the filters at the top: All, Pick, or Operations.
- Tap All to show every task (picking and operations).
- Tap Pick to show only picking tasks.
- Tap Operations to open a menu where you can select a single operation type (for example, Carving, Sanding, or Staining).
- inFlow applies the filter as soon as you select it and highlights the active operation in purple. If no tasks match the filter you selected, inFlow shows a “No tasks match this filter” message.
Working on an operation (Mobile)
When you tap an operation, inFlow opens the operation details screen, putting everything you need to do the job in one place.
The operation details screen shows:
- The operation name and the manufacture order number.
- The assembly product, including its image, name, SKU, and quantity badge (for example, “5 ea.”).
- The manufacture order due date, or “No due date” if the order doesn’t have one.
- The materials (pick list) for the assembly.
- The assembly instructions.
- A timesheet timer with Start, Stop, and Complete operation controls.
To record your labor:
- Tap Start to begin your timesheet. inFlow records the time under your login.
- Tap Stop to pause for a break or to hand off to someone else. inFlow keeps your recorded progress.
- Tap Start new timesheet to continue, or tap Complete operation when the operation is finished.
- To see the materials you need, tap Materials to open the picking screen for that assembly.
- To go back, tap the back arrow to return to the task list you came from.
Adding operation remarks
Operators can now add remarks on an operation from inFlow for Mobile, so floor workers can capture notes about their work (such as issues, observations, or deviations) without writing them on paper.
- Open an operation from a manufacture order.
- Tap the ellipsis (⋯) menu on the operation details screen.
- Tap Remarks, then enter your note.
- Click Done.
- Select the back arrow to navigate away. inFlow prompts you to save the changes.
Remarks are saved separately from the Start, Stop, and Complete operation controls.
Recording waste/unused components (Mobile)
When an operator uses more or fewer raw materials/components than planned in the bill of materials, they can record this by adjusting the quantity of the picked component. This keeps material usage accurate when the manufacture order is completed.
The Adjust material quantity button appears in the ellipsis (⋯) menu next to a component that’s already picked, so you won’t see it for an unpicked component.
You can open the picking screen in a few ways:
- From a manufacture order’s task list, tap a Pick task.
- From an operation’s details screen, tap Materials.
- From a manufacture order, tap View full pick list.
To record waste:
- Open the picking screen using any of the routes above.
- Tap the ellipsis (⋯) menu next to a picked component.
- Tap Adjust material quantity.
- In the quantity modal, adjust the amount up or down, then tap Done.
What happens next depends on how you adjust the quantity:
- Adjusting up (you used extra material) adds the additional amount as a new, unpicked line, so you can see where to pick it. inFlow uses its where-to-pick logic to suggest a sublocation with stock.
- Adjusting down (you used less) directs you to return the unused materials to the relevant sublocation.
Complete a MO: setting put away location & adjusting the yield (Mobile)
Once all tasks are completed, the operator tracks the put-away location and adjusts component quantities if differences exist between the assembly process and the bill of materials.
The yield is the quantity you actually produced. If it differs from the quantity on the order, adjust it during putaway to keep your inventory accurate.
- To open the put away screen, tap the finished product’s ellipsis (⋯) menu, then tap Manage put away locations. When all operations are complete, you can also tap Put away & complete MO button.
- Tap Adjust yield.
- Then tap on the finished product and enter the quantity you actually produced. Tap Done.
- To change the put away location, tap the ellipsis (⋯) next to the finished product, then tap Edit put away sublocation. inFlow fills in the put-away location based on the manufacture order’s location. To select a different location, tap Change next to the location name, then select a different one.
- If your account uses sublocations, inFlow pre-fills the finished product’s default sublocation for that location. Tap the desired sublocation, or Create new sublocation to add a new one to inFlow.
- When back on the put away screen, select the finished product, then tap Complete MO to complete the manufacture order.
Tip: You can set or edit the put away location any time. Tap on the finished product’s ellipsis (⋯), then tap Manage put away locations.
Admin/supervisor operation tools
Viewing current operations
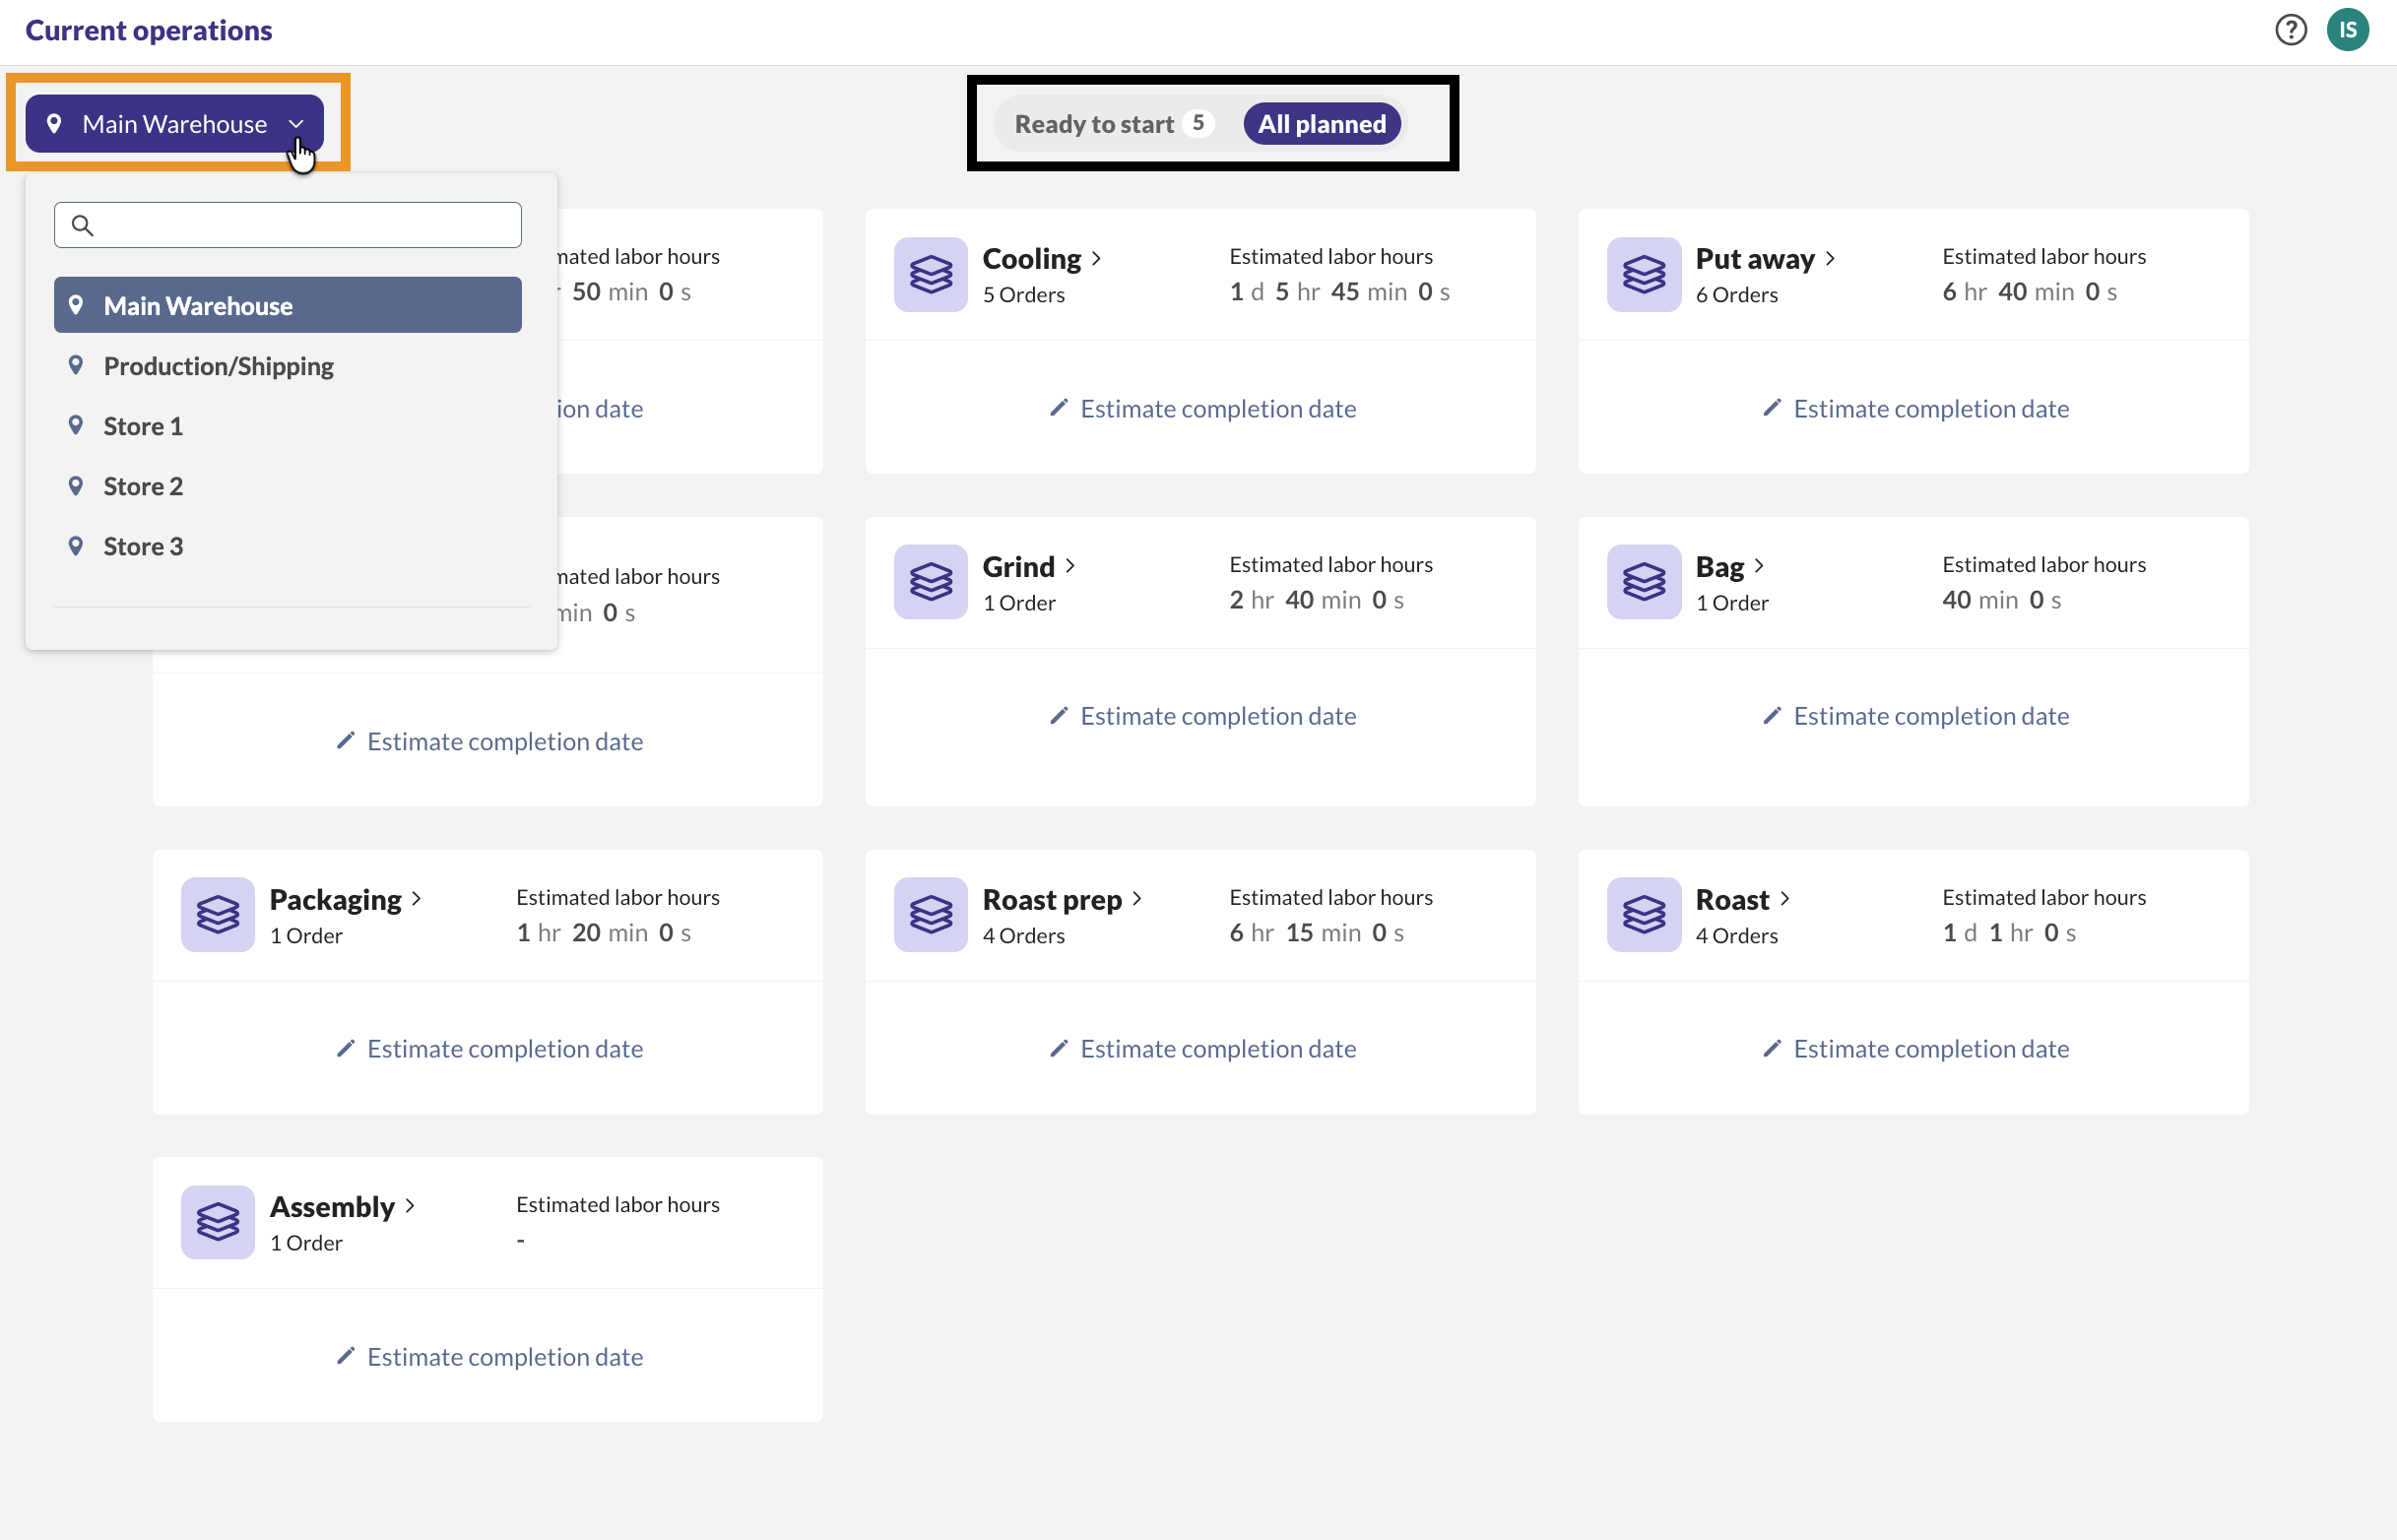
Access to view all tasks on the production floor is a key part of this feature, and Current operations can help with that. This view groups your manufacture orders by operation, and you can estimate when all those orders can be completed based on the hours available to your team.
- Open Current operations (Main menu> hover over Manufacturing > Custom operations).
- In the top-left corner of the screen, select the location you want to view operations for.
- Select either All planned or Ready to start to view the operations in each status.
- For any operation, you can optionally select Estimate completion date, then fill in the number of hours in the Capacity field. Based on the estimated labor hours, inFlow will calculate an estimated completion date for that specific operation in those orders.
- Click on an operation to view all of the manufacture orders that would need the operation to be completed. Click on the MO order number to open it in a new browser tab.
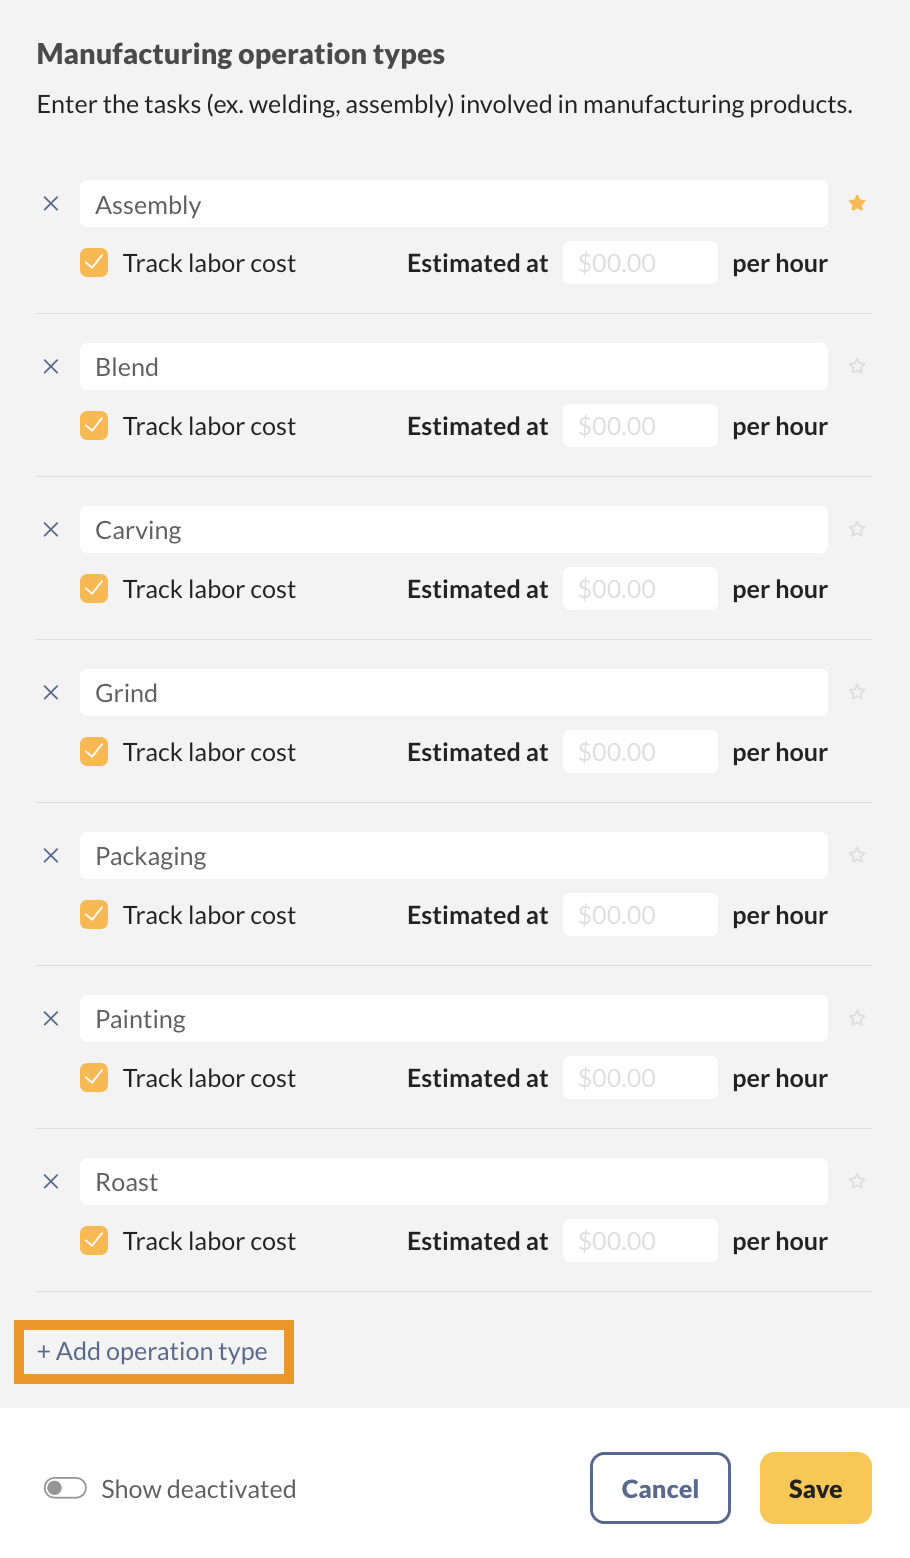
Manufacture operation types (Inventory settings)
If you want to add manufacturing operations outside the product bill of materials, you can do so directly in the Inventory settings.
- Go to the Inventory settings (Main Menu, hover over the Settings icon, then click on Inventory).
- Click on Manufacturing operations.
- Select Add operation type, then enter the operation name. Track labor cost is selected by default. You can set an estimated labor cost per hour by entering the amount in the per hour field. Whenever that operation is added to a bill of materials, this amount will automatically fill in the estimated hourly rate.
- If you’re not tracking hourly labor, deselect Track labor cost. The per-unit cost can still be entered in the operations on the product bill of materials.
- Click Save when done.
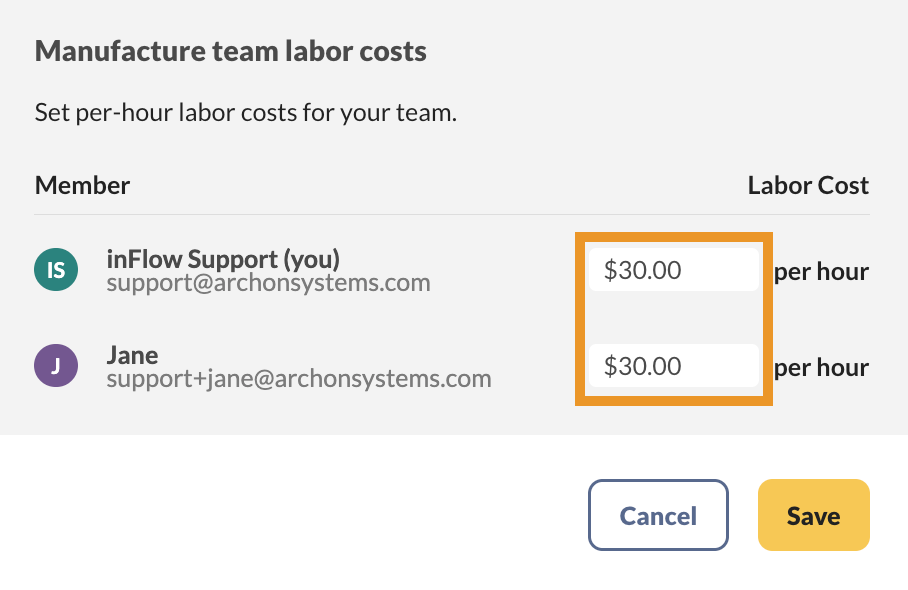
Setting team member labor rates
You can set the labor cost per team member, and this will override the estimated labor cost per hour on a manufacture order when that team member completes an operation. This setting is only available to admins.
- Go to the inFlow Team settings (Main Menu, hover over the Settings icon, then click on Team).
- Click on Manufacture team labor costs.
- Enter the hourly rate in the per hour field.
- Click Save when done.
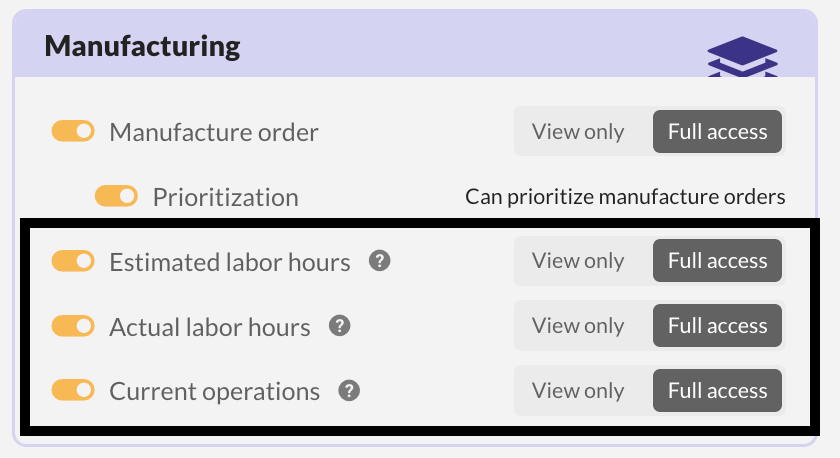
Access rights for production management
Admins in inFlow can manage access rights for every team member.
If someone no longer needs editing capabilities, you can toggle the feature off or choose View only.
Production management reports
The reports below are useful for monitoring labor timesheets and identifying discrepancies between completed operations.
Operation timesheet report
This report provides a list of manufacturing operation timesheets to analyze labor productivity history. Click here to generate the Operation timesheet report.
Operation variance
This report shows the variance between the actual and expected labor and other costs for manufacturing order operations. Click here to generate the Operation variance report.
 Yes, thanks!
  Not really

0 Comments