Label printing with inFlow (DYMO, Zebra, Brother & more)
Barcoding your products is a fantastic way to keep your inventory organized! With inFlow’s Label Designer, creating labels for your products has never been easier. We’re here to help with all your label printing needs!
With inFlow’s Label Designer, you can easily create and print labels using your preferred label printer. Take a look at the tabs below to begin!
Overview
Label printing full setup video
Check out this video for a guide on how to set up inFlow label printing.
Label printing overview
To print labels in inFlow, you’ll need to complete three main steps:
- Designing labels – using the inFlow Label Designer.
- Installing the inFlow Print Helper. Necessary on at least one computer per inFlow account.
- Printing the labels – from purchase orders, manufacture orders, and more.
Before you start
Take a moment to check out the list below to make sure you’re all set to set up label printing with inFlow.
Which computer should you use?
- A computer connected to the label printer with a wired or with a wifi connection.
- A computer that is always on but won’t go into sleep mode during the workday.
System requirements
- Windows 10 and higher
- Mac OS 11 and higher
After setting up label printing on one computer, you can print labels from other computers that use the same inFlow account.
When your team wants to print labels, it is essential that the computer with the label printing setup is not only on but also logged into inFlow.
This means other computers on the same inFlow account won’t need to do the setup to print labels.
Printer recommendations
Most label printers will work with inFlow label printing. If you already have a printer, try it out to see if it’ll work with inFlow’s label printing feature.
We recommend thermal label printers because they print more quickly than traditional ink printers. You can also print onto sticky labels that you can easily apply to your products, saving you time.
If you are looking for a printer, we’ve tested the following:
- inFlow Portable Printer
- Brother QL-1110WB – Wireless label printing
- Zebra GK420D – Fast wireless label printing
- DYMO 550 – Entry-level option
- DYMO 450
Printing inFlow Labels with Brother printers is only compatible with Windows computers.
Designing labels
Creating a label template
Let’s start by creating the label in inFlow. You can use inFlow’s built-in label designer to customize the label to your liking.
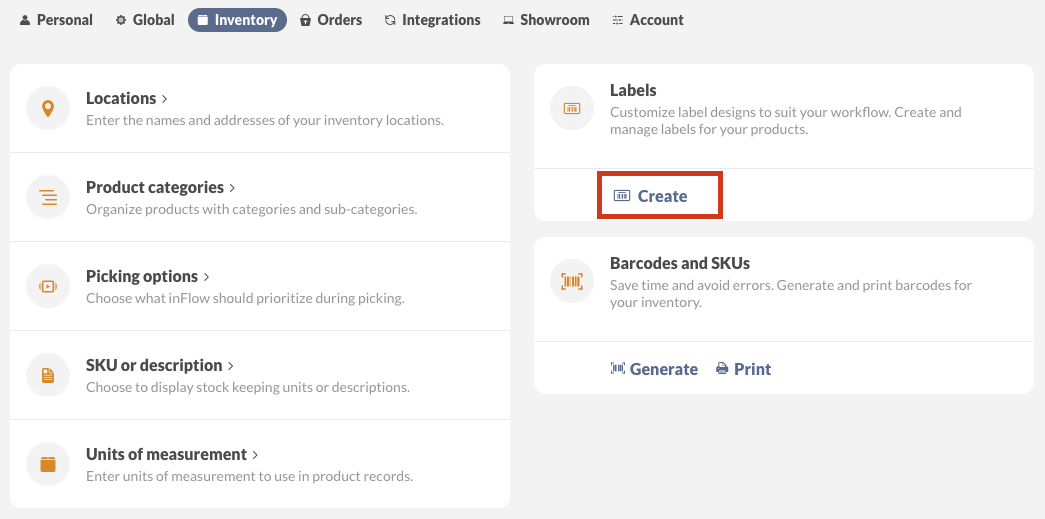
- Go to inFlow’s Inventory settings (Main Menu>Options>Inventory).
- Under Labels, click on Create.
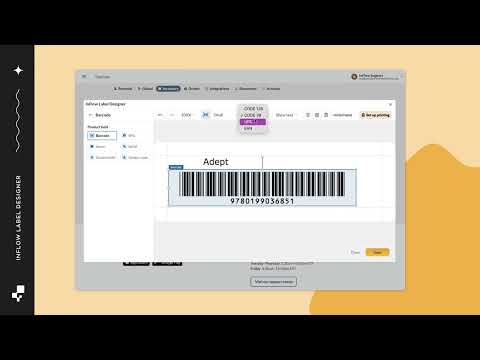
How to customize a label template
The inFlow Label designer is the first step to printing labels in inFlow. You can either select a pre-made template to begin with or create a label from scratch..
Note: When adding more than one product field to the label, deselect the element you added before selecting a new one. Otherwise, you’ll replace it!
- Select a blank or a pre-made template. You can customize pre-made templates in the inFlow Label Designer.
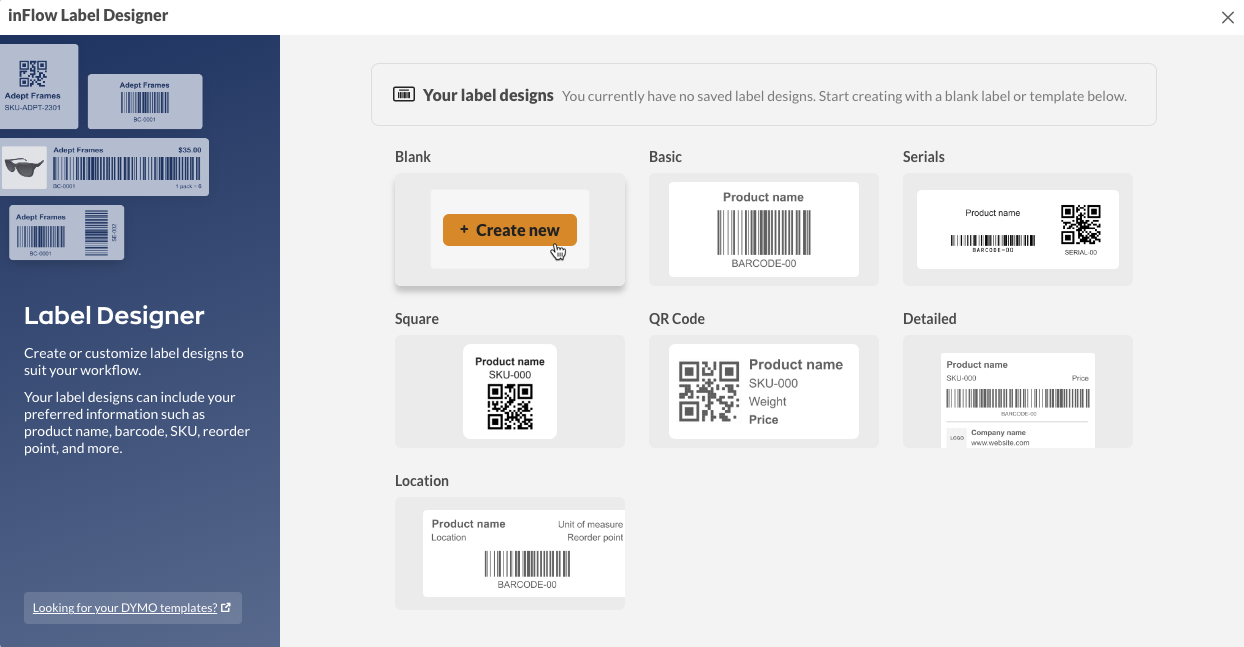
- For blank templates, enter the width and height of the label. Please check your label paper size for the exact size you need.
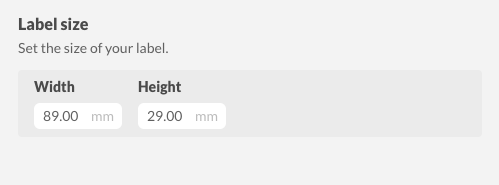
Note: The label measurement units are based on the Dimension and weight settings that are set in inFlow.
- The Elements section has product details you can add to the template design. Click on any of them to add the element to the label.
- Rename the label from Untitled Label to the name of your choice. Click Save when done. If your account creates multiple labels, keep in mind that all label names need to be unique.
When you create a label, we recommend that you use the product preview to test how multiple labels will look. This is especially helpful for making sure longer product names or descriptions fit into the label design.
When your label is complete, you can set up the label printer to connect to inFlow with the inFlow Print Helper. Click on the Setup tab in this article to continue.
Label elements & product fields
See the tables below for detailed explanations of product fields you can add to labels, along with any available options.
Things to keep in mind
- You can adjust the size of all fields. When you see them in red, the information in the field is too small for the chosen size. When you adjust the size, and the field says “release to preview,” you’ve found a size that will work.
- For all fields, you can adjust the alignment for where they should be on your label.
- You can click the duplicate button on any product field you select. This will create a copy of the field with the same settings.
- The Preview product drop-down menu is for you to preview what the label will look like with specific products. This is helpful if you have products with a longer name, so you can test the template without having to print it out first.
- If you make a mistake, you can click on the undo button on the Label Designer.
Label element/field breakdown
| Product field | Function | ||
|---|---|---|---|
| Text | This product field element pulls text-based information from the product record. This includes: -Product name -SKU -Description -Serial -Custom field -Price* -Location -Sublocation -Category -Barcode -Unit of measure (UoM)* -Dimensions* -Reordering* -Vendor info -Remarks -Free-form custom text * Additional options are available when you select these product fields. |
| Product field | Function | ||
|---|---|---|---|
| Barcode | You can add a barcode to the label template. Barcodes are available in the following formats: -Code 128 -Code 39 -UPC EAN You can add the following product fields as barcodes: -Barcode -SKU -Product name -Serial number -Custom field -Vendor code You can adjust the barcode with the size drop-down menu. Use Hide text or Show text to toggle on the text beneath the barcode. |
| Product field | Function | ||
|---|---|---|---|
| QR Code | This generates a QR code for your label. You can set the QR code to a link, or you can have the QR code load text. You can add the following product fields as QR codes: -Free-form link or text -BarcodeSKU -Product name -Serial number -Custom field -Vendor code -Description If Showroom is enabled: -Product link -Showroom link |
| Product field | Function | ||
|---|---|---|---|
| Image | This field adds the default product image or an image of your choice to your label. Images will be in black and white, as most label printers don’t have color printing options. Under Free-form, you can upload an image from the label. This image will remain on the label, whereas the product image will change based on the default image on each product. |
| Product field | Function | ||
|---|---|---|---|
| Shape | This field is where you can add the following basic shapes to your label: -Straight line -Circle -Square Each shape can be re-sized and stretched by clicking and dragging the anchors. |
Other customization options
| Product field | Function | ||
|---|---|---|---|
| Size | The Size section is where you can control the physical size of the label template. Be sure to refer to the label dimensions for your printer. You can change the size of the label at any time for both blank and ready-made templates. Click on the W or H to add new measurements. |
| Product field | Function | ||
|---|---|---|---|
| Margins | In Margins, you can change the printing area of the label. As you make a change to the margins, you will see the dotted line move with your changes. The label margins are a guide to help you add the label elements within the safe area of the label. These margins aren’t printed on the final label. If you prefer to hide the margins, you can un-check Show margins. You can adjust the margins if you’d like or disable them from view altogether. |
Reordering product fields
- The reorder product fields are also related to the location settings in inFlow.
- When printing labels from a stocked product, the reorder point and reorder quantity will show the amounts for the product’s default location or the inFlow user’s default location.
Location product fields
The location printed on the design can change depending on a few different factors.
- The inFlow default location settings.
- Your inFlow account default location settings.
- The location is on a manufacture order. (The work order location if the products haven’t been put away or the put-away location of the product.)
- The location on a purchase order. (The order location if the products haven’t been received or the received location of the products.)
Sublocation product fields
How does the Label designer know which sublocation to use? This depends on where you are printing the label from. Assuming your label design has a sublocation on it:
| Where are you printing the label from? | Top-to-bottom priority |
|---|---|
| Product | Non/serialized products Serialized products |
| Purchase order | Top-to-bottom priority |
| Current stock | Top-to-bottom priority |
| Manufacture order | Top-to-bottom priority |
IPH Setup
Now that you’ve made your label, it’s time to connect your label printer with inFlow. You can do this by installing the inFlow Print Helper (IPH).
Which computer needs to install the inFlow Print Helper?
Before you set up, you’ll need to consider which computer you should install the inFlow Print Helper (IPH) on.
Install the IPH on at least one computer that will always connect to your label printer and inFlow. It’s also best if this computer is set not to go into sleep mode after a short time.
Not all computers that use inFlow need to install the inFlow print helper. Your team can install the Print Helper on only one computer. Other computers using the same inFlow account can print labels as long as one computer has the IPH installed, is running, is logged into inFlow, and is connected to your label printer.
Installing the inFlow Print Helper (Windows)
- From the Label Designer, click on the Set up printing button. (If a label has already been created, go to inFlow’s Inventory settings and select Printing and setup.)
- On the Setup tab, select Download for Windows. Select where on your computer to download the inFlow Print Helper file.
- Double-click on the file to start the installation process.
- When done the inFlow print helper will be run in the background on your computer.
- Right-click on the inFlow Print helper in the system tray then select Log In.


- Enter your inFlow credentials. If you’re already logged into inFlow, you’ll see a “Logged in successfully!” message and can close that window.
- If you want the inFlow Print Helper to launch when your computer starts, right-click on the inFlow Print Helper in the System tray and select Launch at login.
- You can confirm that inFlow is ready to print labels by going to inFlow’s Inventory settings > Printing and setup.
With your label all done and inFlow print helper installed, you’re ready to start printing labels. Click on the Printing labels tab to continue.
Installing the inFlow Print Helper (Mac)
- From the Label Designer, click on the Set up printer button. (If a label has already been created, go to inFlow’s Inventory settings and select Printing and setup.)
- Click on Download for Mac.
- Save the file to your computer.
- Double-click on the file, and drag the inFlow Print Helper to the Applications folder.

- Open the Applications folder, and double-click on the inFlow Print Helper.
- You may get a warning that the inFlow Print helper was downloaded from the internet. Click the Open button to continue.

- The inFlow icon will be loading on your computer’s menu bar.
- Right-click on the inFlow icon and select Log in.
- In a browser window, you’ll get a confirmation message that the print helper has been installed.
- Click the Log in using browser button.
- In a new window, the inFlow login page will open. Log in to your inFlow account.
- A window will load saying Logged in successfully! You can close this window and return to inFlow.
- If you want the inFlow Print Helper to launch when your computer starts, right-click on the inFlow Print Helper in the Menu bar and select Launch at login.


Note: The inFlow print helper will continue to run in the background in the menu bar. You can check the connection status, or close the print helper by right-clicking on the inFlow icon.
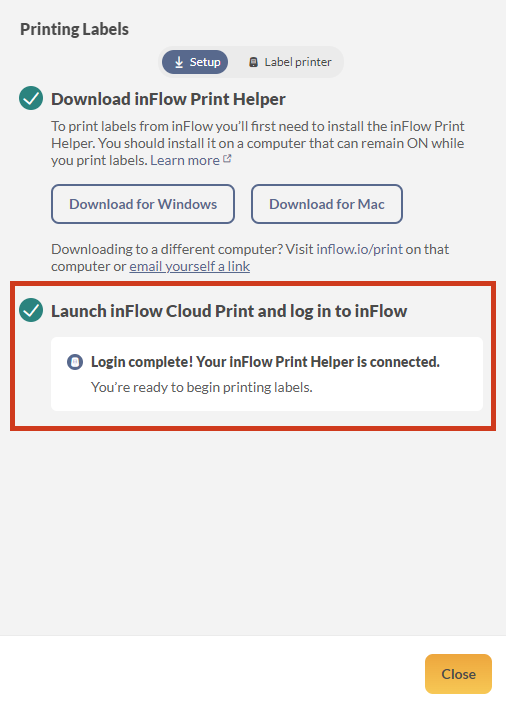
When you return to inFlow, the inFlow Print setup page will say that the inFlow print helper is connected. Click Close to continue.

Now return to the inFlow Designer to print a test label, or continue to the Print labels tab of this article for how you can print labels.
Web
There are several screens in inFlow from which you can print labels. See below for more details.
Note: If more than one computer downloads the IPH, the print labels window will show all printers connected to every computer with the IPH installed.
In inFlow, you can print labels from the following sections:
inFlow Designer
The Designer can be used to print test labels.
- Go to https://app.inflowinventory.com/options/inventory (Main Menu> Options> Inventory tab)
- Click on Manage labels
- Select a label from the Your labels area or a pre-made template.
- Select a product from the Preview product drop-down.
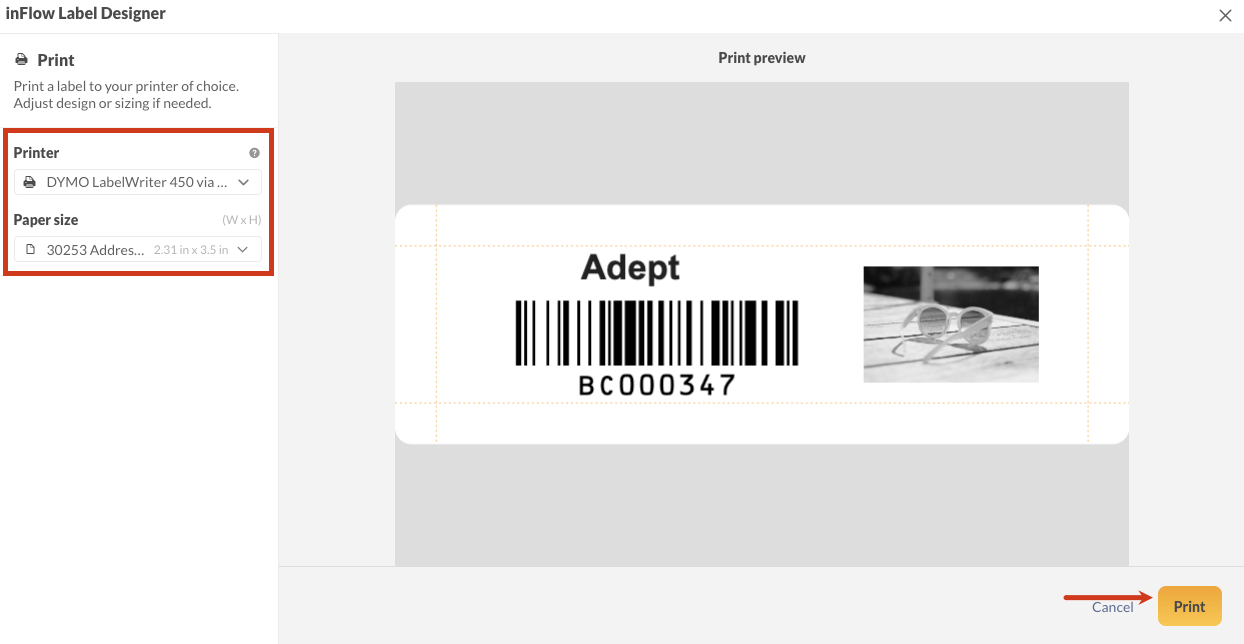
- Then click Print.
- Choose the Printer and Paper size that matches your label design, then click Print.
Note: The measurement units in the Paper size drop-down menu may not match the measurements that are setup in inFlow. The measurement units are set by the printer manufacturer, and there isn’t an option to change theses units.
Product records
- Navigate to a product record (Main Menu>Product list).
- Click on a product.
- Click on Print labels.
- Choose the Printer and Paper size that matches your label design, then click Print.

If more than one computer downloads the IPH, the print labels window will show all printers connected to every computer with the IPH installed.
Manufacture orders
- Open a Manufacture order. (Main Menu > Manufacture order list > Select a manufacture order from the list)
- Click on Print > Labels.
- Choose the products you want to print labels for. You can toggle on Show Finished items or Show Components to print labels.
- Select the label design, printer, and paper size that match your label design, then click Print.
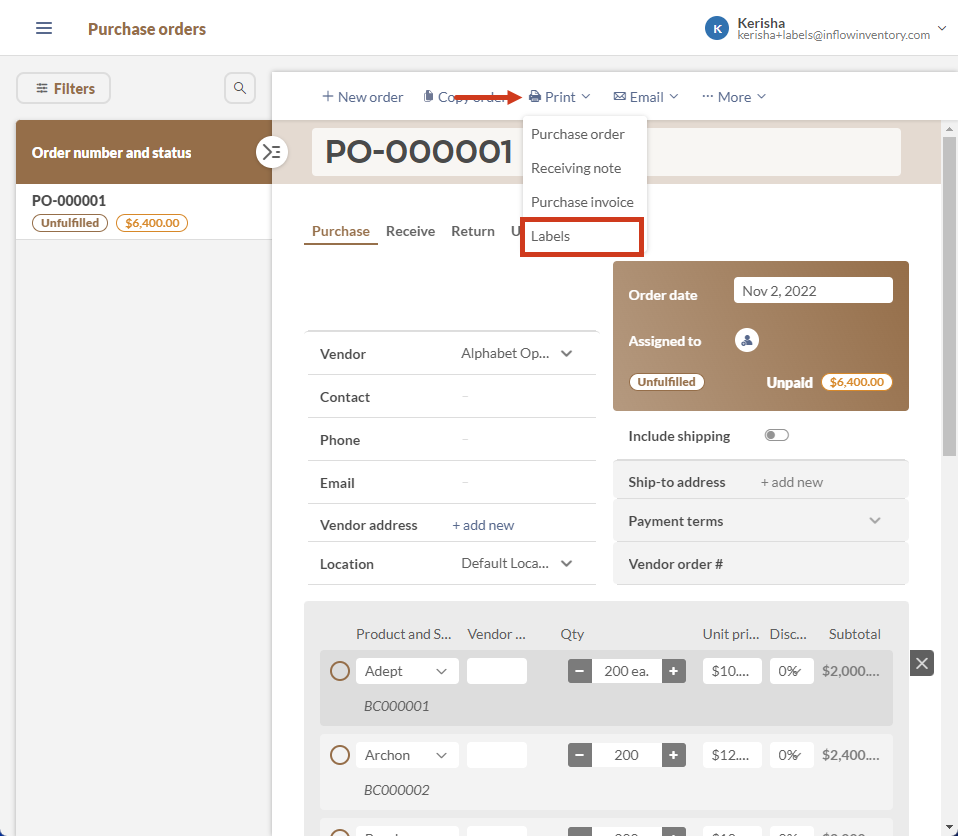
Purchase orders
- Open a purchase order (Main Menu> Purchase order list).
- Click on Print, then select Labels.
- Choose the products you want to print labels for and select the Printer and Paper size that matches your label design, then click Print.
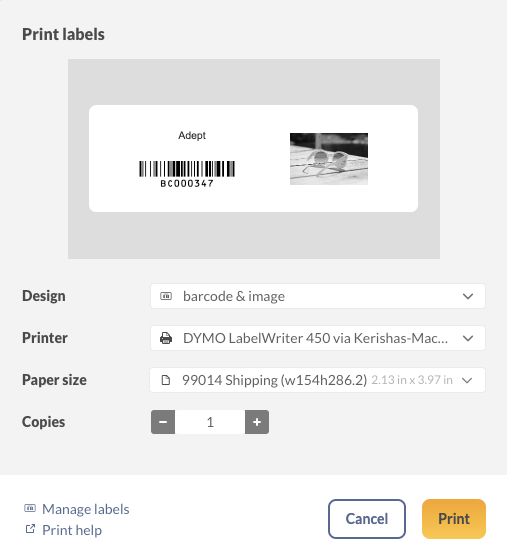
Print Labels options
| Design | In the Design drop-down menu, you can select the label template you want to print. |
| Printer | The Printer field will load the label printer that is connected to inFlow. You can print from any of the printers that are in this drop-down menu. |
| Paper size | The Paper size will load the size that was last used when you printed the label. |
| Copies | This is where you can select how many labels you want to print. You can press the arrow buttons or type in the amount you want to print. |
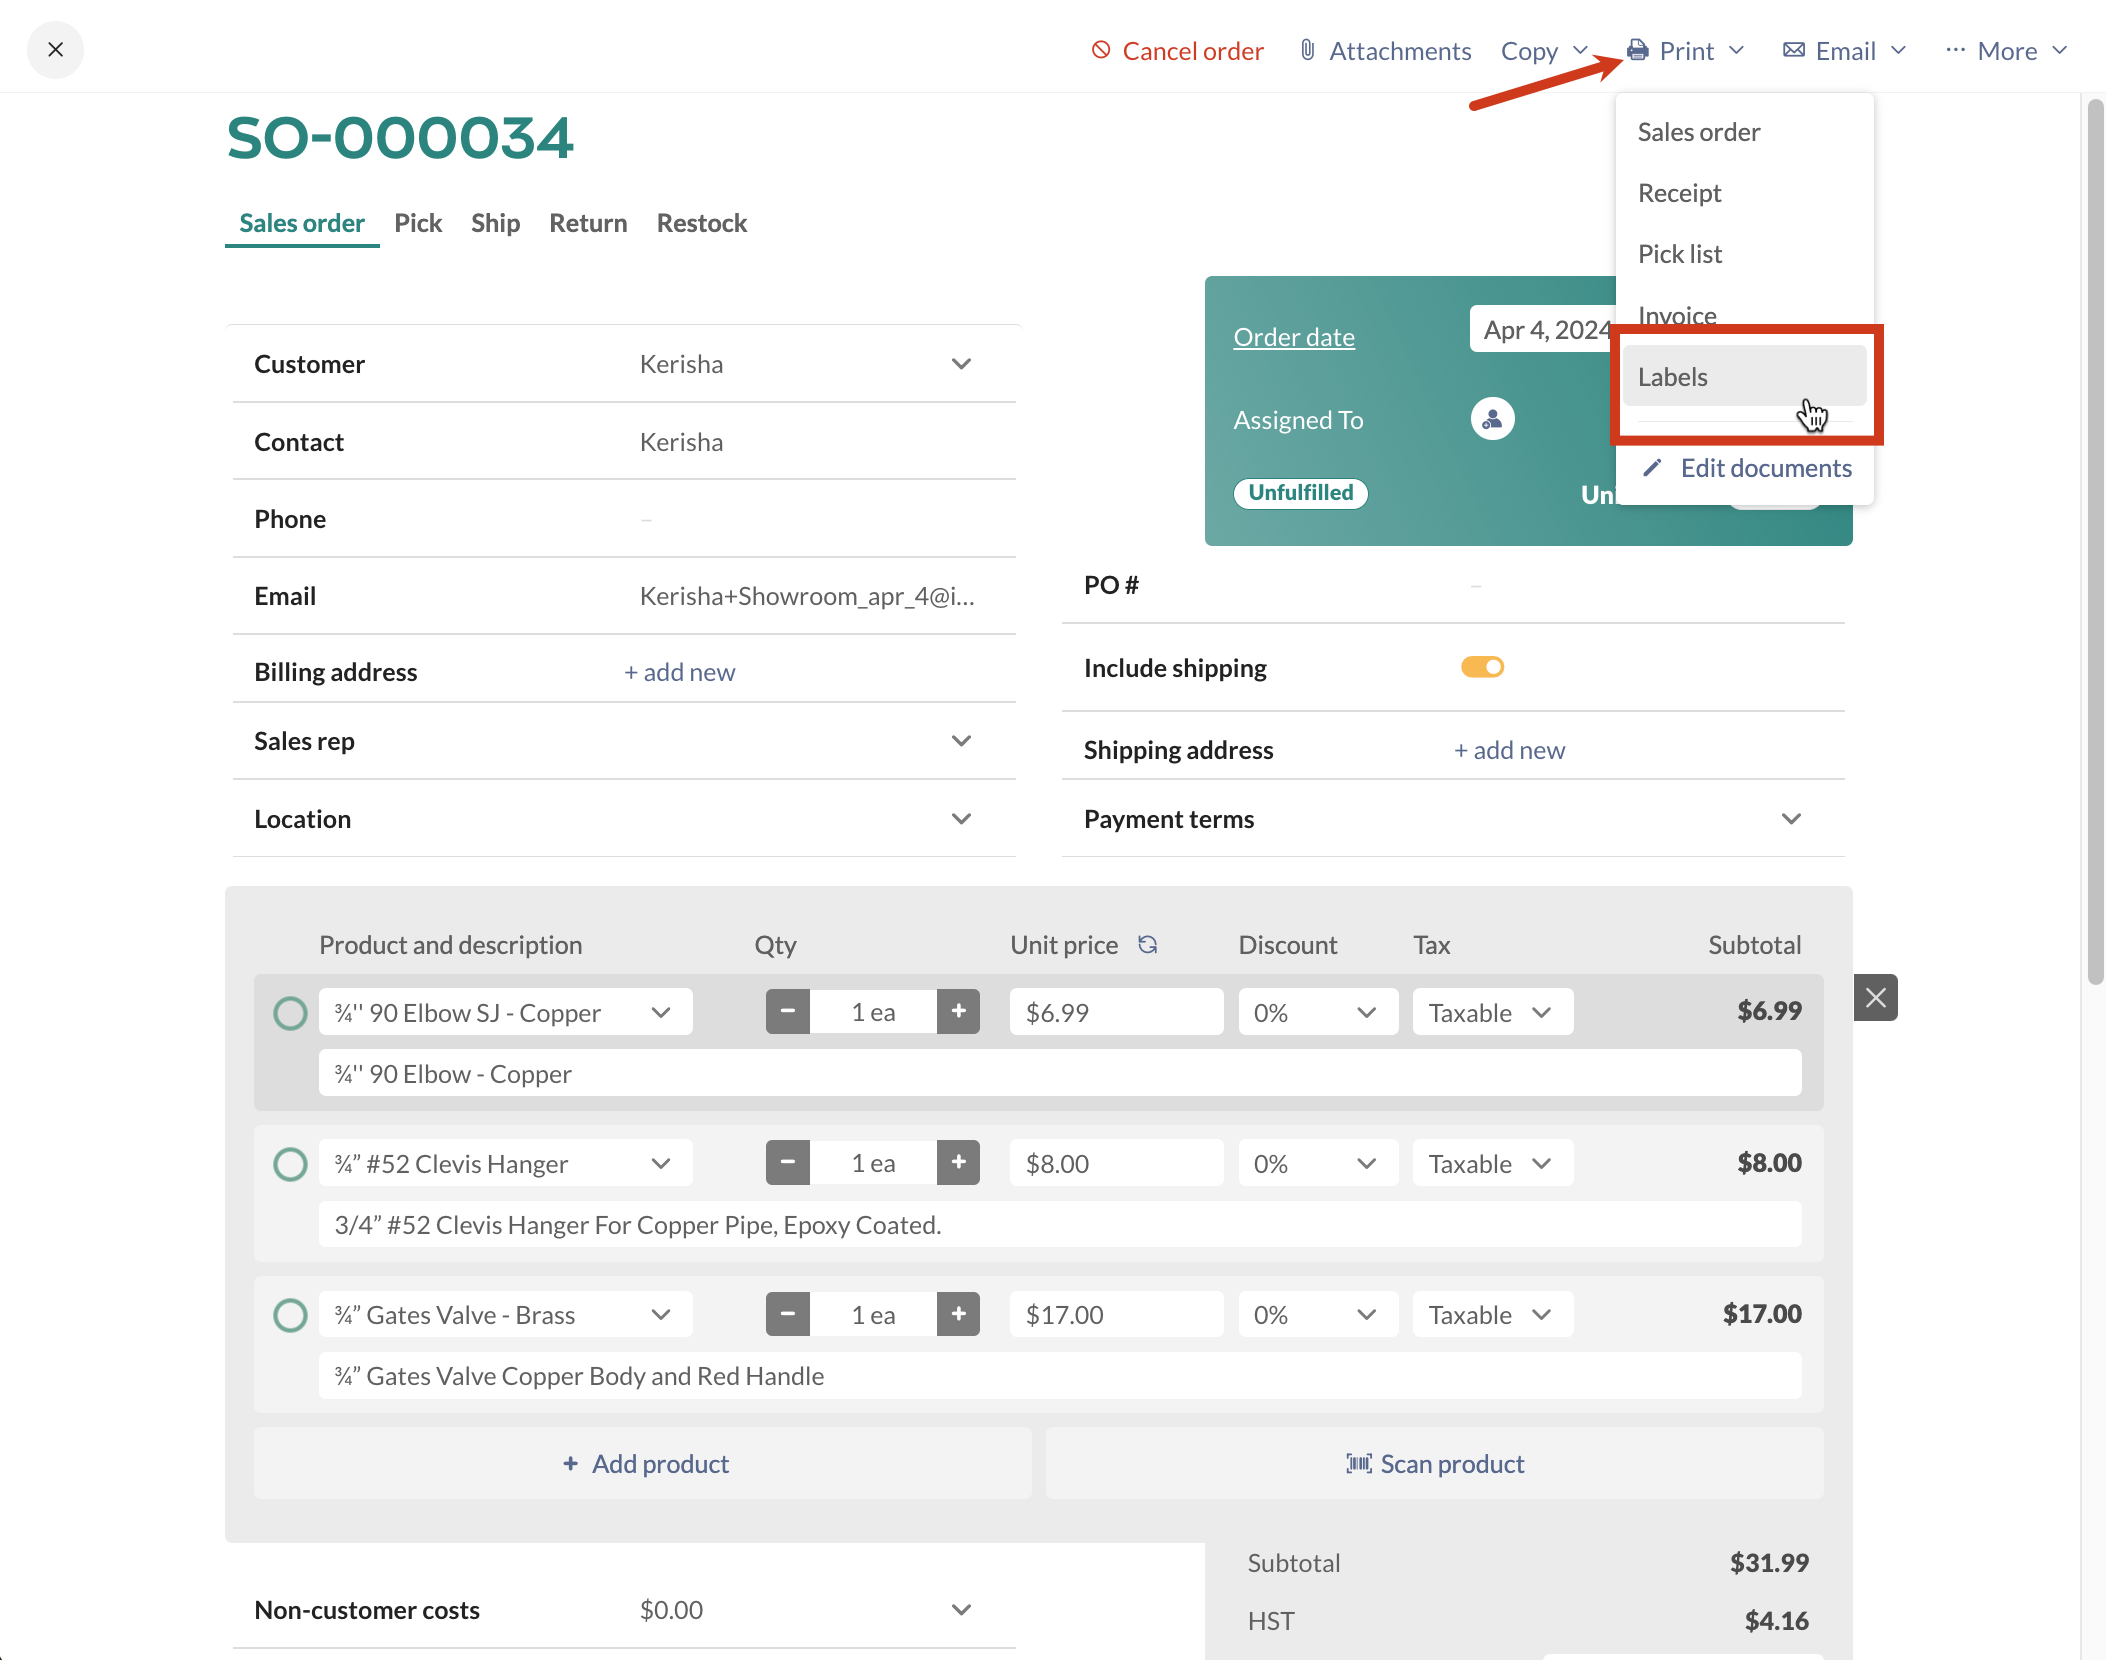
Sales orders
- Navigate to a sales order (Main Menu> Sales order list).
- Click on Print, then select Labels.
- Choose the products you want to print labels for, select the printer and paper size that match your label design, and then click Print.
What else can I customize in inFlow?
In inFlow, you can customize different areas to meet your team’s needs.
Customizable inFlow features
- Rename fields: Rename most of inFlow’s fields to a term of your choice.
- Change order numbers: Change order prefixes.
- Custom fields: Track additional data with custom fields.
- Document Designer: Create and customize sales and purchasing documents.
- Email Designer: Create email templates based on different inFlow features.
Windows
There are several screens in inFlow from which you can print labels. See below for more details.
Product records
- Navigate to a product record (Main Menu> Inventory > Product list).
- Click on a product.
- Click on Label > Make label.
- Choose the Printer and Paper size that matches your label design, then click Print.
Note: The measurement units in the Paper size drop-down menu may not match the measurements that are setup in inFlow. The measurement units are set by the printer manufacturer, and there isn’t an option to change theses units.

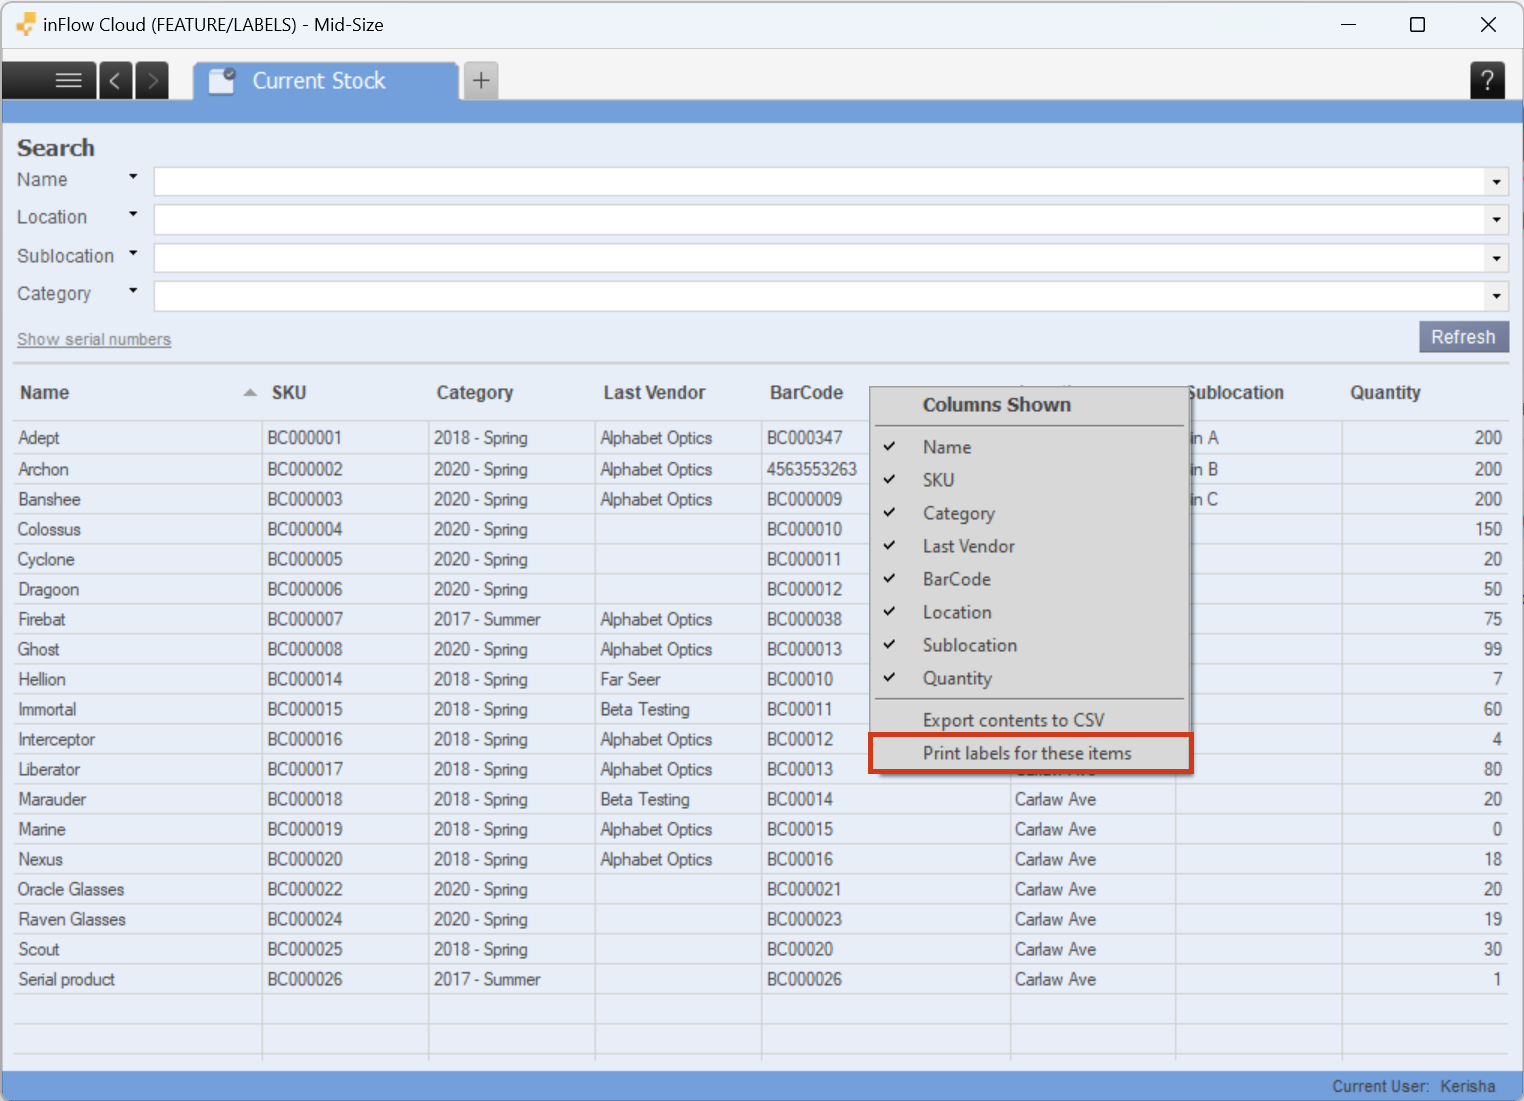
Current Stock
- Navigate to the Current Stock screen. (Main Menu > Inventory > Current Stock)
- In the product table, right-click in the heading section.
- Then select Print labels for these items. The number of labels ready to print will match the quantity of the products on the Current Stock screen.
- Choose the products you want to print labels for and select the Printer and Paper size that matches your label design, then click Print.

Manufacture orders
- Open a Manufacture order. (Main Menu > Inventory> Manufacture Order > Select a manufacture order from the list)
- Click on Labels > Make Labels.
- Choose the products you want to print labels for and select the Printer and Paper size that matches your label design, then click Print.

Purchase orders
- Open a purchase order. (Main Menu > Purchasing > Purchase Order List > Select a purchase order from the list)
- Click on Labels > Make Labels.
- Choose the products you want to print labels for and select the Printer and Paper size that matches your label design, then click Print.

Print Labels options
| Design | In the Design drop-down menu is where you can select the label design you want to print. |
| Printer | The Printer field will load the label printer that is connected to inFlow. You can print from any of the printers that are in this drop-down menu. |
| Paper size | The Paper size will load the label design that was last used. |
| Copies | This is where you can select how many labels you want to print. You can press the arrow buttons or type in the amount you want to print. |
Mobile
There are several screens in inFlow from which you can print labels. See below for more details.
Note: If more than one computer downloads the IPH, the print labels window will show all printers connected to every computer with the IPH installed.
Before you print from the mobile app
To print from the mobile app, you’ll have to make sure the previous steps have been completed:
- Have you saved a label using the inFlow Label designer?
- Is the inFlow print helper installed on a computer connected to a label printer?
If the above points are all done, then you’re ready to print from the inFlow mobile app. You can print labels from the following sections:
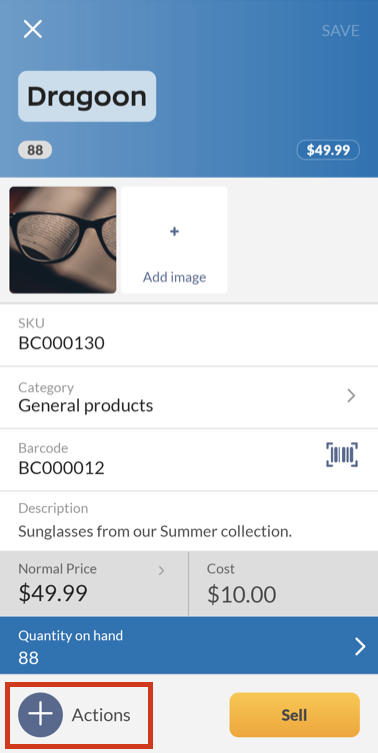
Product records
- Navigate to a product record (Main Menu>Product list).
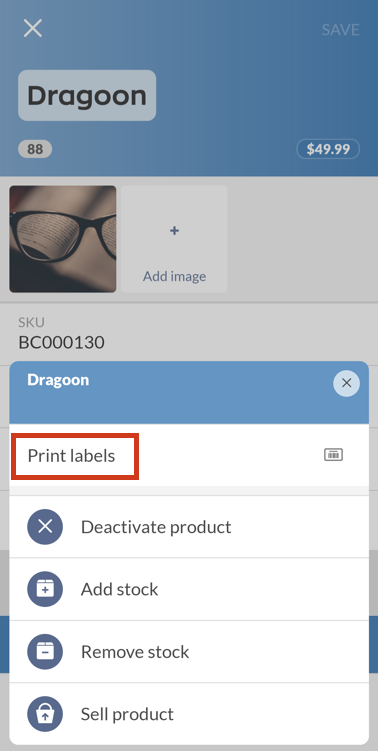
- Tap on Actions.
- Tap on Print labels.
- Under Label design select the product label you want to print.
- Select the printer you want to print from and the paper size that matches your label design.
- Choose how many copies of the label you want to print.
- When done, tap on Print labels.

Product list long-press shortcut
When on the product list, you can press and hold on to a product to launch the Action menu.
- From the product list, tap and hold a product until the Action menu loads.
- Tap on Print labels. inFlow will print one product label based on the last used settings.
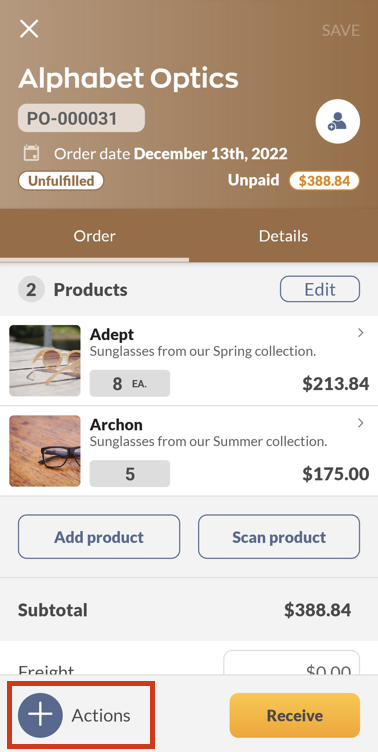
Purchase orders
- Navigate to a Purchase order (Main Menu>Purchase orders).
- Tap on a Purchase order.
- Tap on Actions.
- Tap on Print labels.
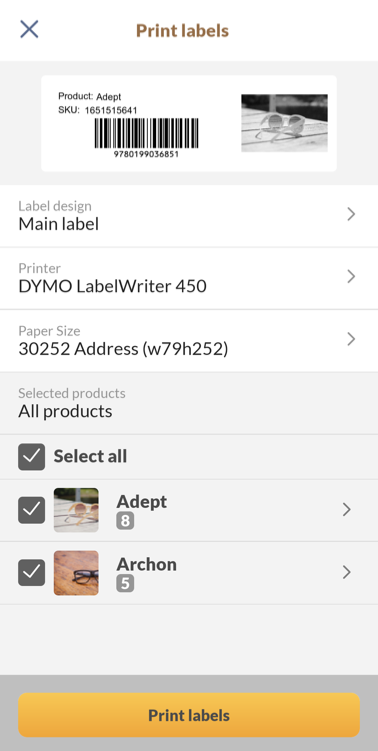
- Under Label design select the product label you want to print. Then select the printer and paper size that matches your label,
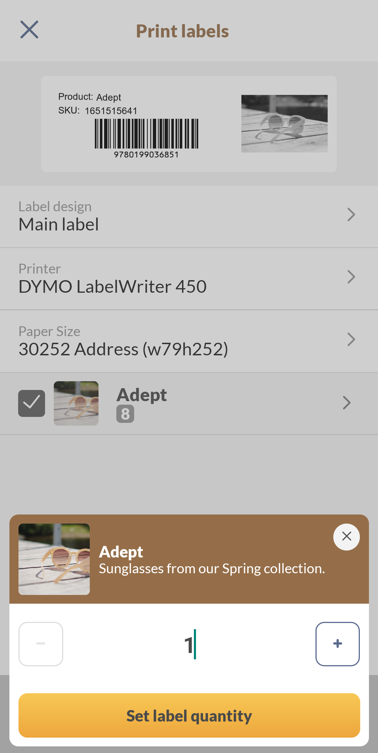
- Select which products you want to print labels for. Tap on each product to edit how many copies you want to print.
When done, click on Print labels.
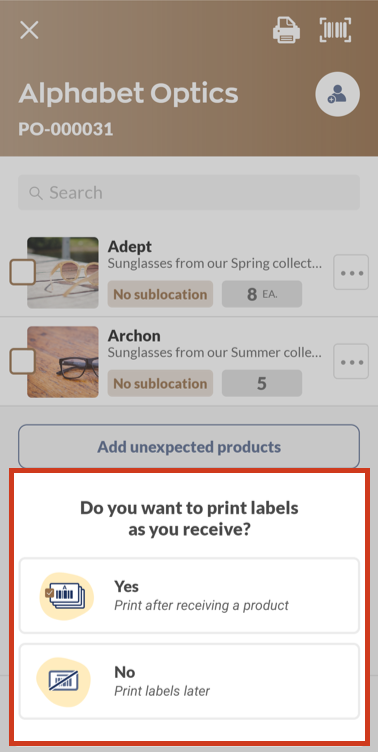
The mobile app has a dedicated feature that only allows you to receive purchase orders. This is great for those on your team whose main focus is on receiving inventory.
- From the homepage, scroll down and tap on Receive purchase orders.
- Tap on a purchase order.
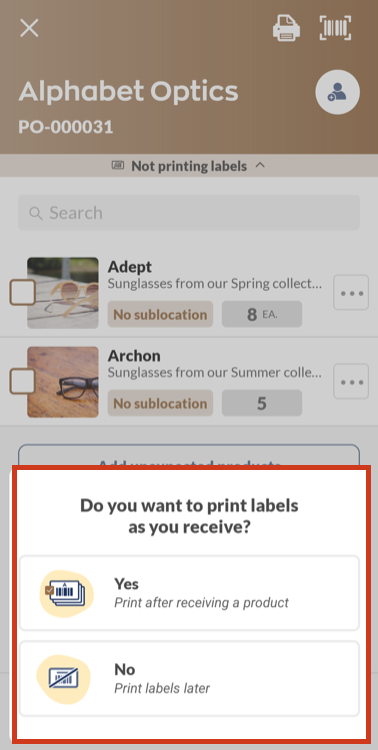
- If it’s your first time receiving the order, you’ll see a pop-up asking Do you want to print labels as you receive? Select Yes to print them as you receive each product or No to print labels another time.
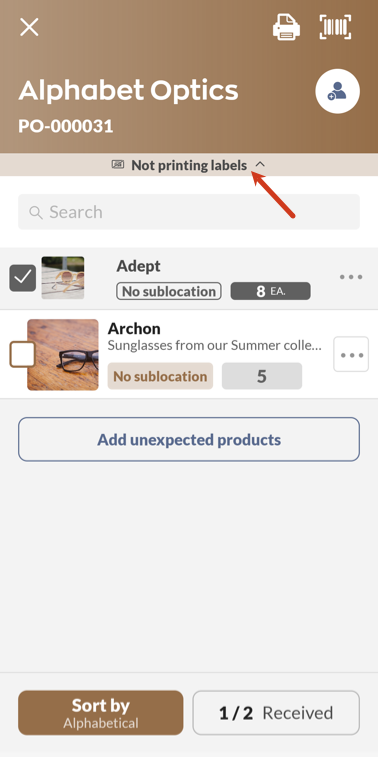
- Continue receiving products on the purchase order.
Printing labels as you receive
Not printing labels as you receive
Print Labels options
| Design | In the Design drop-down menu is where you can select the label design you want to print. |
| Printer | The Printer field will load the label printer that is connected to inFlow. You can print from any of the printers that are in this drop-down menu. |
| Paper size | The Paper size will load the label design that was last used. |
| Copies | The Design drop-down menu is where you can select the label design you want to print. |
Troubleshooting / FAQ
inFlow isn’t able to print labels
- Is inFlow the Print Helper installed on the computer connected to the label printer? If not, you can download and install the inFlow print helper by clicking on Printing and setup from the Inventory settings.
Areas to check:
- If the IPH was installed, check if it’s running and logged into inFlow.
- Is the computer running IPH and connected to the printer and the internet?
- Is the printer turned on?
- Is the IPH running more than once?
- Is your wired or wifi printer connected to the computer with IPH installed? Check your computer’s printer settings to make sure it’s online.
- Check that the IPH is updated.
IPH or printer error? (Windows only)
When troubleshooting label printing issues, it’s important to determine whether the problem lies with the inFlow Print Helper (IPH) or the label printer. You can test this by saving or printing the label as a PDF file.
- Open the label printing window in inFlow.
- Select Print to PDF or Save as PDF as your printer.
If you can save the label as a PDF file, this indicates that there is likely an issue with your label printer.
If you’re unable to save the label as a PDF file, this indicates an issue with the inFlow Print Helper. We recommend reinstalling the IPH or following any of the steps listed below.
If the IPH says Connection pending or isn’t running
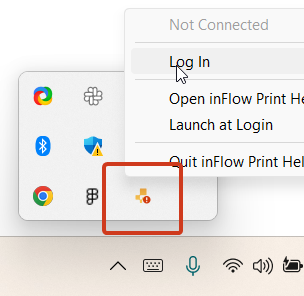
- On your computer, search for “inFlow Print Helper” without the quotes and open the program.
- You should see the inFlow symbol in the System tray (Windows) or Menu bar (Mac) when it’s running.
- Right-click on it and select Log in. If needed, log in to your inFlow account again.
- Refresh inFlow, and try to print the labels again.

Trouble logging in
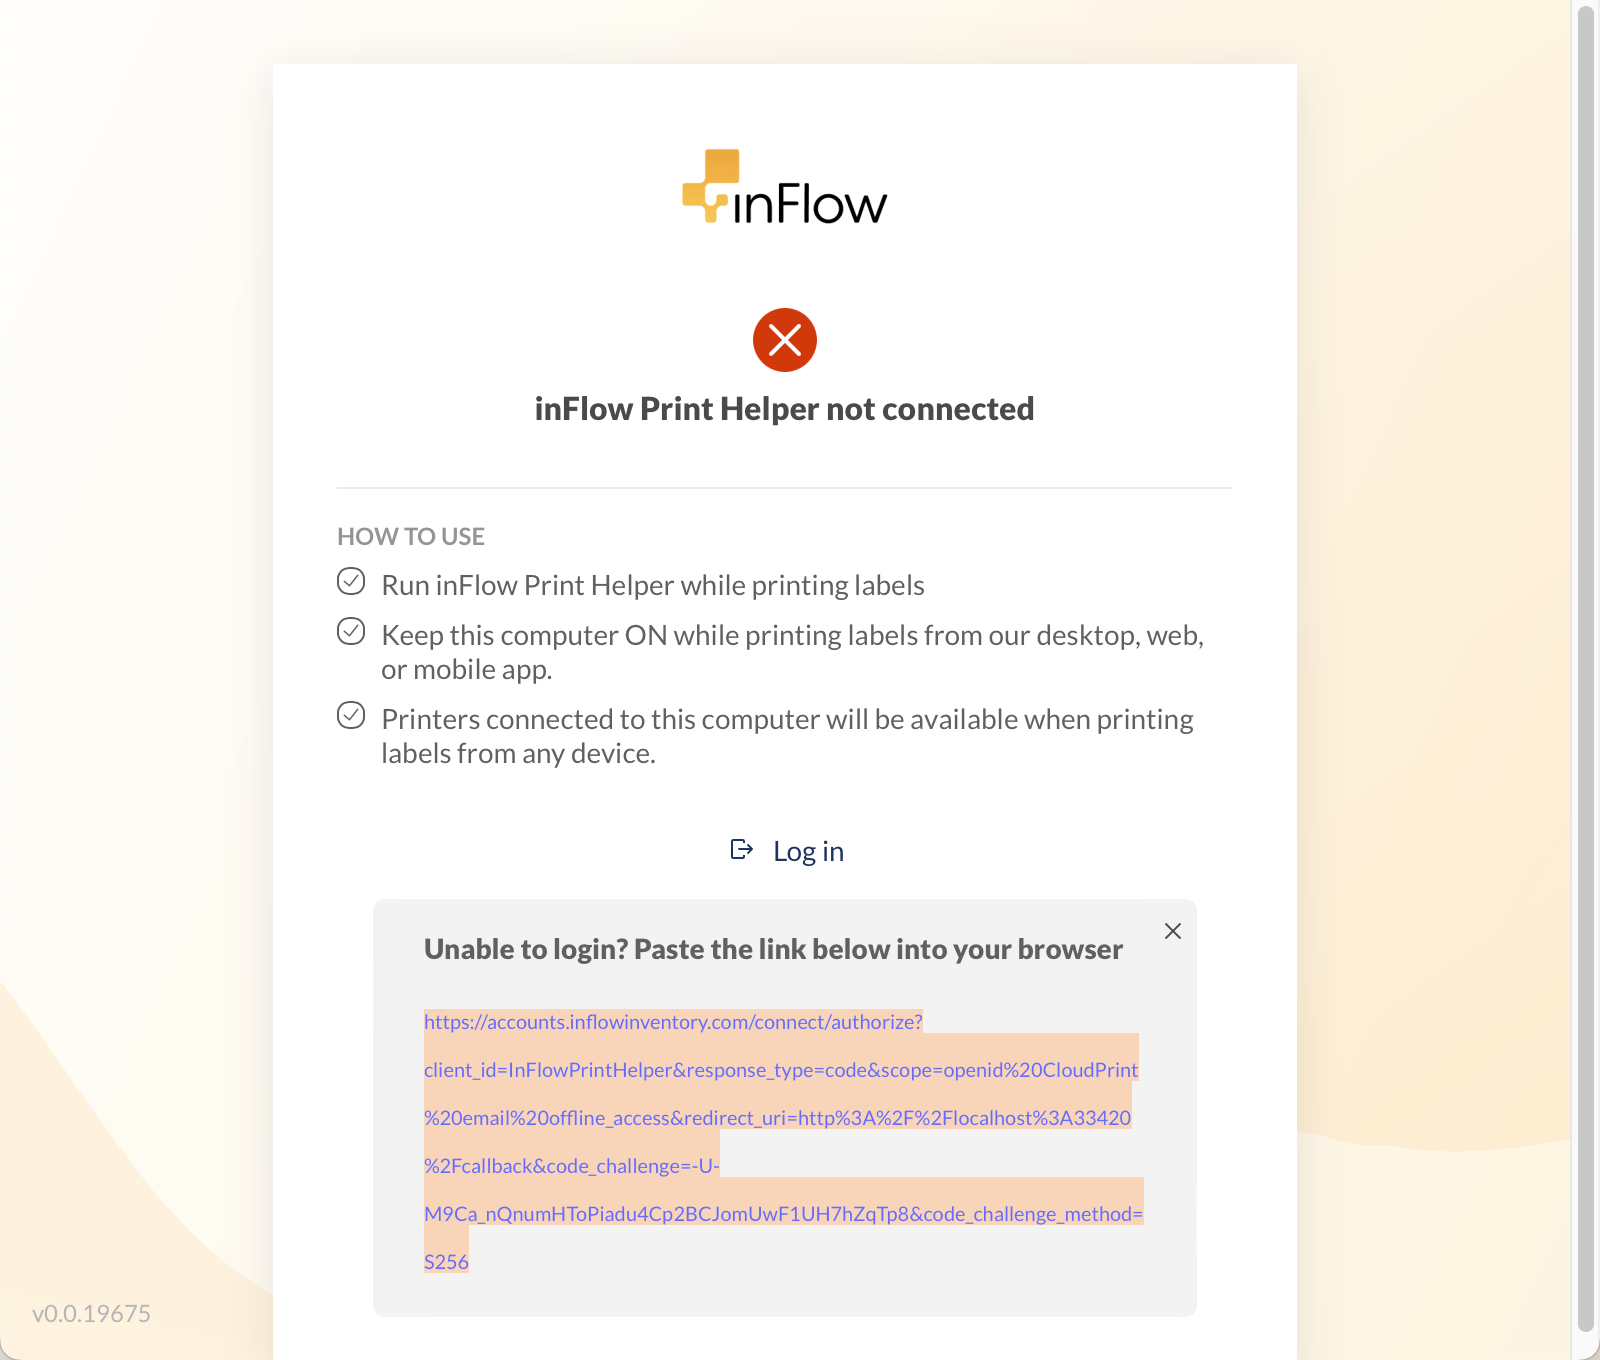
Computers with more security measures installed may have trouble when the inFlow Print Helper needs to open a new browser tab to complete the login steps. If that’s the case, see the steps below.
- From your Windows system tray or Mac menu bar, right-click on the inFlow Print Helper and select Open inFlow Print Helper.
- Select Log in. If a browser tab doesn’t open, select Having trouble logging in?
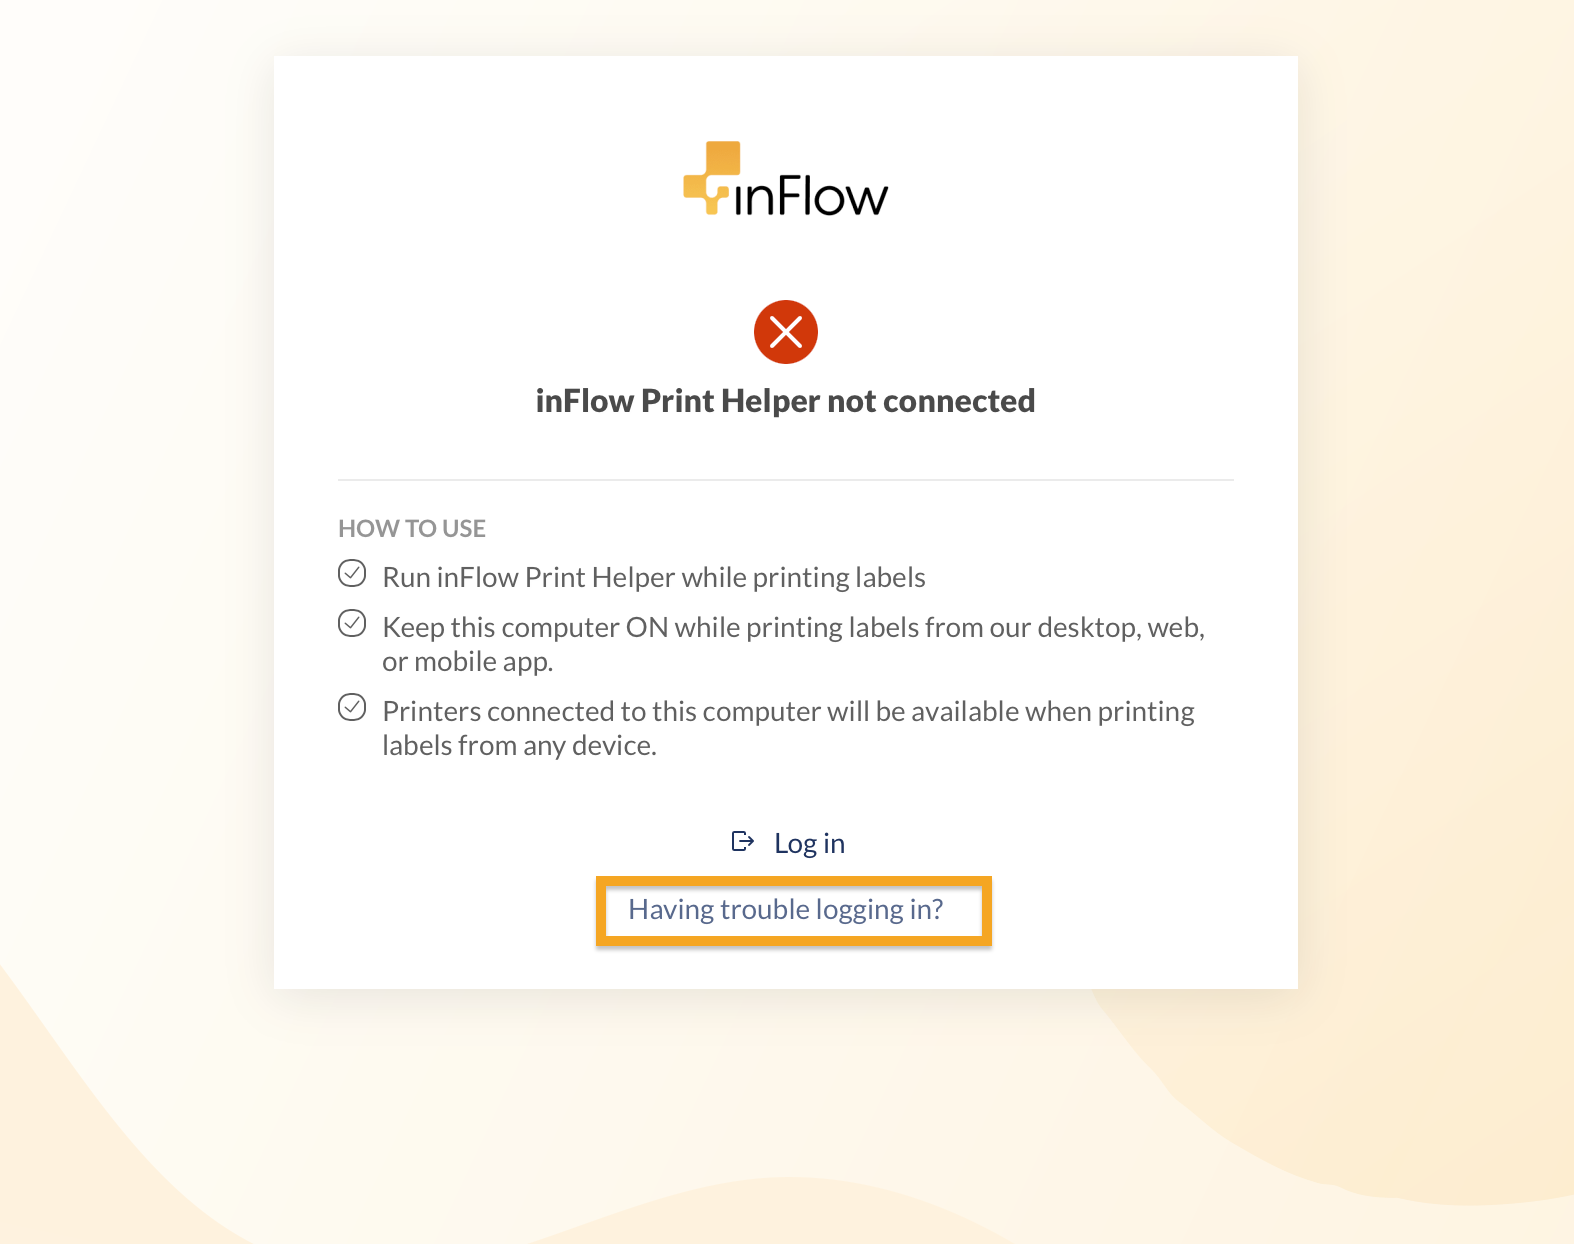
- You’ll see a link displayed below. Click and drag to highlight the link.
- Right-click on your mouse and select Copy.
- Open a new tab on your computer.
- Right-click on the address bar and select Paste.
- From here, you’ll be able to continue to the inFlow Print Helper login screen.
The IPH is running more than once
- Close inFlow (Windows or Web app).
- Take a look at your system tray. Right-click on all the instances of the IPH open in the system tray and select Quit inFlow Print Helper.
- Click on the start menu, or use the Windows button on your keyboard and type in “inFlow Print Helper” without quotes. Click on the application.
- This will open the IPH in the background. In the system tray, right-click on the IPH and select Log in.
- Log back into inFlow, and try to print the label again.
Unable to detect printers. Check the inFlow Print Helper connection
If you see this error, check that the inFlow Print Helper is running on the computer connected to a printer. Also, make sure it’s logged into inFlow.

If the inFlow Print Helper is running and logged in, and you still see this error, your computer may not detect your printer. To check this
- On your Windows or Mac computer, look for Printers & Scanners in your settings.
- If your printer isn’t listed, you’ll need to add your printer. Refer to your printer’s manufacturer for the latest driver software to install your printer.
- If the printer is listed on the Printers and Scanners screen but not connecting to inFlow, try unplugging your printer, turning it off, and then turning it back on before plugging it back into your computer.

Labels aren’t printing after you click on print
Check your Printer queue to see if there are any errors. Sometimes, you may have previous labels that had errors printing and block your printer until you clear your queue.
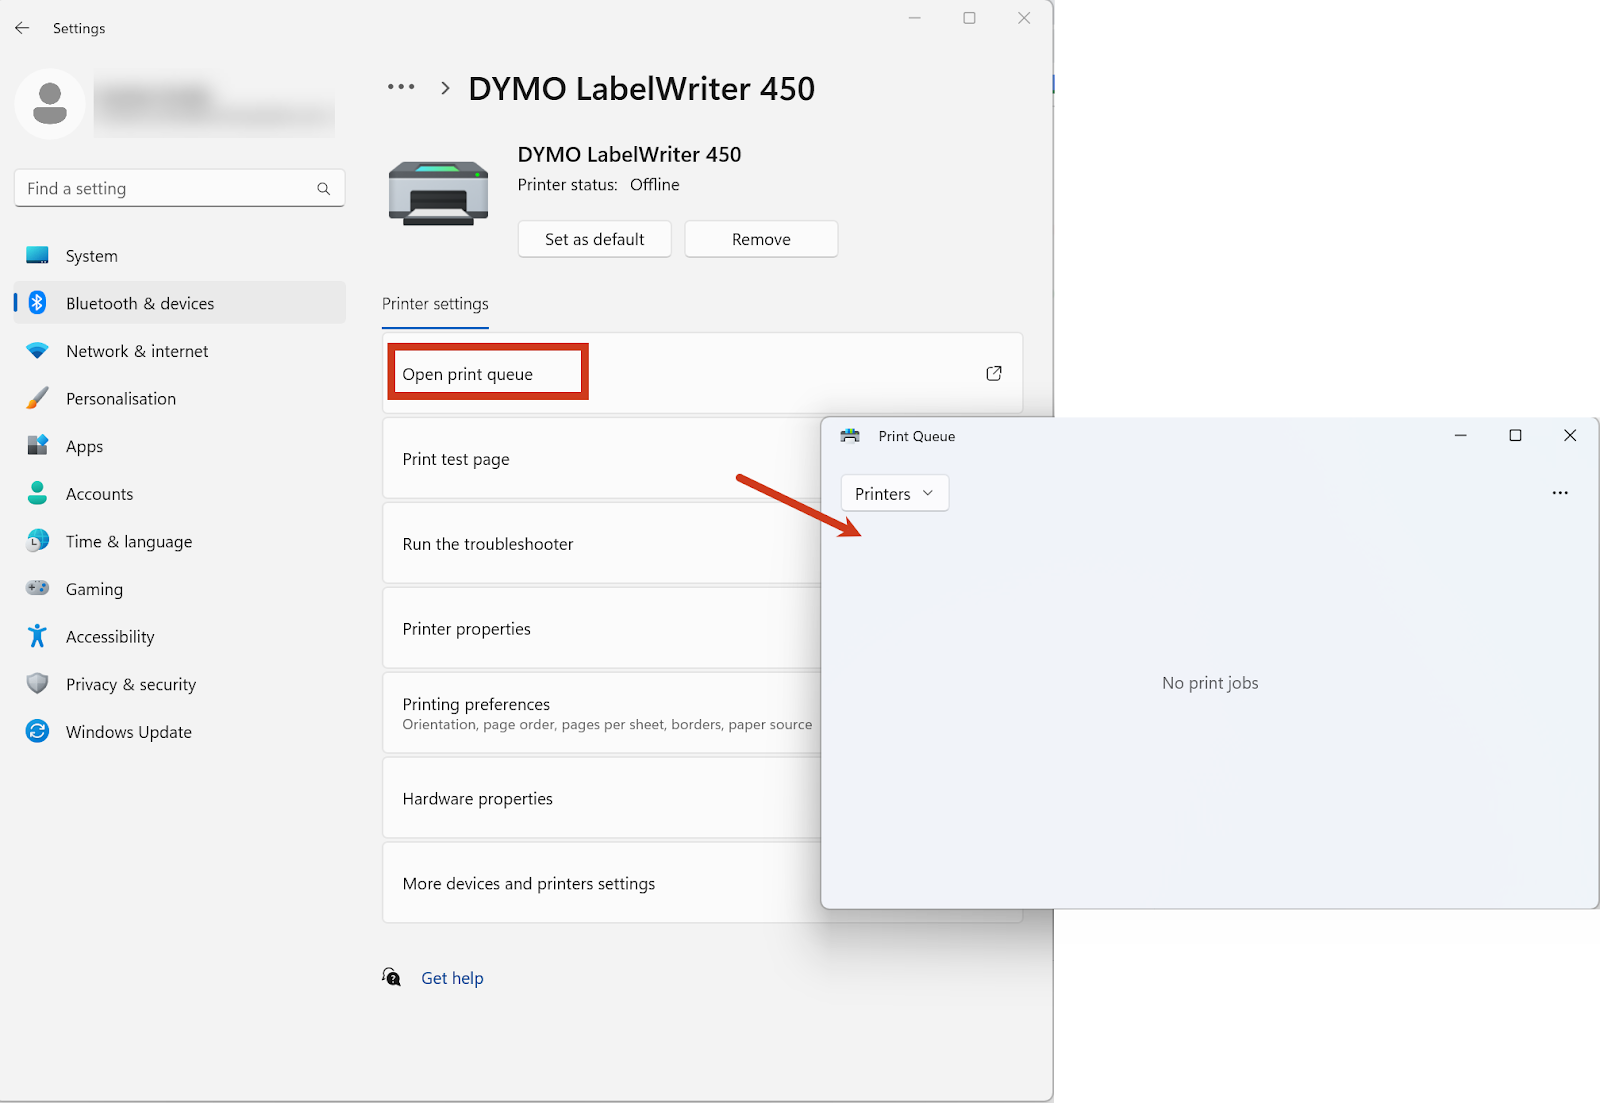
Windows
- From your Printers & Scanners, click on your printer.
- Click on Open Queue to view all of the print jobs.
- Each label that is waiting to be printed will be on a separate row. You can right-click on any row (or all) and click on Cancel to clear your queue.
Mac
- Go to Printers & Scanners, and click on your printer.
- Click on Print Queue to see all of your print jobs.
- Each label that is waiting to be printed will be on a separate row. You can right-click on any of them (or all) and click on or cancel to clear your queue.

Can I print labels in color?
The inFlow Label Designer is designed to print exclusively in black and white, to provide compatibility with the majority of label printers on the market.
Labels aren’t printing after the computer was left idle
If you use the inFlow Web app and your computer is idle for a little while, sometimes the connection will pause when there’s no activity. Refresh the page or try logging in to inFlow Print Helper again, and the connection should resume.
Labels are cutting off product information
If you’ve printed a label and noticed some of the information was cut off, we recommend adjusting the label design to make the text long enough to fit your product information.
If you see a product field with “…”, this means there’s more information in the field that will get cut off. Adjust the length and width of the text box so you can see all the product information on the label.
Use the Preview product drop-down to change the product that the inFlow Label Designer is showing. Look at multiple products to ensure all the product details fit your label design.
Labels look blurry from printing on a DYMO 450 (Windows only)
If you’re noticing that the text on your labels isn’t clear, you can adjust the print quality settings to see if that will improve the appearance.
Windows computer:
- Click on the start menu or press the Windows button on your keyboard.
- Type in “Printers and scanner” without quotation marks, and click on the app.
- Click on DYMO LabelWriter 450.
- Click on Printing Preferences, then select the Paper/Quality tab.
- Select Best, then click the Apply button.
- Go back to inFlow and print your label again

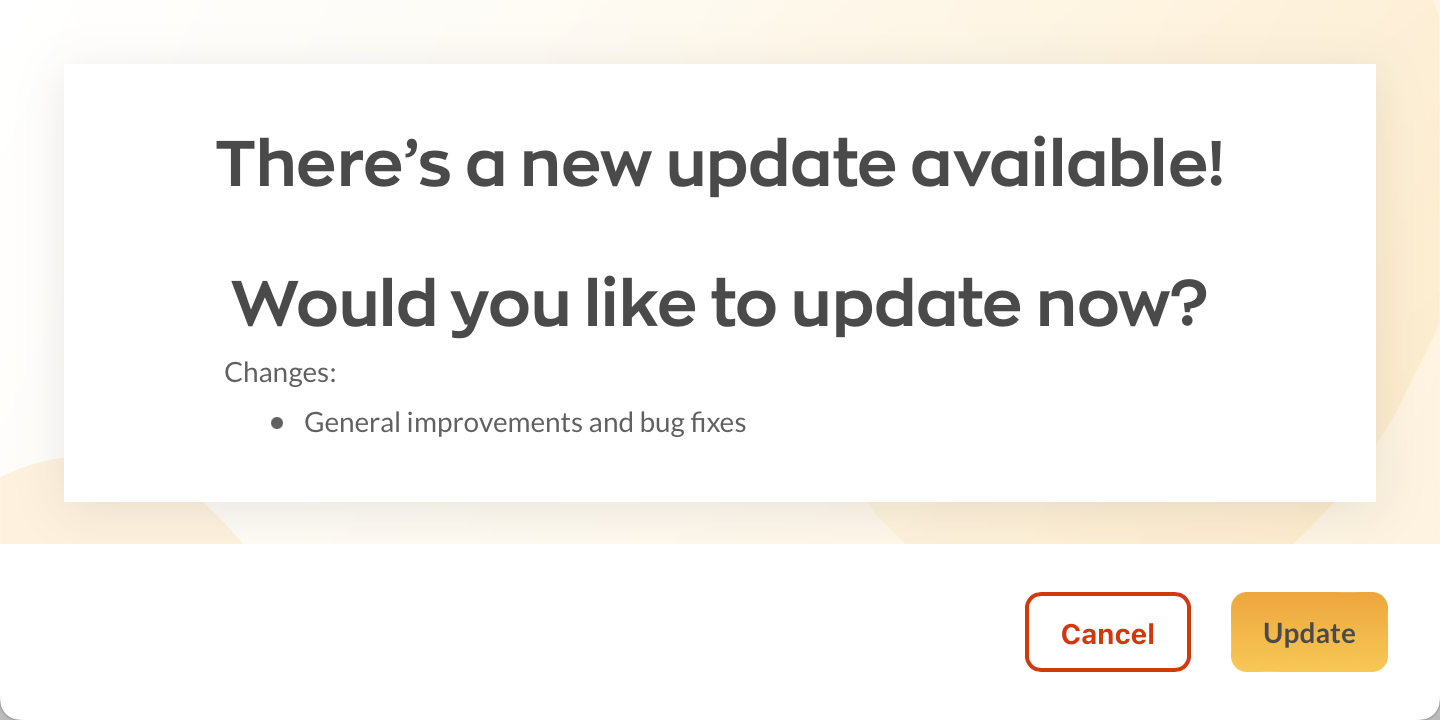
Updating the inFlow Print Helper
When the inFlow team releases updates, you can update the inFlow Print Helper by
- Right-clicking on the inFlow IPH symbol in the System tray (Windows) or Menu bar (Mac).
- Next, click on Update available.
- On the pop-up window, click on Update. Once the update is done, the IPH should start again.

The free-form text QR code isn’t working
If your QR codes are linked to plain text from the free-form field, it’s recommended that no more than 500 characters be added to this field in order to have the QR codes work correctly. If there’s too much data in the free-form field, the QR code won’t scan.
Label size does not match paper size
This warning appears if the length or width of the paper size you selected is smaller than your template design. This warning won’t prevent inFlow from printing a label. inFlow will resize the label to fit on your paper. Double-check the label to make sure it’s readable and that the barcodes are scannable.


0 Comments