How to create & manage products in inFlow
inFlow keeps track of products you buy from vendors, manufacture, and sell to customers. You can enter your products into inFlow one by one or import them in bulk if you have them in a spreadsheet.
Web
Creating new products
- From the Main Menu, hover over the Create button (plus icon), then select Products.
- Fill out the Product Name and select the corresponding Product type from the list below. If you’re unsure of what to pick, please take a look at the Product types section below.
- Click Create when done. You’ll be redirected to the product record, where you can add more information about the product.
Product types
Product types in inFlow determine whether your products have stock levels that need to be tracked (stocked products) or if they are fees/labor charges (services). This setting is required and is permanent for each item upon saving for the first time. There are four types:
- Stocked product: These are physical products that show exact quantities in each location and can be tracked in full.
- Enable serial tracking: These will also show exact quantities, but are specifically for products with a unique code per unit.
- Enable lot tracking (beta): These products track exact quantities, along with the lot/batch code and, optionally, an expiry date.
- Non-stocked product: These are products you would like to track but do not need to see quantities for (packing materials, boxes/cartons, paper, etc.).
- Service: These products are services and do not have quantities or locations attached to them.
Need to change your product type? See here for details.
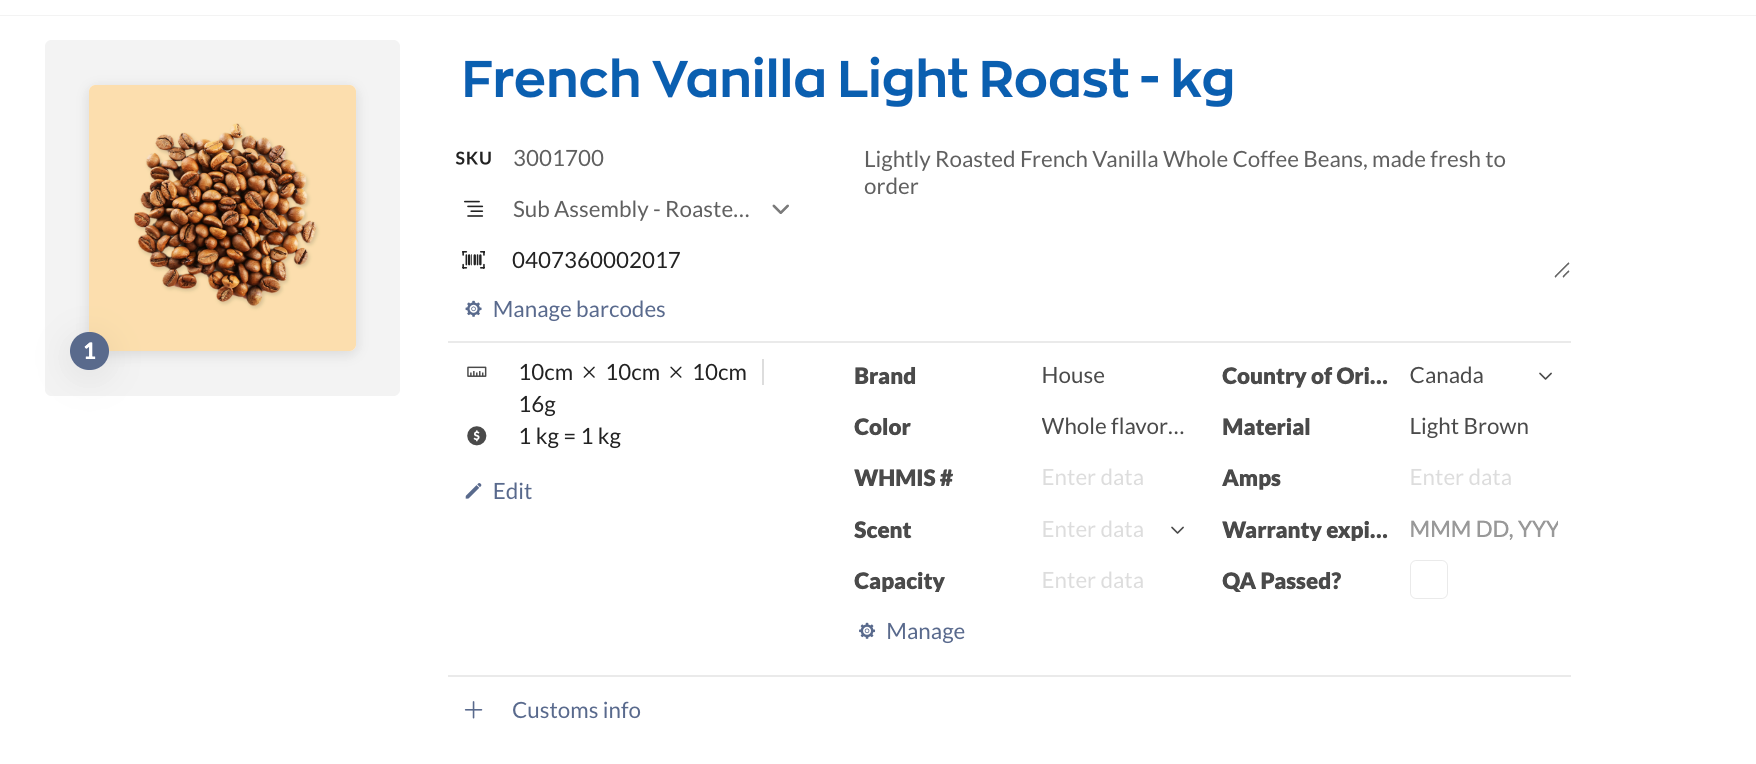
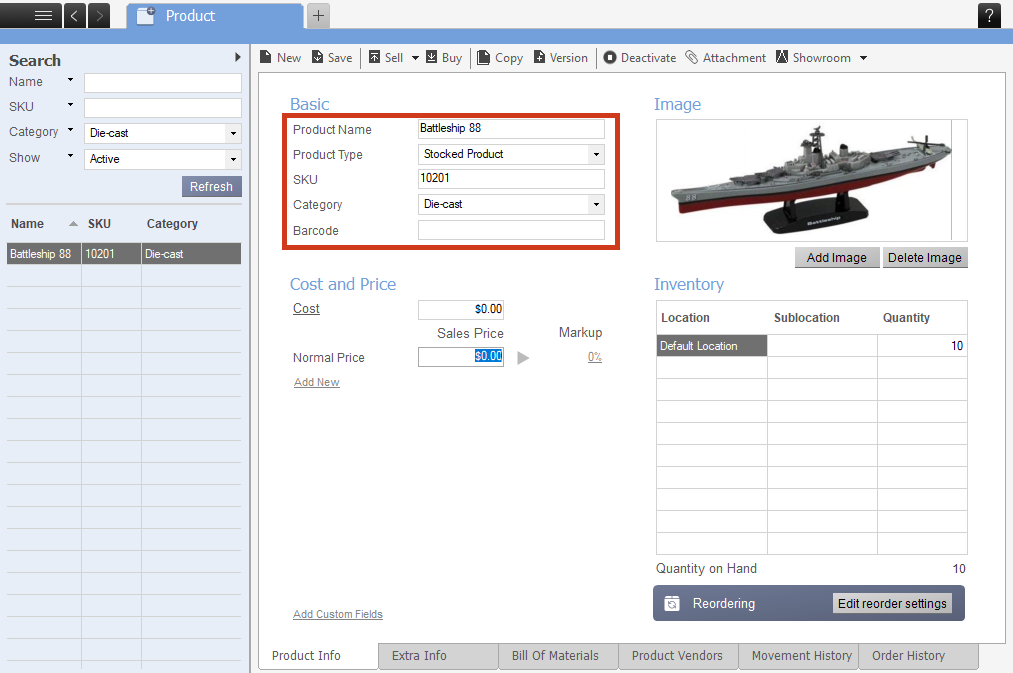
Product details
At the top right of the product record, you’ll find the Action bar. From here, you can deactivate the product, attach files, copy the product record, sell the product or print labels.
You’ll also see fields that let you add more details to your products, such as:
- Product image
- SKU
- Barcode
- Product measurements and units of measure
- Customs info (Country of origin & HS Code)
- Product description
- Customs fields (x10)
Overview tab
This tab shows your product and quantity information on the left and your selling prices and costs on the right.
Quantity & locations
By default, quantity on hand is displayed on the Quantity tile. To view the quantity available, click on on hand.
Under each location, there will be a quantity bar or quantity badge that shows the quantity in stock.
To see the additional quantities for specific or all locations, such as quantity picked or reserved, click View breakdown.
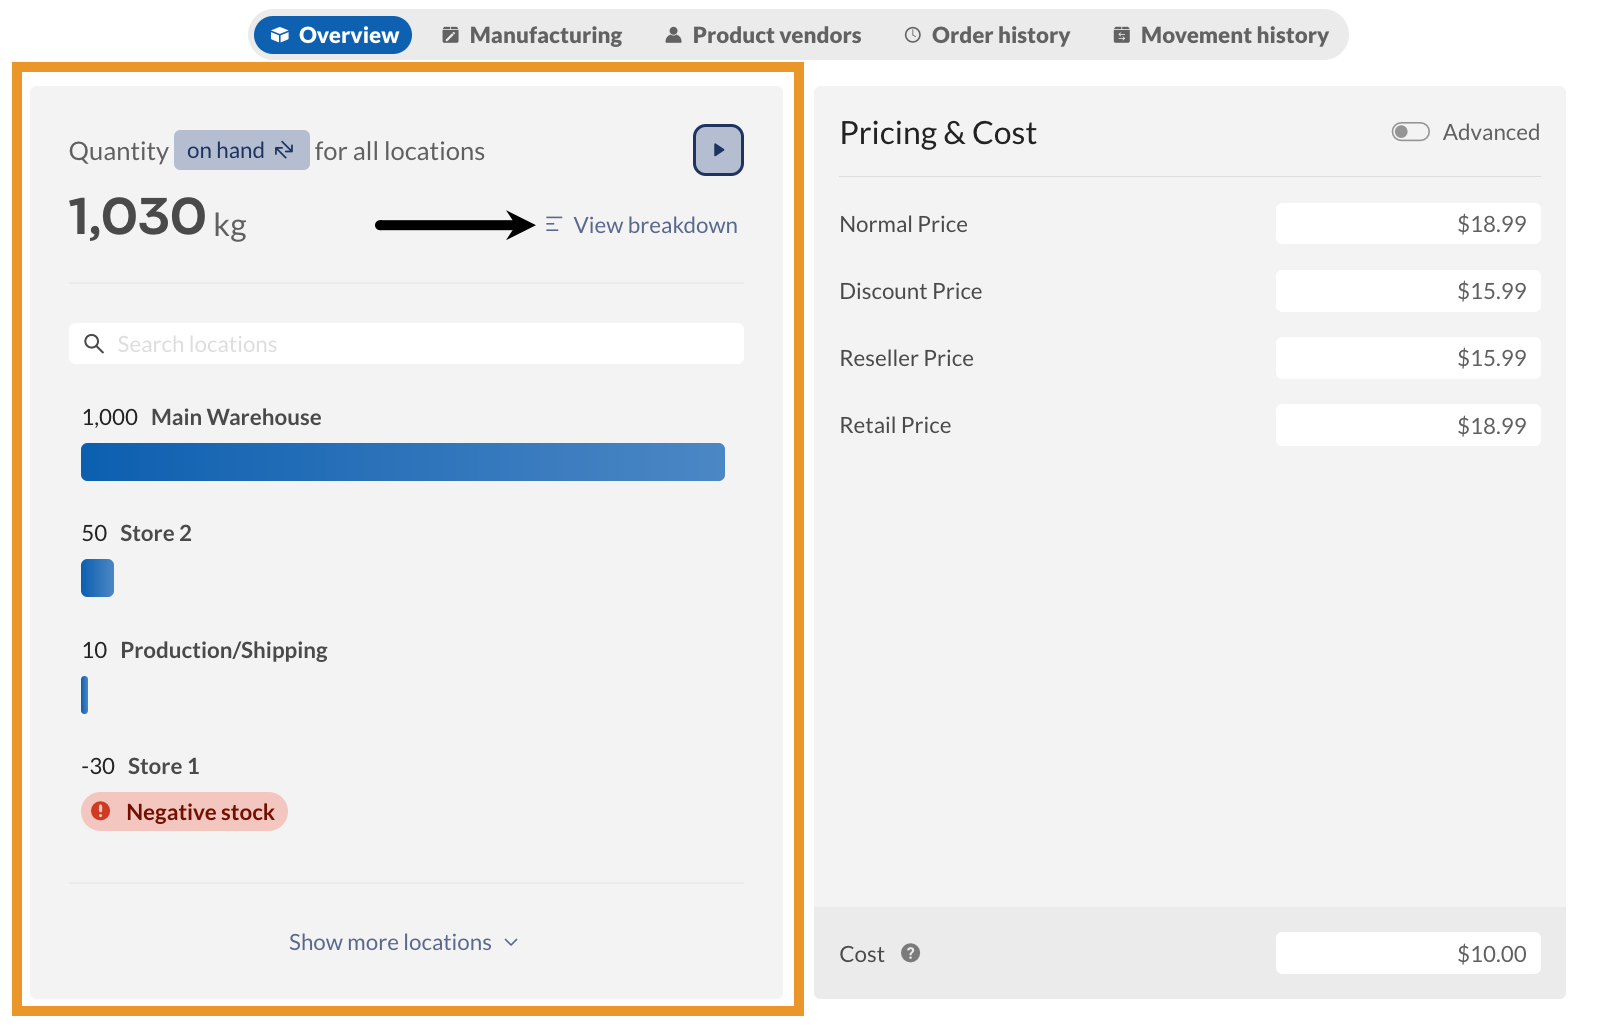
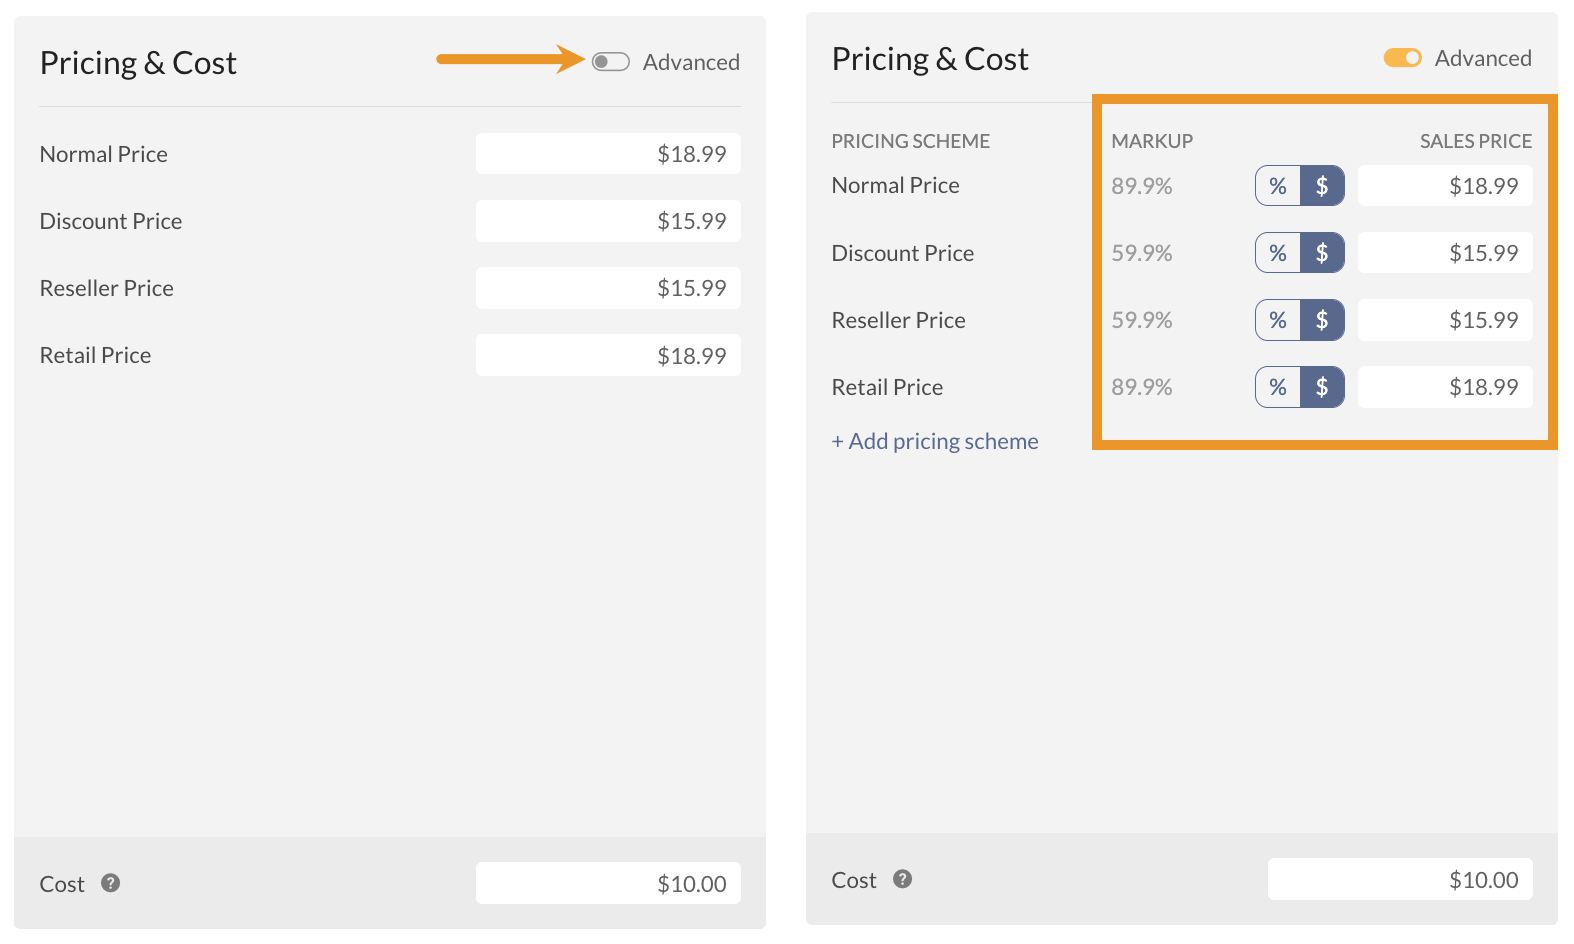
Pricing & Cost
This section lets you add your selling prices and view/edit the product costs, depending on the costing method inFlow is set to.
Click Advanced to view/edit the product markup or margins.
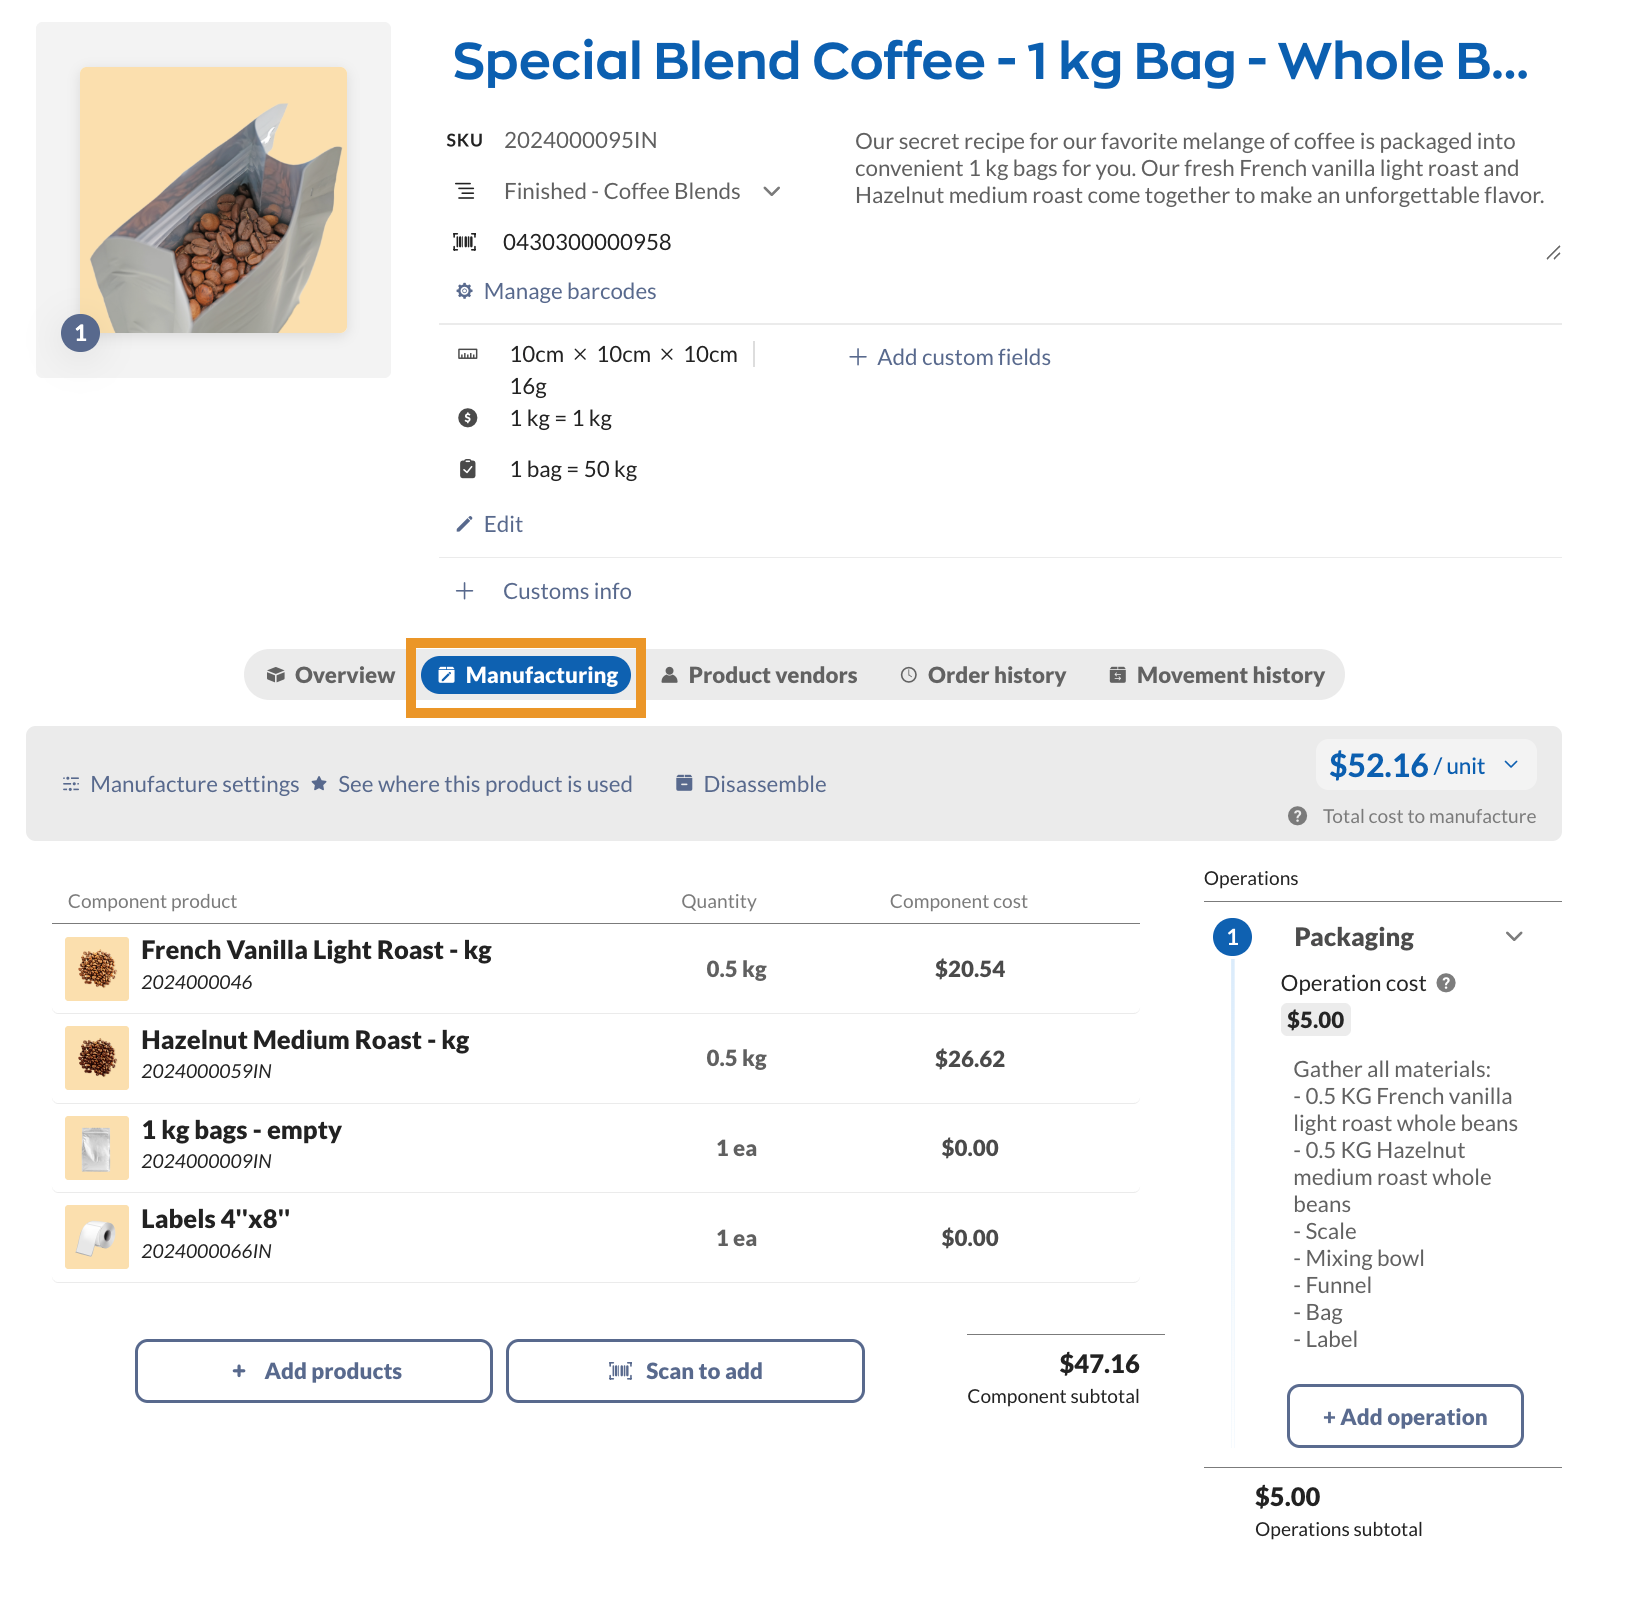
Manufacturing tab
The Manufacturing tab is available for inFlow Manufacturing accounts, where you can create a bill of materials list that tracks raw materials and components used to manufacture a product, along with their costs and assembly instructions.
This tab also includes settings for creating product bundles and disassembling products.
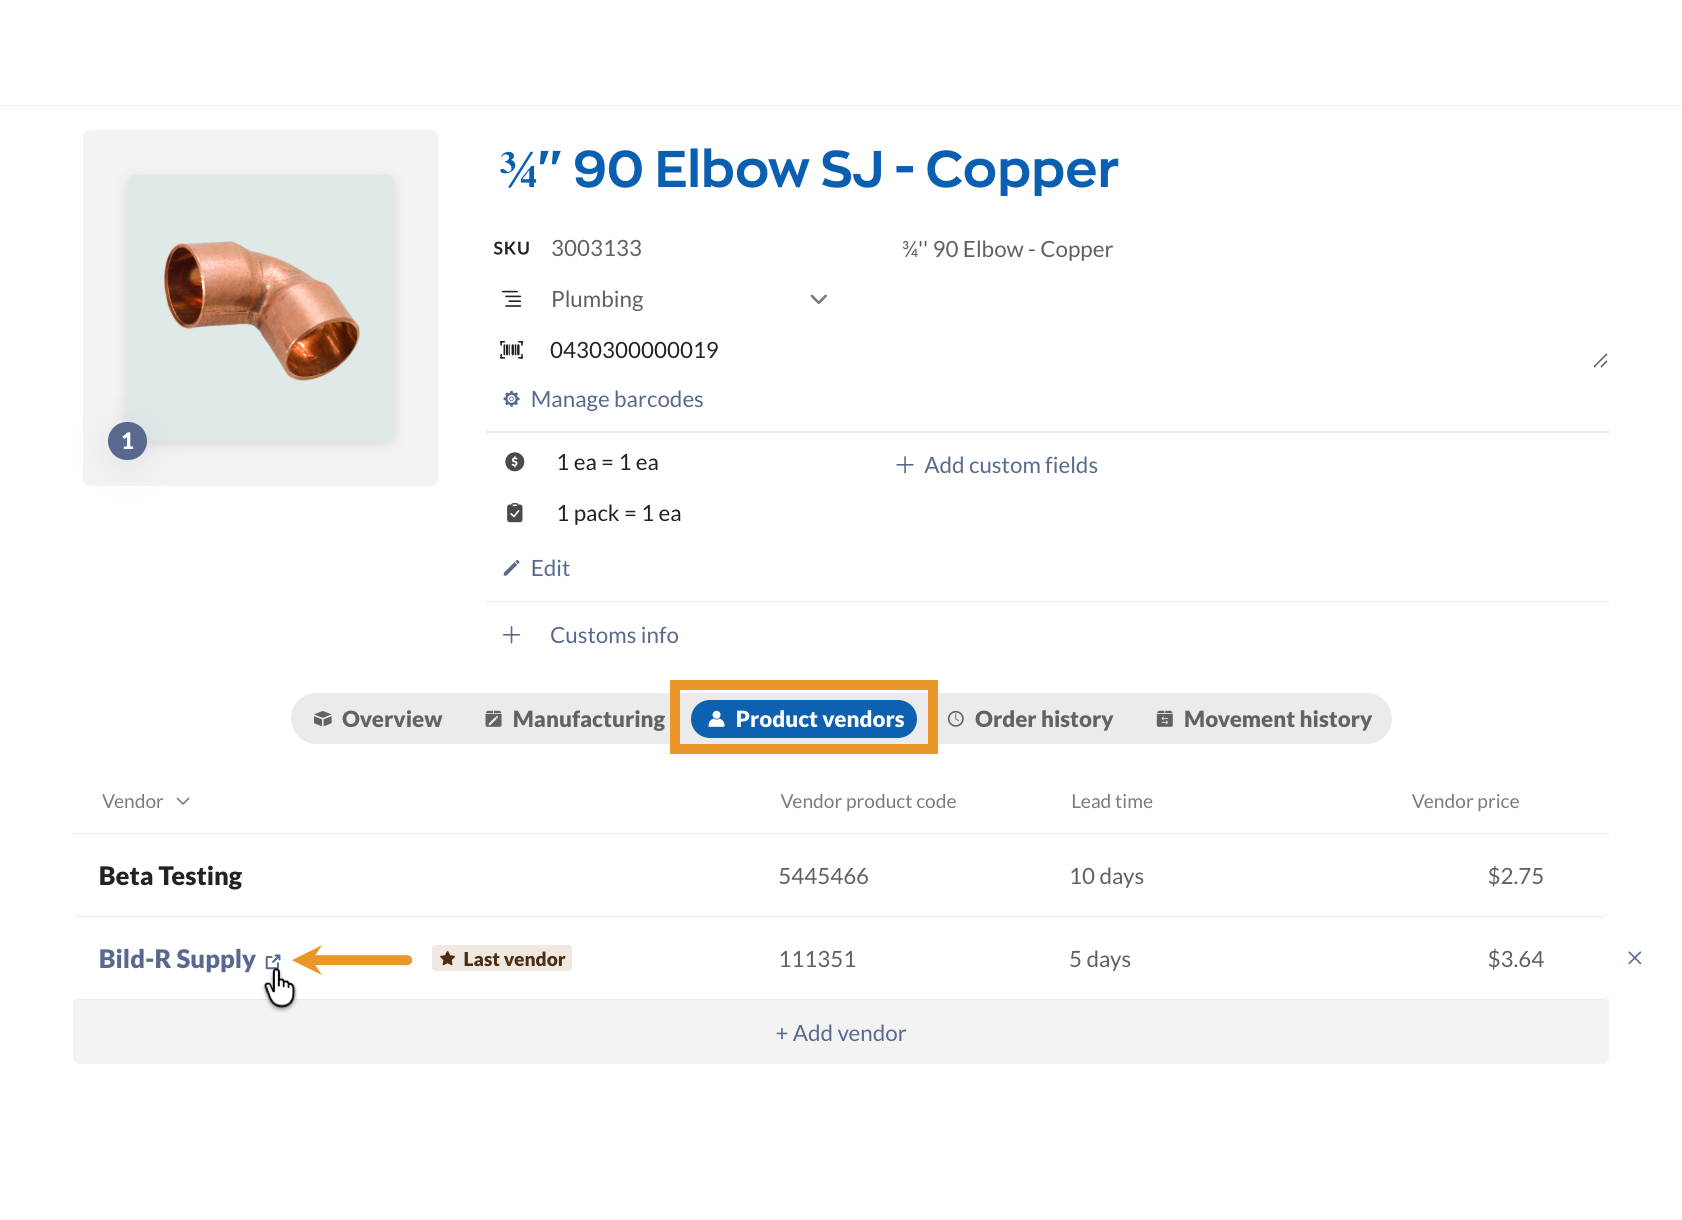
Product vendors tab
This tab lets you review the vendors you buy this product from. Just hover over the vendor name to open their record in a new tab.
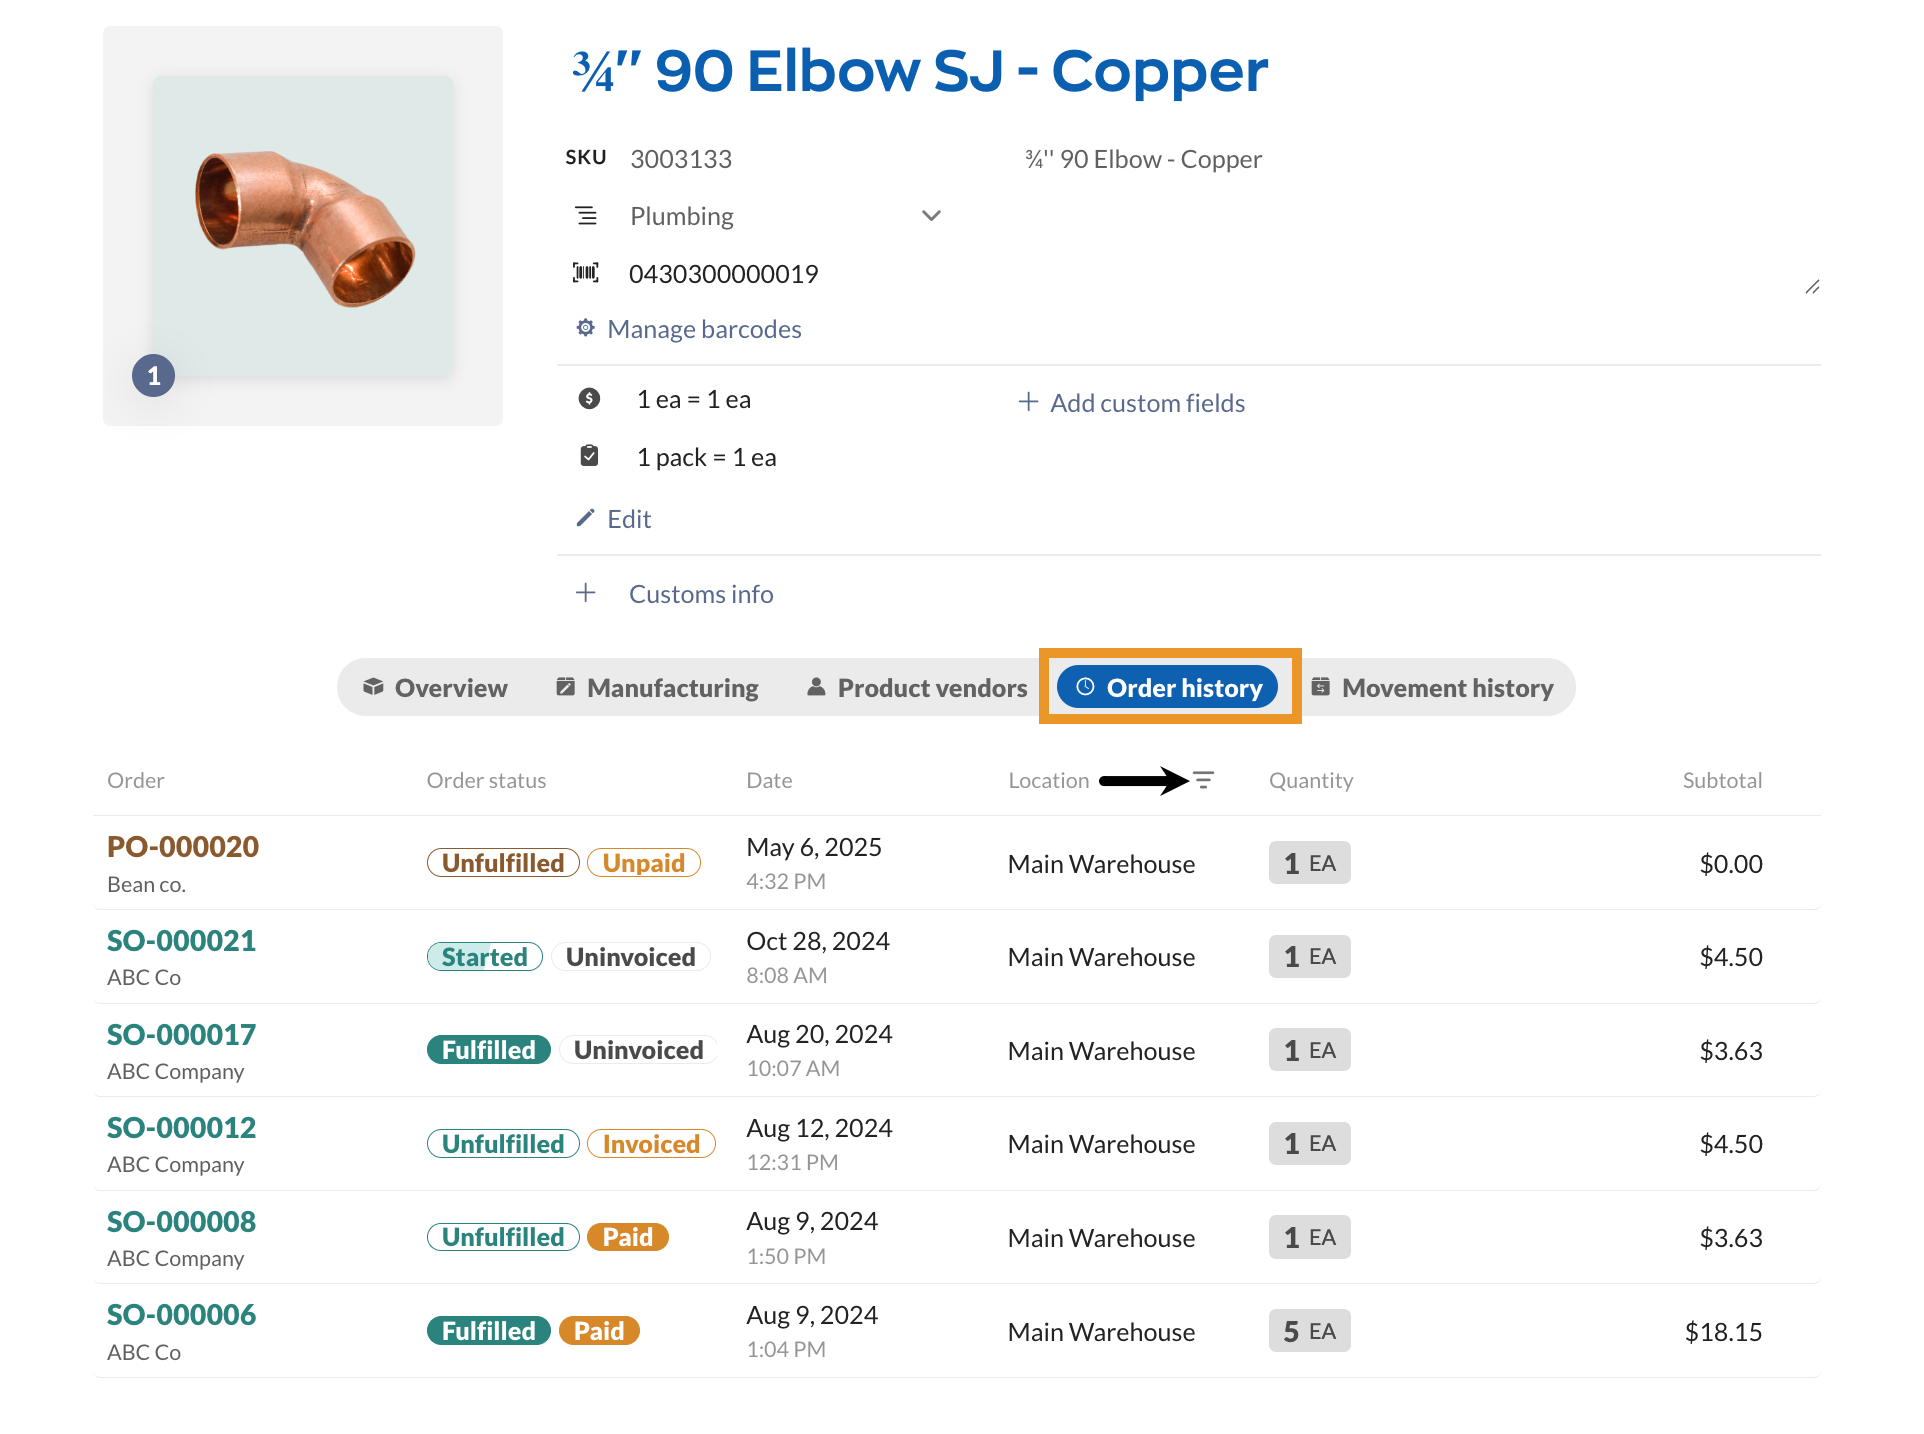
Order history tab
The Order history tab on the product record displays the last 100 sales, purchase, or manufacture orders for this product.
You can narrow down the orders on this tab by clicking on the Location heading and selecting a specific location.
If you’d like to view more than 100 orders, you can run the following reports.
- Sales by Product Summary
- Sales by Product Details
- Purchase Order Summary
- Purchase Order Details
- Manufacture Order Finished Products
Movement history tab
The Movement history tab displays your last 100 stock change entries, including all orders, stock transfers, and adjustments.
Use the filter icons next to the headings to refine the results in this table.

To view more than 100 entries, take a look at the Inventory movement summary report.
Product record fields
Take a look below to better understand the product record fields in inFlow.
Product name
The product name in inFlow is a required field and must be unique. Generally, the product name is customer-facing and has to be readable. In other words, the product name is an easy way for anyone to identify a product. It will appear on invoices and purchase orders. For example, Small Red Dragon Shirt could be a product name.
Symbols in product names (word breakers)
Symbols such as: “-” “,” or “/” in product names are considered “word breakers.”
When searching for the product in inFlow Inventory for Web, inFlow treats the words before and after the symbol as separate words.
Word breakers could make it harder to find products when searching.
Example:
Product name: Pipe-A.
When adding “Pipe-A” to a search field, inFlow will treat the search for “Pipe” and “A” as two separate words.
Stock keeping unit (SKU)
A product SKU, on the other hand, is typically used solely for internal purposes. It can be a sequence of letters and numbers and is used as an additional way to identify a product. A Small Red Dragon Shirt could have the SKU 8451651231. SKUs typically remain the same for a product, while the product name may change for marketing purposes.
SKUs are not required, but we recommend including them if you’re using an integration, as they are a standard way to identify products across different software platforms.
If your products don’t come with SKUs, inFlow can help generate them for you!
Product category
Categories are used to organize products into groups, making them easier to filter and search for in your product list and improving operational efficiency.
Categories are especially useful if you’re sharing your product information with your customers using the Online Showroom!
If you’re unsure how to categorize your products, consider visiting eCommerce stores that sell similar items to see how they’re categorized, which can give you some ideas. For more information on categories, see our article here.
Product description
Once you’ve named your product and assigned an optional SKU, you can add additional product details to the description field to help further identify your products. A description should describe a product more than the item name.
When sharing your product information with customers through the Online Showroom, the product description serves as your marketing copy, representing the value of your product to them.
You can learn more from this article.
Barcode
A product barcode is an image of black and white bars that represent a set of numbers and characters that can be scanned by a barcode reading device (like a barcode scanner or mobile phone). This barcode number can be used to identify a specific product. Scanning products instead of typing them out manually will save you time and reduce human error.
If your products don’t have barcodes, inFlow can automatically create barcode numbers for you, or you can use the existing product barcode numbers instead.
Cost
The product cost in inFlow is the cost you incur to purchase a product or service from your vendor. Product cost is used in calculating the cost of goods sold and profit when selling products to customers.
inFlow can automatically track your product costs whenever you create a purchase order for your vendor. You can specify how you would like inFlow to track your costs by setting the costing method (Moving Average, First-In-First-Out, Last-In-First-Out, or Manual). For details on how inFlow calculates your product costs, have a look here.
What is the difference between cost and vendor price?
| Cost | A calculated value that inFlow has generated based on the cost method, past purchase orders, and work/manufacture orders. |
| Vendor price | This field is for tracking different prices that your vendors charge for products in your inventory. If Product A is purchased from different vendors, the different prices that your vendors charge are logged in the Product vendors tab of the product record. When you make a purchase order from a vendor with a specific vendor price, inFlow will use that price instead of the product cost listed. |
Price
The product price in inFlow is the price you charge your customers for a product or service. If you have groups of customers who receive special pricing, such as wholesale or VIP, you can set up multiple pricing schemes. You can save a specific pricing scheme to a customer record so that inFlow automatically applies it to the customer’s sales orders.
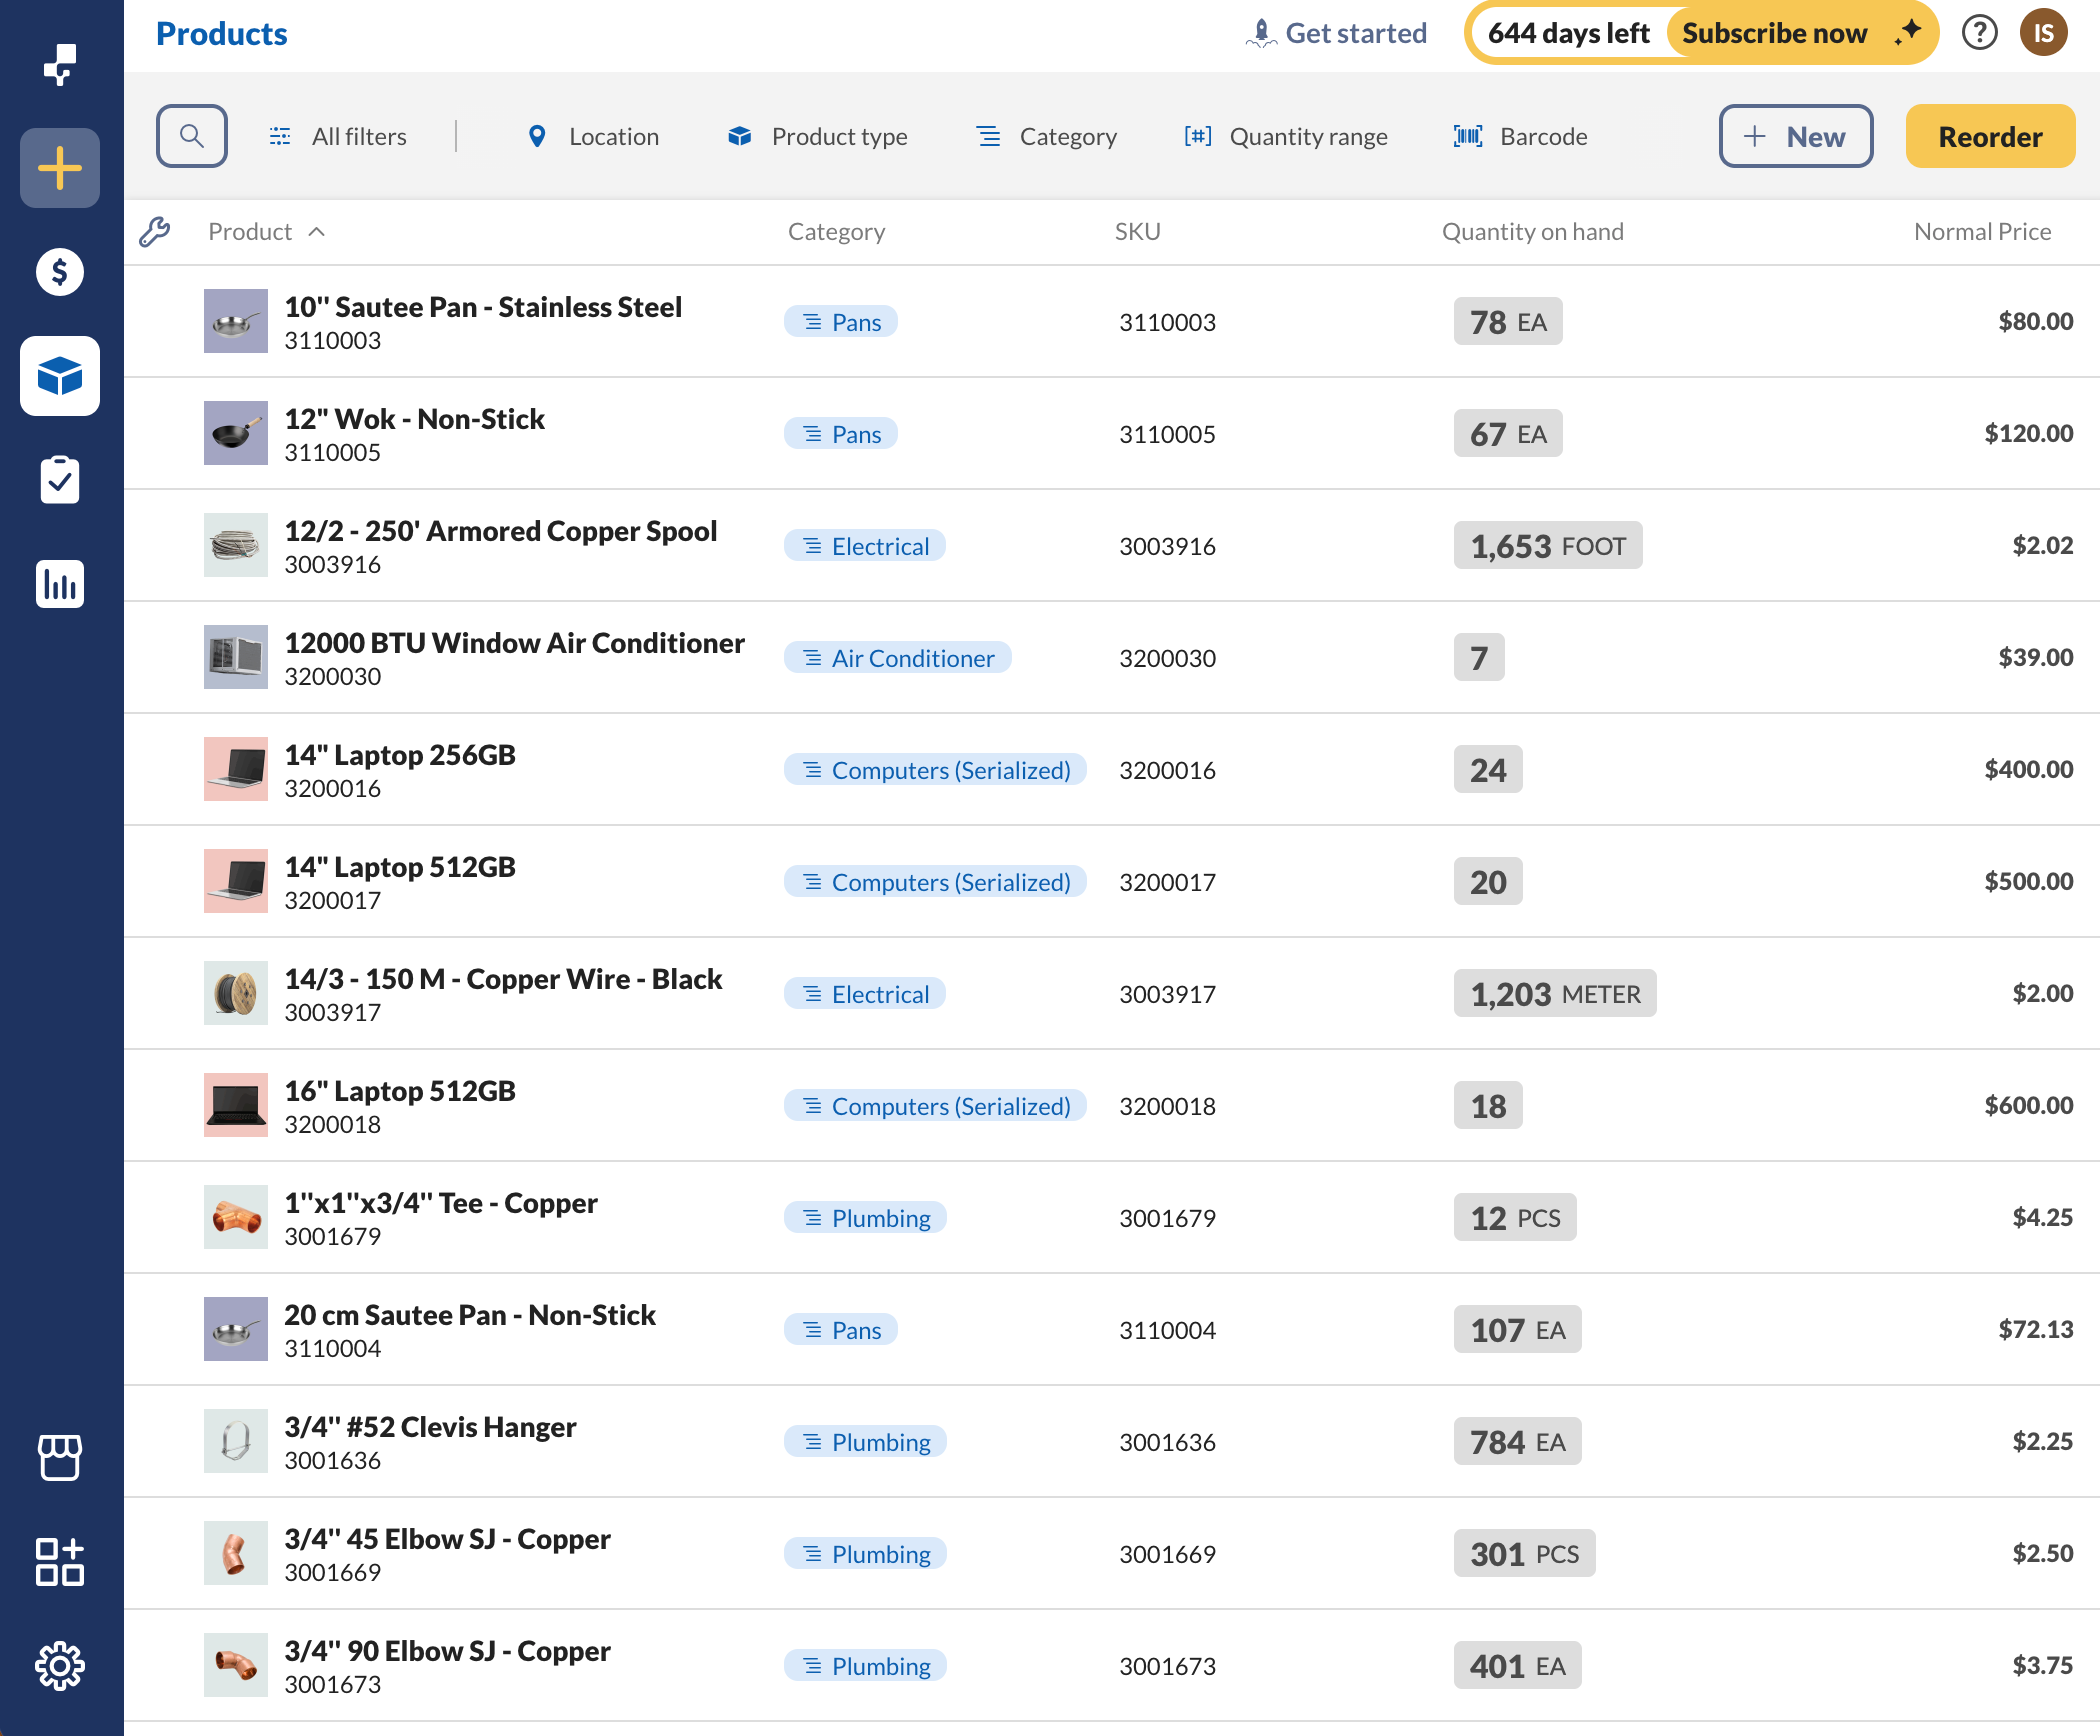
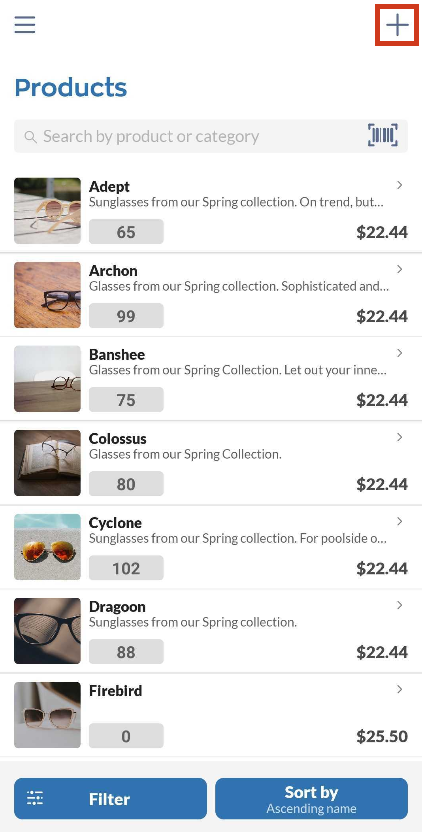
Product list
You can view a full list of products from the Product List screen (Main Menu>Products). The menu at the top of the product list serves as a filter to narrow down products to what you’re searching for.
Select the wrench icon to customize the product list headings.
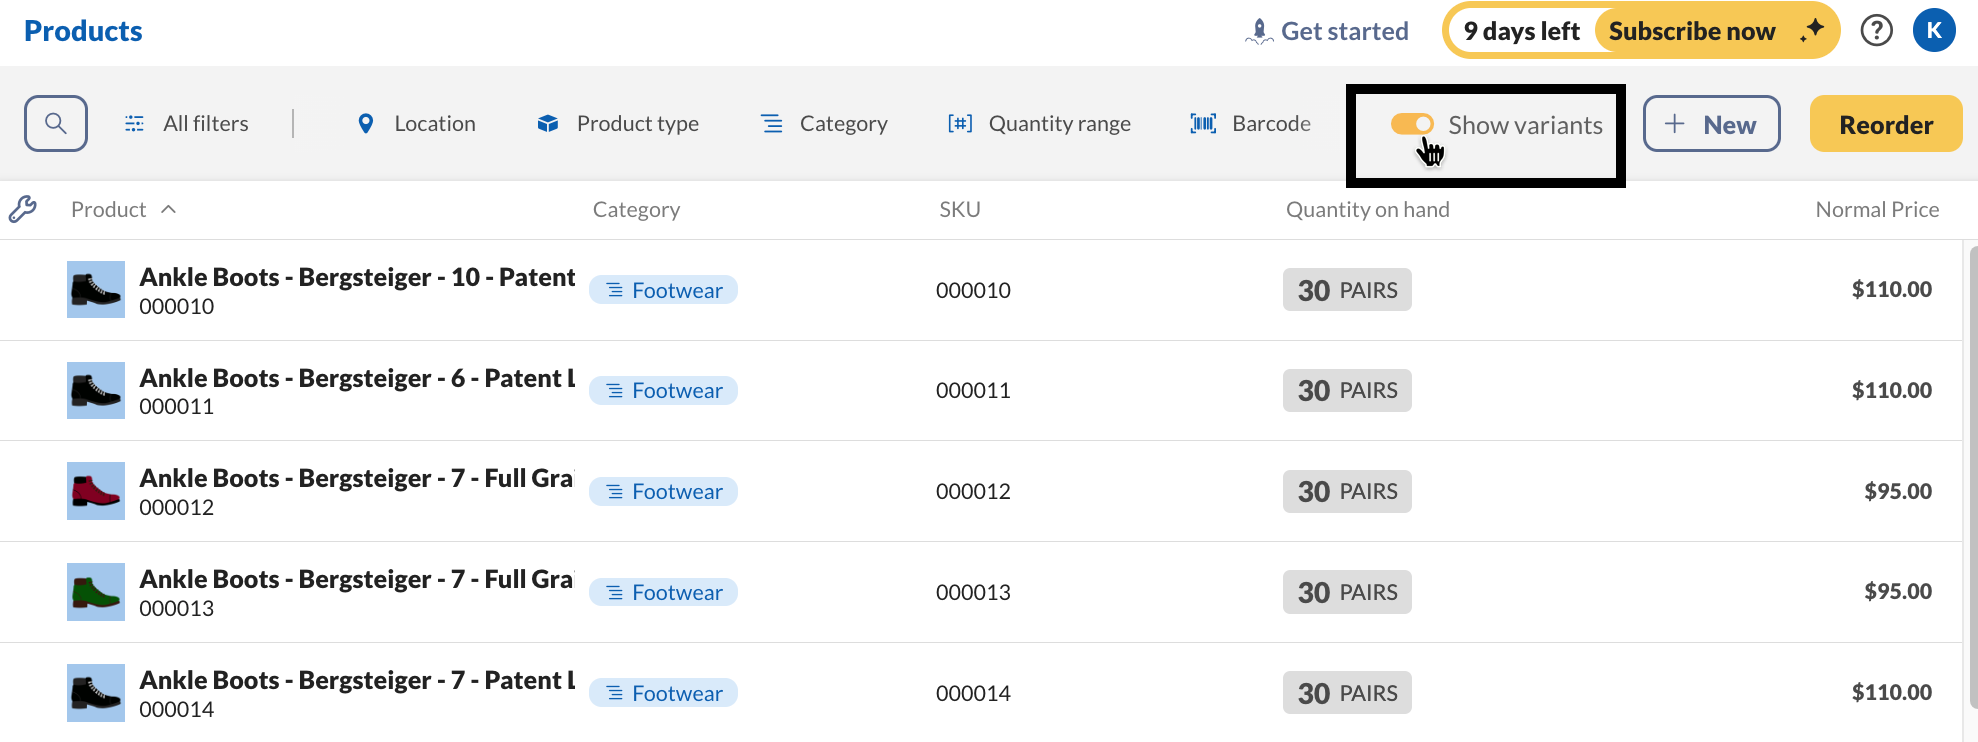
Viewing variants from the product list
By default, inFlow displays standard and product groups while hiding the variant options of product records. To view variant options on the product list, toggle on Show variants at the top-right-hand corner of the screen.
Windows
Creating new products
- Go to the Main Menu > Inventory > New Product.
- Click into the Product Name field and enter your product name – it must be unique!
- Select the Product Type*.
- Optionally, add any other product details such as SKU, category, barcode, description, product image…
- Click Save in the top toolbar.
Product Type selection is mandatory and cannot be changed once saved, so it’s not possible to save a serialized product and change it to non-stocked/service/serialized after. Please see here for more info on product types.
Product record fields
Take a look below to better understand the product record fields in inFlow.
Product name
The product name in inFlow is a required field and must be unique. Generally, the product name is customer-facing and has to be readable. In other words, the product name is an easy way for anyone to identify a product. It will appear on invoices and purchase orders. For example, Small Red Dragon Shirt could be a product name.
Symbols in product names (word breakers)
Symbols such as: “-” “,” or “/” in product names are considered “word breakers.”
When searching the product in inFlow Inventory for Web, inFlow will consider the words before and after the symbol as separate words.
Word breakers could make it harder to find products when searching for a product.
Example:
Product name: Pipe-A.
When adding “Pipe-A” to a search field, inFlow will treat the search for “Pipe” and “A” as two separate words.
Product type
Product types in inFlow determine whether your products have stock levels that need to be tracked (stocked products) or if they are fees/labor charges (services). This setting is required and is permanent for each item upon saving for the first time. There are four types:
- Stocked product: These will show exact quantities in each location and can be tracked in full.
- Serialized product: These will also show exact quantities, but are specifically for products with serial numbers.
- Non-stocked product: These are products you would like to track but do not need to see quantities for (packing materials, boxes/cartons, paper, etc.).
- Service: These products are services and do not have quantities or locations attached to them.
Need to change your product type? See here for details.
Stock keeping unit (SKU)
A product SKU, on the other hand, is typically used for internal purposes only. It can be a sequence of letters and numbers and is used as an additional way to identify a product. A Small Red Dragon Shirt could have the SKU 8451651231. SKUs typically remain the same for a product, while the product name may change for marketing purposes.
SKUs are not a required field, but we recommend including SKUs if you’re using an integration, as they are a standard way to identify products across different software platforms.
If your products don’t come with SKUs, inFlow can help generate them for you!
Product category
Categories are used to organize products into groups, making them easier to filter and search for in your product list and improving operational efficiency.
Categories are especially useful if you’re sharing your product information with your customers using the Online Showroom!
If you’re unsure how to categorize your products, consider visiting eCommerce stores that sell similar items to see how they’ve been categorized, which can provide some ideas. For more information on categories, take a look at our article here.
Product description
Once you’ve named your product and assigned an optional SKU, you can add additional product details to the description field to help further identify your products. A description should describe a product more than the item name.
When sharing your product information with customers through the Online Showroom, the product description serves as your marketing copy, representing the value of your product to them.
You can learn more from this article.
Barcode
A product barcode is an image of black and white bars that represent a set of numbers and characters that can be scanned by a barcode reading device (like a barcode scanner or mobile phone). This barcode number can be used to identify a specific product. Scanning products instead of typing them out manually will save you time and reduce human error.
If your products don’t have barcodes, inFlow can automatically create barcode numbers for you, or you can use the existing product barcode numbers instead.
Cost
The product cost in inFlow is the cost you incur to purchase a product or service from your vendor. Product cost is used in calculating the cost of goods sold and profit when selling products to customers.
inFlow can automatically track your product costs whenever you create a purchase order for your vendor. You can specify how you would like inFlow to track your costs by setting the costing method (Moving Average, First-In-First-Out, Last-In-First-Out, or Manual). For details on how inFlow calculates your product costs, have a look here.
What is the difference between cost and vendor price?
| Cost | A calculated value that inFlow has generated based on the cost method, past purchase orders, and work/manufacture orders. |
| Vendor price | This field is for tracking different prices that your vendors charge for products in your inventory. If Product A is purchased from different vendors, the different prices that your vendors charge are logged in the Product vendors tab of the product record. When you make a purchase order from a vendor with a specific vendor price, inFlow will use that price over the product cost that is listed. |
Price
The product price in inFlow is the price you charge your customers for a product or service. If you have groups of customers who receive special pricing, such as wholesale or VIP, you can set up multiple pricing schemes. You can save a specific pricing scheme to a customer record so that inFlow automatically applies it to the customer’s sales orders.
Mobile
You can quickly add products to your database using the inFlow Inventory Companion App! The mobile app also lets you scan barcodes without any special equipment.
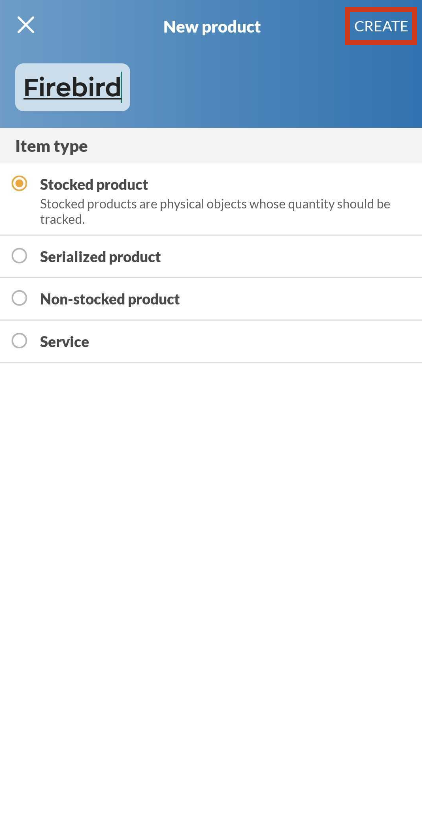
Creating new products
- Tap on the Main Menu button (the 3 horizontal lines at the top left of the screen) and select Products (or directly tap on the Product list on the homepage).
- Tap on the + symbol.
- Enter a Product Name, then choose an product type (stocked products are generally physical products and is the most common option). If you tap on the different products, inFlow will give you a brief summary of each.
- Tap the Create button.
- You will now be on the product page where you can add an image, price, description, and many more. You can also add or scan a barcode using your smartphone’s camera.
- When done, click Save.
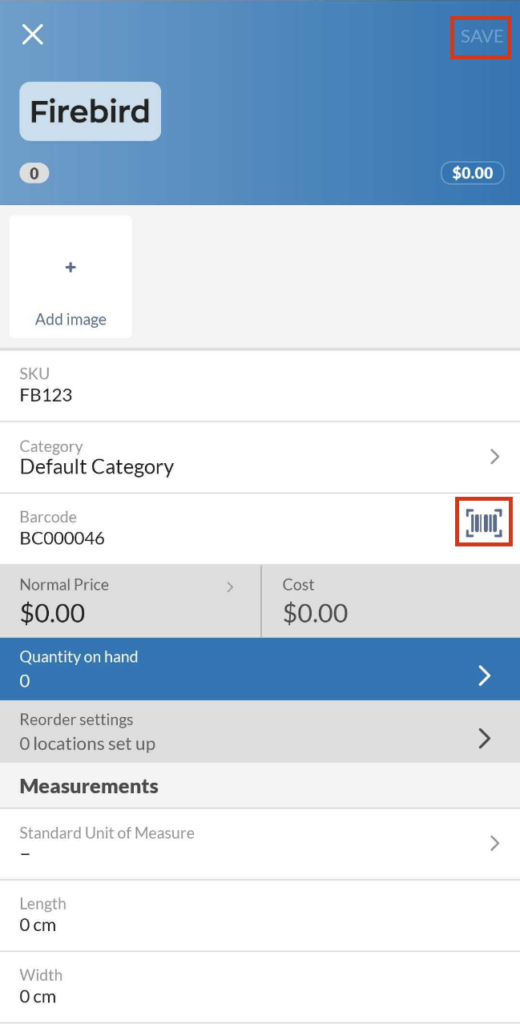
Adding images
On the Product page, tap on the + Add image tile and either take a picture or select one from your smartphone’s library.
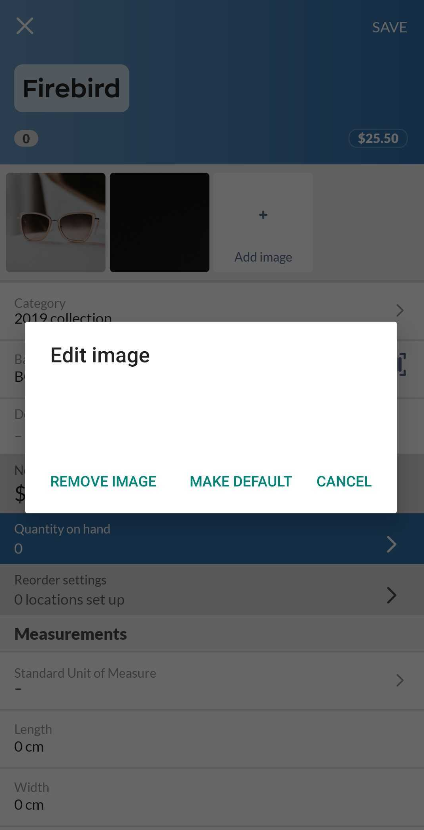
Editing images
If you have more than one picture for your product and wish to choose a main one, long-press on the picture you want to make your default and tap on Make default.
You can also delete a picture by selecting Remove image.
Importing products
Importing your products into inFlow
Below are the simplified steps to quickly create a template to import your products. Check out this article for a full guide to creating a product details import file.
- Download this CSV template and start filling it in with your product details! When you’re done, save the file as a CSV file.
- From the Main Menu, hover over the Settings icon and select Import.
- Click Select File to find the CSV file from your computer. Then click Next.
- Match the fields listed to the left (fields that you’ll see in inFlow), to the fields in the drop-down menus (which are the column headings of your CSV file).
- Once all CSV fields are matched, click Next.
Your import is now in progress. You’ll receive an email when it’s done, so feel free to navigate away from this page.
Helpful videos
Take a look at this video for steps on importing products to inFlow Inventory for Web.
And if you’re importing your CSV file into inFlow Inventory for Windows, take a look at the video below.


0 Comments