How to set/restrict team member access rights in inFlow
inFlow Admins can effectively customize which features team members can access and edit via user access rights. Discover more details below.
Please note this feature is available on select plans or add-ons.
Web
User access rights options
In inFlow, there are two main user access profile options.
- Administrator: This team member option grants full access to all areas of inFlow included in your plan.
- Team member: This is a non-administrator member that can be edit, view-only, or have no access to inFlow features, depending on what the inFlow administrator has set.
Do you need to add a team member first? Find out how to do so here.
Access rights restrictions
There are three main levels of access that an inFlow administrator can assign to team members:
- Full Access: This option gives this team member full access to this feature.
- View only: Team members can view this feature, but can’t edit any information.
- No Access: This feature is not viewable to team members.
Order-related access rights
For sales and purchase orders, there are more access rights options available. No access, View only, and Full access work exactly the same as they do for other features on this list, but you can also choose:
| Access option | Explanation |
|---|---|
| Mobile picking only | This restriction prevents the team member from accessing or editing the sales order, but allows them to view and pick items on open sales orders. It is only available on the inFlow mobile app, not on Windows or the Web. |
| View and mobile picking only | This option allows the team member to have view-only access to the sales order and to pick items for open sales orders. This restriction allows a team member to view sales orders in the Windows and Web app, but can only pick orders from the inFlow mobile app. |
| Mobile receiving only | This allows the team member to access inventory only on open purchase orders, without being able to view the purchase orders or their costs directly. This restriction applies only to the inFlow mobile app, not the Windows & Web app. |
| View and mobile receiving only | This option allows team members to have view-only access and receive items for unfulfilled purchase orders. This restriction allows a team member to view purchase orders in the Windows and Web app, but they can only receive orders from the inFlow mobile app. |
Setting user access rights
- With an Administrator account, log in to inFlow’s Team settings (Main Menu>Options>Team).
- Click the Edit access rights next to a team member’s name.
- Select the toggle next to the feature to give or take away access for a team member. If necessary, you can also choose the type of access they get, like Count only or View only.
- Click Save when done.
Viewer users
Higher-tier inFlow plans offer the option of view-only users. This will give users the ability to view data in inFlow without edit access.
Viewer seats are included in select plans. If you require additional viewer seats beyond what is offered in your current plan, please reach out to your Customer Success Manager or Support Team for assistance.
Team Member Tracking Report
In addition to modifying access rights in inFlow, you can track changes made by all your team members in a report. For more information, see this article.
Advanced user access rights
Higher-tiered plans and plan add-ons include a few extra user access rights features. Take a look at this guide for a list of included features.
Windows
User access rights options
In inFlow, there are two main user access profile options.
- Administrator: This team member option grants full access to all areas of inFlow included in your plan.
- Team member: This is a non-administrator member who can edit or view only, or have no access to inFlow features, depending on what the inFlow administrator has set.
Access rights restrictions
There are three main levels of access that an inFlow administrator can assign to team members:
- Full Access: This option gives this team member full access to this feature.
- View-only: Team members can view this feature, but can’t edit any information.
- No Access: This feature is not viewable to team members.
Do you need to add a team member first? Find out how to do so here.
Order-related access rights
You may have noticed that for sales and purchase orders, there are more access rights options available.
No access, View only, and Full access work exactly the same as they do for other features on this list, but you can also choose:
| Access option | Explanation |
|---|---|
| Mobile picking only | This restriction prevents the team member from accessing or editing the sales order, but allows them to view and pick items on open sales orders. It is only available on the inFlow mobile app, not on Windows or the Web. |
| View and mobile picking only: | This option allows the team member to have view-only access to the sales order and to pick items for open sales orders. This restriction allows a team member to view sales orders in the Windows and Web app, but can only pick orders from the inFlow mobile app. |
| Mobile receiving only | This allows the team member to access inventory only on open purchase orders, without being able to view the purchase orders or their costs directly. This restriction applies only to the inFlow mobile app, not the Windows & Web app. |
| View and mobile receiving only | This option allows team members to have view-only access and receive items for unfulfilled purchase orders. This restriction allows a team member to view purchase orders in the Windows and Web app, but they can only receive orders from the inFlow mobile app. |
Setting user access rights
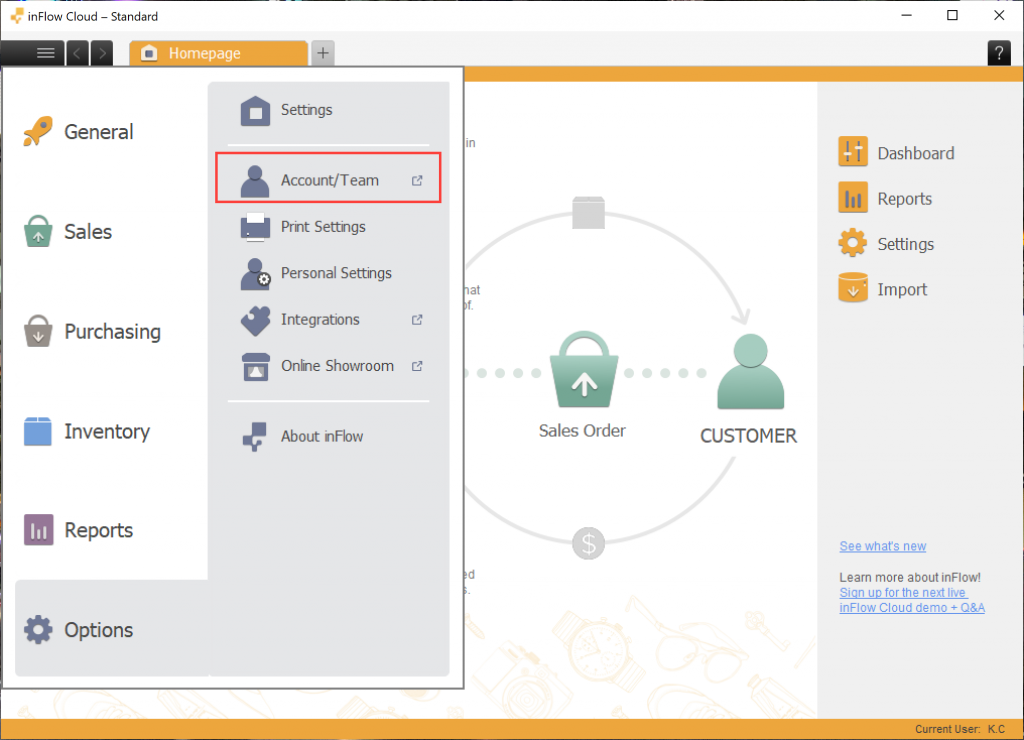
- Go to Main Menu > Options > Account/Team.
- inFlow redirects to the inFlow Team settings on your web browser.
- Once the Team settings have loaded, click the Edit access rights next to a team member’s name.
- Select the toggle next to the feature to give or take away access for a team member. If necessary, you can also choose the type of access they get, like Count only or View only.
- Click Save when done.
Viewer users
Higher-tier inFlow plans offer the option of view-only users. This will give users the ability to view data in inFlow without edit access.
Viewer seats are included in select plans. If you require additional viewer seats beyond what is offered in your current plan, please reach out to your Customer Success Manager for assistance.

Team Member Tracking Report
In addition to modifying access rights in inFlow, you can track changes made by all your team members in a report. For more information, see this article.
Advanced user access rights
Higher-tiered plans and plan add-ons include a few extra user access rights features. Take a look at this guide for a list of included features.
Restrict access by location
To help you manage your inventory more smoothly, you can easily grant your team members access to specific locations or set restrictions as needed. Just a quick note—this feature is available with our higher-tier plans!
What areas of inFlow does this affect?
Restricting access by location affects all inFlow locations. The following are examples of some areas you will notice this change:
- Purchase orders
- Sales orders
- Manufacture orders
- Stock counts
- Stock transfers (all locations can be viewed, but sending and receiving products is restricted based on location access rights.)
- Stock adjustments (with a location field at the order level)
What will team members with restricted location access see in inFlow?
Anywhere in inFlow where you would normally select a location (such as the sales order list or within a purchase order), the team member will see only the locations they have access to.
Team members who do not have access to all locations can’t add, edit, remove, or rename locations, even if they have admin rights. Location-based access rights will apply to inFlow for Web, Windows, and Mobile.
Exception: Stock transfers allow team members to see all locations, as you should be able to request from / send to locations you may not have access to. However, you will not be able to complete the transfer if you don’t have access to the location where it is being sent/received.
Restricting team member access by location
- With an Administrator account, log in to inFlow’s Team settings (Main Menu>Settings>Team).
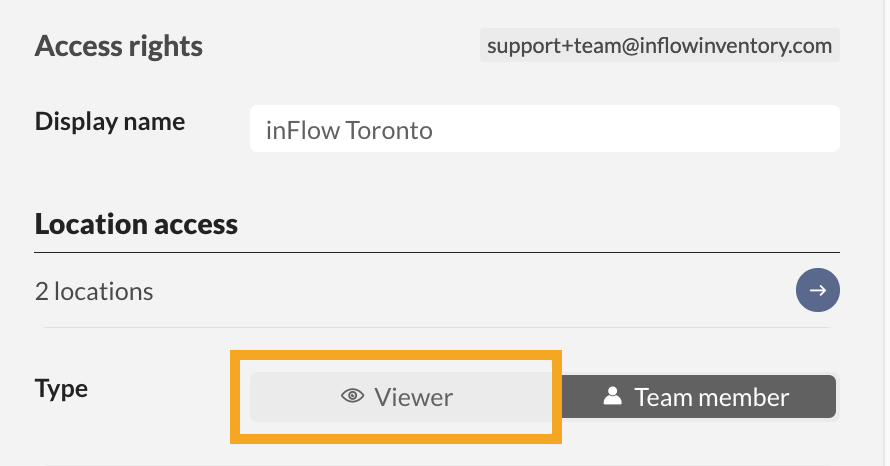
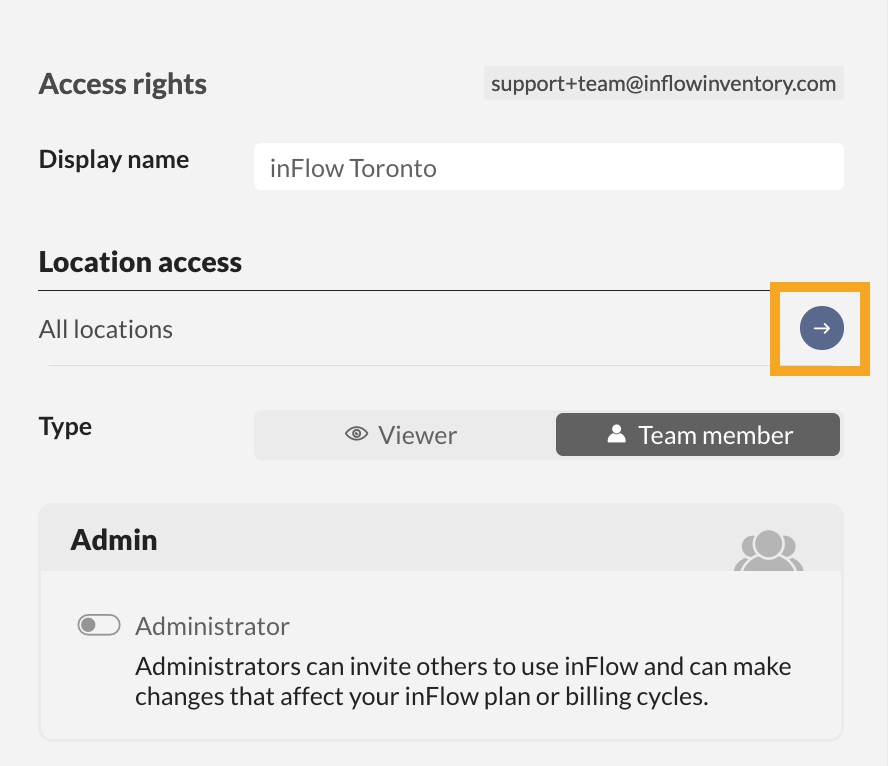
- Click the Edit access rights next to the team member you want to change the access rights for.
- Select the arrow underneath the Location access header.
- Select the locations you would like this team member to have access to.
- Click Save.

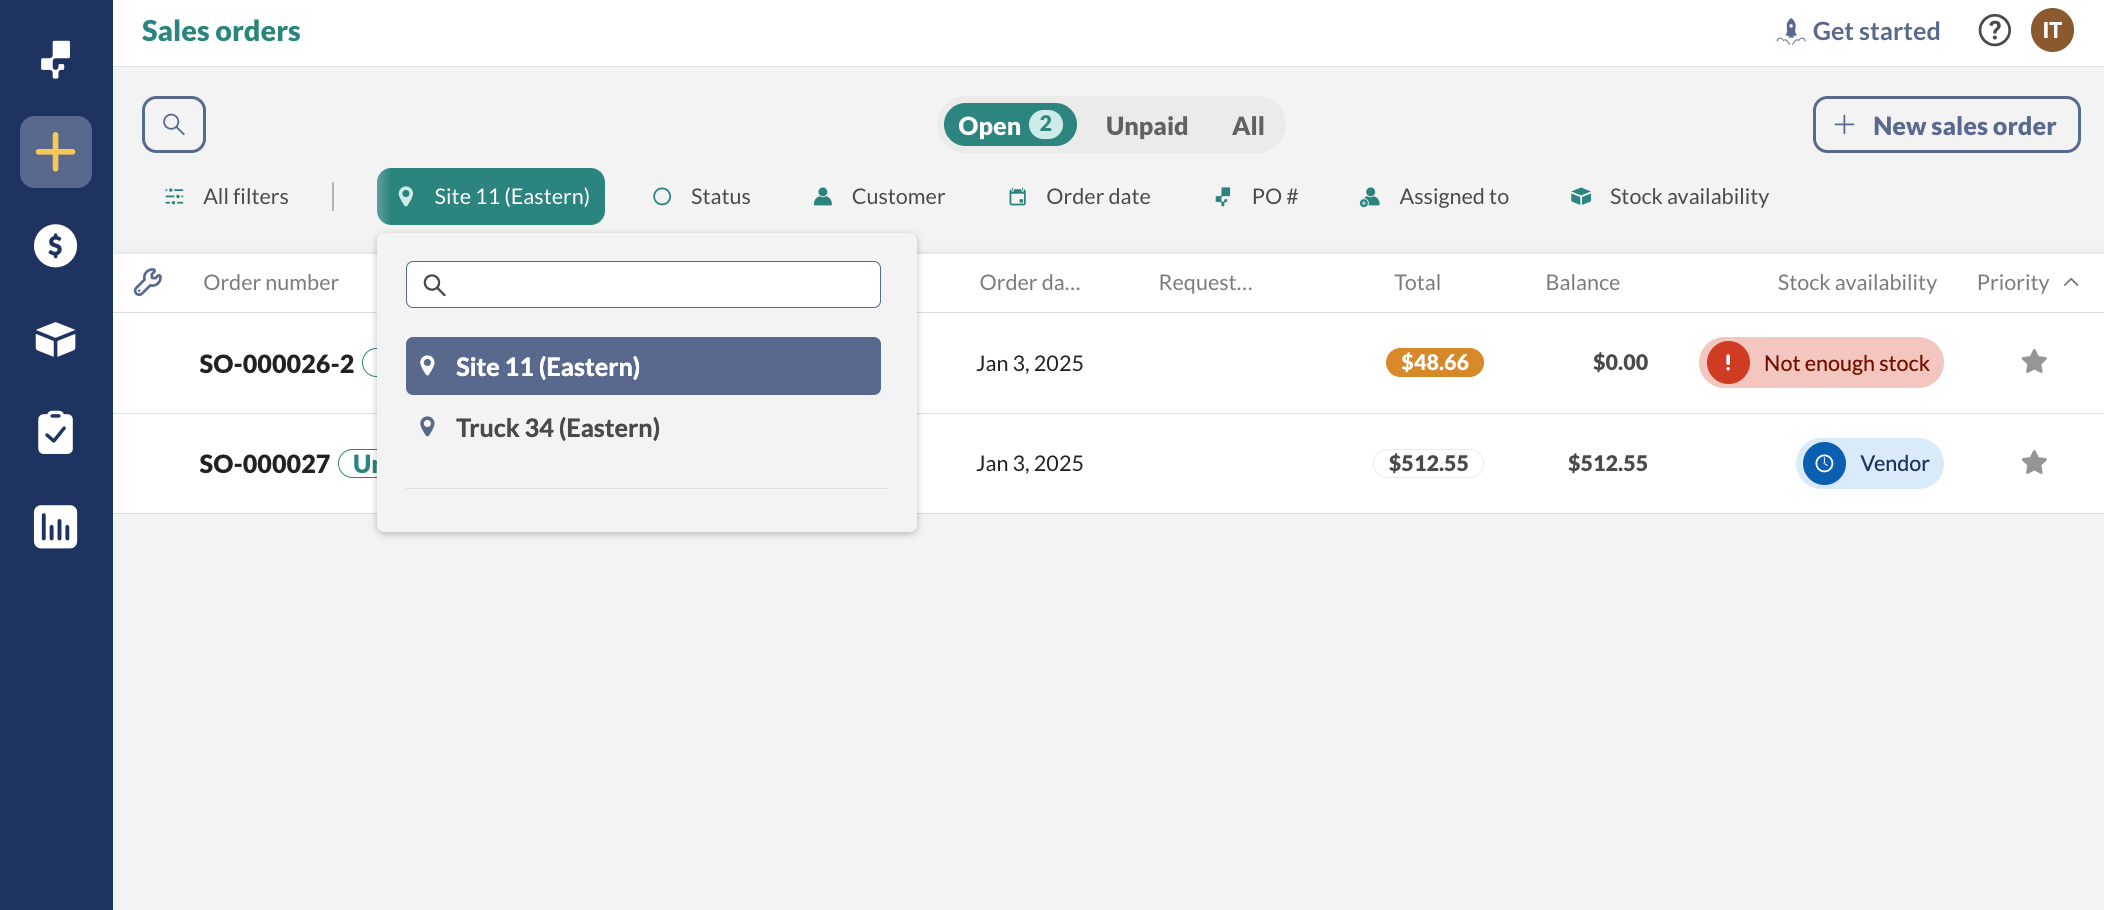
Sales orders with restricted location access
On sales orders, team members with restricted location access will only see their locations in the sales order drop-down menu.
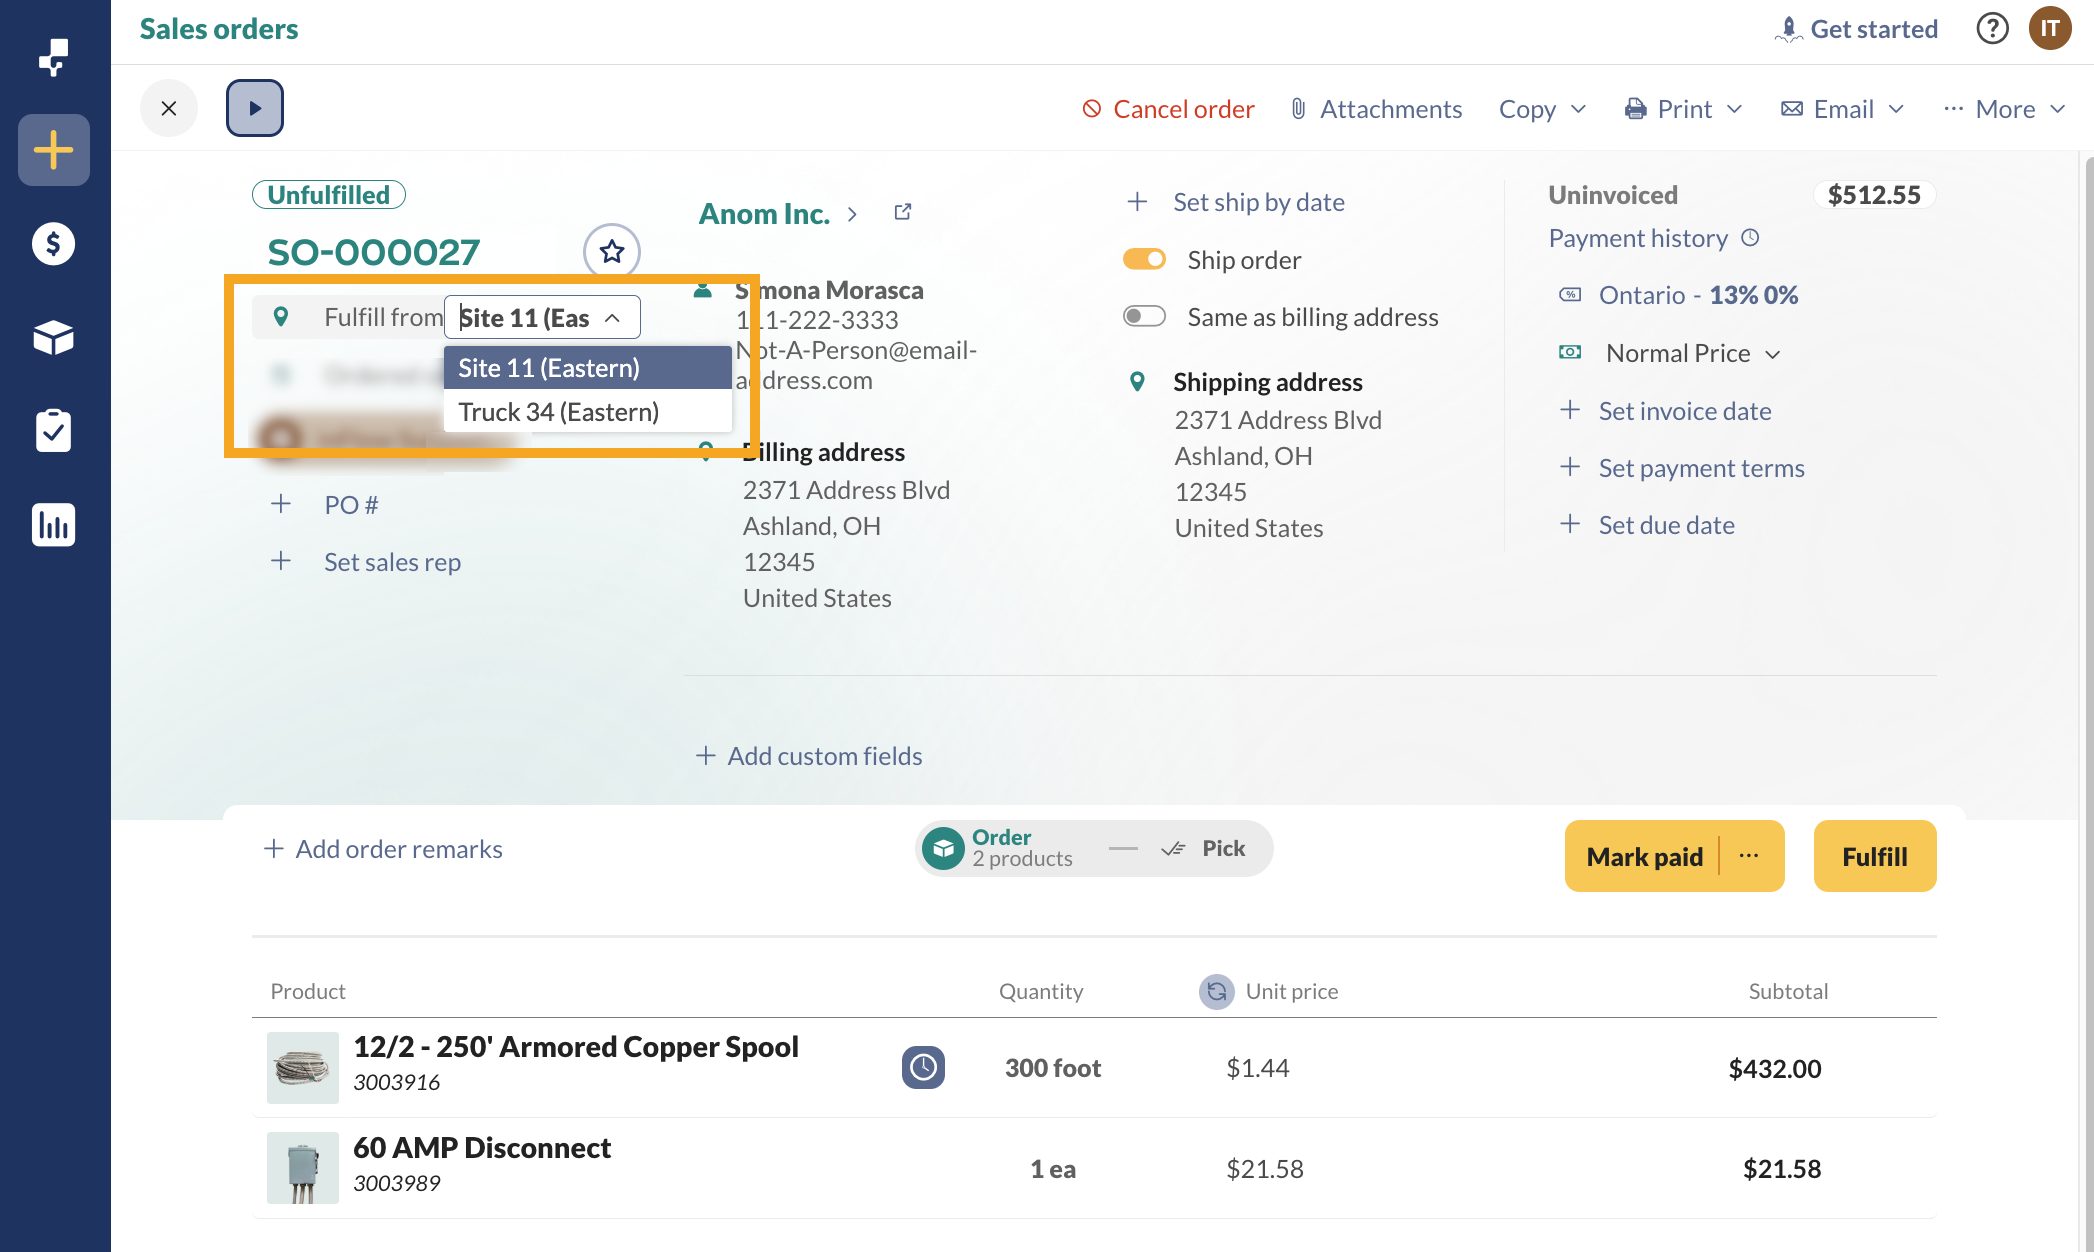
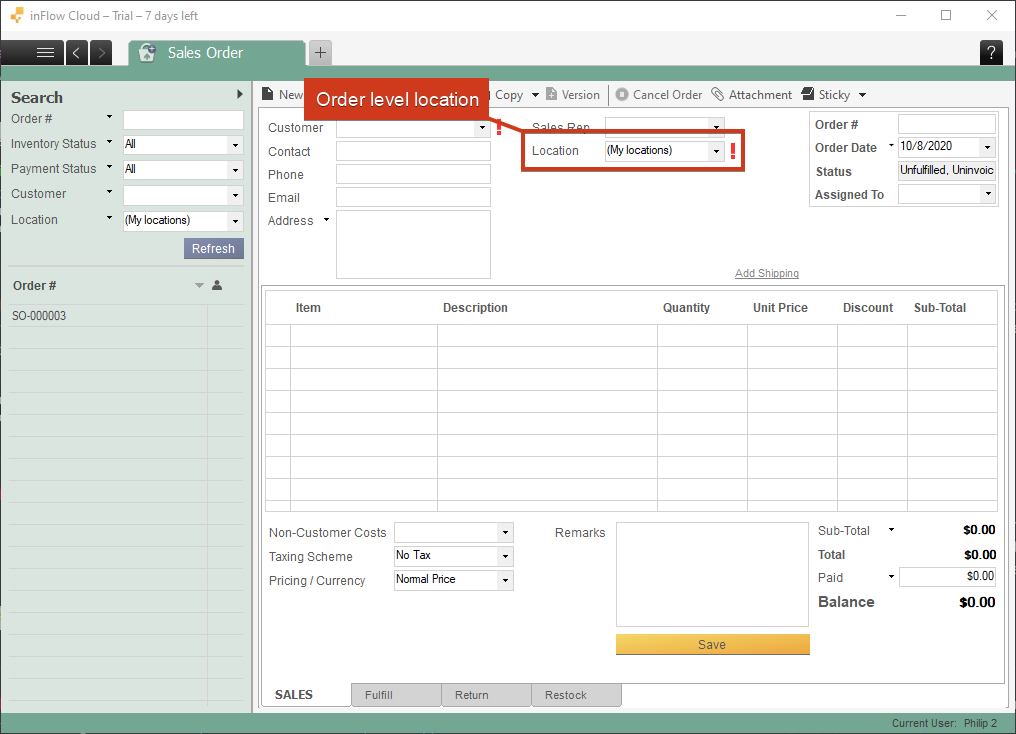
The specific location from which each product is taken in the order is indicated on the pick / fulfill/restock / put-away tabs and can be found on sales and manufacture orders.
inFlow orders lists with restricted location access
All order list views filter by the locations you have access to. This can be seen in the Purchase order list, Sales order list, Manufacture order list, Stock count list, Stock adjustment list, Stock transfer list, and Customer list.


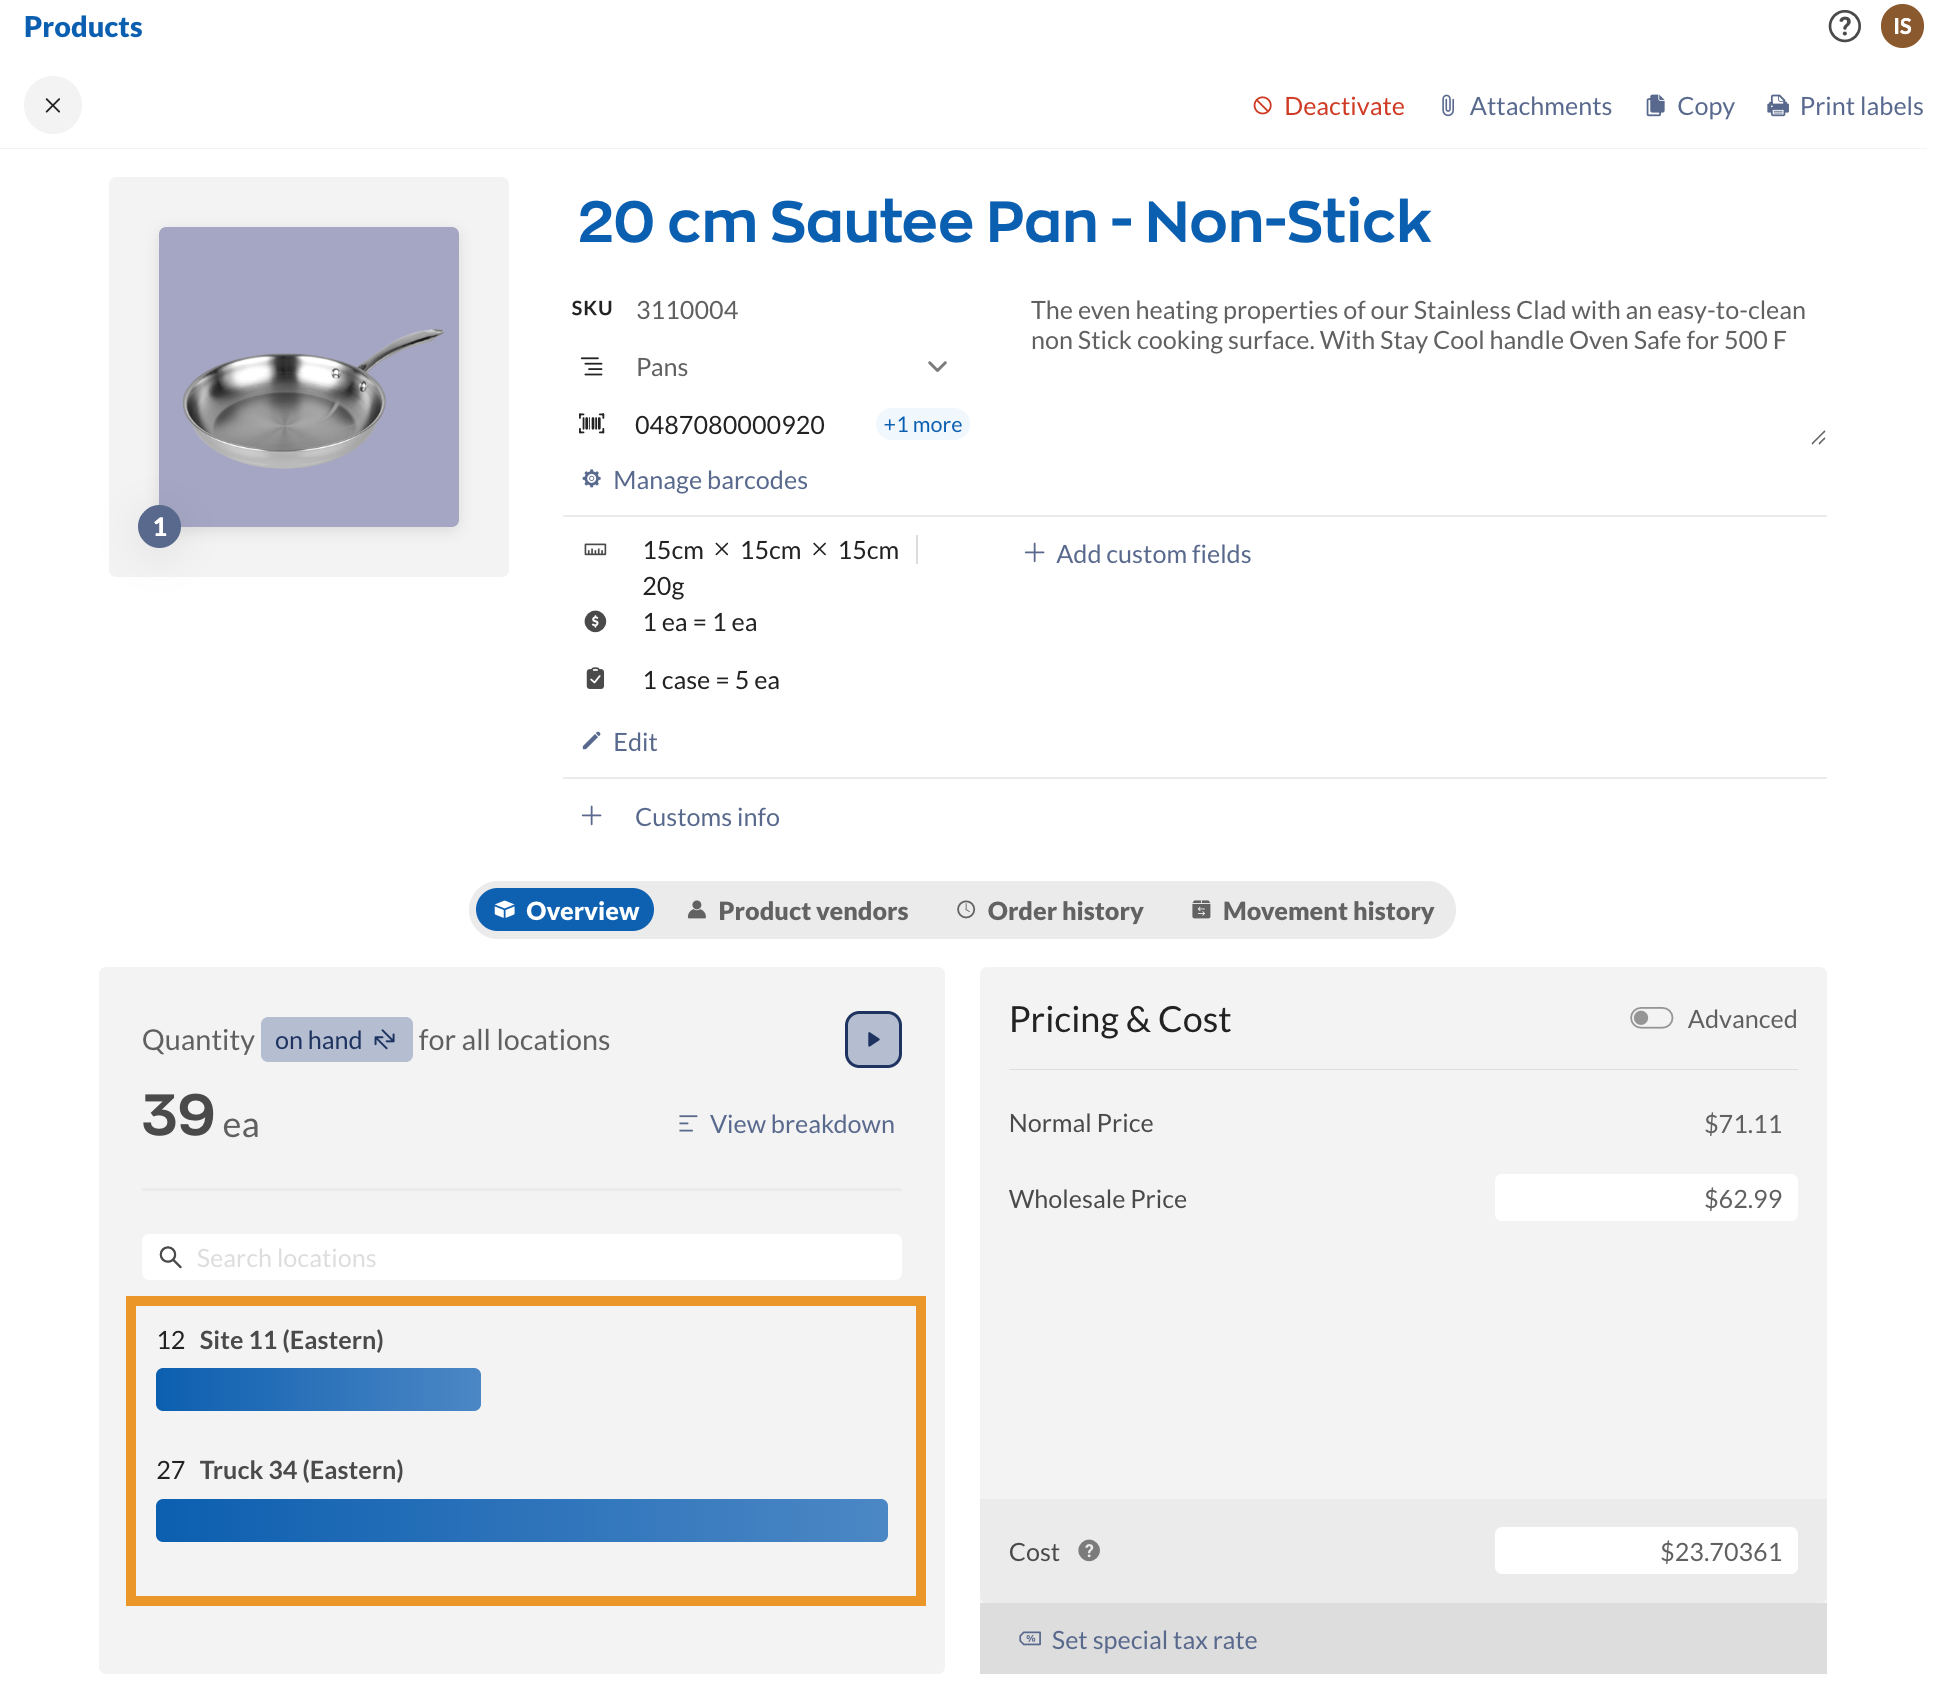
Product records with restricted location access
On a specific product’s details page, only locations with access will display inventory. This also affects the Quantity on Hand displayed here; as a result, different team members could see different quantities on hand for the same item if they have access to different locations.

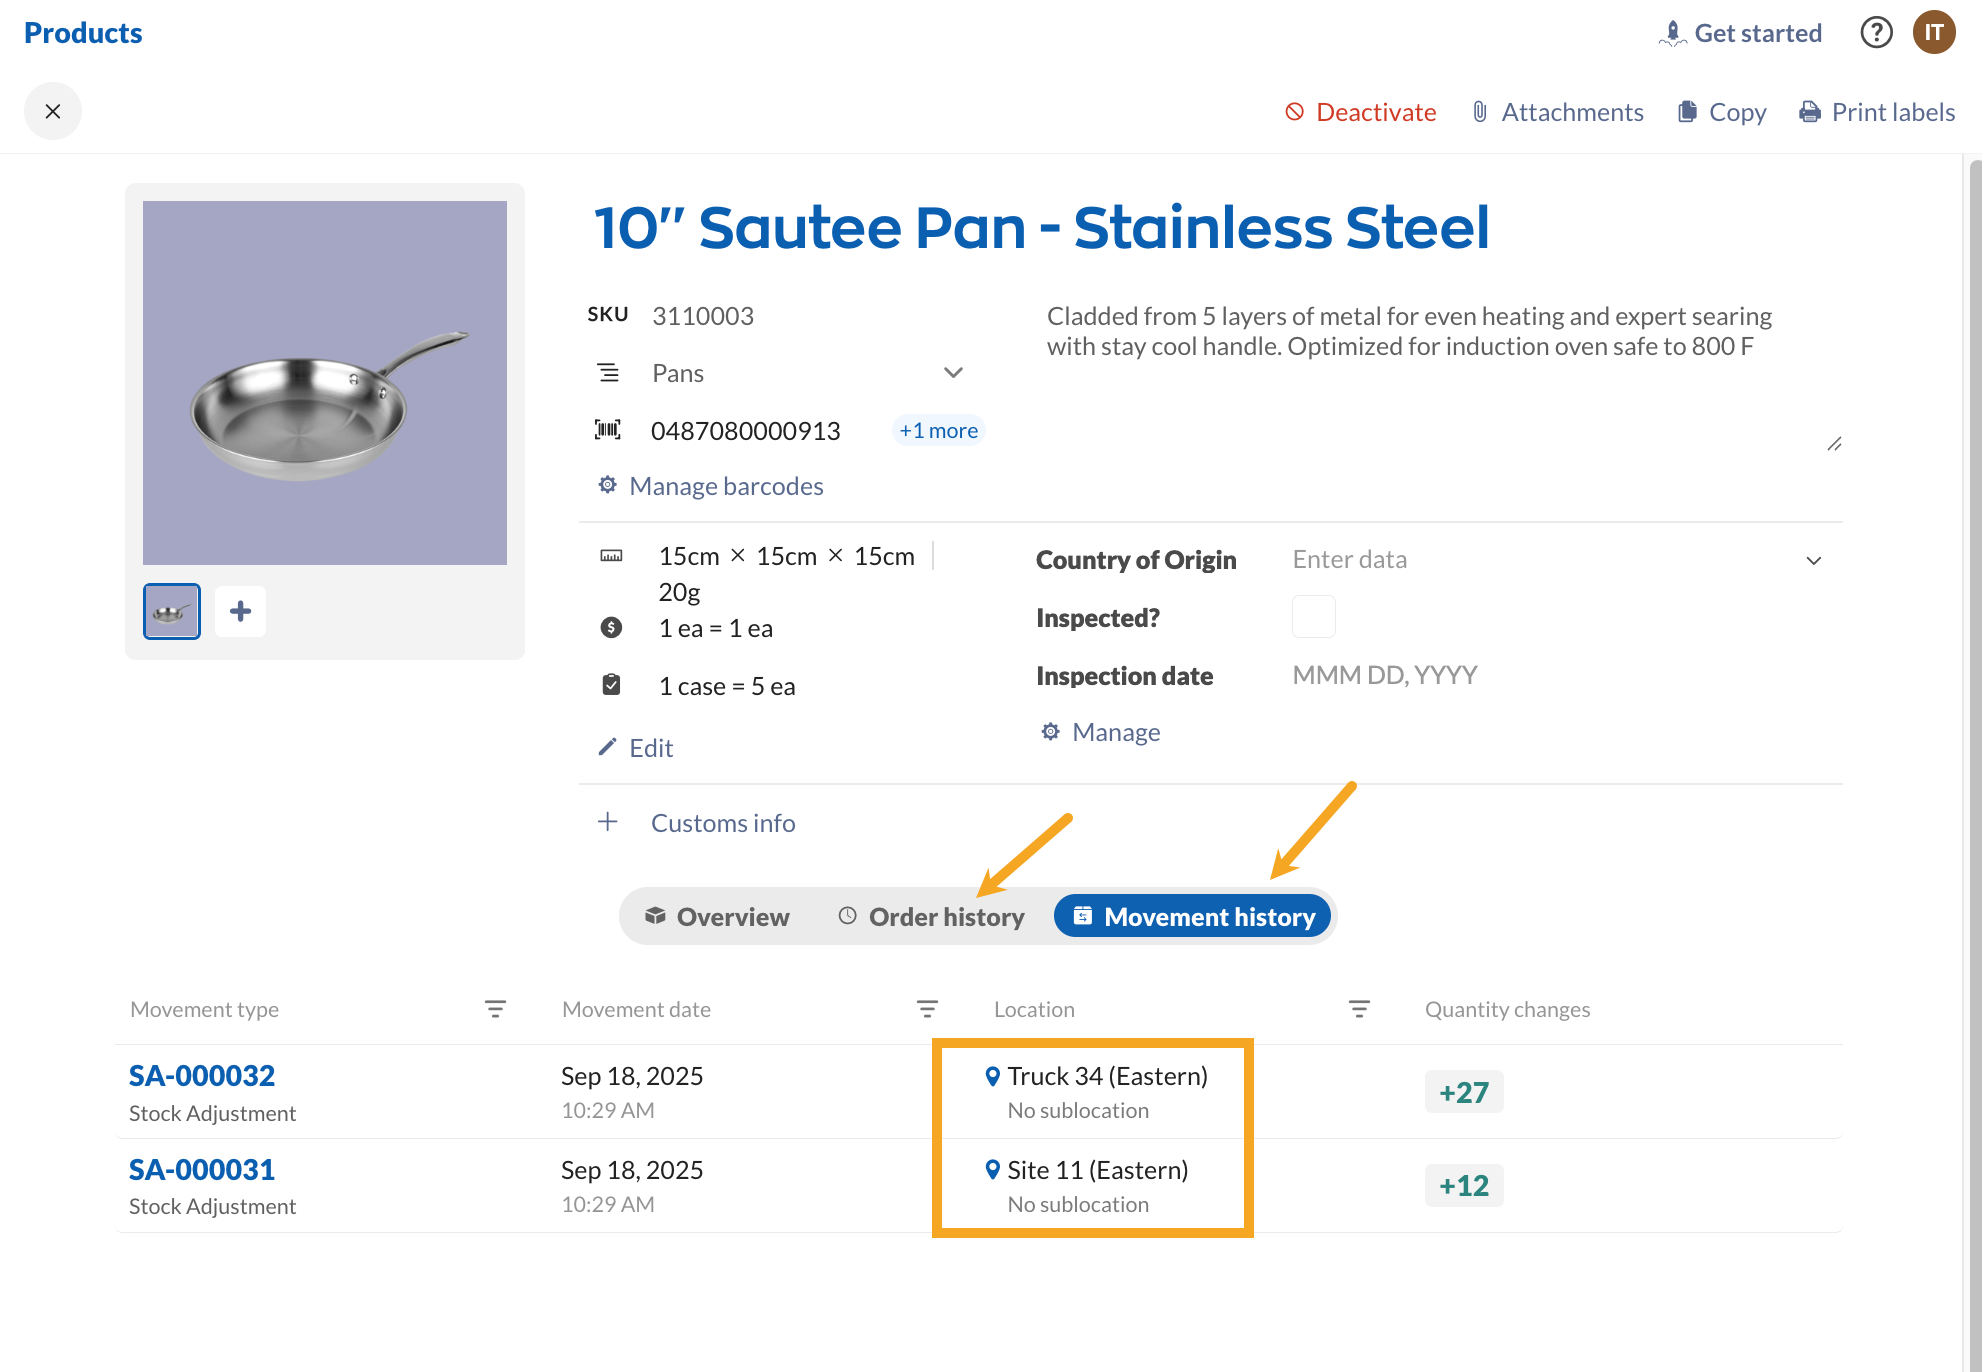
Product records (order & movement history) with restricted location access
The Movement History and Order History of each product will only show transactions associated with locations you have access to. This means that all values displayed, such as Quantity on Hand, Quantity Reserved, Quantity Available, Quantity Picked, and Quantity on Order, will only reflect for the locations you have access to.

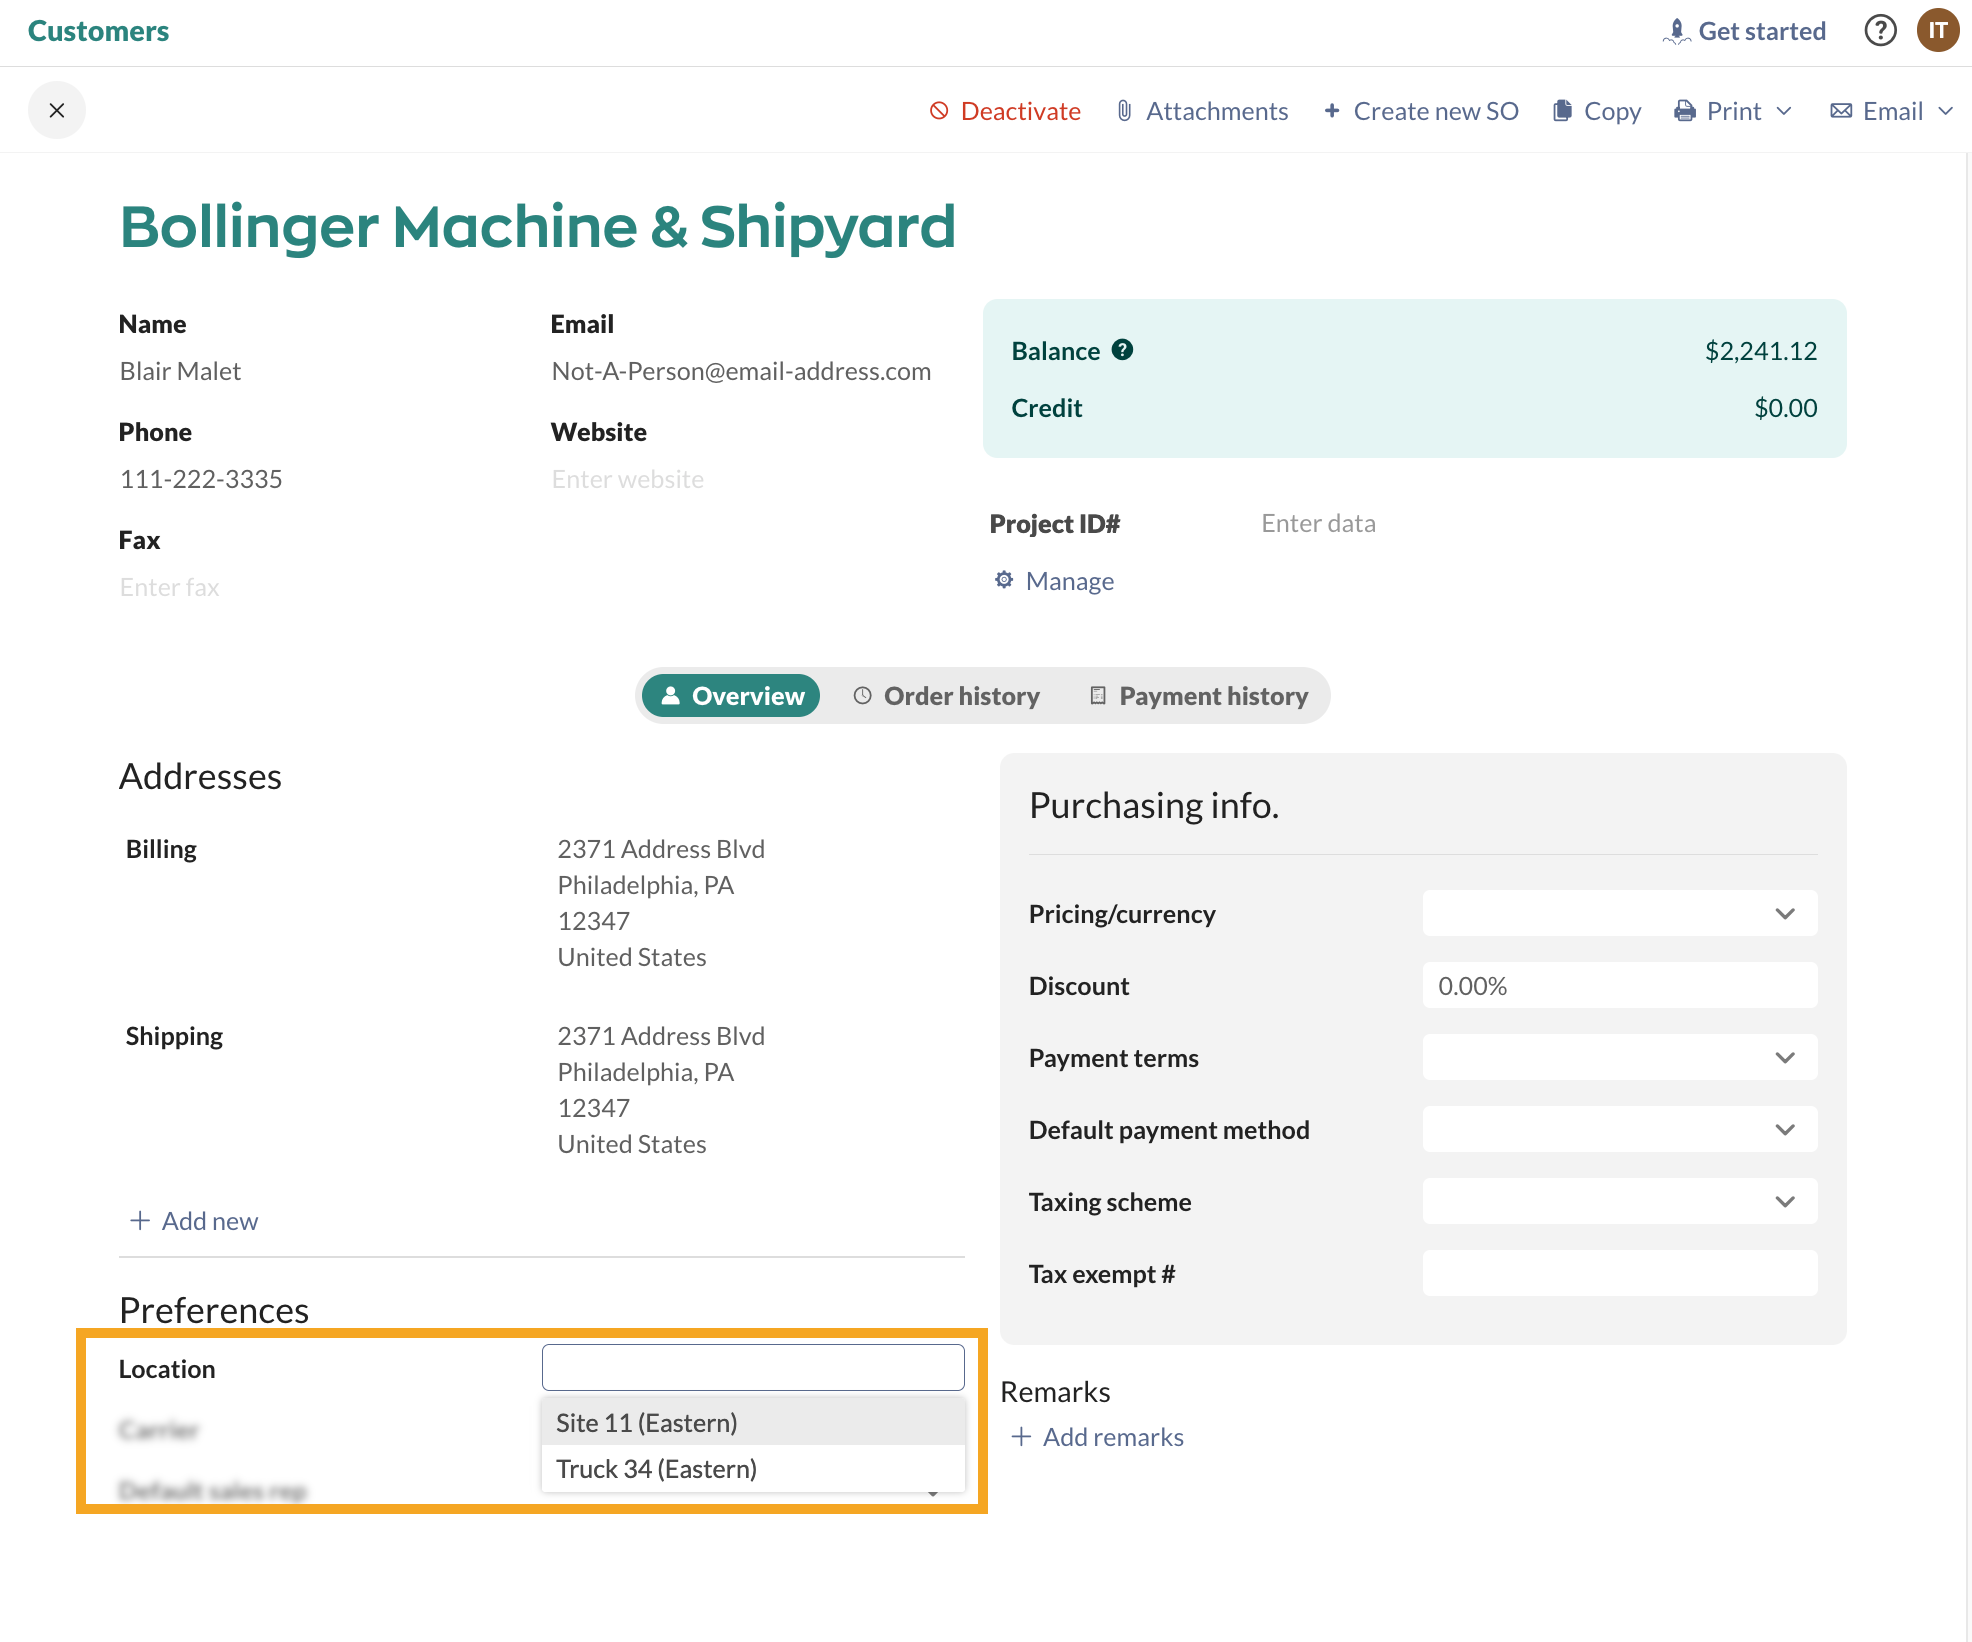
Customer records with restricted location access
Each customer’s default location will only show locations you have access to.

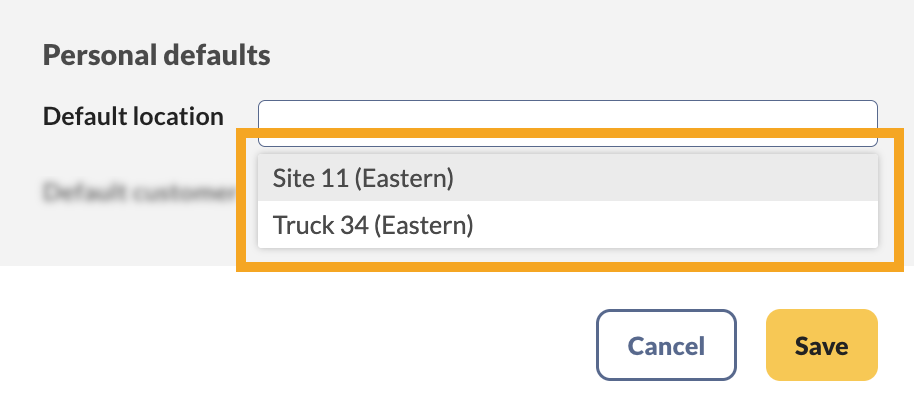
Personal settings with restricted location access
The Default Location in your Personal Settings can only be set to a location you have access to.

Reports with restricted access rights
All report filters will now show the locations you have access to.
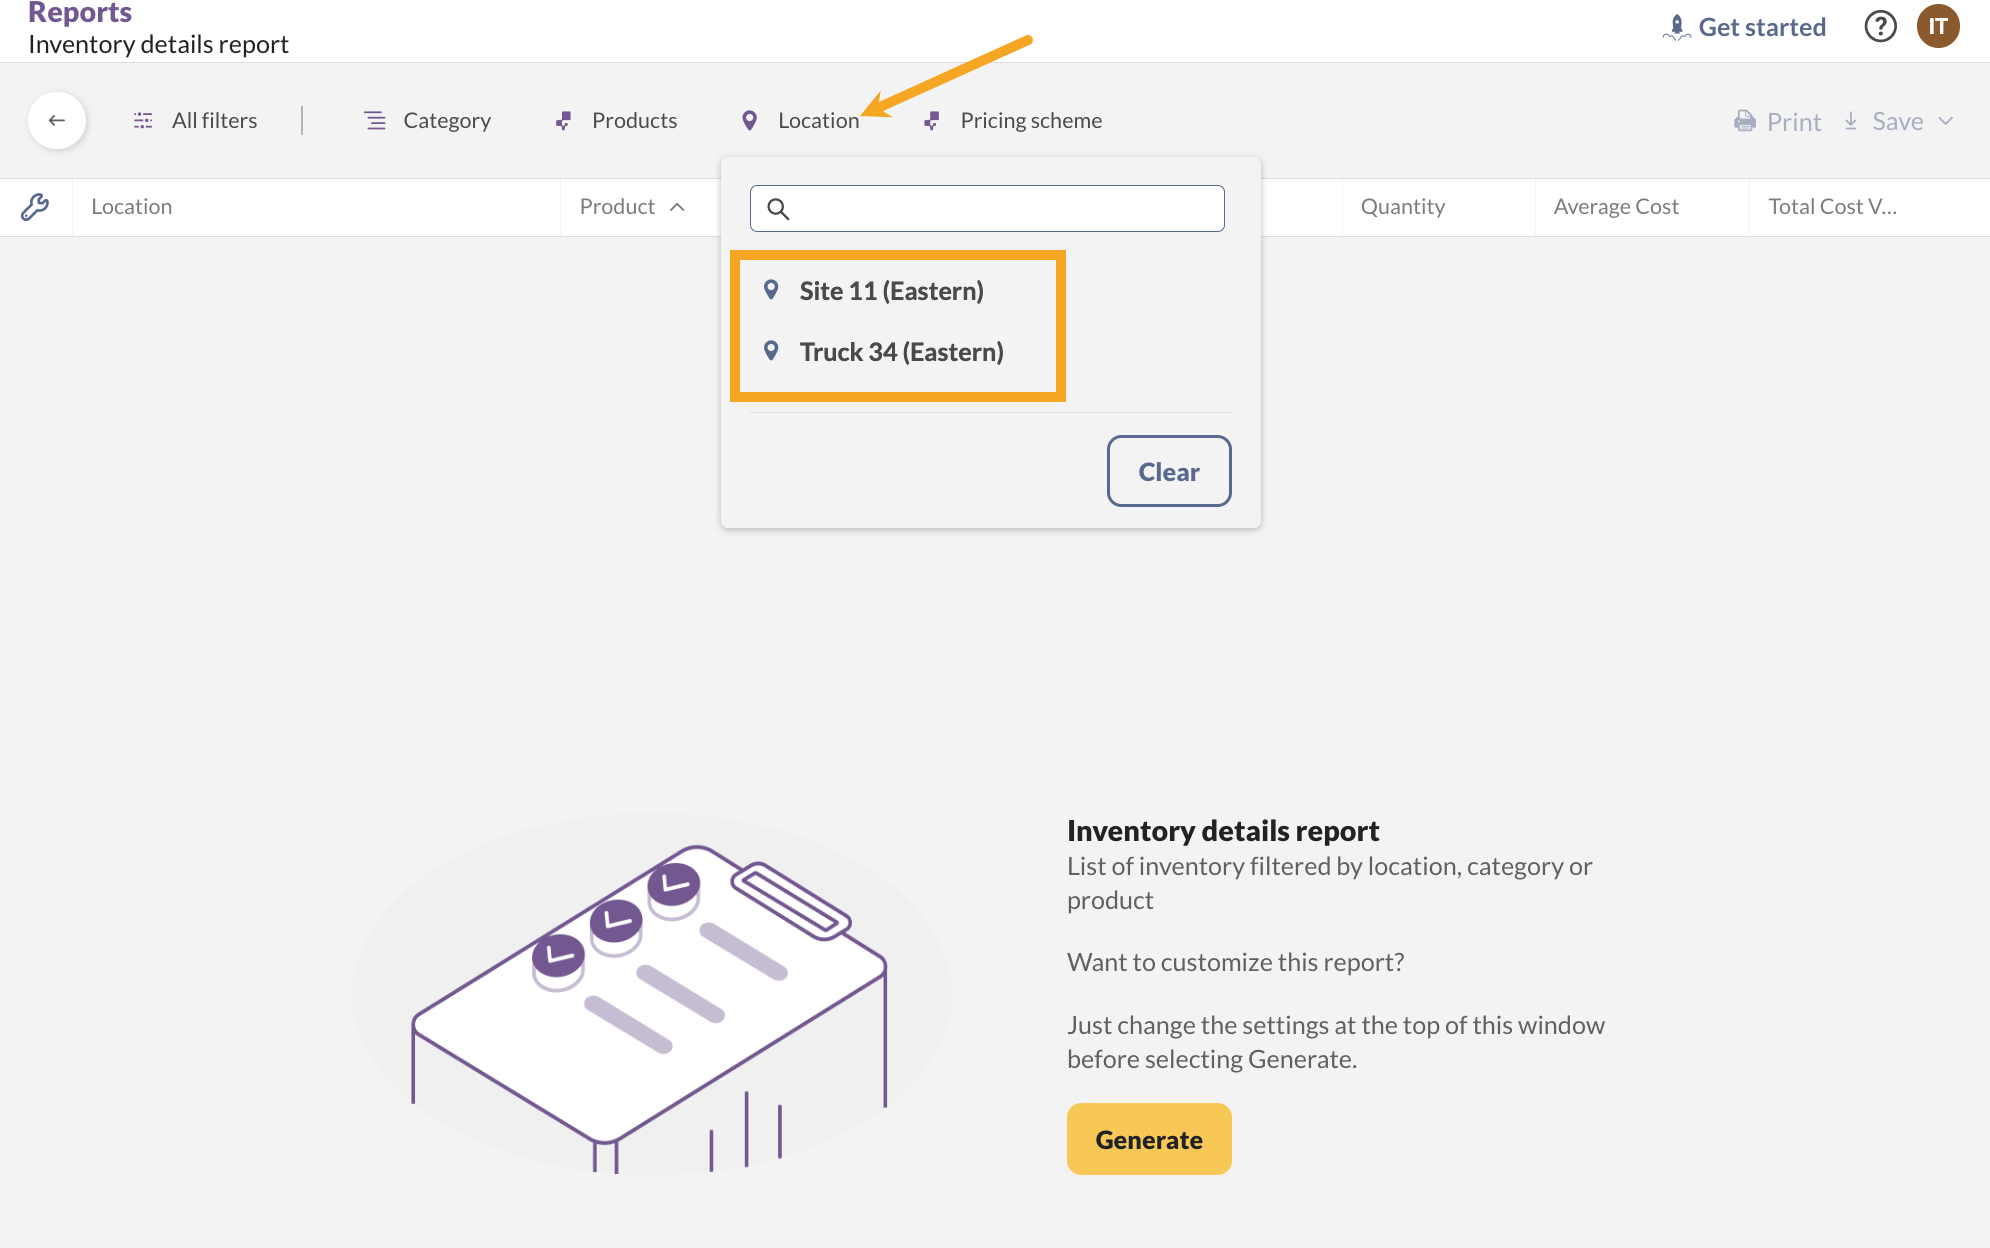
All report filters will now default to (My locations) when a location filter is applied.

Frequently asked questions & troubleshooting
Can team members with location restrictions view orders in all locations?
It’s important to understand that team members will not be able to see any records associated with a location they do not have access to, or records that do not have a location assigned.
For instance, if I do not have access to the warehouse location, I will not be able to view any sales orders linked to the warehouse, nor will I see orders that do not specify a location. This principle also applies to customers, purchase orders, and other related records.
I don’t have access to all locations
If you do not have access to all locations, some areas of inFlow will be completely inaccessible, and you will receive an error message when trying to access them.

An error will be seen when a team member with restricted location access tries to view any of the following features:
- The dashboard
- Historical Inventory Summary Report
- Team Member Tracking Report
- Product Cost Report
- Estimated Inventory Duration Report
Additionally, you will not be able to access or view any orders that either have no location assigned to them (the location field is blank) or are assigned a location you do not have access to. This would be most noticeable in Purchase Orders, Sales Orders, and Manufacture Orders.
I’m seeing a different number/quantity than my team member
Areas where data is totaled across all locations will only show totals from your allowed locations. This means that each team member may see different numbers depending on the locations they have access to.
This means team members may see different numbers/quantities in the Current Stock screen, a product’s inventory level on the Product Details page, and reports that display quantity-related values, such as the Inventory Summary report.
I can’t find an order/customer
Team members will only see orders and customers from locations to which they have access. Any Sales Order or Purchase Order without a location assigned will not be visible to team members without access to all locations.
Customers without a default location will still be visible to team members without access to all locations. However, you cannot apply for a batch payment or view customers’ payment history without a default location you have access to.
I am unable to make a batch payment or see my customer payment history
If you do not have access to view all locations and your customer’s default location is empty, the option to create batch payments will be hidden.
Additionally, if you do not have access to all locations and your customer has no default location set, the Payment History tab will be hidden.
If they do have a default location set and you do not have access to all locations, you will be able to view the payment information, but not the details of the orders themselves.


how to limit access to change of product sales prices?