inFlow’s Online Showroom: inFlow’s B2B portal
Do you want to easily sell your inventory while ensuring accurate stock numbers? inFlow’s Online Showroom is the solution!
Please note that this feature is available on select plans or add-ons.
Overview
Showroom overview
The Online Showroom is a way to share your product information online with customers, allowing them to view the products you sell, check stock availability, and place orders. You can control exactly which products and product information you want to display in the Showroom’s simple and customer-friendly catalog-style view.
We’ve set up a sample Showroom. Check it out here!

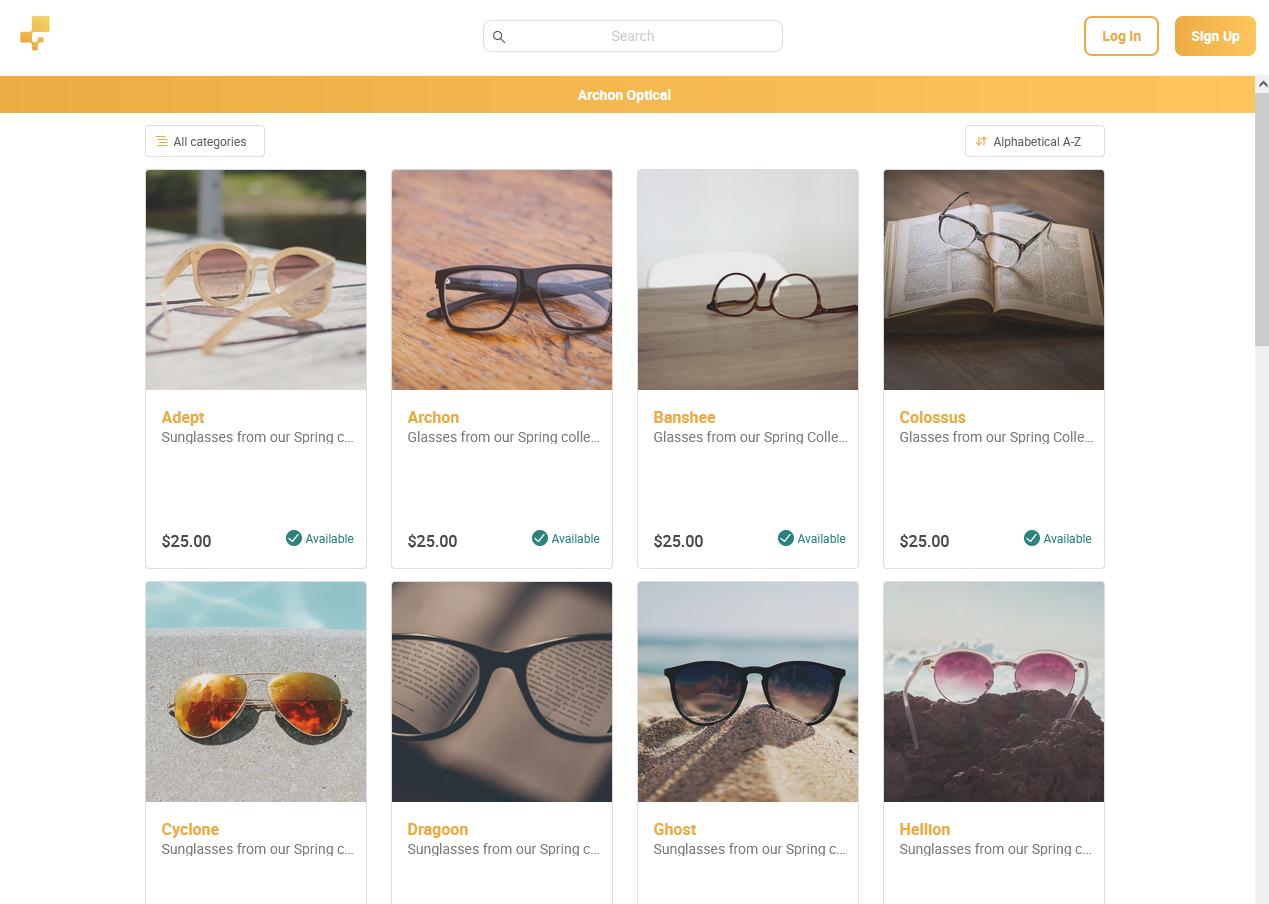
What does the Showroom look like?
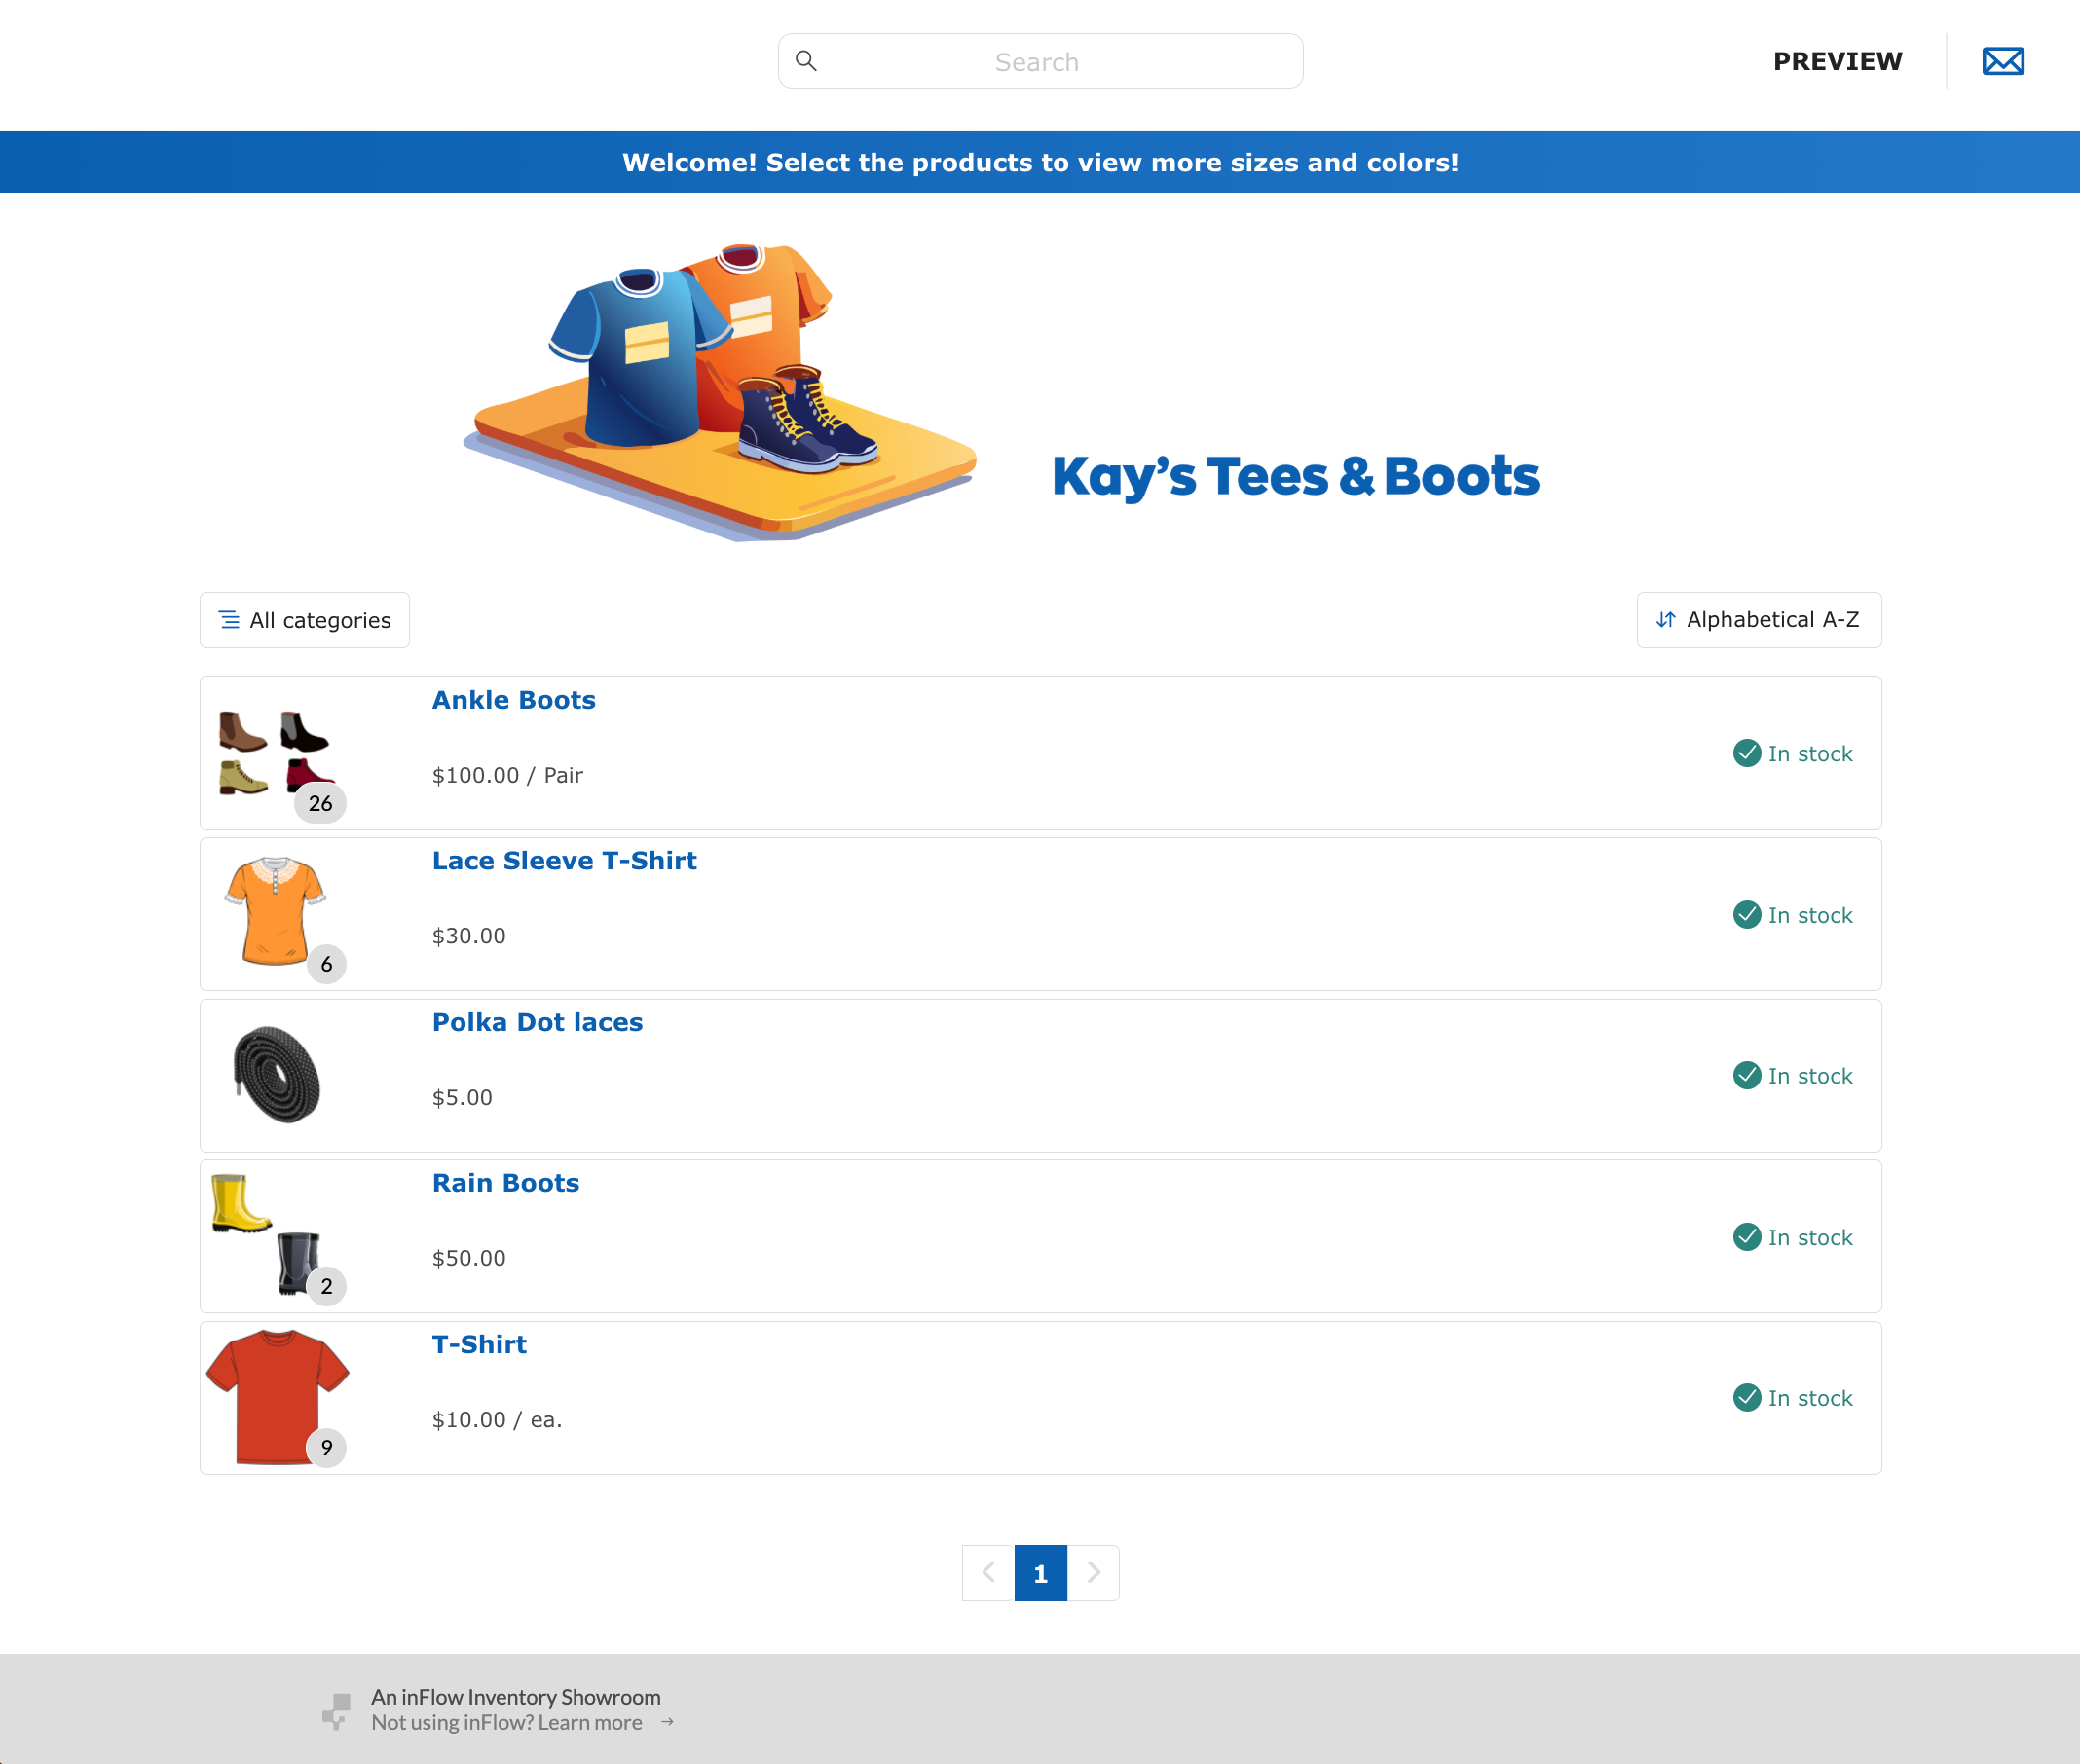
The Showroom has a clean design with your company name and logo at the top left-hand side of the page.
Showroom uses your inFlow Inventory company logo from the Company details section. To modify your company name and logo:
- Log into inFlow’s account settings.
- Click Edit company details. Here you can set your company logo, name, address, etc.
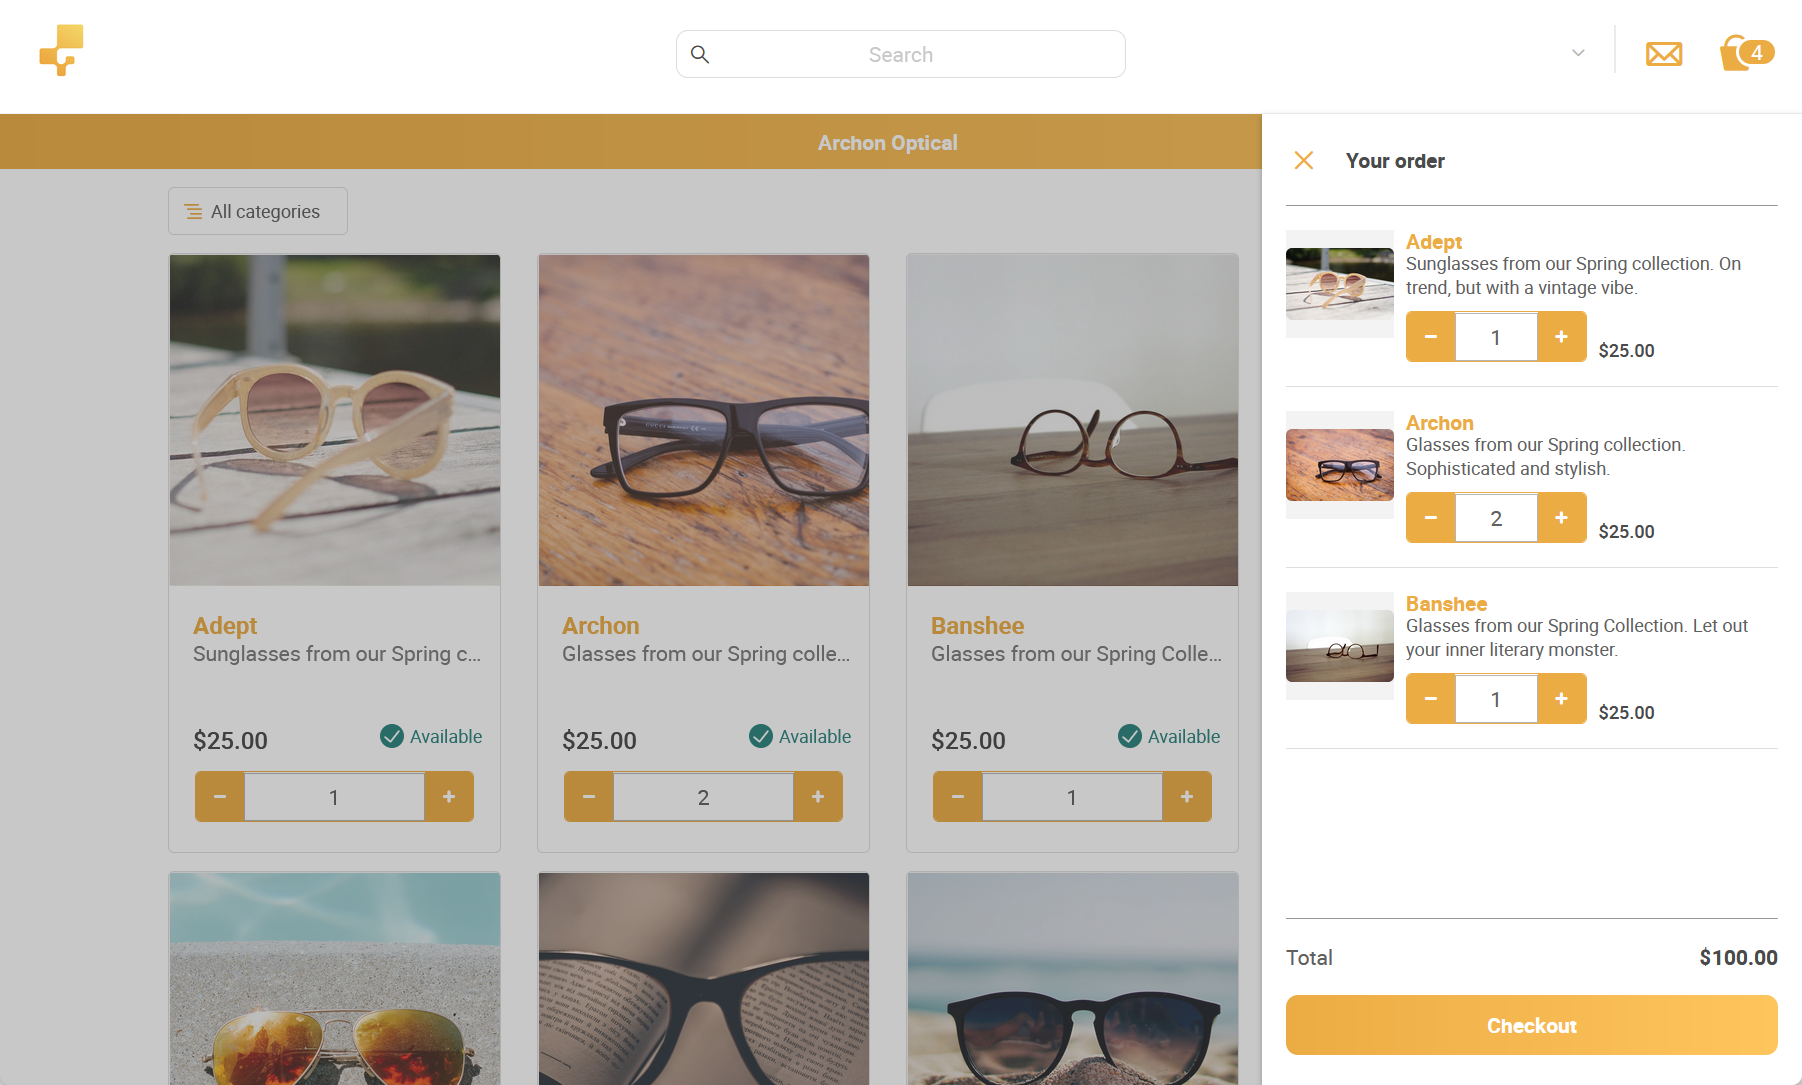
If you’ve sent a private showroom invitation to your customers, there will be a shopping bag icon at the top right of the screen. The current number of items in the cart is shown there, and clicking it will open the shopping cart, where the customer can review their order and check out.
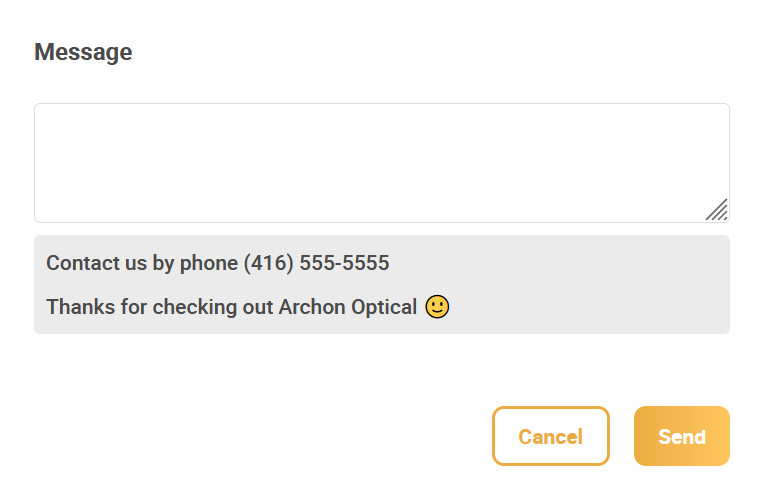
Customers viewing your Showroom can contact you using the built-in email form at the top-right corner of the page. From the showroom set-up window, you can choose what email address your mail is directed to. The phone number and contact message are also listed at the bottom of the email form.
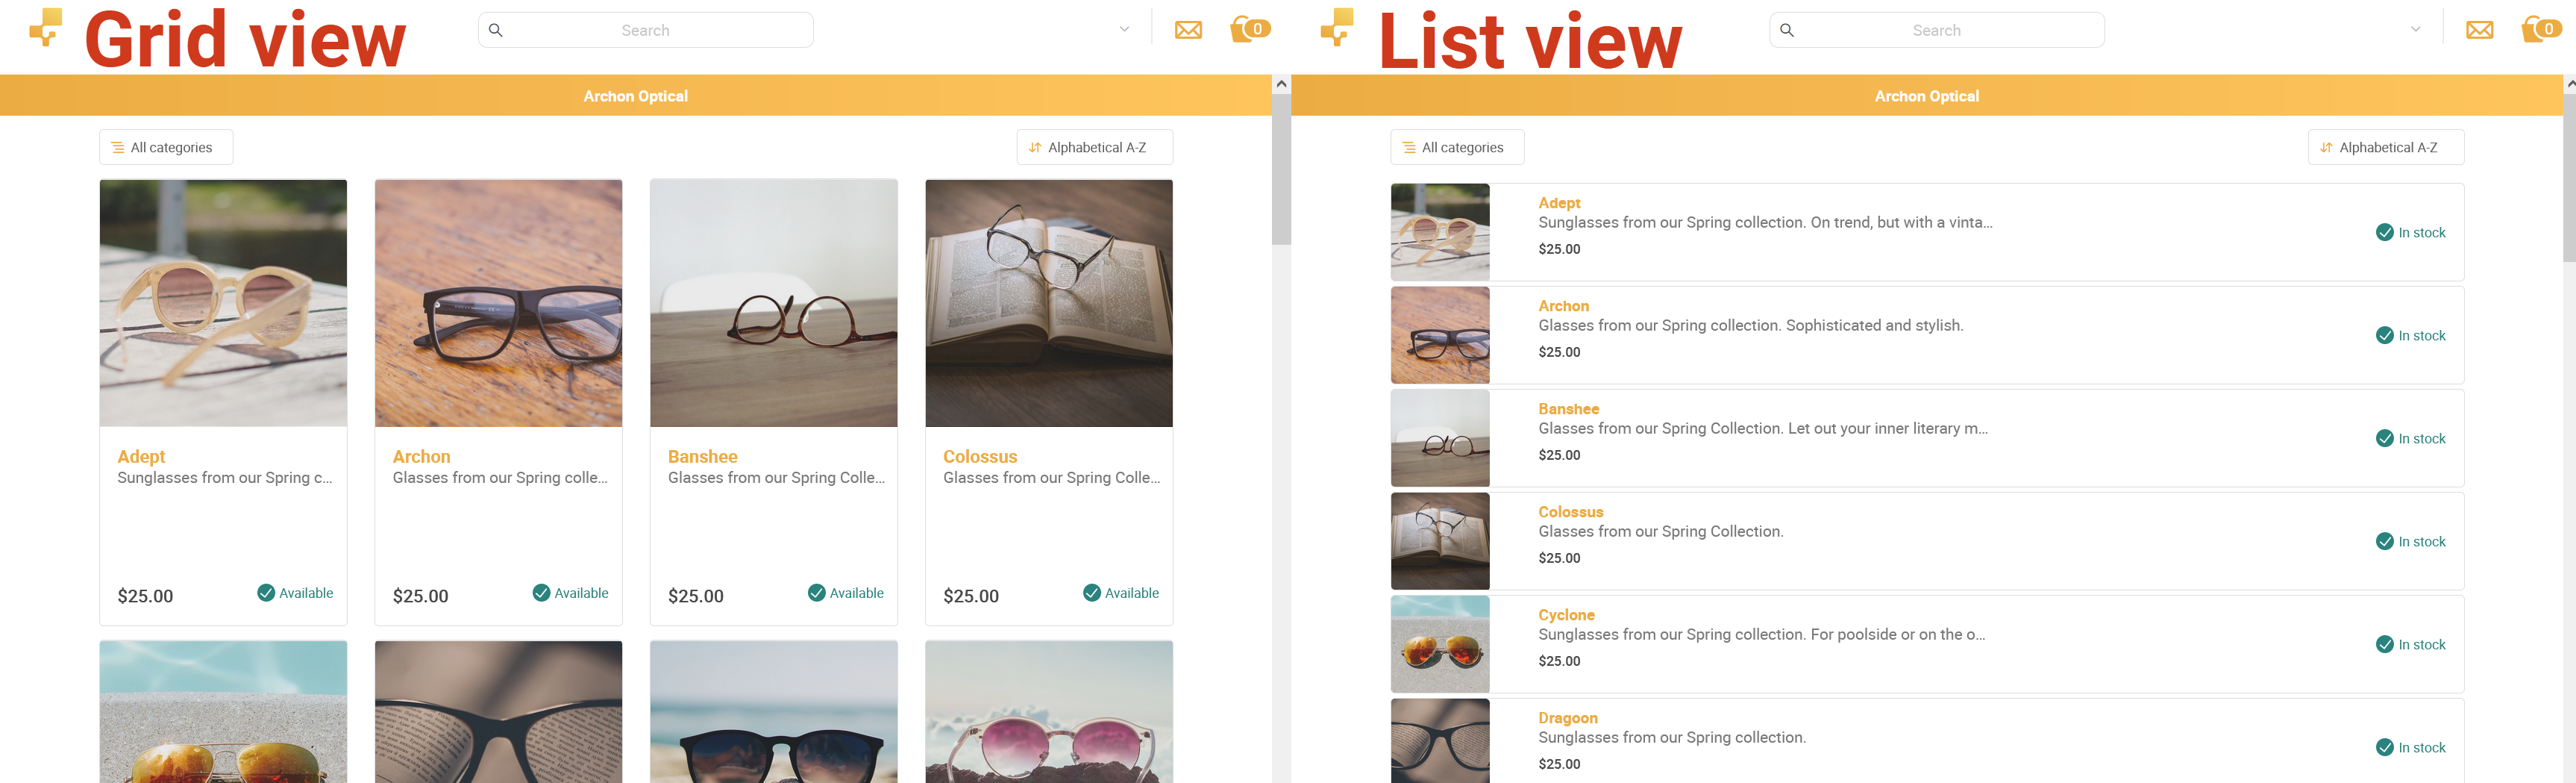
Depending on your chosen settings, your customers can view your items in a grid or in rows.
Any items without an image in your inFlow database are replaced with a generic colored placeholder image.
Product details
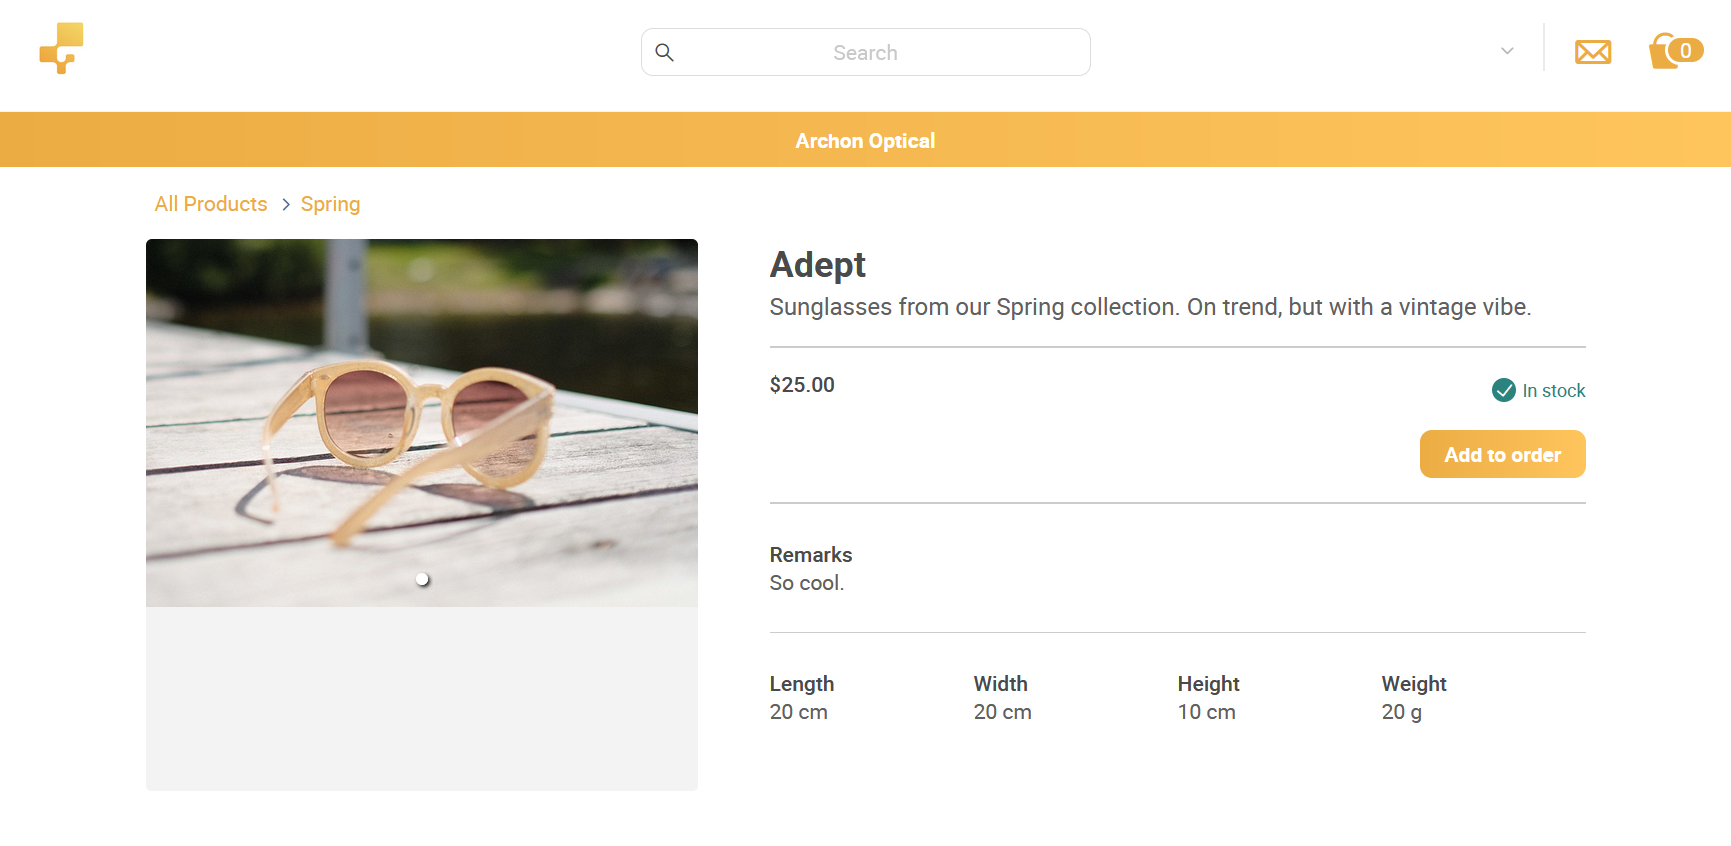
Customers can click on any product to get more details about it. If you’ve set up the Showroom to display descriptions, quantities in stock, measurements, or other information, it will be here. If you’ve enabled order taking, your customers can select a quantity of the product and add it to their order.
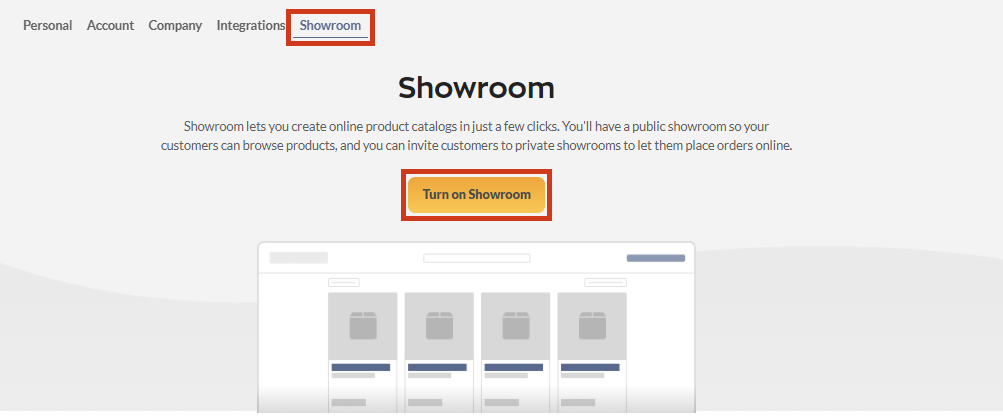
Setup
Setup
If you’re logged into the inFlow Inventory Windows app, you can use the shortcut to redirect you to the Showroom settings by clicking on Main Menu > Options > Online Showroom. Your web browser will open, and you can click on the Showroom tab.
If you’re already logged into the inFlow web app, then you can access the Showroom settings from here. Please note that the Showroom can only be accessed by inFlow Inventory admins.
To change the Showroom settings, click on Turn on Showroom.
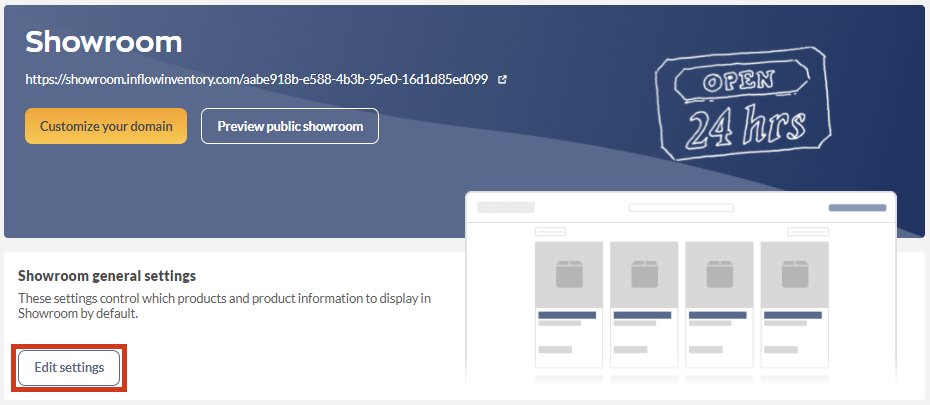
Once enabled, the Showroom section gives you the option to preview your Showroom or copy the URL for your Showroom site for you to share with others.
General Showroom settings
The Showroom general settings are where you can set up how your Showroom will look to your customers. The general settings almost act as a template for when you decide to create personalized Showrooms for your customers.
Under the Showroom general settings heading, click the Edit settings button to select the products, custom fields, and relative information that you want to display in your Showroom.
You’ll now see a full list of settings you can change to personalize your Showroom. You can click the Preview Showroom link on the bottom left at any time to take a look at your changes.
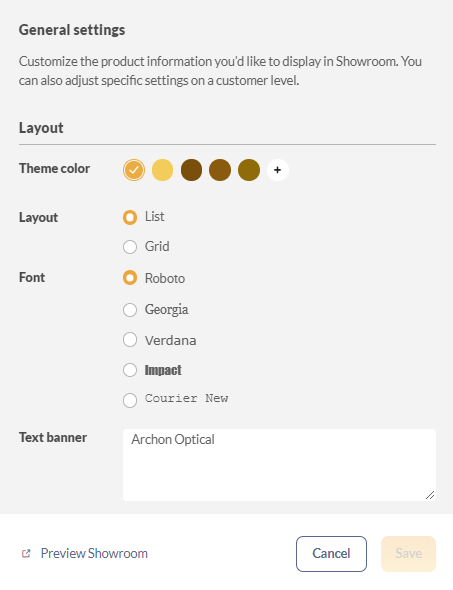
Theme color
The Theme color offers suggested theme colors based on the color scheme of the logo uploaded in your inFlow Account settings. If you don’t have a logo uploaded, the Showroom will show the default blue colors. You can also click the “+” button to add additional colors with the color picker or by adding the color #HEX code.
In this example, the shades of orange and brown inFlow suggest being based on the inFlow logo uploaded in the inFlow Account settings. Please see the two images below as an example.


Layout
The layout settings allow you to customize how your products are displayed in your Showroom. There are two options: List and Grid. The List view is best suited for displaying products with longer names, while the Grid view is ideal for showcasing product photos.
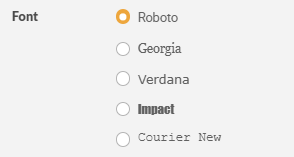
Font
This area is where you can select the font you’d like your Showroom to have.
Text banner and banner image
In this section, you can add a banner at the top of your online Showroom to match your company’s branding. You can use both banners or just one.
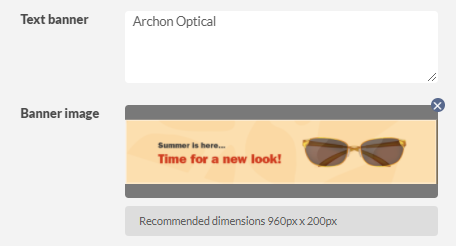
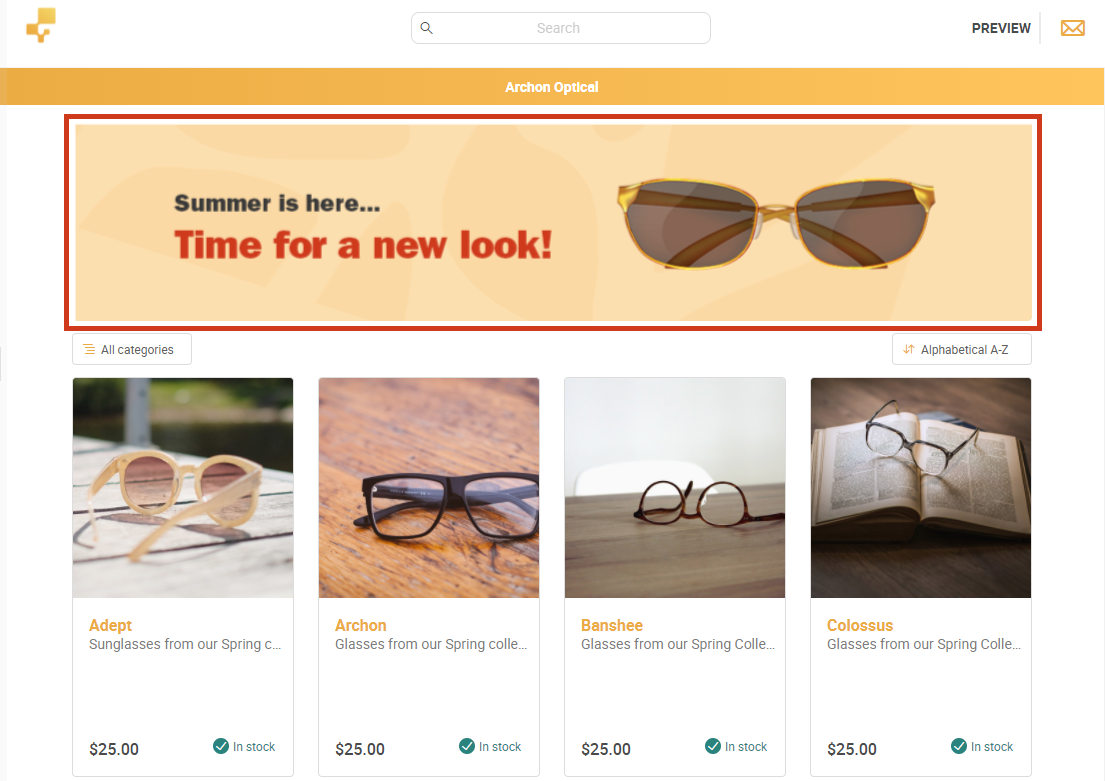
Note the Text banner from the Showroom settings is listed at the very top of the page, followed by the Banner image.
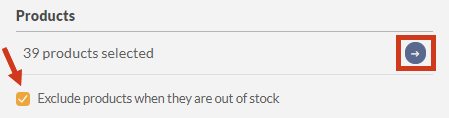
Products
To select the products to show in your Showroom, click on the arrow in the products section. You can also exclude out-of-stock products by adding a check mark to the Exclude products when they are out of stock setting.
Click on the checkbox of a category to display the products in that category in your Showroom.
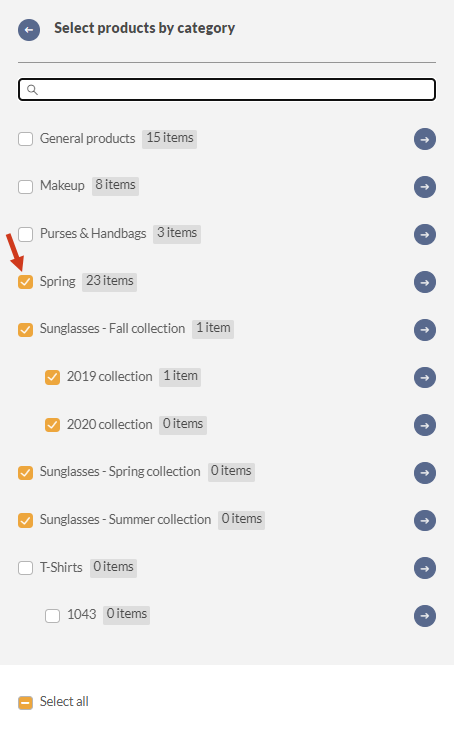
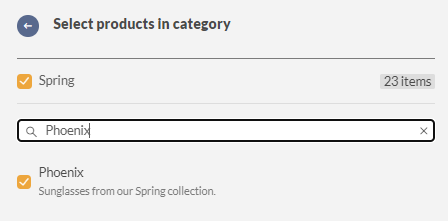
If you only want to display a subset of the products in a category, click on the grey arrow and select the products you want. You may also search for a specific product.
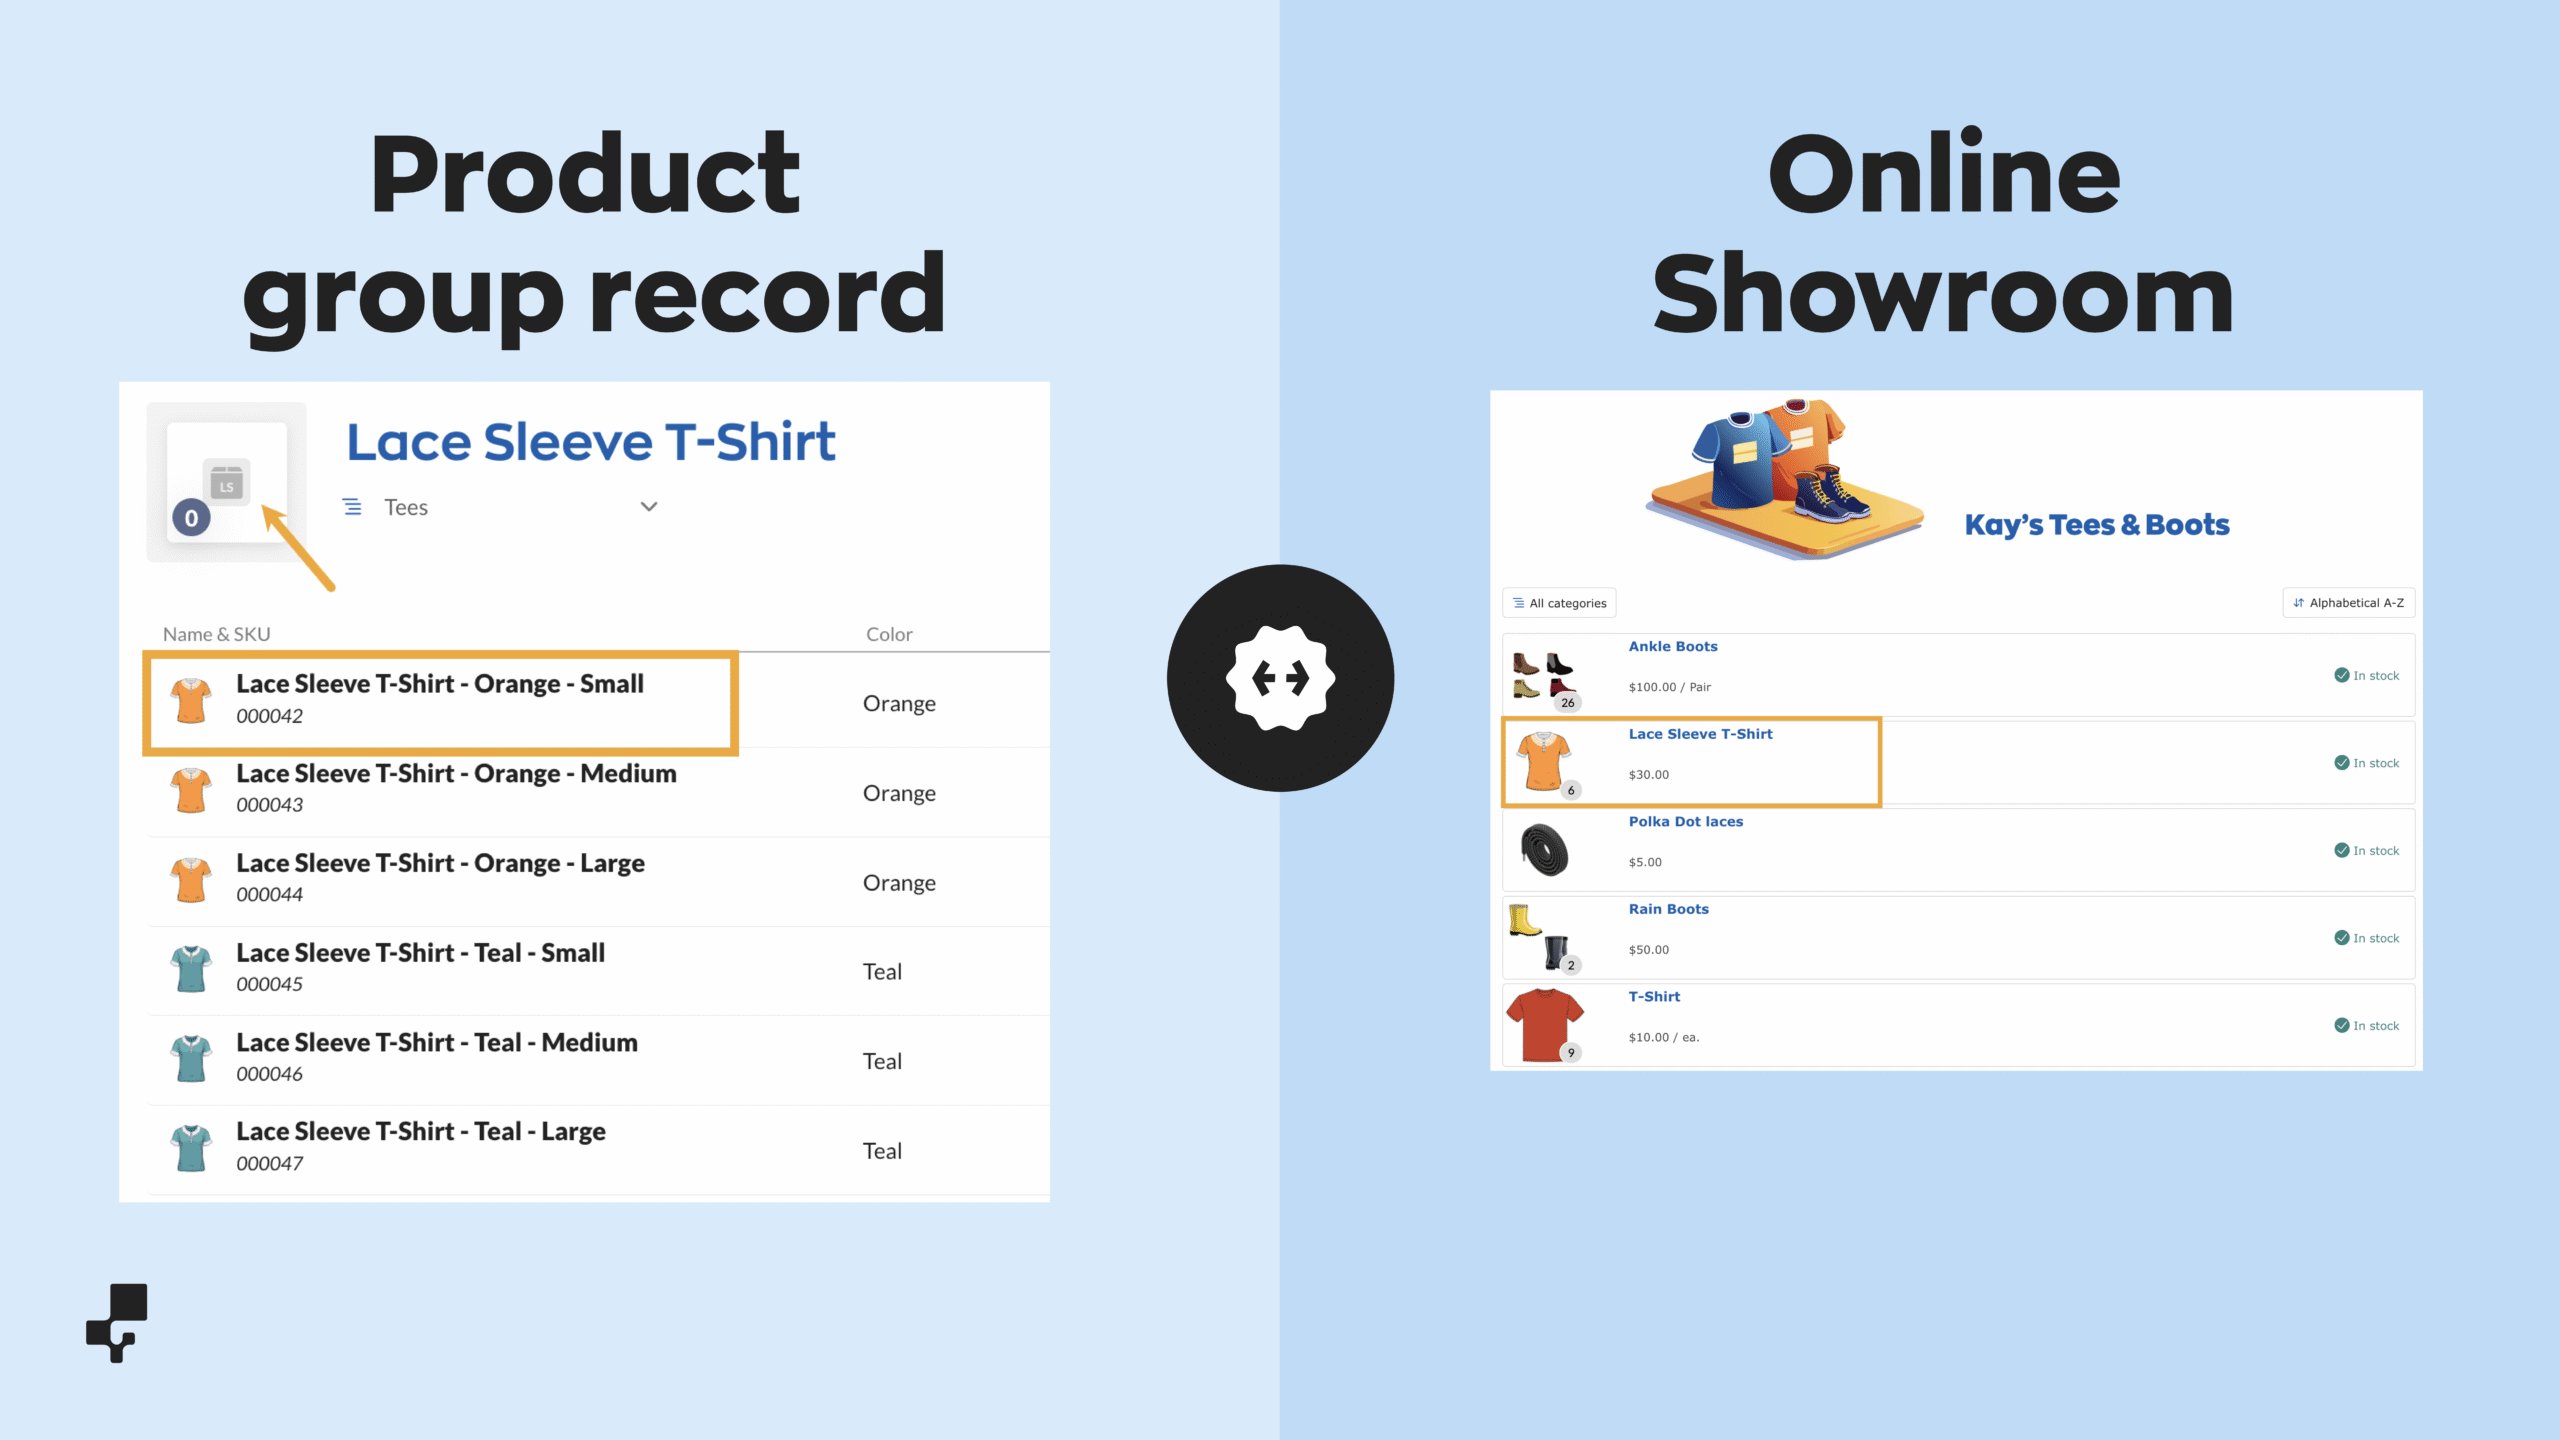
How will variants work with the Online Showroom?
When using the Online Showroom, the product group is listed on the product list, accompanied by a number in the corner of the product image that represents the available variants.
When selected, drop-down menus are available for your customer to choose an option.
When the sale syncs to inFlow, only the variant option product will appear on the sales order, not the entire product group.
What product details does the Online Showroom list?
You can select which details are shown for each product from the Showroom settings, just like with standard products.
If your Showroom setting displays the quantities in stock, the Showroom list page will show the combined quantities available for all variants.
When you select a product from the Showroom listing, you will see the default variant option first (the one listed first in the product group), along with the SKU, pricing, and other product details.
Variants that include their own images will show these images first, followed by any images from the product group.
What if my product group doesn’t have an image?
If there is no product image on the product group record, the Showroom will display the image for the first product in the product group.
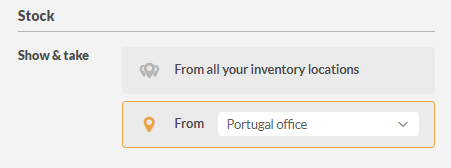
Show and take stock
You can choose to show and take stock of either all your inventory locations or from a single location. This option is on the Edit settings > General Showroom settings section, and you’ll also be able to adjust it on the Showroom special access section on each customer’s settings.
New customers added to your Showroom will have their location matching your general settings location unless they already have a Location set on their Preferences on the Customer page.
Note: Any existing Customers who have a default location set on their Customer page and were invited to Showroom will only see stock available from those locations. Orders from these customers will also automatically have that location set on the Sales Order.
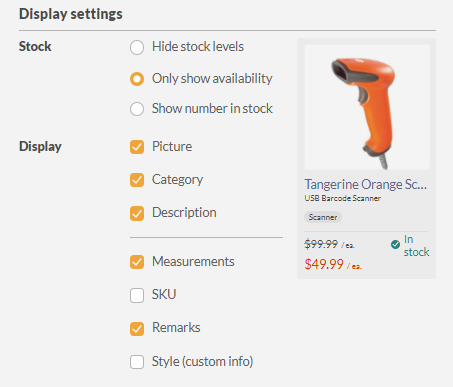
Display settings
This section allows you to customize the information from inFlow that will be displayed on the Showroom. Choose to display the quantity in stock, whether an item is in stock, its image, category, description, measurements, and/or custom fields.
For product quantities, the Online Showroom only shows the available quantity, not the quantity on hand.
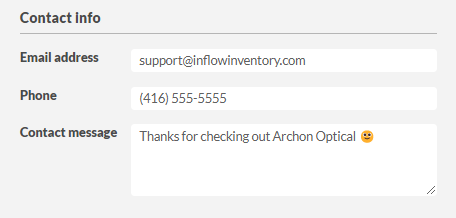
Contact info
The Contact info section lets your customers reach you. Your phone number will be displayed in the Showroom contact section, and any messages your customers send will be sent to this email address. Additionally, if an order is placed by an invited customer, an email will be sent to them with the order details.
Click on the Save button at the bottom of your screen and your Online Showroom is complete! To take a look at it, scroll to the top of the Showroom screen and click the Preview public Showroom button.
Access
Giving access to the Showroom
Now that you’ve created your Showroom, you have the option to allow it to be seen by everyone, or you can keep it invitation-only.

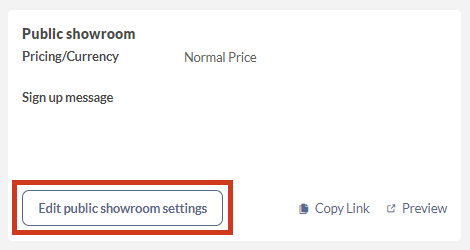
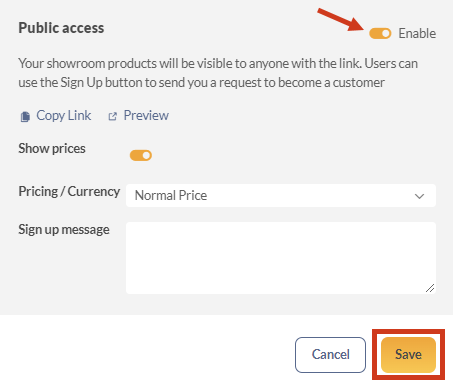
Public showroom
To allow your Showroom to have public access click on the Edit public showroom settings button on the Public showroom tile.
- Toggle the Enable switch on.
- There will be a few settings listed below. You can choose to show prices for your products, select your Pricing/Currency, and customize the signup message.
Note: Keep in mind that the Show prices setting needs to be selected to allow customers to order from you. If the prices aren’t shown on your customer’s special Showroom invitation then they won’t be able to place an order.
- Once you’re done with the changes, click Save.
The signup button is displayed on the public access Showroom for a new user to sign up as a customer in your inFlow database.
You can now copy the Showroom link and send it out to start sharing. You will find your Showroom URL on the top of the Showroom setup screen.
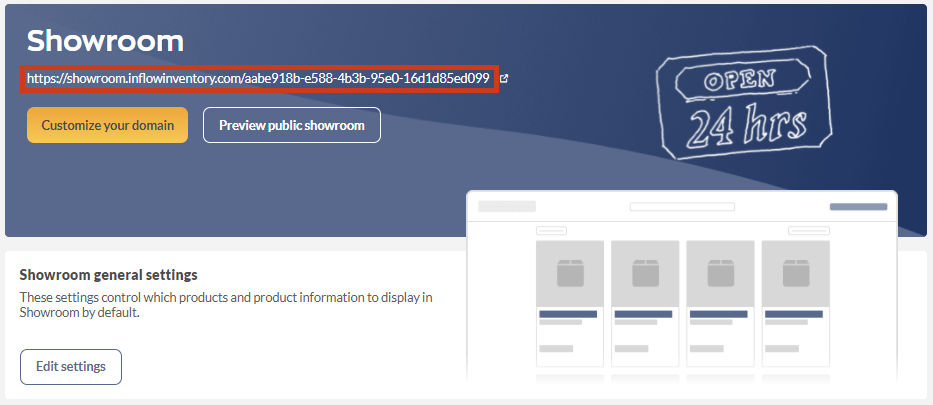
You also have the option to customize your domain if you have the Showroom Pro add-on.
Private showrooms
If you’d like to send a custom view of your Showroom to someone or allow them to place orders through your Showroom, you can do that with the Private showrooms feature. You can select which products and details your customers can see, and you’ll also be able to display a specific location to them.
There is no limitation on the number of invitations that you can send out for your online Showroom.
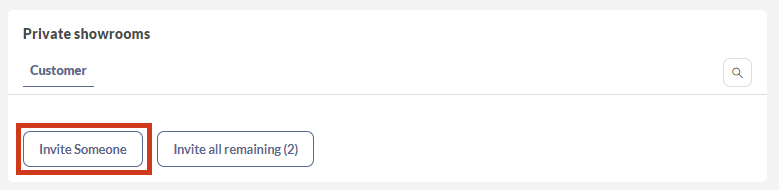
- Click the Invite someone button on the Private showrooms tile.
If you want to invite all your customers with an existing email address, click on the Invite all remaining button. The default Showroom settings will be applied to these customers.
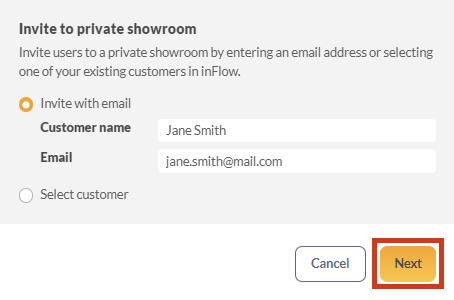
- An invitation window will open. If you’re inviting someone to your Showroom who isn’t a customer listed in your inFlow database, select Invite with email and then enter their name and email address. If you’re inviting an existing inFlow customer, choose Select customer and then select their name from the drop-down menu. Their email address and name will auto-populate. Click Next to go to the next step.
- In this window, you have the option to customize which products and settings will be viewed by the recipient. Select the Showroom settings from the products, stock, price, and display settings, as well as the message sent to them. If you want them to view your Showroom with the default Showroom settings, turn on the Match general settings toggle next to the Products, Stock, and Display settings heading. To learn more about each of these areas, check the Setup tab of this article.
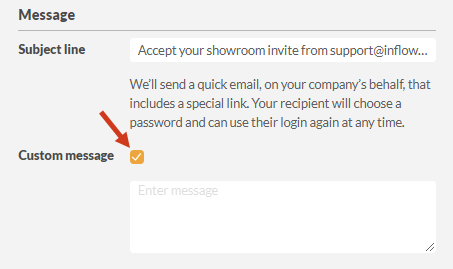
- You can change the subject line of the Showroom invitation, and you can send a custom message to the person you’re inviting by clicking on Custom message in the message section. Click the Send invite button when you’re done.
Note: Showroom invites are valid for two weeks once the initial email is sent, and it’s followed by two reminders.
Placing orders with the showroom
If your customers need a hand with setting up the online showroom and placing orders, feel free to share this helpful video with them!

Taking orders
Enable order taking
Ordering through your online Showroom is a fast and easy way for your customers to buy more of your products.
Note: Show Price must be selected to allow showroom to take orders
Once your Showroom is enabled, you’ll need to edit your checkout settings. In your Showroom setup screen, click on Edit checkout settings on the Checkout tile.
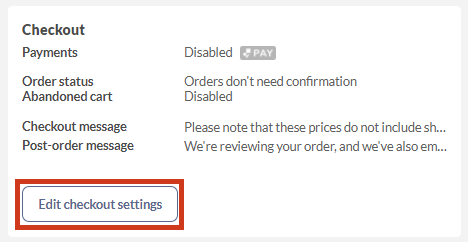
A new window will appear. To start taking orders, make sure the Checkout section is enabled (this should automatically be set for you, but here’s where you go if you want to change the setting). Click Save.
Accepting payment
If your business is located/registered in the United States or Canada, you can sign up for inFlow Pay to accept credit card payments from your Showroom orders! For complete details on this, take a look at our inFlow Pay article here.
Order status
If you’d like to confirm your customer’s orders before your stock in inFlow is reserved, click the Requires confirmation toggle. Showroom orders will be created in inFlow with an Unconfirmed status. Unconfirmed orders do not count against your quantity reserved until you confirm them. Any team member with full edit rights to sales orders can mark an order as confirmed. We recommend enabling this option if you need more control over the amount of stock your customers reserve through your Showroom.
If the Order status is set not to require confirmation, Showroom orders will come into inFlow as unfulfilled.
Abandoned cart
When a user adds a product to the Showroom cart but doesn’t proceed to checkout and completes the purchase, you can toggle this feature to remind them via email. This is part of the Showroom Pro add-on.
Messaging
You can set a Checkout message and a Post-order message on this screen. This is what will be displayed to your customers when they place an order.
After saving these settings, anyone you’ve sent a special Showroom invitation to will be able to place orders through your online Showroom.
How a customer places an order
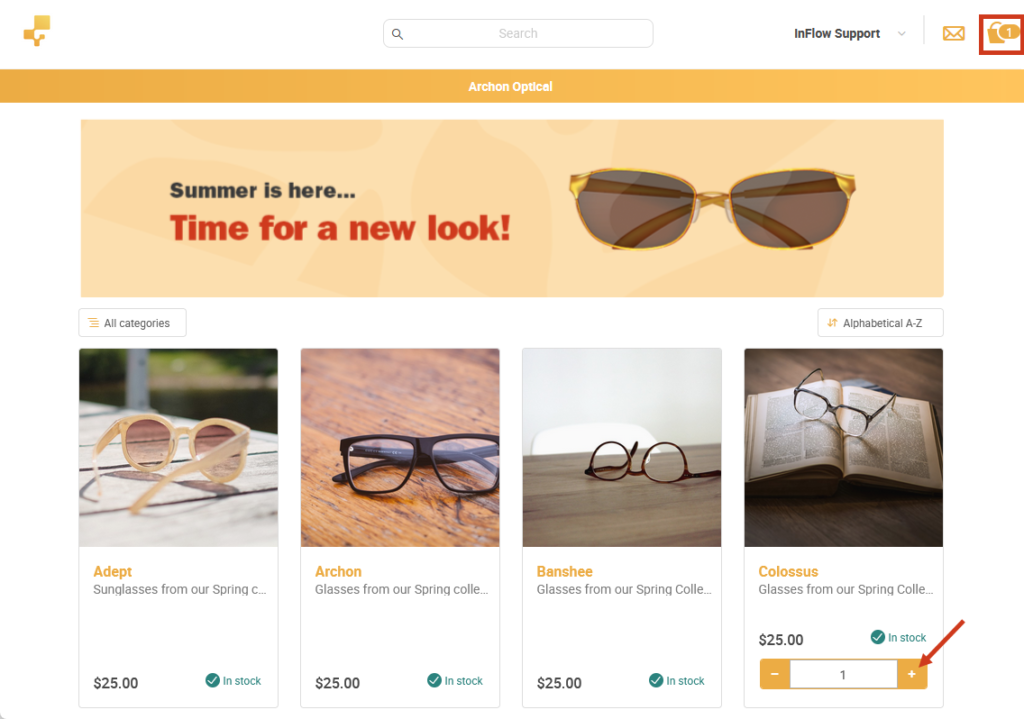
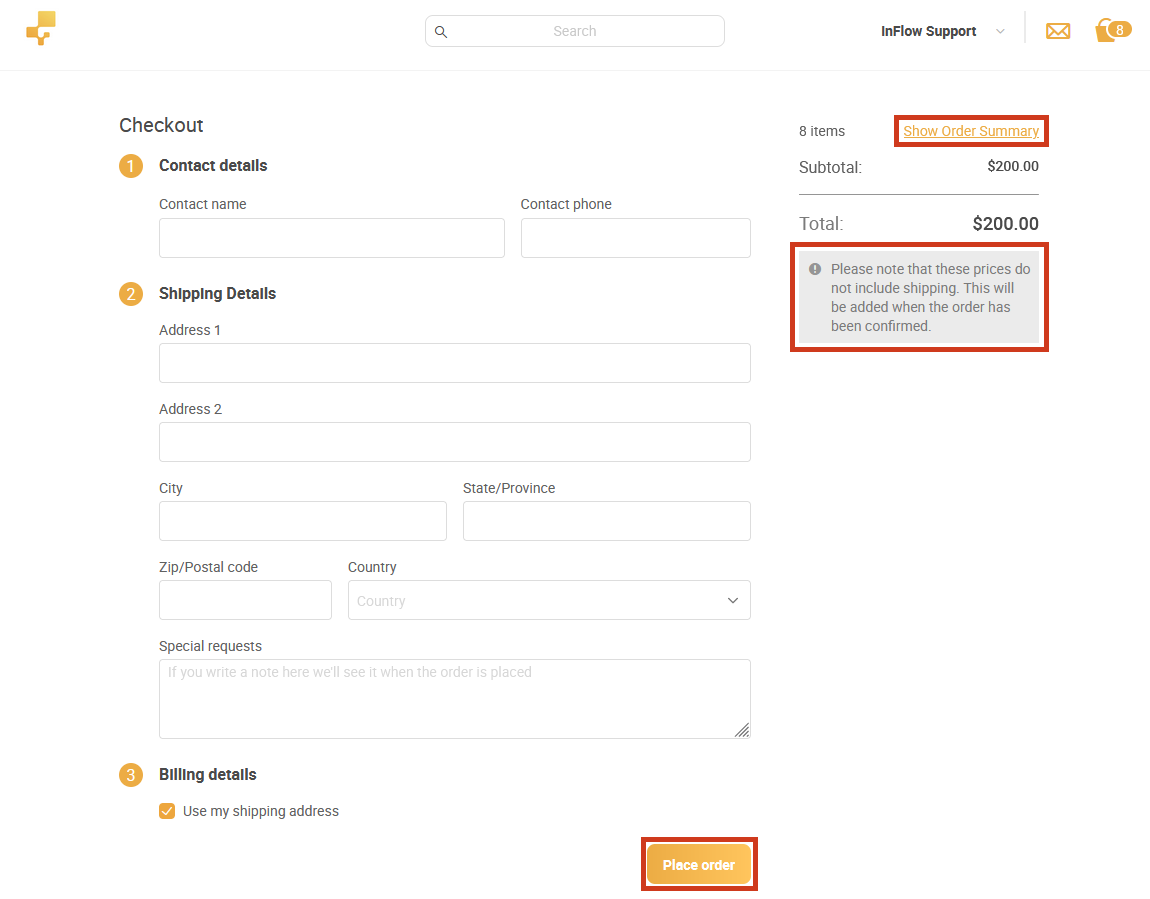
Your customers will be able to add items to their order from the main Showroom or individual product pages. At the top right, they’ll see how many items they have in their shopping bag.
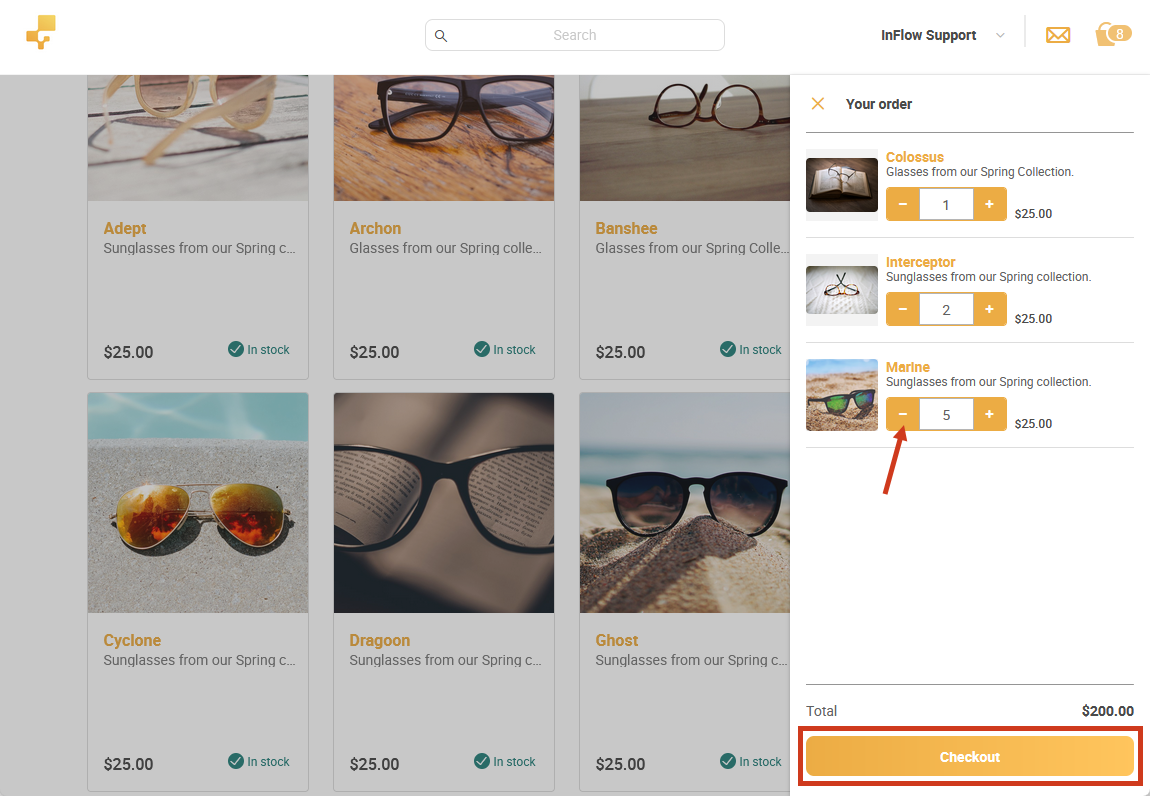
After clicking the shopping bag icon, the order summary will appear. Here, your customer can edit the quantities of the items they’ll order. Once they’re ready, they just need to click on the Checkout button to proceed.
On the Checkout page, your customer can enter their contact, shipping, and billing details. Any special requests the customer has can also be entered here. The items that the customer has ordered can be seen again if they click on the Show Order Summary link. They’ll also see the checkout message you’ve entered into your Showroom settings.
If you’ve entered any of this information into the customer’s record in inFlow, this will be pre-filled for them. If the Showroom user isn’t attached to a customer in inFlow, a new customer will be created for you using the Showroom user’s email, and any information they fill in here will be included. To finish the process, your customer just needs to click on Place order.
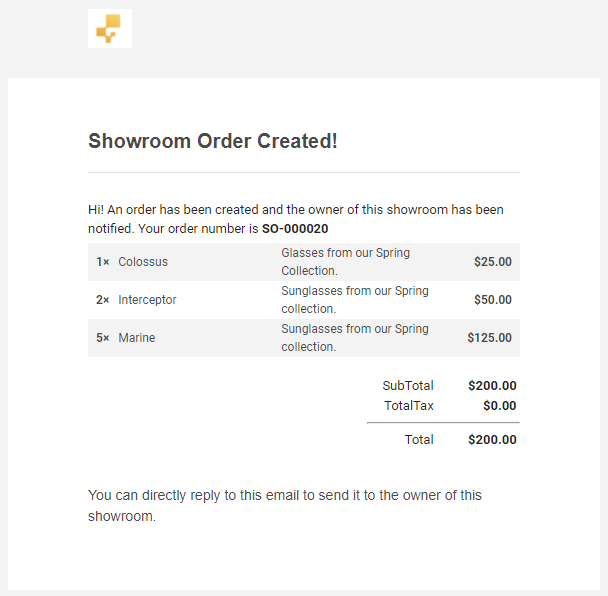
An order will be created, and the customer will see a confirmation screen showing them the order number and the post-order message from your Showroom settings.
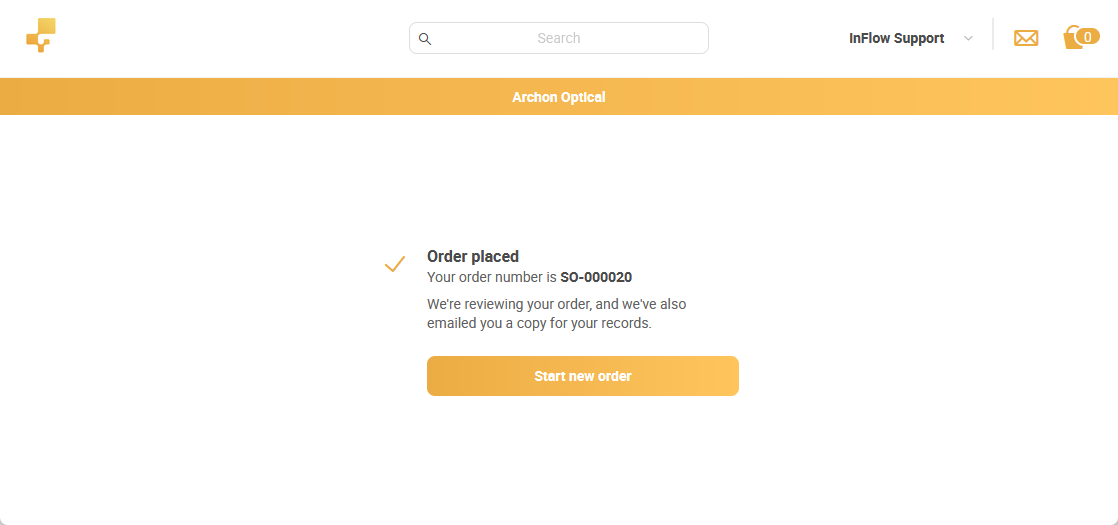
After an order is placed, both you and your customer will receive a confirmation email notifying you that the order has been created. Both of you can reply to this email to contact the other party if any follow-up is needed.
Placing orders with the showroom
If your customers need assistance with setting up the online showroom or placing orders, feel free to share this helpful video with them.
Showroom Pro
Showroom Pro
Showroom Pro is an add-on that allows you to be able to set up your own customized Showroom web address (custom domain) and access e-commerce features that email your customers when they’ve added to their cart and didn’t place an order (abandoned cart). Showroom Pro also removes any inFlow branding from your documents.
For more information, please contact our Support team here.
Showroom & Showroom Pro webinar

Setting up a custom Showroom domain
You can customize your Showroom domain on your web app. To do so:
- Log in to app.inflowinventory.com with an admin account.
- Go to Main Menu > Options > Showroom > Customize your domain.
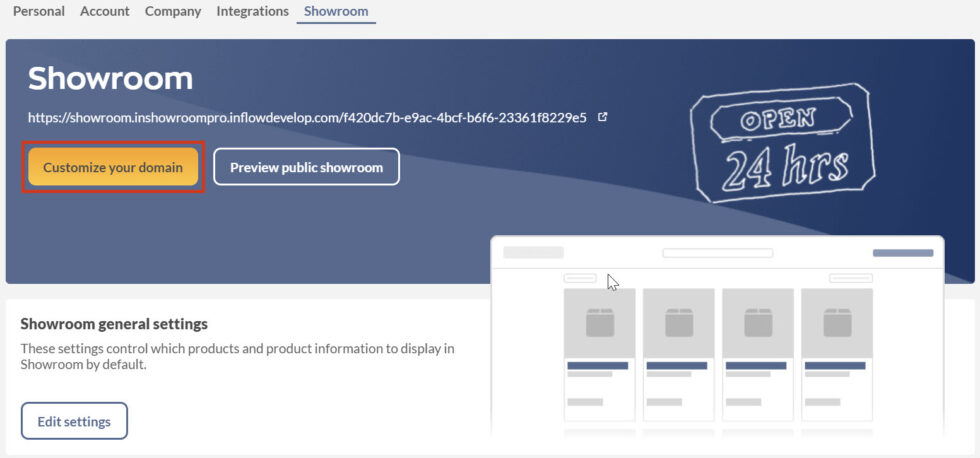
- On this window, you can set a custom domain.
You must own that domain already.
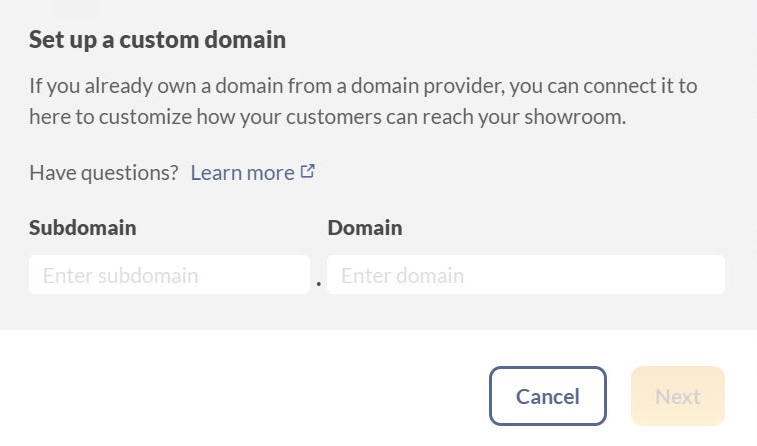
- On the next screen, you’ll have the Type, Hostname, and Target name which you’ll need to use when setting up with your Domain Provider to customize how your customers can reach your showroom. Make sure they are the same.
Once that’s done, it can take from 1 to 3 days for those changes to be applied. In most cases, it will take just a few minutes.
When you access your Showroom settings, you’ll see the verification status. Once you submit your domain, it will display as Pending Verification, and it will disappear when the domain is approved.
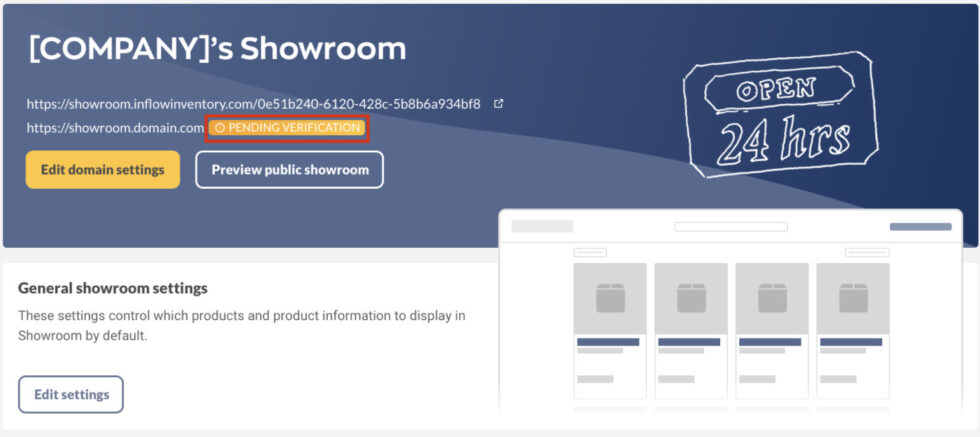
Even after the custom domain is verified, there could be a period of time before there’s a valid SSL certificate for it. This should be available within approximately 5-10 minutes, and during that time the link won’t work.
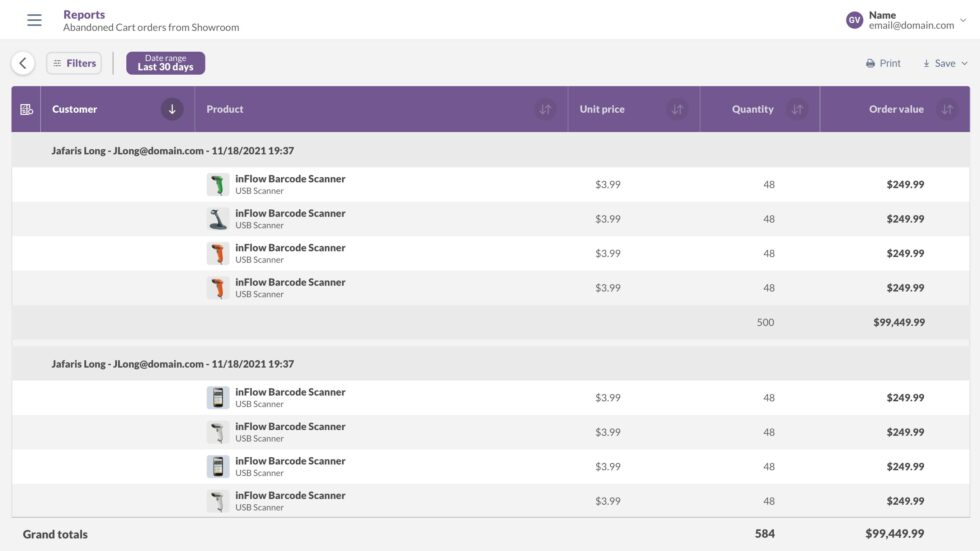
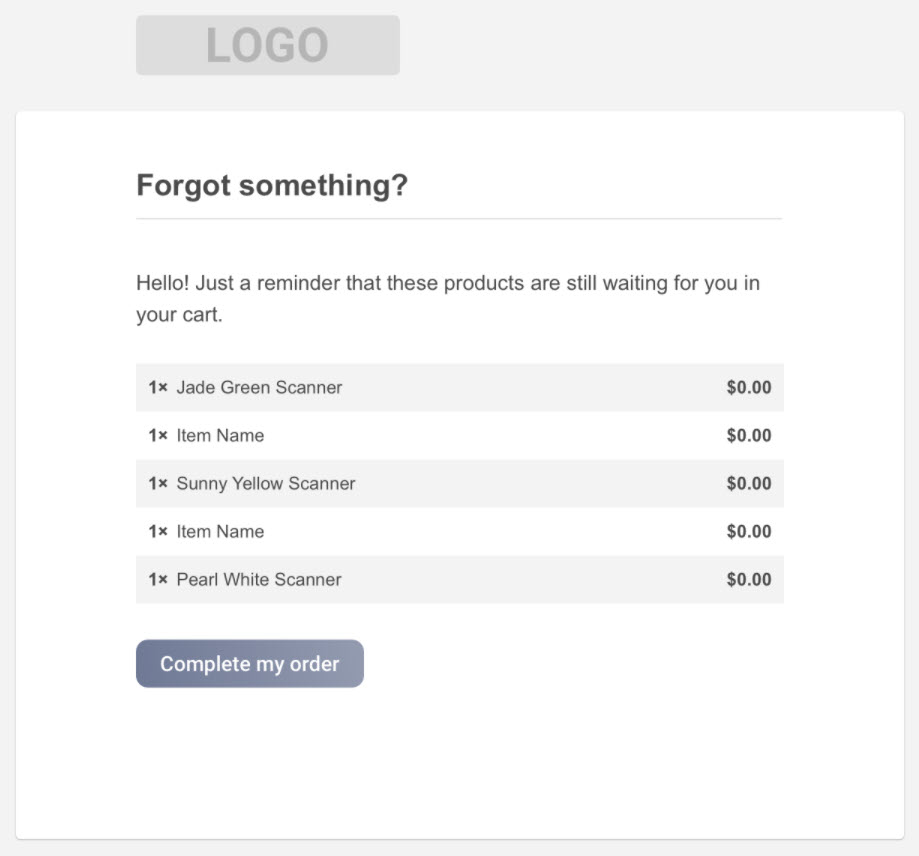
Abandoned cart
When a user adds a product to the Showroom cart but doesn’t proceed to checkout and completes the purchase, they create an abandoned cart.
We’ve added report and email reminders to notify both you and your customers about products they’ve forgotten to purchase.
Abandoned cart report
The abandoned cart report is created when a customer hasn’t interacted with their Showroom cart for over an hour after adding a product.
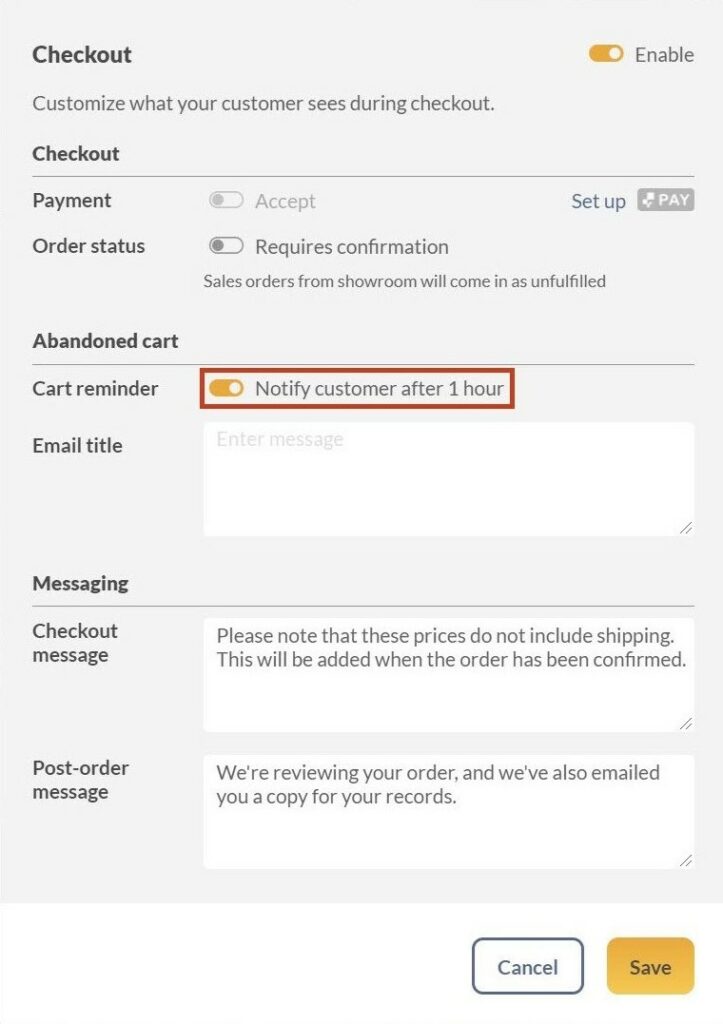
Customer email reminder
You can set inFlow to automatically send a reminder to your customers if they add items to the cart and don’t complete the purchase.
If enabled, inFlow will check for abandoned carts every 15 minutes and trigger an email reminder to the customer.
inFlow will not send the email if:
- The customer is still browsing the Showroom (if there was any activity within the past hour).
- We’ve already sent out an email regarding the same cart, and there has been no new activity.
To enable the customer notification, you’ll need to:
- Go to the Showroom settings (Main Menu > Showroom)
- Click on Edit checkout settings.
- Toggle the Notify customer after 1 hour button and save.
Remove inFlow branding
This add-on gives you the option to remove the following from the Showroom:
- Footer from all pages, including the Showroom special access login page.
- “inFlow Showroom” title in the webpage title.
- inFlow branding from Showroom emails.
- “An inFlow Inventory Showroom” title in the Showroom footer.
This add-on gives you the option to remove the following from documents emailed from inFlow:
- inFlow footer from online documents.
- inFlow branding from emails.
For more information, please contact our Support team here.


how to do this on you APP?
Your app is not that great
How do I use an old email with a new customer?