How to make bulk changes in inFlow
Did you know that in inFlow, you can save time by making changes in bulk? Check it out below to learn more.
Please note: This feature is only available on inFlow for Web.
Products
Selecting multiple products in bulk
To make changes, you can select up to 20 product rows from the product list. To do so, hover over a product and click the checkbox to the left of the product image.
- Select a product from the product list.
- Hold the shift key on your keyboard and hover over the products. Until you select another product, the included products will be highlighted in orange.
Print product labels in bulk
- Using the shift button on your keyboard, select up to 20 products.
- Click Print > Label.
- Choose the number of copies to print, label the template, and label size.
- Then click Print.
Deactivate products in bulk
- Using the shift button on your keyboard, select up to 20 products.
- Select the Deactivate button.
- Review the products listed, then click Deactivate products.

Deactivating more than 20 products?
If you want to deactivate more products at once, you can use inFlow’s imports. This guide explains more.
Sales & purchase orders

Updating sales order status in bulk (invoice, uninvoice & pay)
- Select multiple sales orders. You can use your shift button to hover over orders to select a group of orders at once.
- Click Update status and select one of the options. The orange bar at the top of the window will list any orders that aren’t applicable.
Note: Multiple reference numbers can be added to the Ref# field and will apply to all of the selected orders.
Printing sales orders in bulk
- Select sales orders, then click Print.
- Select the document type.
- You’ll see a list of sales orders you’re printing documents for, then click Print sales orders.
- Print the document with your browser’s printing screen. If you want to save the document, select Save as PDF to save the file to your computer
Emailing sales orders in bulk
- Select sales orders, then click Email.
- Select the document you want to send.
- If needed, make changes to the Reply to field.
- Select the toggle Send me a copy to have a copy of the email sent to you.
- The email subject and message are prefilled with the information from the set email template. These fields can’t be edited when bulk emailing. To make changes to the email template, select Edit email template.
- Below the email message is a list of the recipients. If needed, fill out any of the email fields.
- Click Send when done.
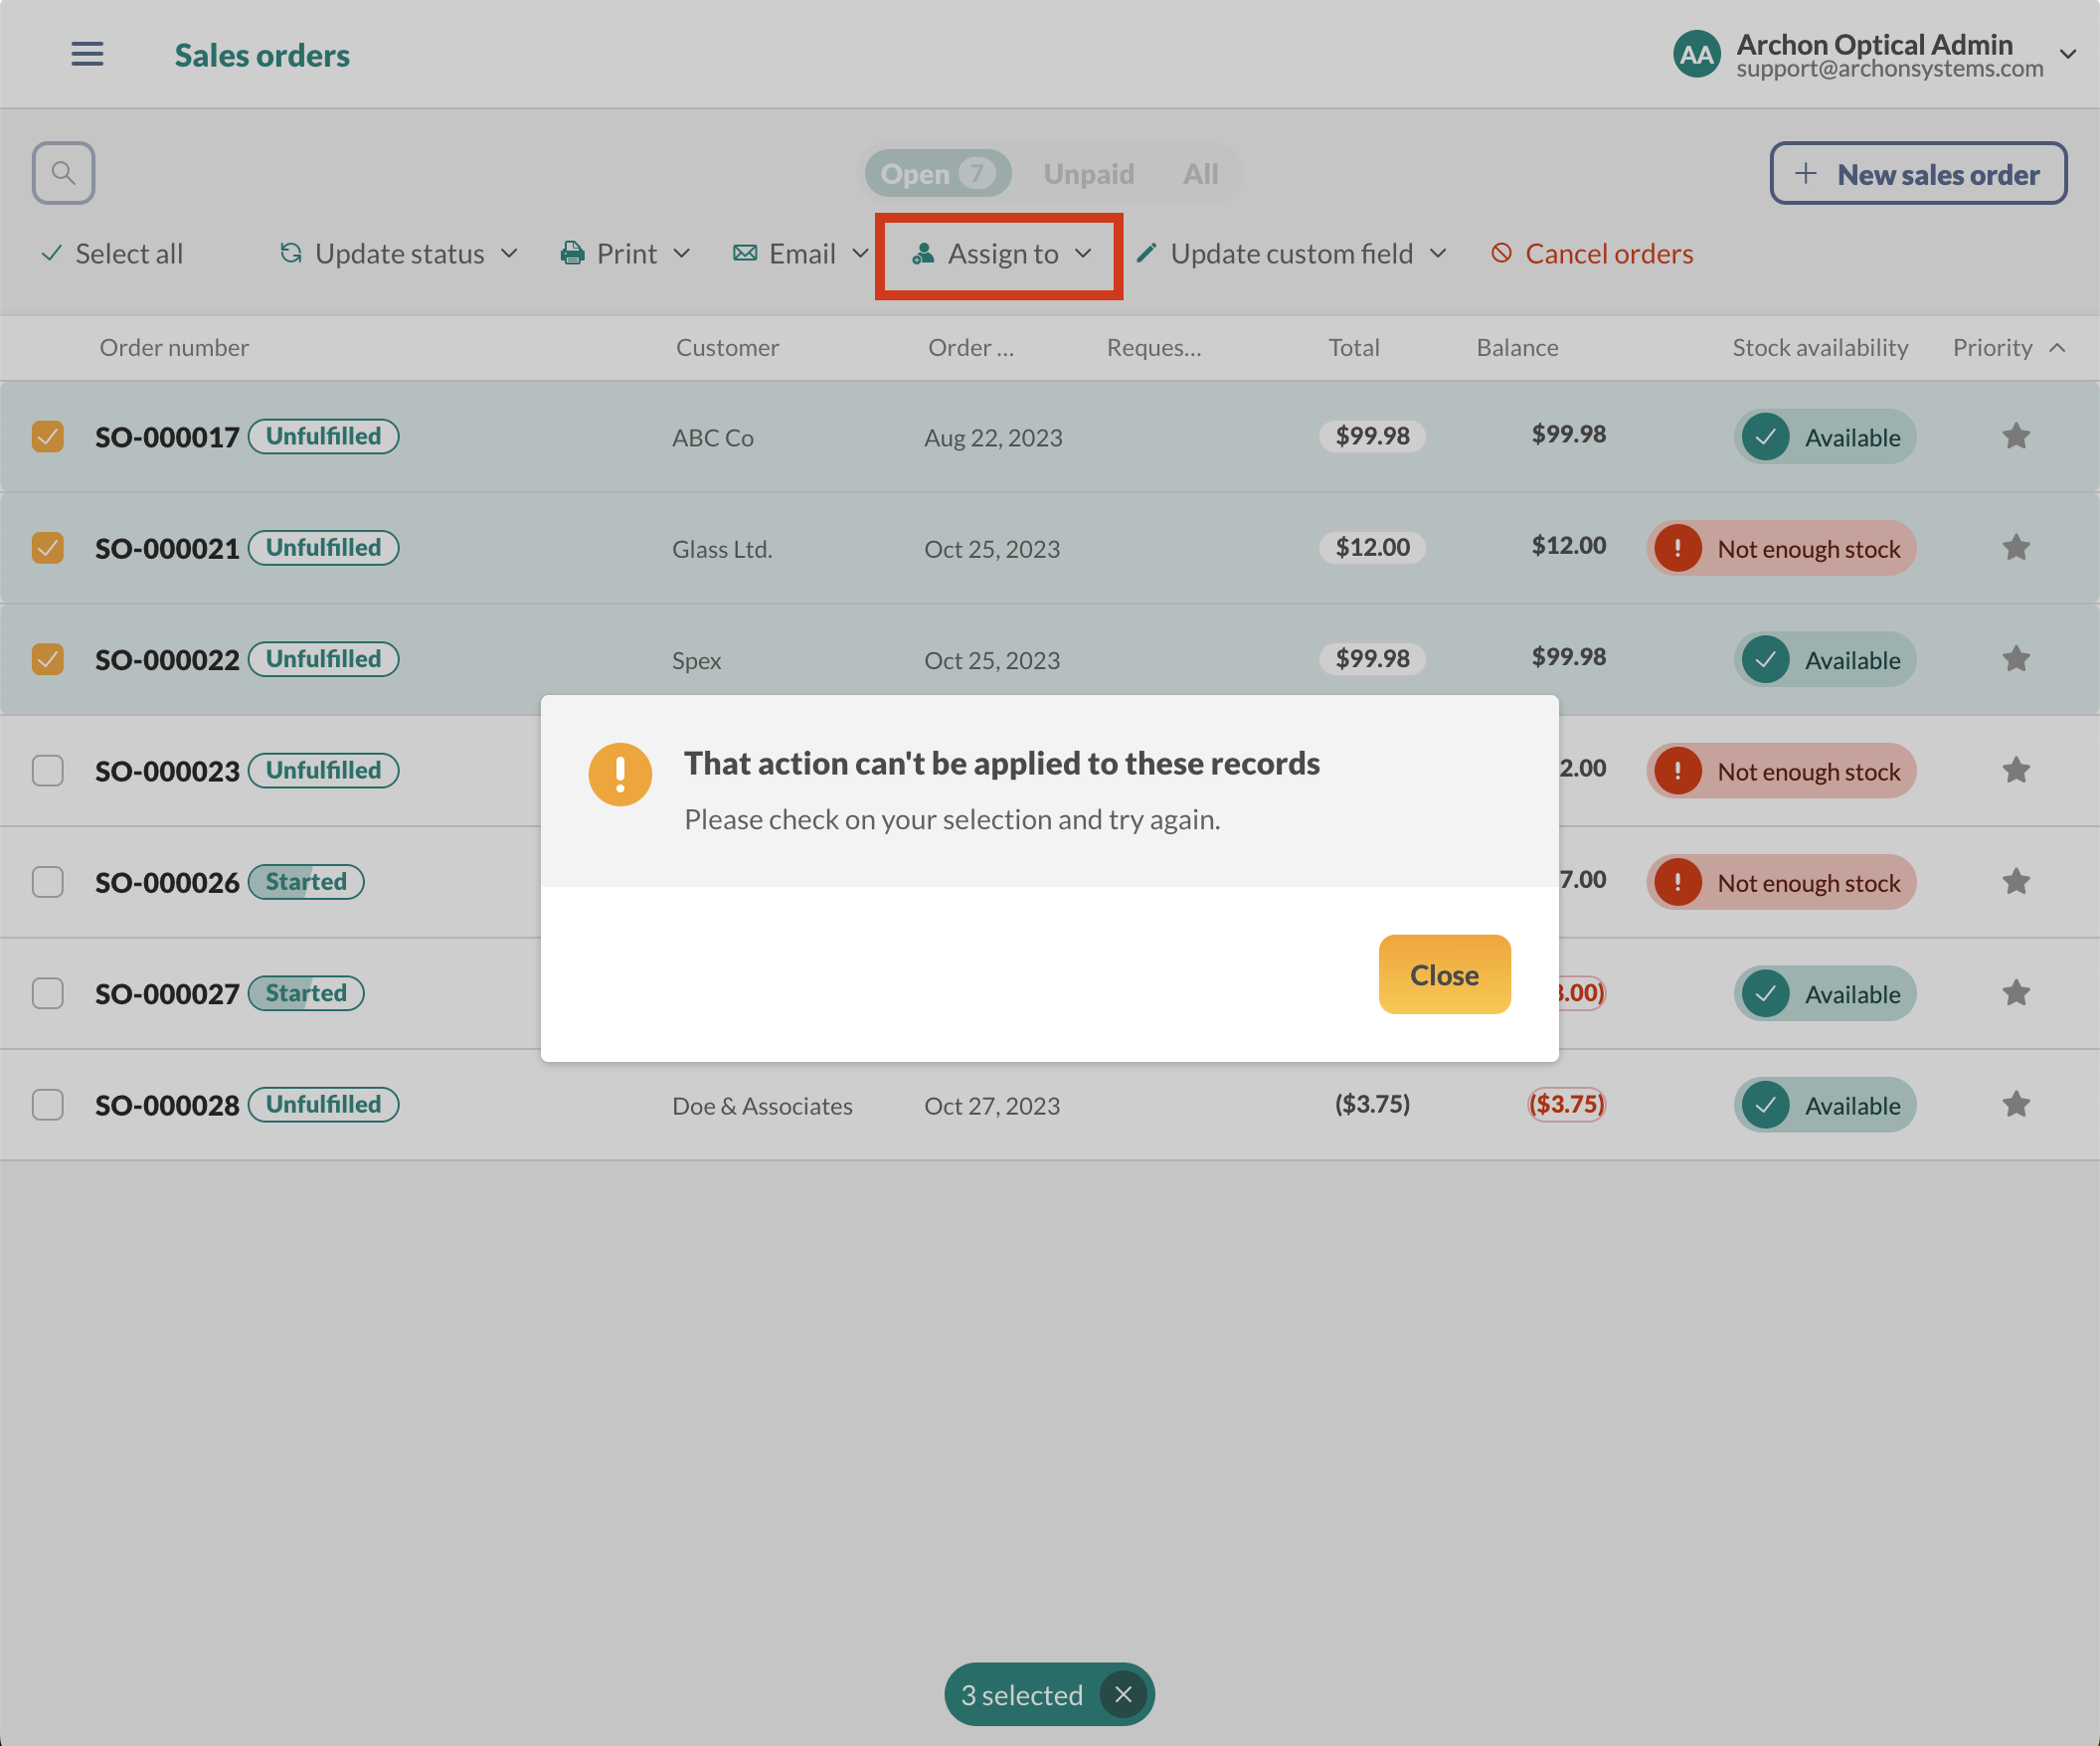
Assign sales orders to team members in bulk
- Select orders, then click Assign to.
- Select a team member from the drop-down menu.
- Review the orders, then click Confirm.

Error assigning sales orders
If you get the error message That action can't be applied to these records, check the team member’s permissions to ensure they have full access to the sales orders or the location of the sales order.
Updating sales order custom fields in bulk
- Select orders, then click on Update custom field.
- Available custom fields will listed for you to edit. Fill out the field, then click Update.
Canceling sales orders in bulk
- Select orders, then select Cancel orders.
- Review the orders listed, then click on Cancel orders.
Did you cancel an order by mistake?
If you canceled the wrong order, you can learn how to recover it from this guide.
Paying purchase orders in bulk
Up to 20 purchase orders can be selected to do a bulk action or make changes. See below for details.
- Select purchase orders, then click on Pay.
- Fill out the payment information, then click Pay orders.
Note: Multiple reference numbers can be added to the Ref# field and will apply to all selected orders.
Printing purchase orders in bulk
- Select purchase orders, then click Print.
- Select the document type.
- You’ll see a list of purchase orders you’re printing documents for, then click Print purchase orders.
- Print the document with your browser’s printing screen. If you want to save the document, select Save as PDF to save the file to your computer
Emailing purchase orders in bulk
- Select the purchase orders, then click Email.
- Select the document you want to send.
- If needed, make changes to the Reply to field.
- Select the toggle Send me a copy to have a copy of the email sent to you.
- The email subject and message are prefilled with the information from the set email template. These fields can’t be edited when bulk emailing. To make changes to the email template, select Edit email template.
- Below the email message is a list of the recipients. If needed, fill out any of the email fields.
- Click Send when done.
Assigning purchase orders in bulk
- Select the purchase orders, then click Assign to.
- Select a team member from the drop-down menu.
- Review the orders, then click Confirm.
Error assigning purchase orders
If you get the error message “That action can’t be applied to these records,” check the team member’s permissions to ensure they have full access to the purchase orders or the location of the purchase order.
Canceling purchase orders in bulk
- Select purchase orders, then select Cancel orders.
- Review the orders listed, then click on Cancel orders.
Did you cancel an order by mistake?
If you canceled the wrong order, you can learn how to recover it from this guide.
Customers & vendors
Printing customer/vendor statements
- Select multiple customer/vendor records, and click Print > Vendor statement.
- Next, choose a statement date range, review the selected vendors, and finally, click on Print statements.
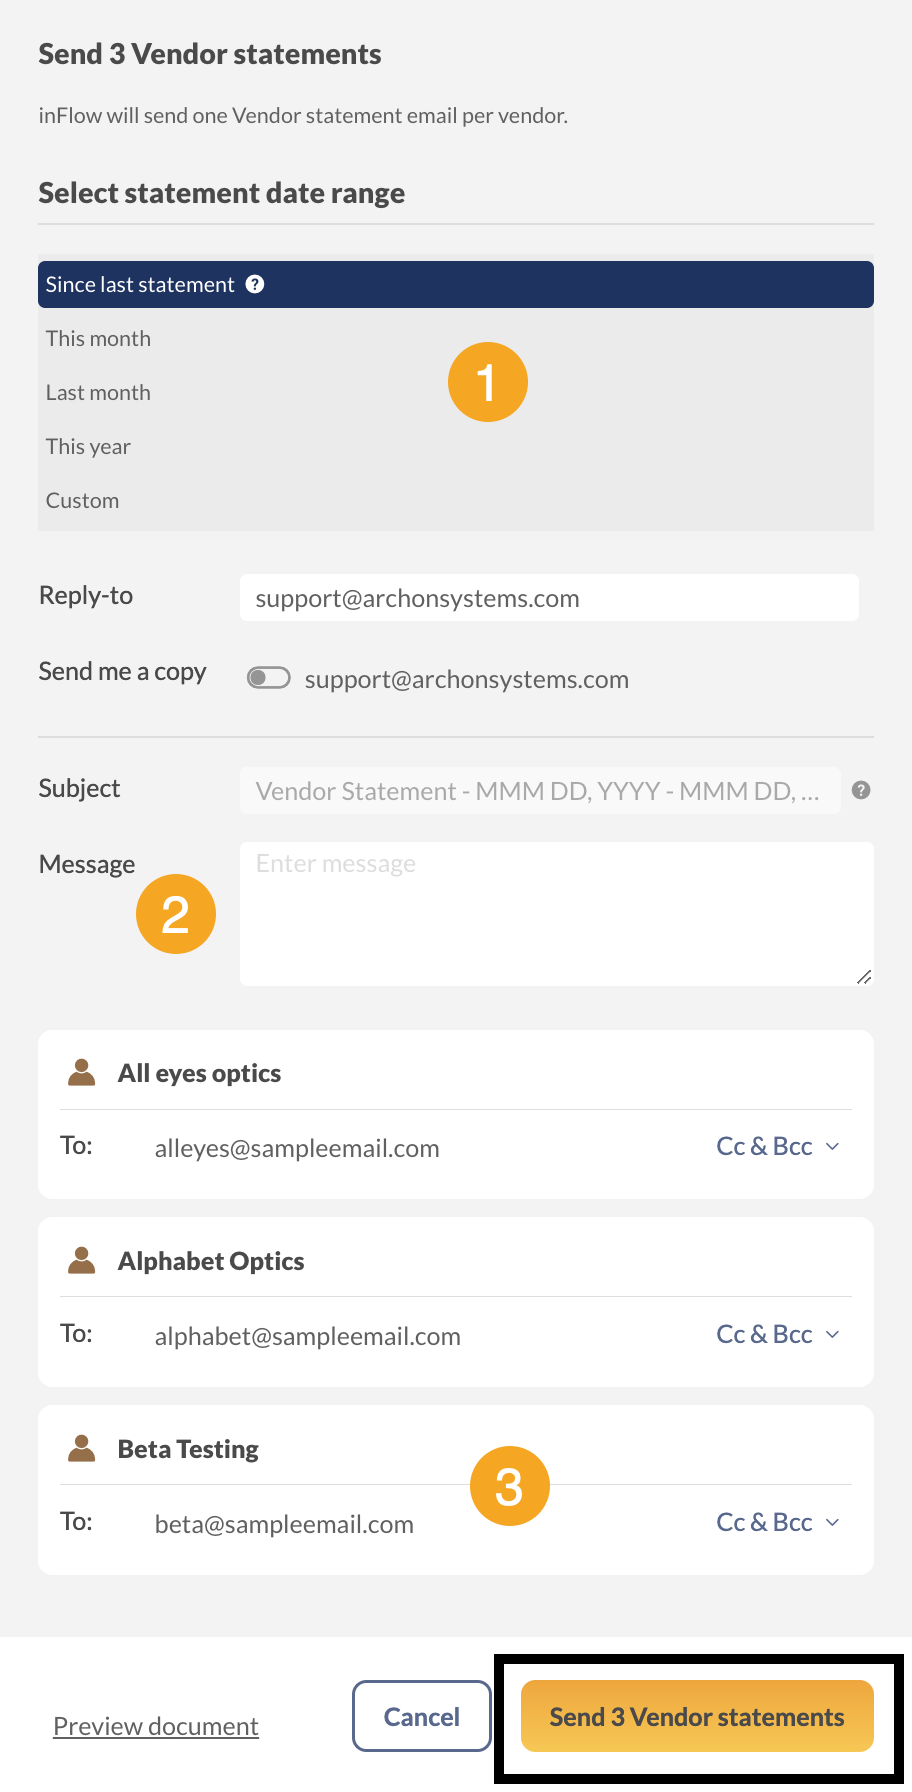
Emailing customer/vendor statements
- Select multiple customer/vendor records, and click Email > Vendor statement.
- Next, choose a statement date range, and add an email message. (The email message is sent to all recipients.)
- Finally, review the selected customers/vendors and their email addresses. When done, click Send Customer/Vendor statements.
Updating custom fields in bulk
- Select multiple customer/vendor records, then click on Update custom field.
- Available custom fields will listed for you to edit. Fill out the field, then click Update.
Deactivating customers in bulk
- Select multiple customer/vendor records, then select Deactivate.
- Review the records listed, then click on Deactivate.
Stock transfers & adjustments
Printing stock transfers in bulk
- Select up to 20 orders from the Stock transfer list, then click Print.
- Review the orders that will be printed, then select Print Stock transfers.
Emailing stock transfers in bulk
- Select up to 20 orders from the Stock transfer list, then click Email.
- Fill out the email form and review the stock transfers listed. To view the documents, select Preview document.
- Click Send Stock transfers when done.
Assigning stock transfers in bulk
- Select multiple stock transfers, then click Assign to.
- Select a team member from the drop-down menu.
- Review the orders, then click Confirm.
Error assigning stock transfers
If you get the error message That action can't be applied to these records Check the team member permissions to ensure they have full access to the stock transfers feature or the location of the stock transfers.
Updating stock transfer statuses in bulk
- Select multiple stock transfers, then click Update status.
- Select Send transfer or Recieve transfer.
- Review the orders, then click Confirm.
Canceling stock transfers in bulk
- Select stock transfer, then select Cancel transfers.
- Review the orders listed, then click on Cancel orders.
Canceled a transfer by mistake?
If you canceled the wrong order, you can learn how to recover it from this guide.
Printing stock adjustments in bulk
- Select up to 20 orders from the stock adjustments, then click Print.
- Review the orders that will be printed, then select Print stock adjustments.
Emailing stock adjustments in bulk
- Select up to 20 orders from the stock adjustment list, then click Email.
- Fill out the email form and review the stock adjustments listed. To view the documents, select Preview document.
- Click Send Stock adjustments when done.
Update stock adjustment reasons in bulk
- Select up to 20 orders from the stock adjustment list, then click Update reason.
- Select the reason from the drop-down menu.
- Review the stock adjustments listed, then click Confirm.
Canceling stock adjustments in bulk
- Select stock transfer, then select Cancel adjustments.
- Review the orders listed, then click on Cancel adjustments.
Canceled an adjustment by mistake?
If you canceled the wrong order, you can learn how to recover it from this guide.
Manufacture orders
Printing manufacture orders in bulk
- Select up to 20 manufacture orders, then click Print.
- Select one of the documents in the drop-down menu.
- Review the orders, then click Print.
Emailing manufacture orders in bulk
- Select multiple manufacture orders, then click Email.
- Select a document from the drop-down menu.
- Fill out the email form and review the listed manufacture orders. To view the documents, select Preview document.
- Click Send when done.
Assigning manufacture orders in bulk
- Select multiple manufacture orders, then click Assign to.
- Select a team member from the drop-down menu.
- Review the orders, then click Confirm.
Error assigning manufacture orders
If you get the error message That action can't be applied to these records, check the team member permissions to ensure they have full access to the manufacture orders or the location of the manufacture order.
Canceling manufacture orders in bulk
- Select multiple manufacture orders, then select Cancel orders.
- Review the orders listed, then click on Cancel orders.
Canceled a transfer by mistake?
If you canceled the wrong order, you can learn how to recover it from this guide.


0 Comments