Connecting QuickBooks Online or Intuit Enterprise Suite to inFlow
If you’re using inFlow and QuickBooks Online or the Intuit Enterprise Suite to manage your inventory and accounting, you’ll love the seamless integration that streamlines your processes and enhances efficiency.
Setup

To fully utilize the integration between inFlow and QuickBooks Online, you may need a paid QuickBooks Online account. It’s recommended to select a higher-tier plan that includes access to journal entries. If you have any questions about how QuickBooks Online connects with inFlow, please reach out to your Customer Success Manager (CSM).
How does this work?
With inFlow, you can easily create new sales and purchase orders that can be seamlessly sent to QuickBooks Online. Plus, you have the flexibility to make payments within inFlow or QuickBooks Online using the handy two-way sync payments option.
If there are missing records in QuickBooks Online, inFlow can create new products, customers, and vendors for you. Currently, records made in QuickBooks Online can’t be pushed to inFlow.
As soon as the purchase order push is enabled, inFlow will push your inventory value to QuickBooks Online. Your inventory value must be accurate in inFlow and QuickBooks Online before enabling the integration.
Before setup checklist
We currently support QuickBooks Online and Intuit Enterprise Suite US, Canada, UK and AUS.
- ✅ Are your product quantities and costs accurate in inFlow? If you intend to push purchase orders, ensure your stock levels and product costs are accurate! The integration adjusts QuickBooks’ total inventory value to match inFlow’s, so you’ll want to ensure they match before you begin. See the “Push purchase orders and inventory” tab for details!
- ✅ Does your home currency in inFlow and QuickBooks Online match? Make sure that your main currency in both systems is the same. If you use more than one currency in your inFlow orders, turn on the Multicurrency setting in QuickBooks Online.
- ✅ Are your taxes in both systems? Ensure that your inFlow taxes are also in QuickBooks Online.
- ✅ Is your QuickBooks Online account using non-inventory product types? inFlow can only use QuickBooks Online’s non-inventory products.
If your QuickBooks account uses inventory product types, it will conflict with the integration and may cause double entries as both systems try to update the stock value.
Make sure the products are non-inventory before connecting inFlow to QuickBooks Online to avoid making several corrections after the fact. If you have inventory-type products in stock, check the Adjust Inventory Items section of this QuickBooks Online guide to remove the product quantities.
If you’re using inventory-type products in QuickBooks Online, you must make them inactive and re-create them as non-inventory products
QuickBooks Online doesn’t have an option to convert inventory products to non-inventory products.
- ✅ Does your inventory include serialized products? At the moment, QuickBooks Online doesn’t support tracking serialized products, so serial numbers won’t be pushed to your QuickBooks Online invoices or bills.
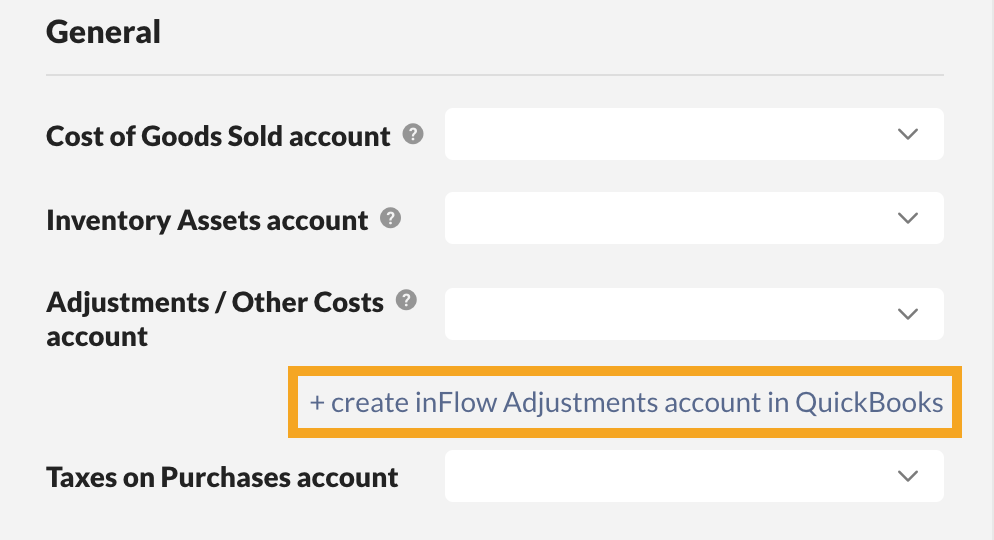
When inFlow pushes a sales or purchase order with a serialized product, the product is sent to QuickBooks Online without the serial number information. There won’t be any errors in inFlow or QuickBooks mentioning the missing serial details. - ✅ Creating an inFlow Adjustments account – inFlow must connect to a Cost of Goods Sold account (COGS) and a different COGS-based account to track adjustments. During the QuickBooks Online setup, select Create inFlow Adjustments account in QuickBooks.
- ✅ Do your inFlow customers have the correct currency settings? You can’t change the customer currency settings in QuickBooks after a sales order has been pushed. Verify that the currency set up in the inFlow customer profile matches one of the currencies set up in QuickBooks.
To check, open inFlow and go to the Main Menu > Sales > Customer list. Open the customer profile and select the correct currency from the Pricing/currency drop-down menu.
Once inFlow is connected to QuickBooks Online, do not change your costing method/options to prevent errors and accounting inaccuracies.
QuickBooks Online explainer & setup webinar

Please note: the above webinar was recorded before the payment sync feature was added to this integration.
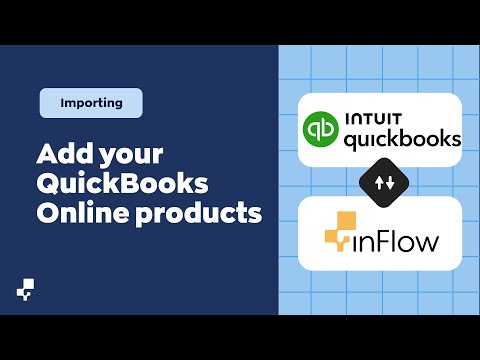
Exporting products from QuickBooks Online to inFlow
Connecting inFlow to QuickBooks Online is simple! You don’t need all your products ready in both systems first. inFlow will generate non-inventory-type products as needed. If you have products in QuickBooks Online, import them into inFlow to centralize your inventory management. Watch the video below for the complete steps!
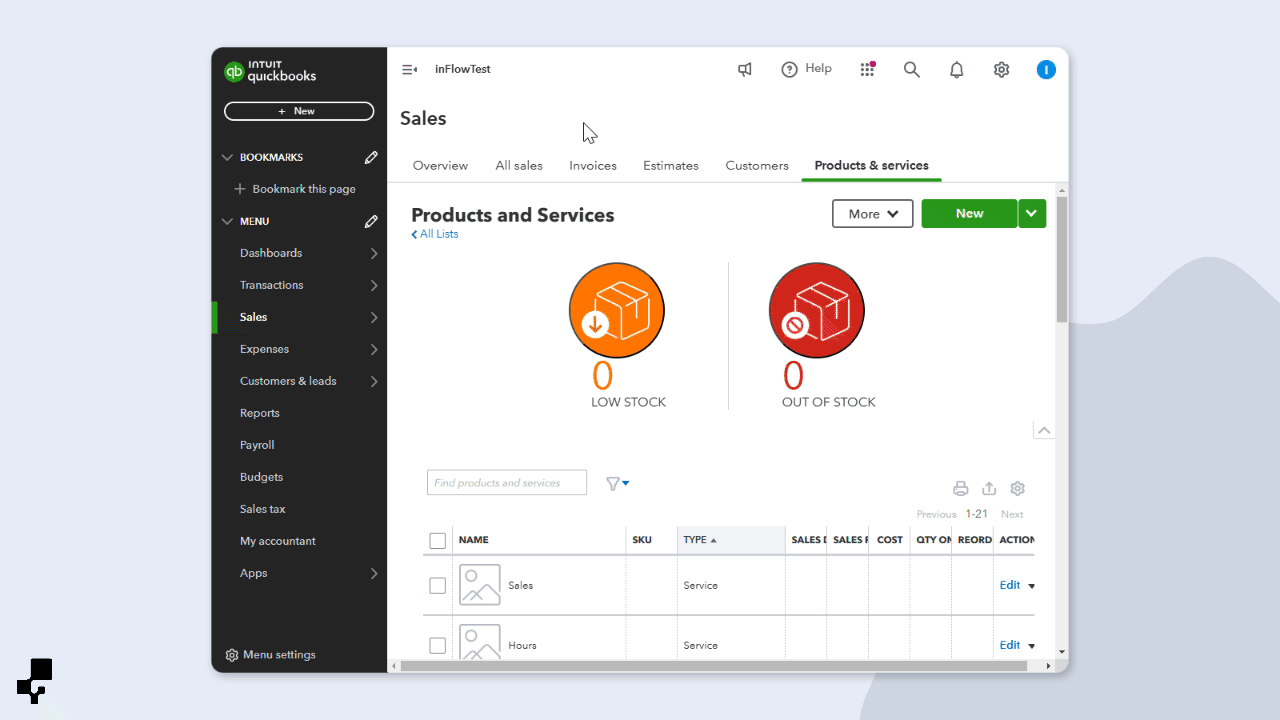
- In QuickBooks Online, click on Sales, then Products & Services.
- Before exporting, make sure all of your products are Non-inventory type for the inFlow integration to work correctly with QuickBooks Online.
- When ready, click Export and save the file to your computer.
Connecting inFlow to QuickBooks Online
- With an Admin account, log in to inFlow’s integration settings. (Main Menu > Options > Integrations. )
- Under Core integrations, click on QuickBooks Online.
- In the pop-up, select Connect to QuickBooks.
- Your browser will direct you to your QuickBooks Online account for authorization. If you have multiple QuickBooks accounts, select the account with which inFlow should connect.
- Click Connect to allow inFlow to view and update your QuickBooks data.
Connecting inFlow to Intuit Enterprise Suite
- With an Admin account, log in to inFlow’s integration settings. (Main Menu > Options > Integrations. )
- Under Core integrations, click on QuickBooks Online.
- In the pop-up, select Connect to QuickBooks.
- Your browser will direct you to your Intuit Enterprise Suite account for authorization. If you have multiple entities within your Intuit Enterprise Suite account, select one entity with which inFlow should connect.
- Click Connect to allow inFlow to view and update your Intuit Enterprise Suite data.
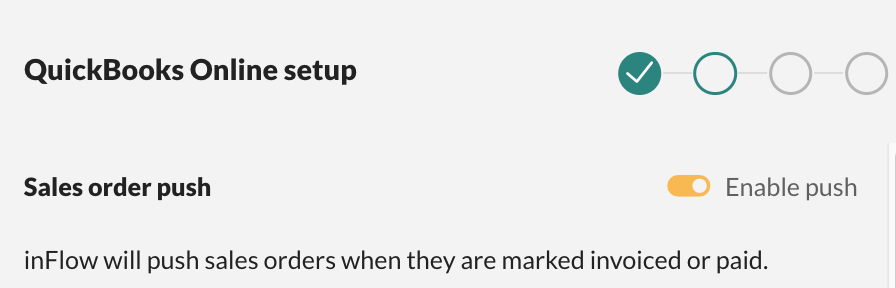
Sales orders push integration settings
- Your browser will redirect to inFlow’s QuickBooks Online integration setup with the Sales order push setting toggled on. This means sales orders from inFlow will be pushed to QuickBooks Online as an invoice.
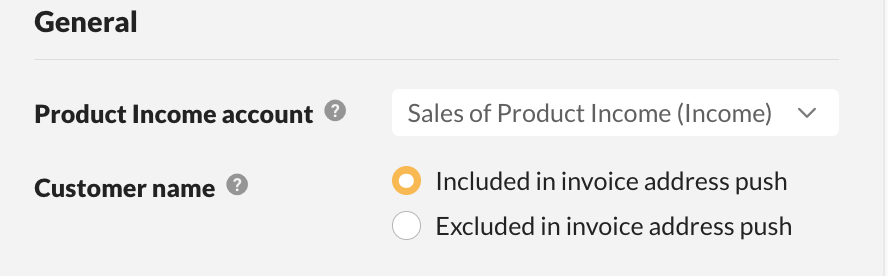
- In the General section, select the Product Income Account that inFlow should connect to.
Typically, this is the account in QuickBooks Online you use to receive money for products sold. This account will be set as the Product income account for products created via inFlow in QuickBooks Online. Select the appropriate QuickBooks Online account from the drop-down. The Product Income account for existing products in QuickBooks Online will not change. - Select the customer name setting you prefer. When a sales order is pushed to QuickBooks, you can choose whether to include or exclude the customer name as part of the address in the resulting invoice in QuickBooks.
Sales order payment settings
- Next are the Payment settings. When the Sync payments setting is toggled on, you can choose how you would like to manage and process payments. Select your preferred option. See the table below for details on each payment option.

| Payment setting | Explanation |
|---|---|
| Push and pull payments | This is a two-way payment sync option. You can process payments in inFlow or QuickBooks Online, and the payment will be pushed to the other system for you. |
| Push payments | With this payment option, payments can only be made on inFlow sales orders, and the payment information will be sent to the matching QuickBooks Online invoice. If a payment is added to the QuickBooks Online invoice, inFlow will not receive the payment information on the matching sales order. |
| Pull payments | With this setting, payments are only added to the QuickBooks Online invoice, and the payment information will be sent to the matching inFlow sales order. If a payment is added to an inFlow sales order, QuickBooks Online will not receive the payment information on the matching invoice. |
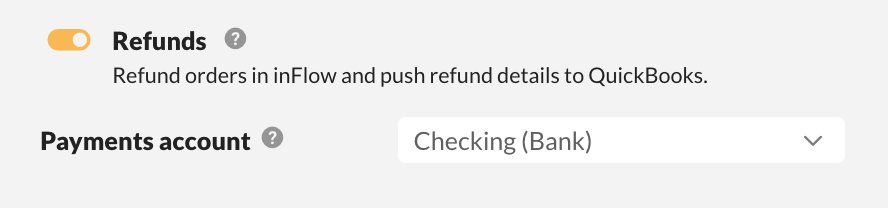
- The Refund setting is toggled on by default. This allows you to process refunds in inFlow, and the refund information will be sent to the matching QuickBooks Online invoice. Toggle this setting off if you don’t want refunds sent to QuickBooks Online. Any refunds will need to be processed in inFlow and QuickBooks Online separately.
- Next, select the Payments account from the drop-down menu. This is the account that updates when payments have been made on inFlow sales orders and QuickBooks invoices.
Sales order tax setup
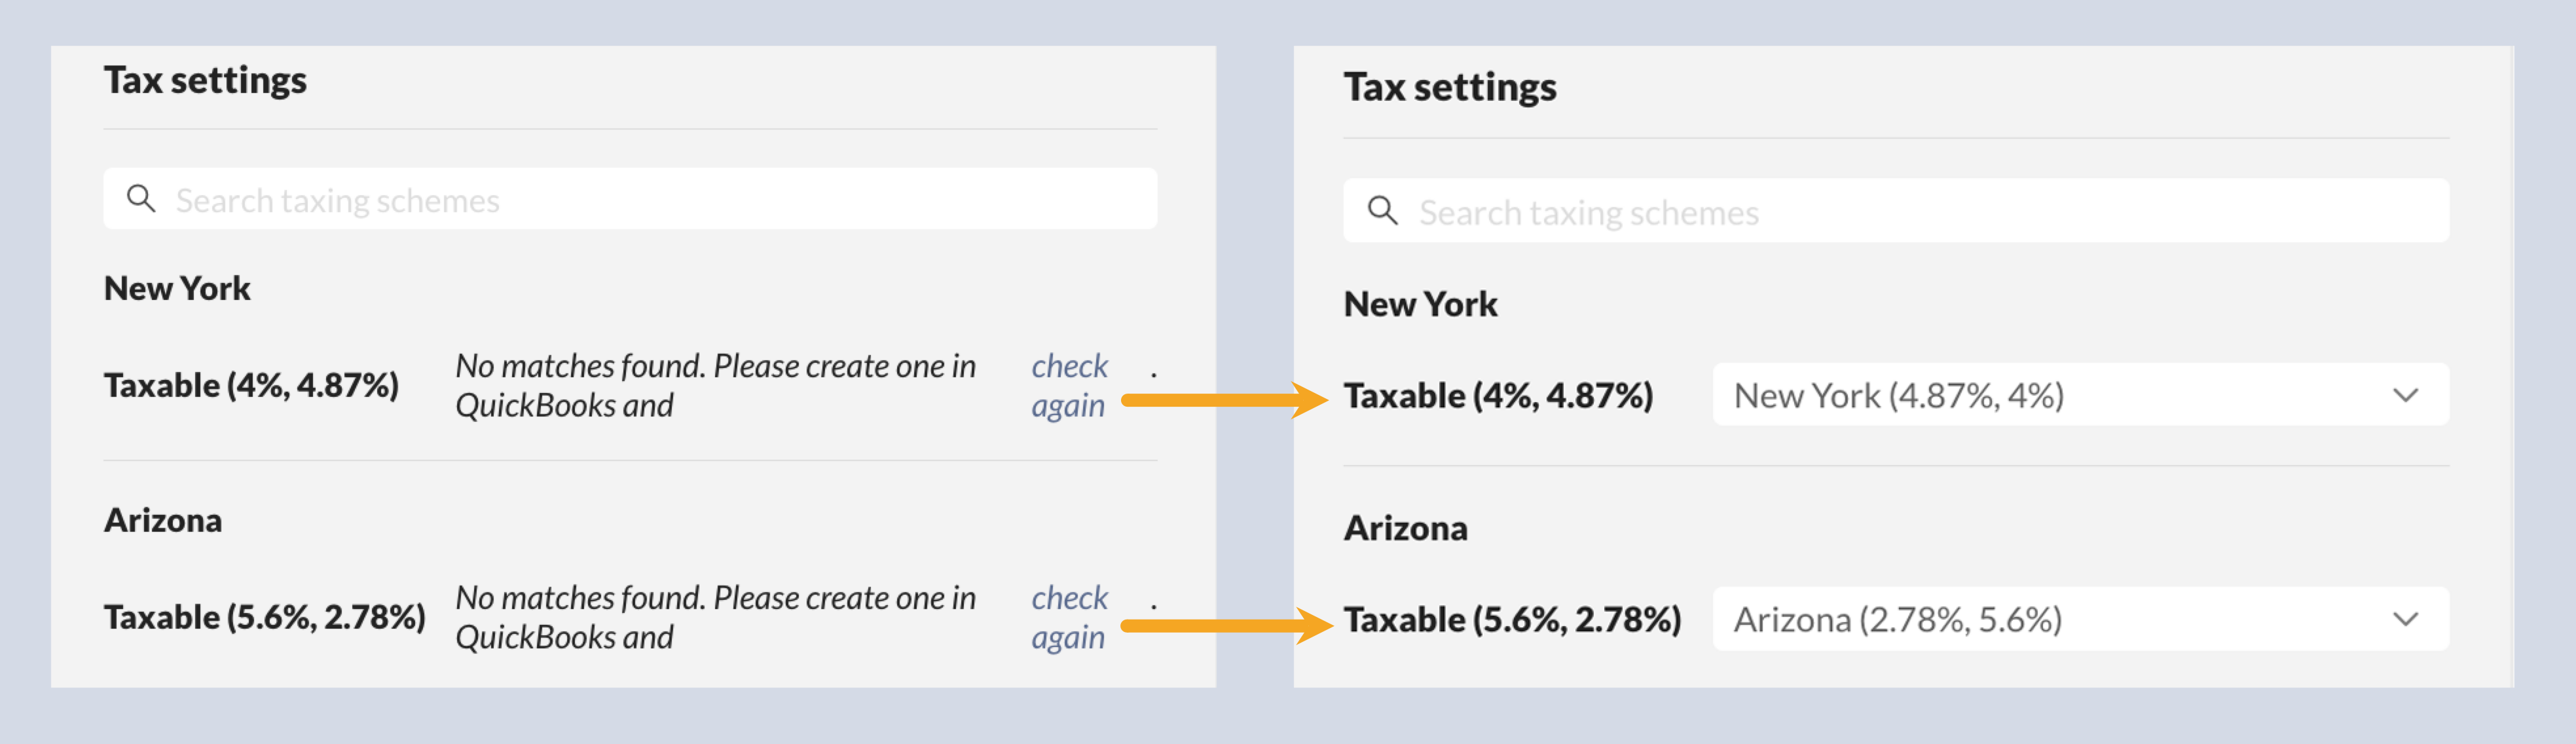
- At the bottom of the setup, you’ll find the tax settings. Similar to mapping your accounts, you’ll need to map the taxes in inFlow to the tax rates in QuickBooks.
Match the inFlow taxes to the QuickBooks Online taxes in the drop-down menu. If you see No matches found, please create one in QuickBooks and check again; it means QuickBooks doesn’t have a matching tax. Create the tax in QuickBooks Online, then click Check again before proceeding.
- Click Next to continue the Payment order and inventory value push integration settings.
QuickBooks has released an Automated Sales Tax feature that can calculate the taxes on your invoices for you based on shipping addresses and other order information on your invoices. If your account has this feature enabled, you won’t have to map any taxes, and the window will say, “Tax setup is complete”. Click Next to complete the setup.
Sales order push account setup breakdown
| Account | Explanation |
|---|---|
| Product income account | Typically, this is the account in QuickBooks Online you use to receive money for products sold. This account will be set as the Product income account for products created via inFlow in QuickBooks Online. Select the appropriate QuickBooks Online account from the dropdown. The Product Income account for existing products in QuickBooks Online will not change. |
| Customer name | When a sales order is pushed to QuickBooks, you can choose whether to include or exclude the customer name as part of the address in the resulting invoice in QuickBooks. |
| Payments account | If payment push is enabled, you’ll need to tell inFlow which QuickBooks account to update when the order is pushed. This is the bank account you use in QuickBooks Online to receive/send payments (Checking, etc.). |
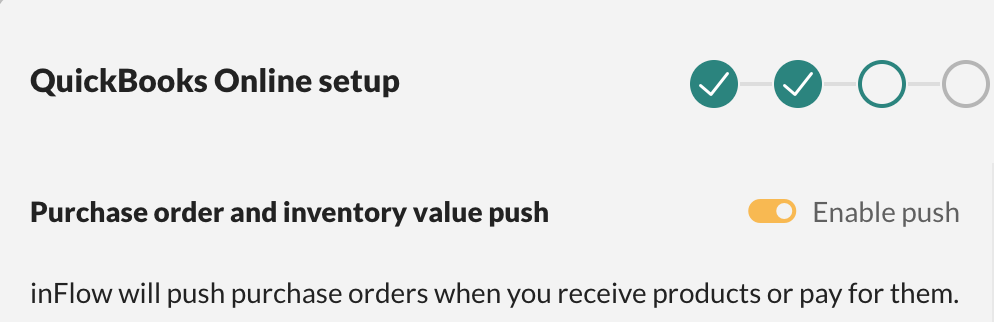
Purchase order and inventory value push settings
- At the top of the screen, you’ll see that Purchase order and inventory value push settings are toggled on.
This setting will push purchase orders from inFlow to QuickBooks Online as bills. In addition to creating a bill, inFlow will update the Inventory Assets and Cost of Goods Sold accounts in QuickBooks.
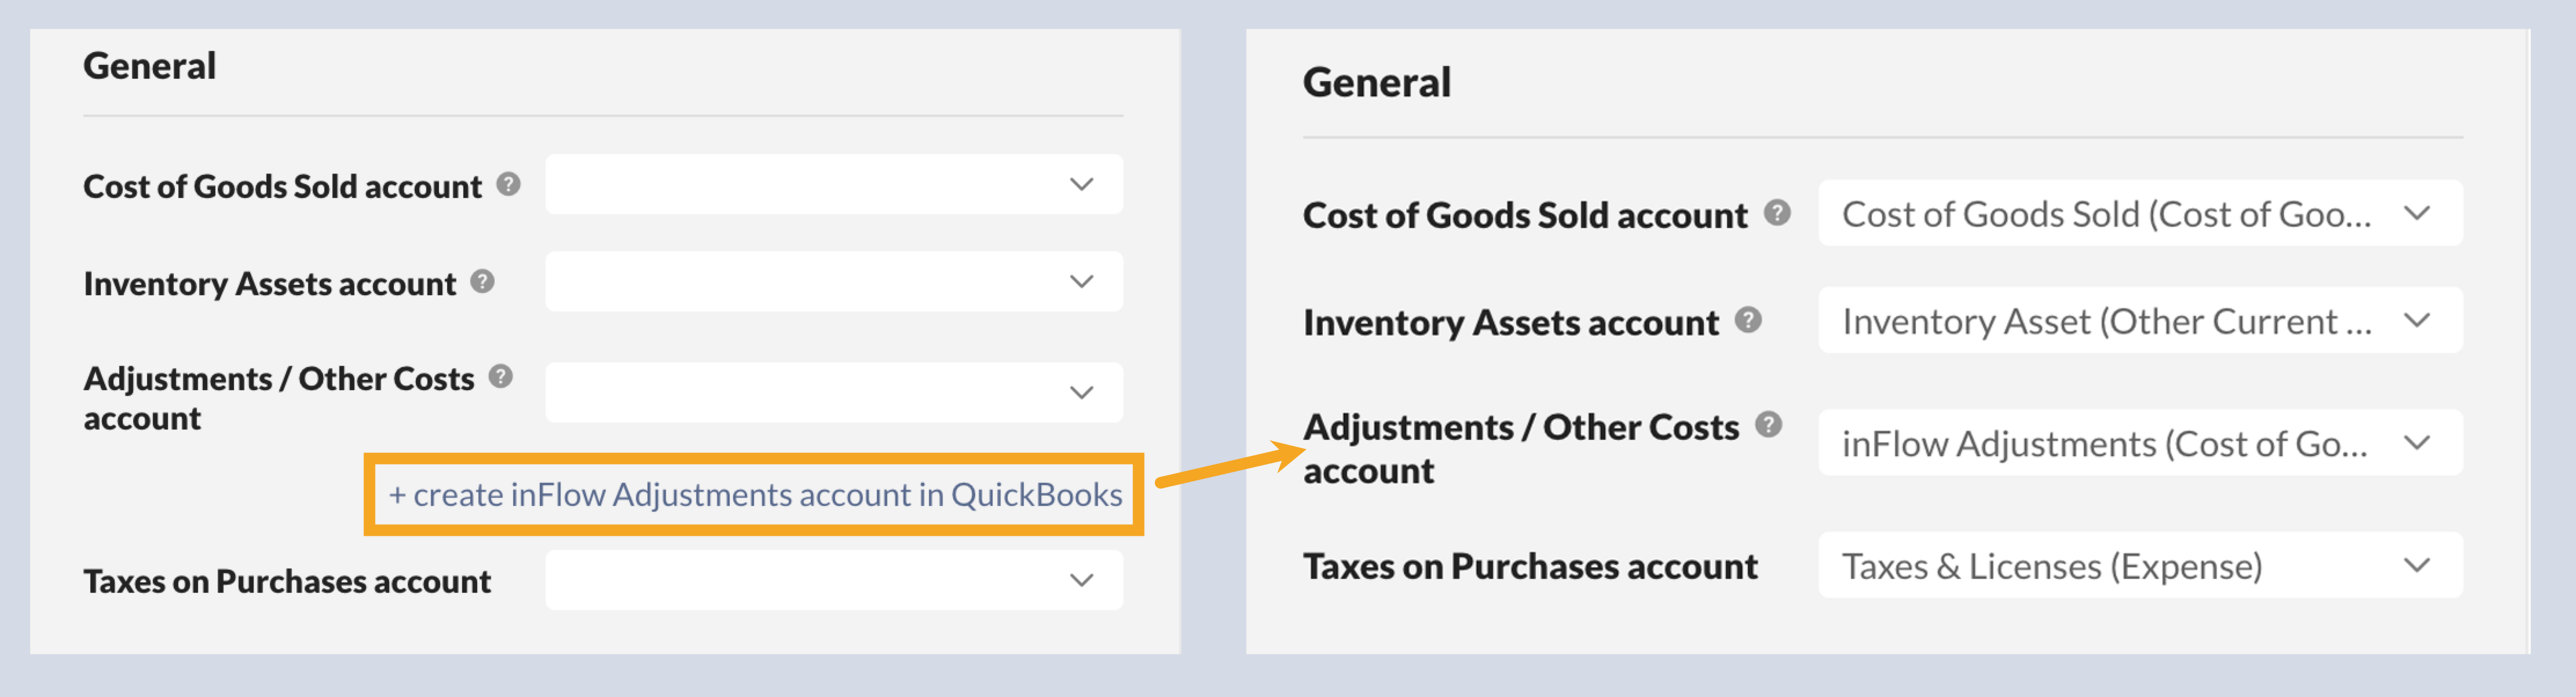
- In the General settings, select the appropriate accounts that inFlow should connect to. For the Adjustments/Other Costs account, we recommend that you select Create inFlow Adjustments account in QuickBooks to create a dedicated account for inFlow to make adjustments where needed. Don’t select the same QuickBooks Online account for more than one setting.
Purchase order payment settings
- Next in the setup is Payment settings. The Sync payments setting lets you choose how you want to manage payments. Select your preferred option. See the table below for a breakdown of each option.
| Payment setting | Explanation |
|---|---|
| Push and pull payments | This is a two-way payment sync option. You can process payments in inFlow or QuickBooks Online, and the payment will be pushed to the other system for you. |
| Push payments | With this setting, payments are added only to the QuickBooks Online bill, and the payment information is sent to the matching inFlow purchase order. If a payment is added to an inFlow purchase order, QuickBooks Online will not receive the payment information on the matching bill. |
| Pull payments | With this setting, payments are only added to the QuickBooks Online bill, and the payment information will be sent to the matching inFlow purchase order. If a payment is added to an inFlow purchase order, QuickBooks Online will not receive the payment information on the matching bill. |
- The Refund setting is toggled on by default. This allows you to process refunds in inFlow, and the refund information will be sent to the matching QuickBooks Online bill. Toggle this setting off if you don’t want refunds sent to QuickBooks Online. When this setting is inactive, refunds will need to be processed separately in inFlow and QuickBooks Online.
- Next, select the Payments (Check) account and the Payments (Credit Card) account from the drop-down menus. These are the accounts that will be used for paying bills to your vendors in QuickBooks Online.
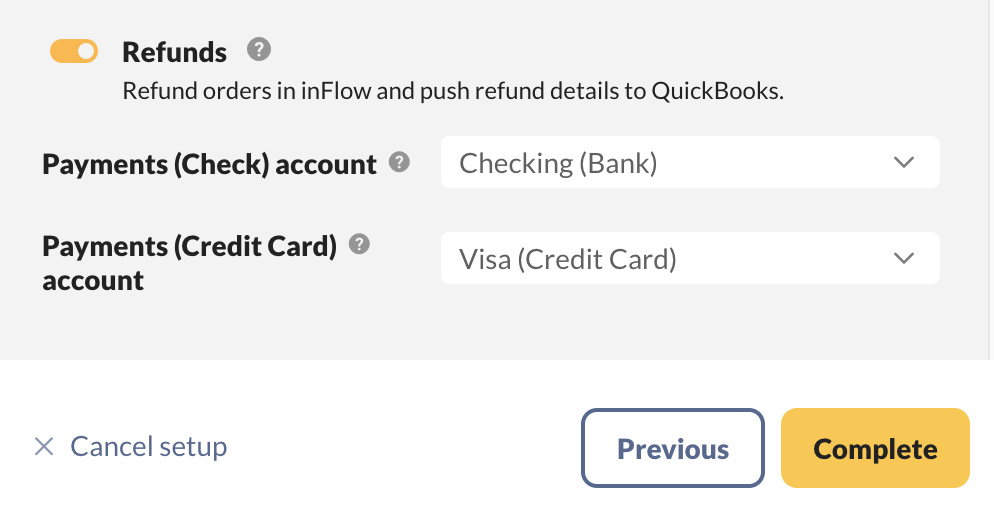
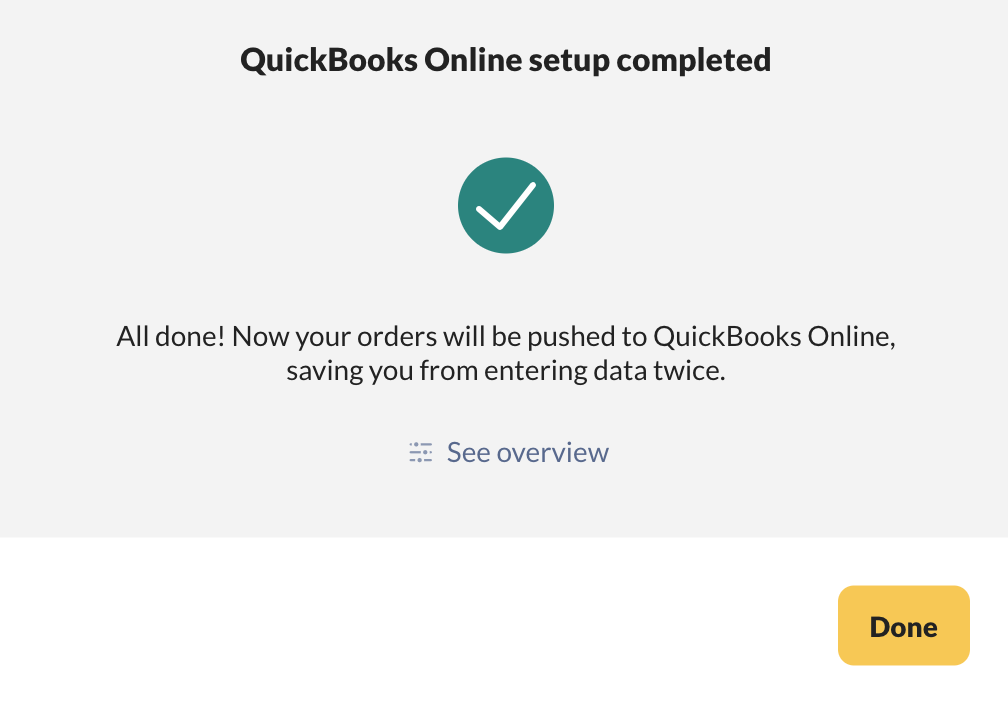
- When done, click Complete, then click Done. And now inFlow is connected to QuickBooks Online.
Purchase order push account setup breakdown
| Account | Explanation |
|---|---|
| Cost of Goods Sold | You’ll need to tell inFlow which QuickBooks account to update when it pushes the total Cost of Goods Sold value from inFlow to QuickBooks Online. |
| Inventory Assets account | You’ll need to tell inFlow which QuickBooks account to update when it pushes the inventory cost value from inFlow to QuickBooks. |
| Adjustments/Other Costs account | QuickBooks US doesn’t support taxes on purchases. To make the integration work, you’ll need to select a QuickBooks account for inFlow to update (it should be a liability or expense account) so that any taxes on purchase orders in inFlow are still pushed to QuickBooks, but as a separate line/category on the order. |
| Taxes on Purchases (QuickBooks US only) | If payment push is enabled, you’ll need to specify inFlow which QuickBooks account to charge when the purchase order payment method is set to “Credit” in inFlow. |
| Payments (Check) | If payment push is enabled, you’ll need to tell inFlow which QuickBooks account to take payment from when the payment method is set to “Check” on the purchase order in inFlow. |
| Payments (Credit Card/no payment method selected) | If payment push is enabled, you’ll need to tell inFlow which QuickBooks account to take payment from when the payment method is set to “Credit” on the purchase order in inFlow. |
If no payment method is selected on the purchase order in inFlow, then that payment will be deducted from the selected QuickBooks payment account.
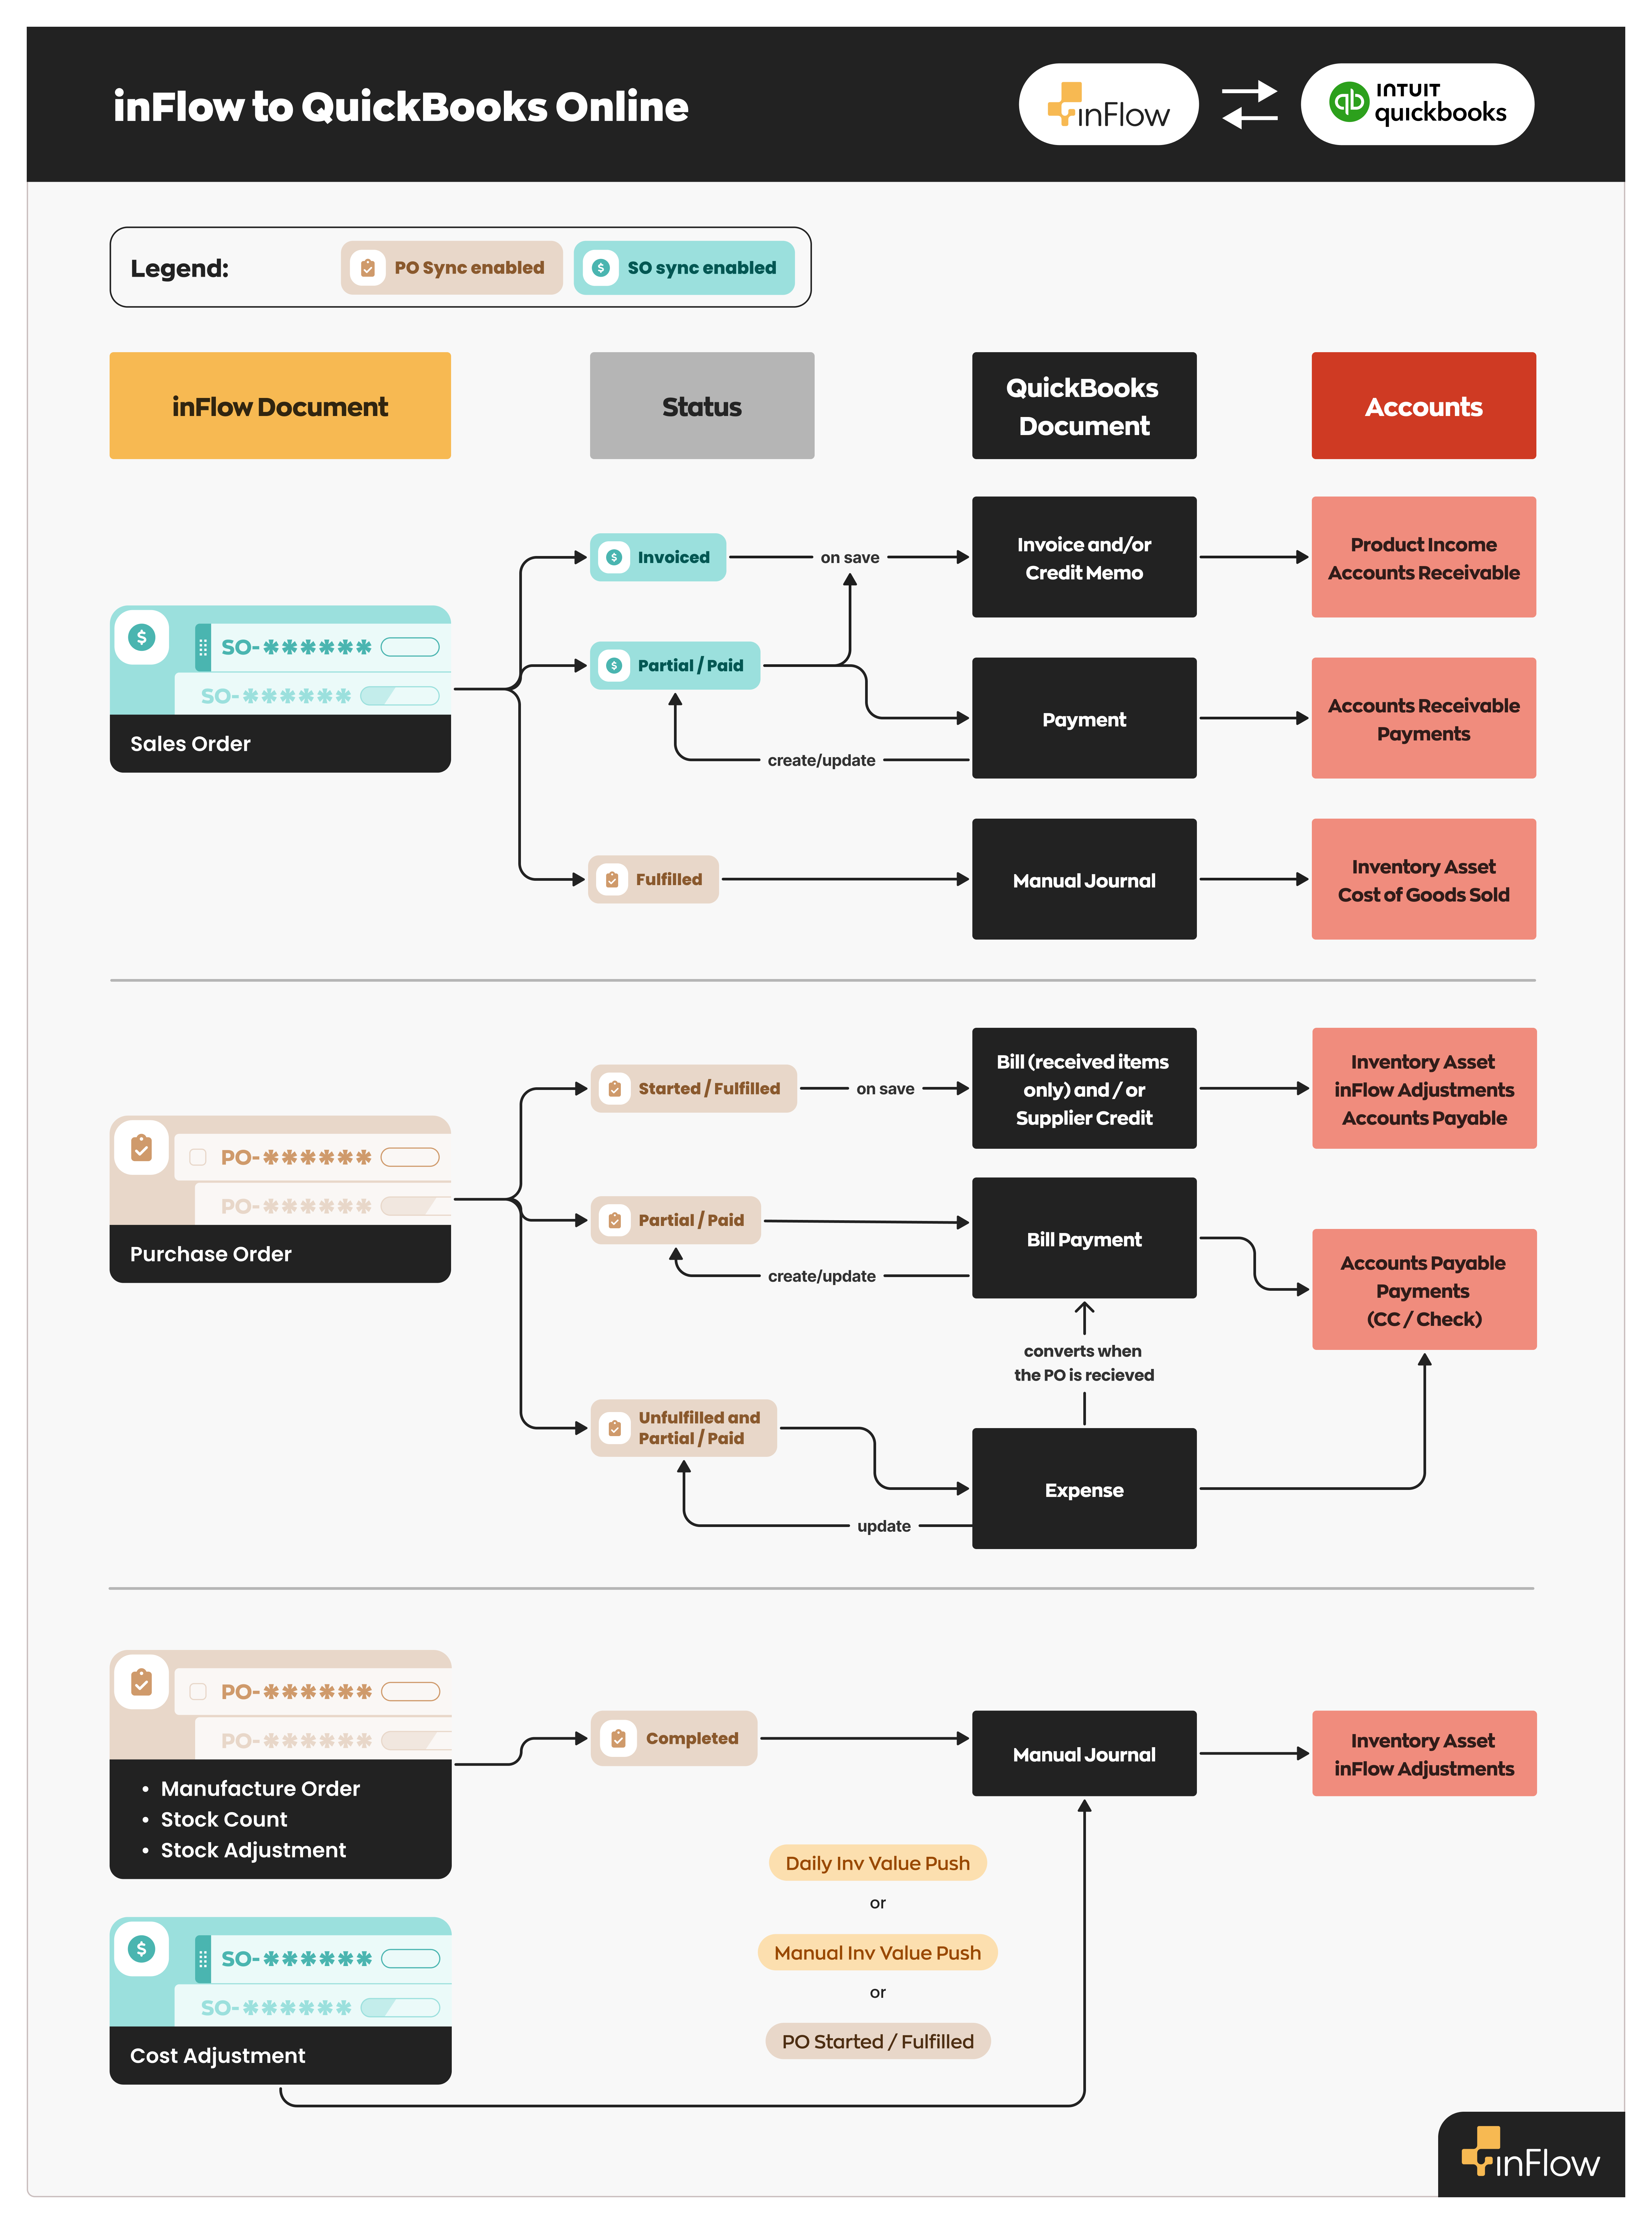
inFlow to QuickBooks account flowchart
For a visualization of how inFlow connects to your various QuickBooks Online accounts, take a look at the flowchart below.
Push sales orders
Now that inFlow and QuickBooks Online are connected, you can begin processing sales orders and push them to QuickBooks Online.
How to push a sales order to QuickBooks Online
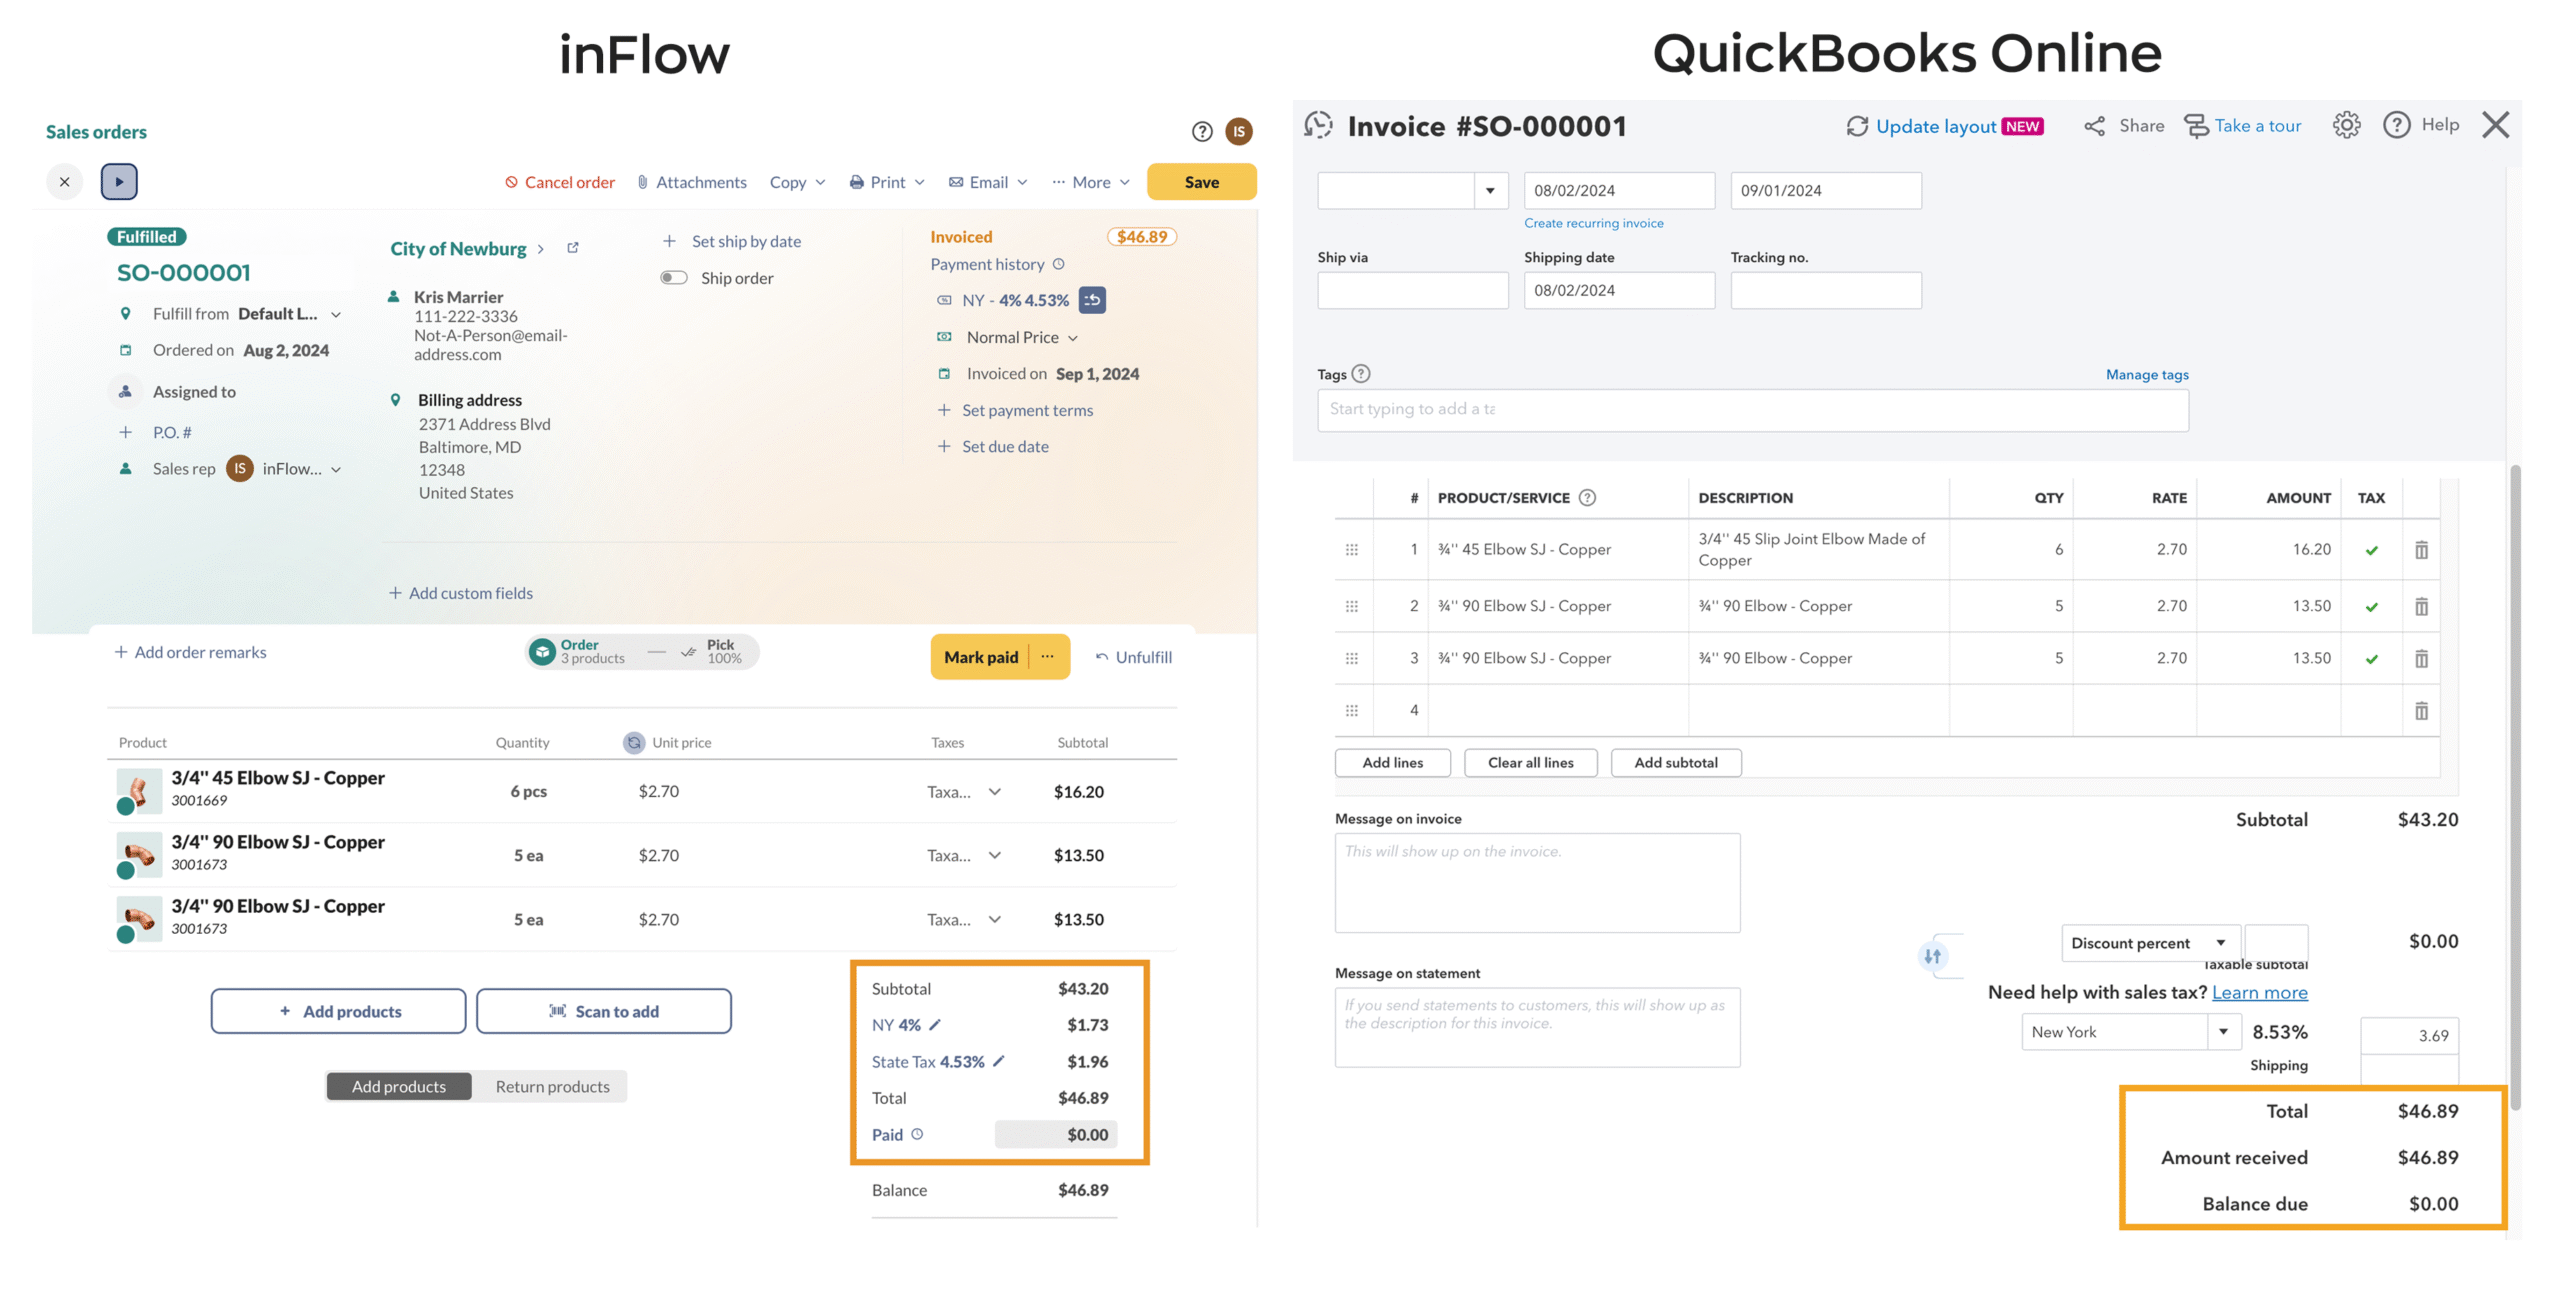
In inFlow, when a sales order is marked as invoiced (meaning you’ve notified your customer that they owe you for the order), inFlow will push the order to QuickBooks Online as an invoice.
You can change the sales order status to invoiced when a sales order is partially paid or paid in full, or when you select the Mark invoiced button.
You can mark a sales order as invoiced in the following ways:
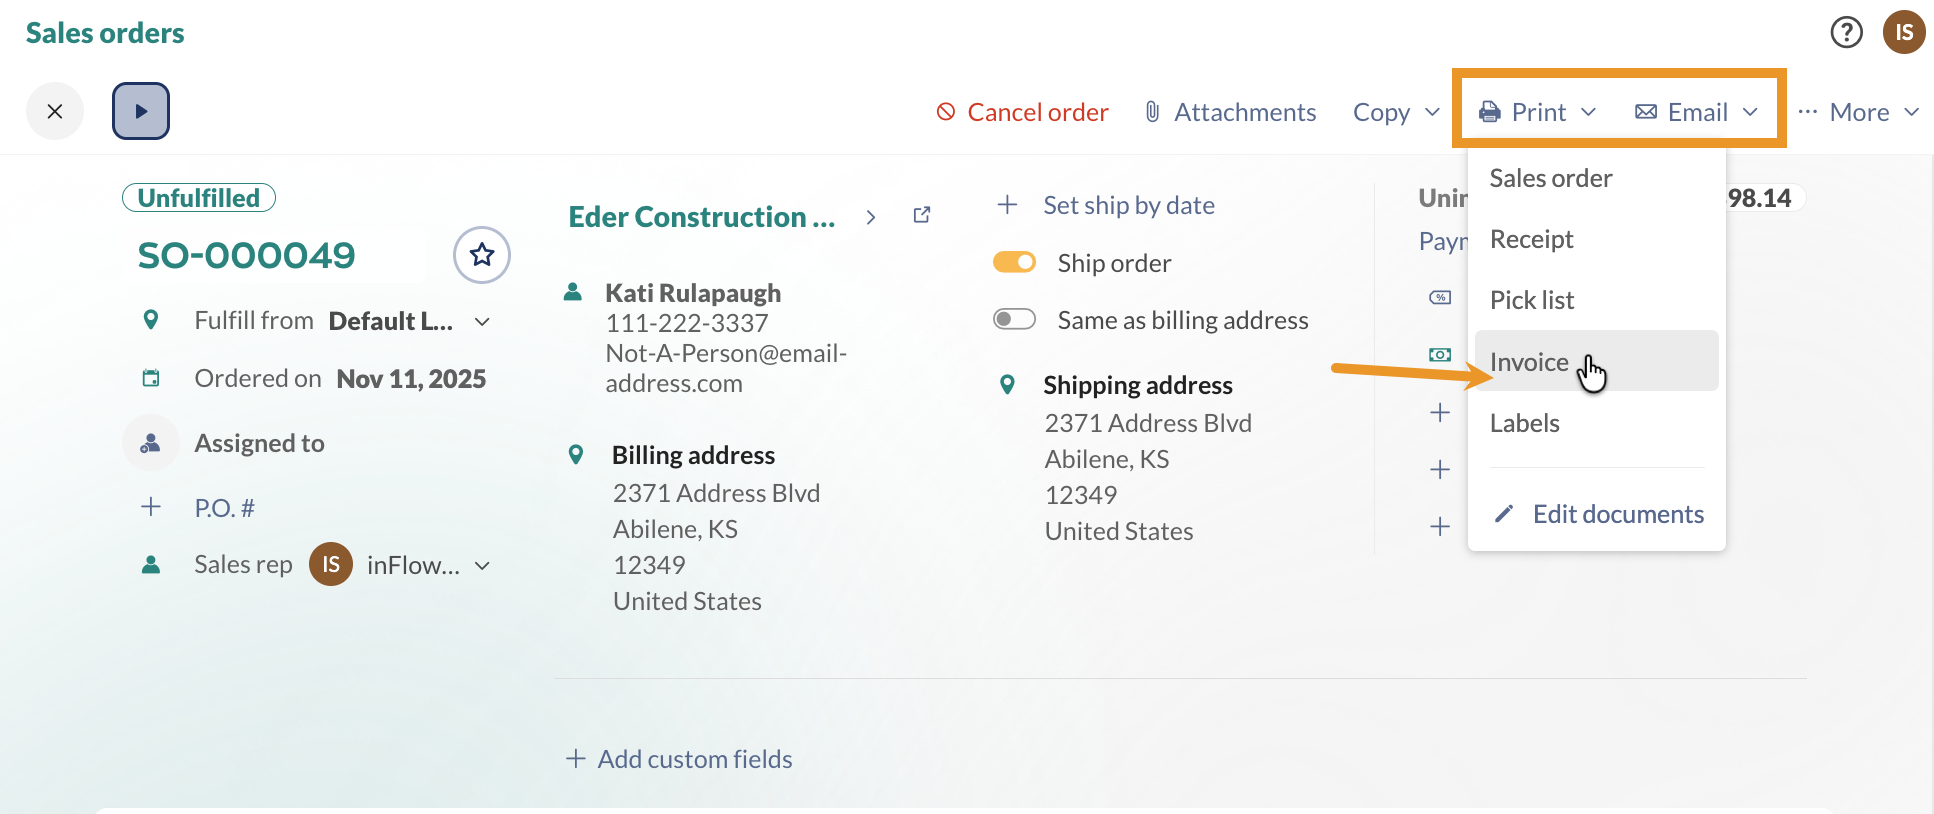
- Printing a sales invoice.
- Emailing a sales invoice.
- Select the Mark invoiced button.
Printing and emailing
Printing and emailing invoices from inFlow is how you can inform your customers that they have an open order with an outstanding balance.
Printing or emailing the invoice triggers inFlow to set the order status to Invoiced, which then sends the order to QuickBooks Online.
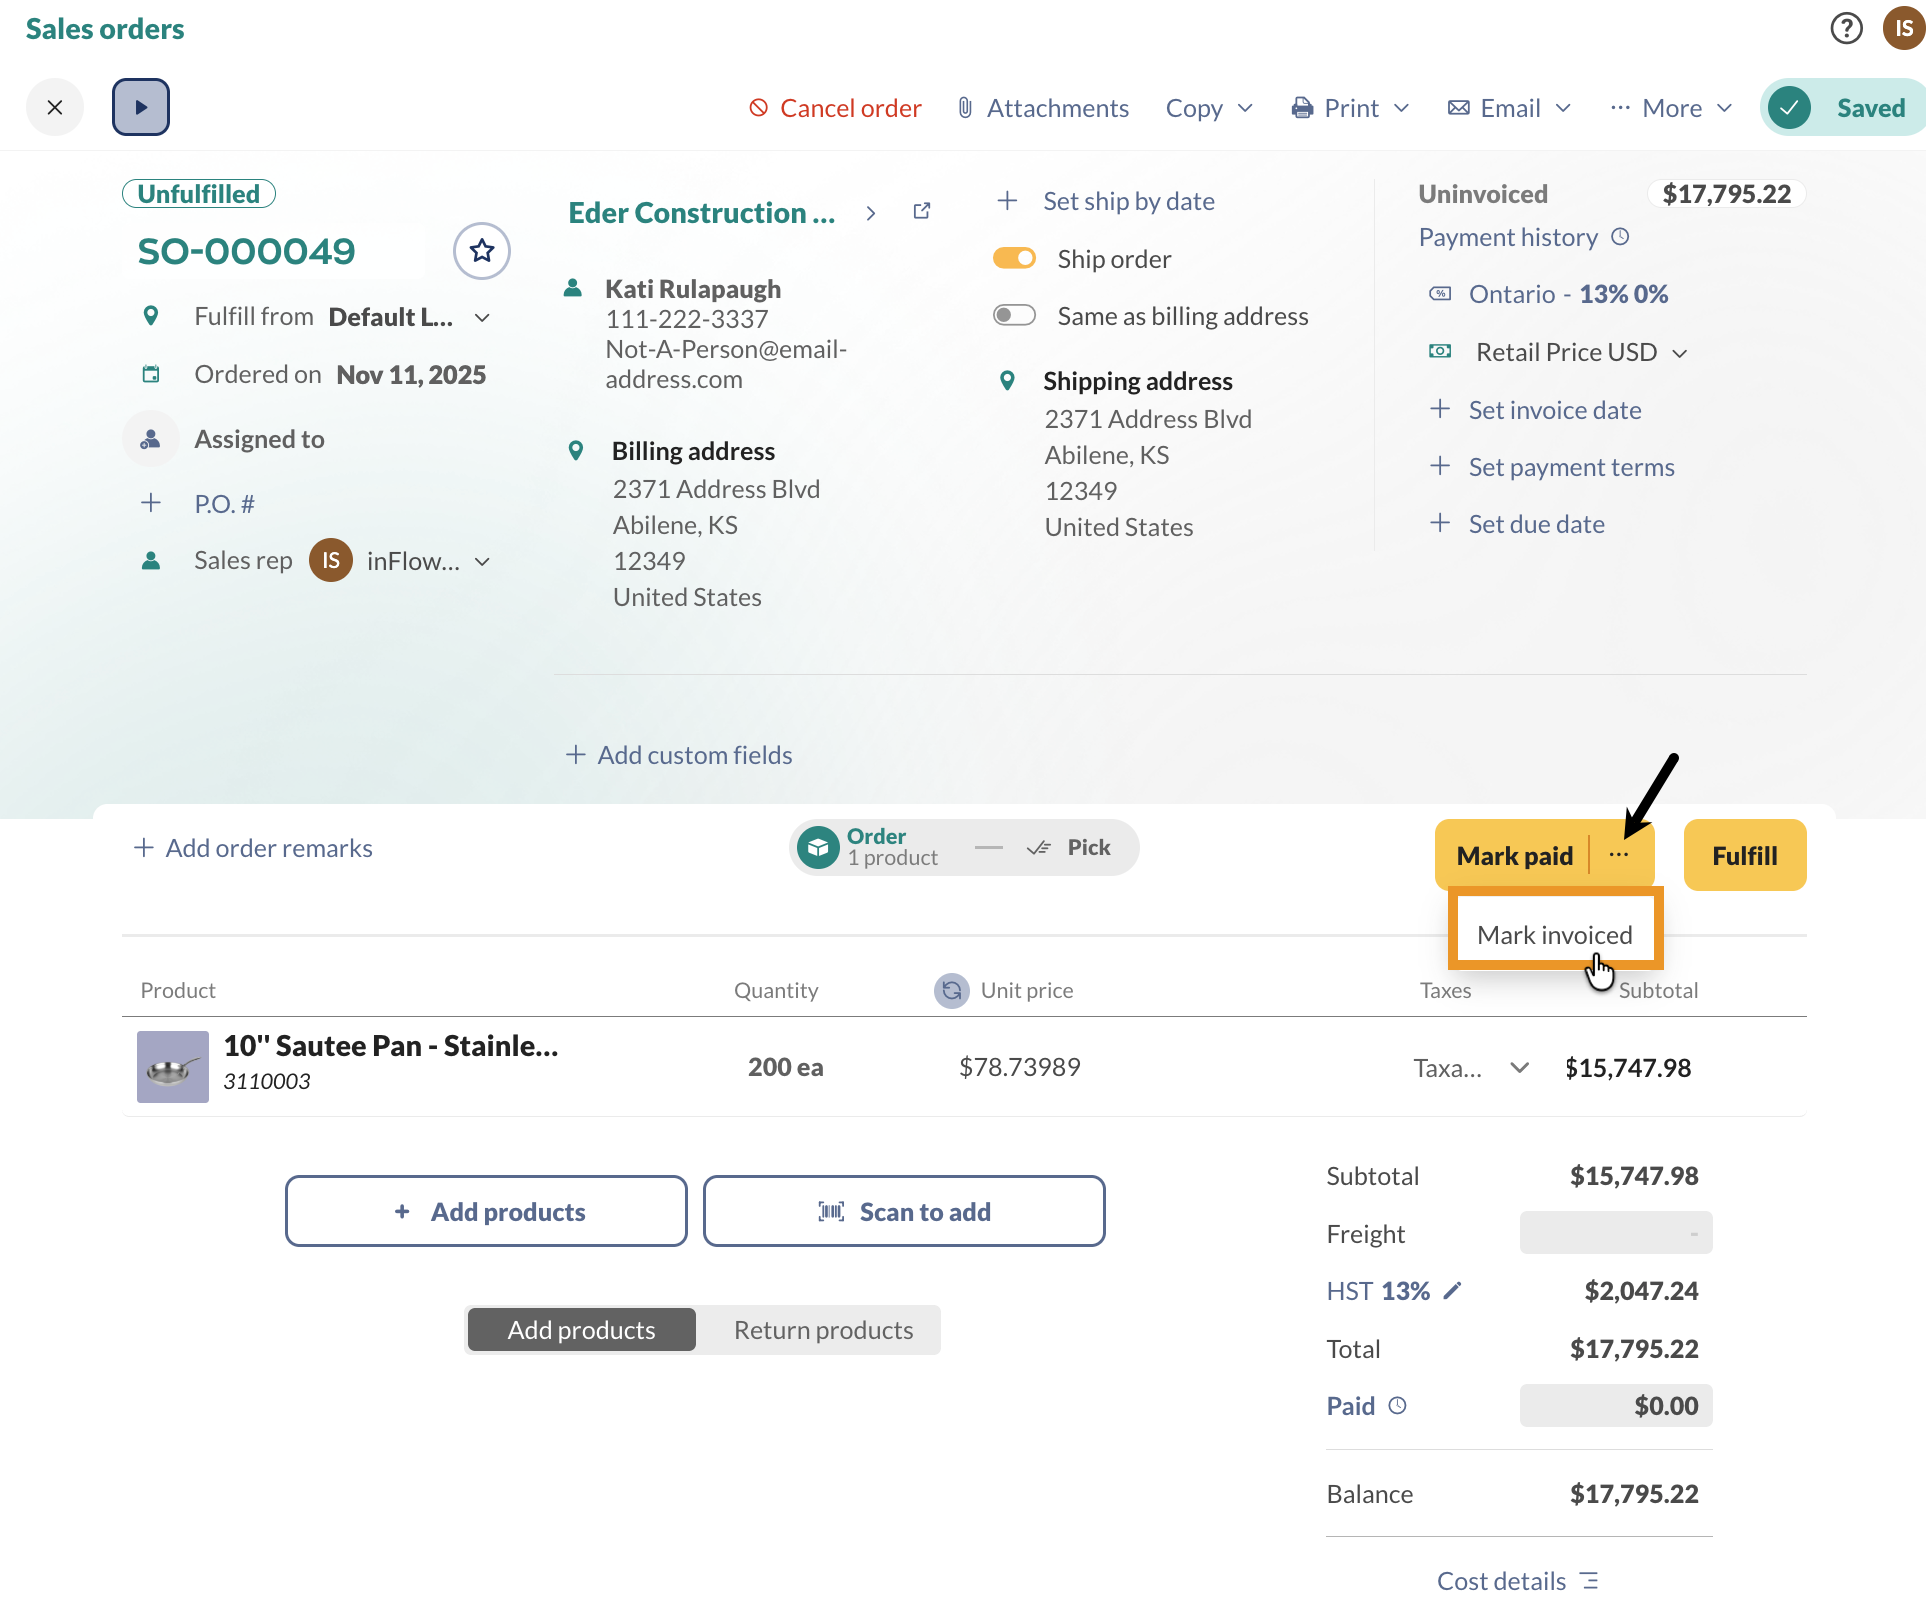
Mark invoiced button
If you want to mark the order as invoiced but don’t need to print or email it, click the down arrow next to Mark paid, then select Mark Invoiced.
Which transactions will inFlow sales orders be in QuickBooks Online?
Sales orders pushed from inFlow will be created in QuickBooks Online as invoices, credit memos, journal entries, and payment transactions.
| Order/transaction in inFlow | Order/transaction in QuickBooks Online |
|---|---|
| Invoiced unpaid sales orders will be listed as an invoice in QuickBooks Online. | Invoice |
| Payments that have been added to invoiced sales orders have been pushed to QuickBooks Online. | Payment transactions |
| Refunds on paid sales orders that have been pushed to QuickBooks Online. | Journal entry |
| Unpaid blank sales orders with negative totals that are pushed to QuickBooks Online | credit memo |
New to accounting? Take a look at QuickBooks Online’s common accounting terms to learn more.
Where can I find invoices and other transactions in QuickBooks Online?
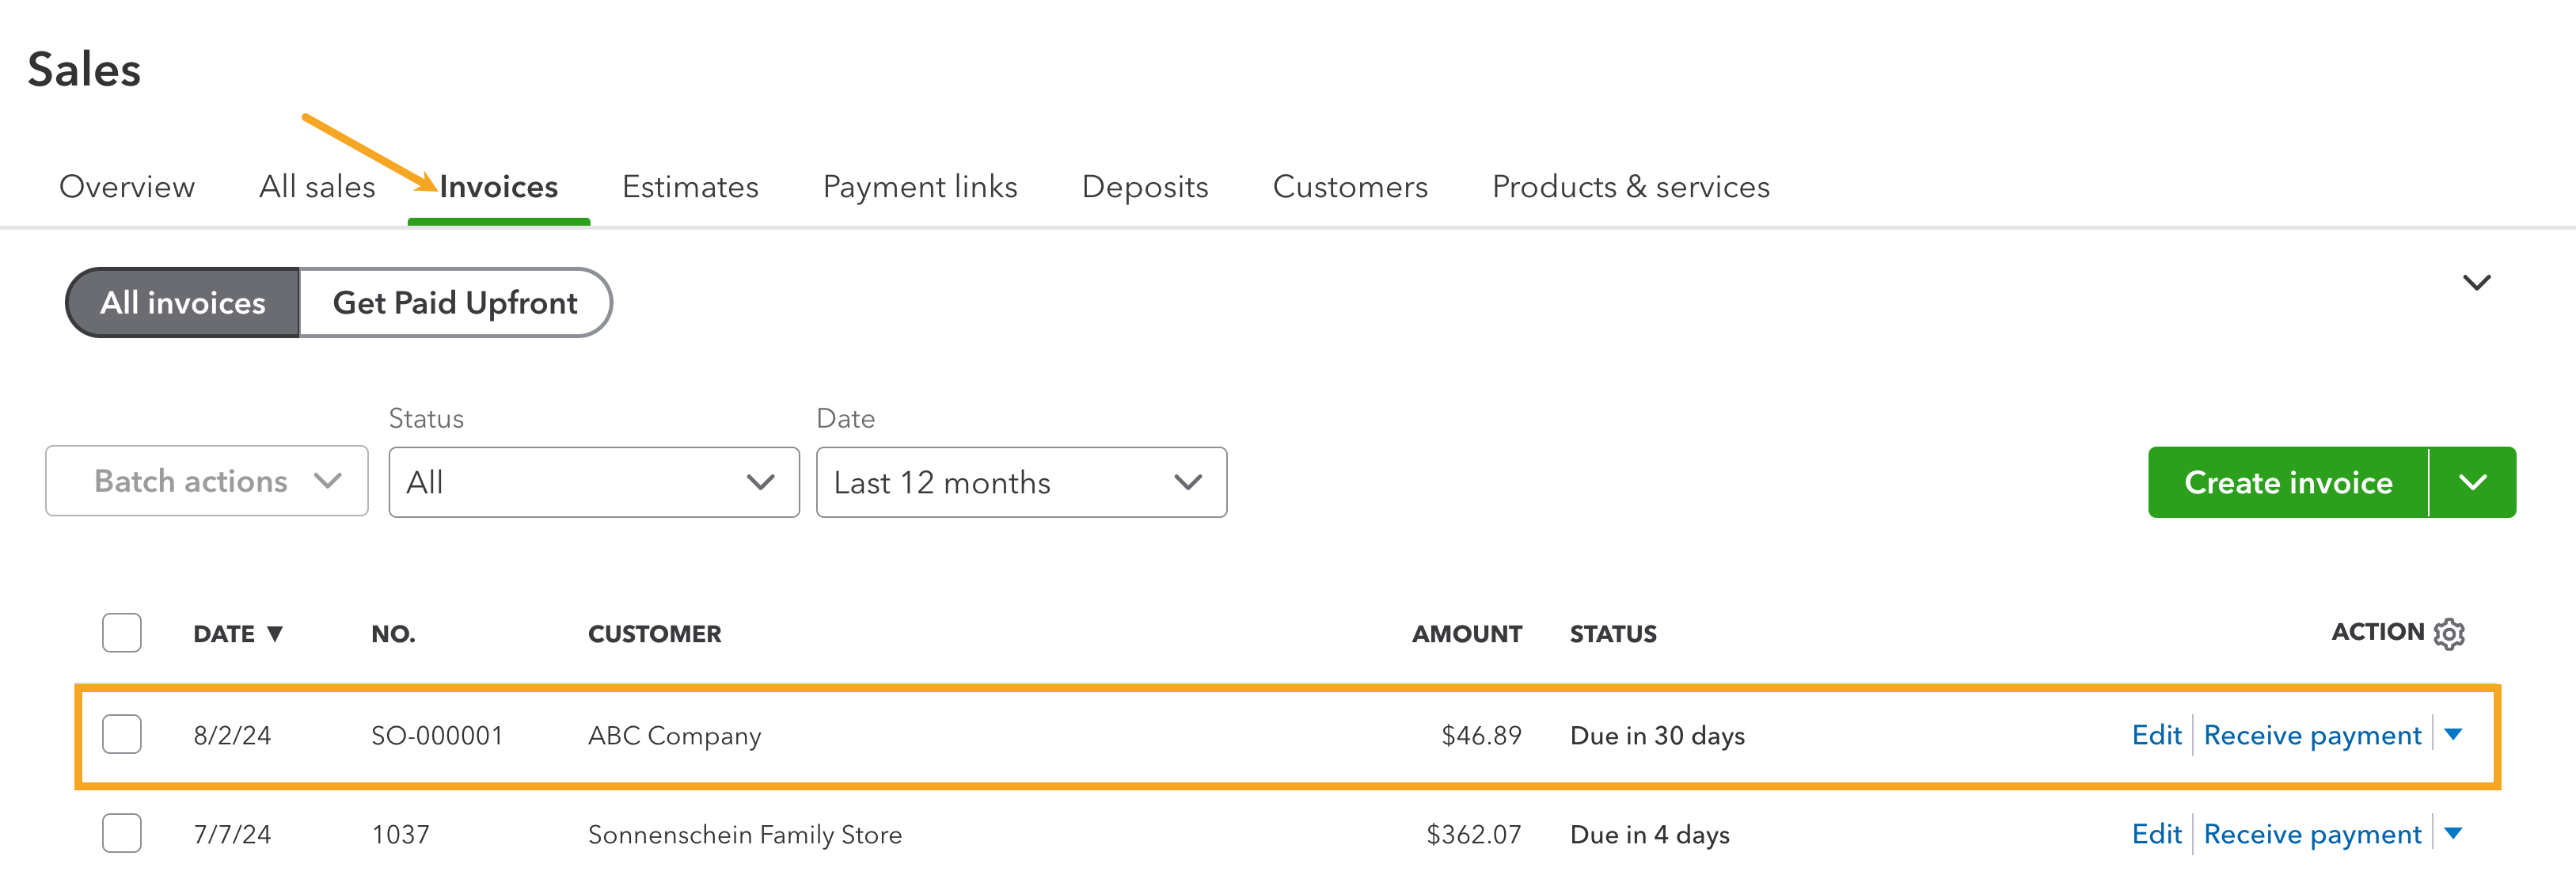
When your sales orders are invoiced, partially paid, or paid in inFlow, they can be found in the Sales section of QuickBooks Online (qbo.intuit.com/app/sales)
You can click any table heading to sort your orders. Select Edit or View to look at the invoice.
inFlow’s sales order number will show up as the Invoice number in QuickBooks, making information tracking simple. Payments, refunds, and adjustments will create different line items in your sales transactions list.
inFlow won’t push historical sales orders or quotes to QuickBooks Online. However, changing a historical uninvoiced sales order to invoiced or adding a payment in inFlow will push that order to QuickBooks.
QuickBooks Online’s Audit log is a handy way to see many transactions at once.
Which sales order fields push to QuickBooks Online?
- Customer name
- Customer billing address
- Shipping address
- Invoice/Order date
- Invoice/Order number
- Products/SKUs sold
- Quantity of products purchased
- Payment details
- Payment terms
- Due date
- The subtotal on the sales order
- Freight
- Taxes on the sales order
- Balance left on the sales order
- Sales order remarks
Which fields won’t push to QuickBooks Online?
- P.O #
- Sales rep
- Location of items
- Non-customer costs
- Payments made by credit
- Custom fields
- Requested ship date
- Credits
What customer fields push to QuickBooks Online?
Currently, inFlow only pushes your sales order with QuickBooks, not your customer records. When you save an order in inFlow with a customer that isn’t in QuickBooks, the push will create a new customer profile in QuickBooks, and inFlow will set the following fields:
- Name
- Billing Address
- Shipping Address
- Phone Number
- Currency
Other customer fields must be entered manually in QuickBooks.
After a customer is created, inFlow will not update the customer profile in QuickBooks Online. If there are any changes, please enter them directly in QuickBooks and inFlow.
How will the products sync to QuickBooks Online?
The way products are pushed to QuickBooks Online will depend on the information available for the product in inFlow and QuickBooks Online. The matching priority happens automatically, but it goes as follows:
- Matching by inFlow SKU to a QuickBooks Online SKU.
- Matching by inFlow Product Name to a QuickBooks Online Product (SKU must be empty in at least one system)
- If there is no match, inFlow will create a new non-inventory product in QuickBooks Online, matching your product name and SKU field (if a SKU exists in inFlow)
Processing payments
When setting up the inFlow to QuickBooks integration settings, you can choose whether to process payments with the sales order push integration settings or not.
If the Sync payments setting is active, there are three payment options to choose from:
- Push and pull payments
- Push payments
- Pull payments.
Take a look below to learn how you can apply payments for each payment setting.
Push and pull payments
This is a two-way payment sync option. You can process payments in inFlow or QuickBooks Online, and the payment will be pushed to the other system for you.
In this example, the payment was made in inFlow and pushed to QuickBooks Online.
Paying multiple orders/invoices
In inFlow, you can pay for multiple sales orders at once, and the payments will be pushed to QuickBooks Online individually.
When using QuickBooks Online, paying multiple invoices with a single payment isn’t supported. Each invoice must have its own payment.
Push payments
With this payment option, payments can only be made on inFlow sales orders, and the payment information will be sent to the matching QuickBooks Online invoice.
If a payment is added to the QuickBooks Online invoice, inFlow will not receive the payment information on the matching sales order.
Pull payments
With this setting, payments are added only to the QuickBooks Online invoice, and the payment information is sent to the matching inFlow sales order.
If a payment is added to an inFlow sales order, QuickBooks Online will not receive the payment information on the matching invoice.
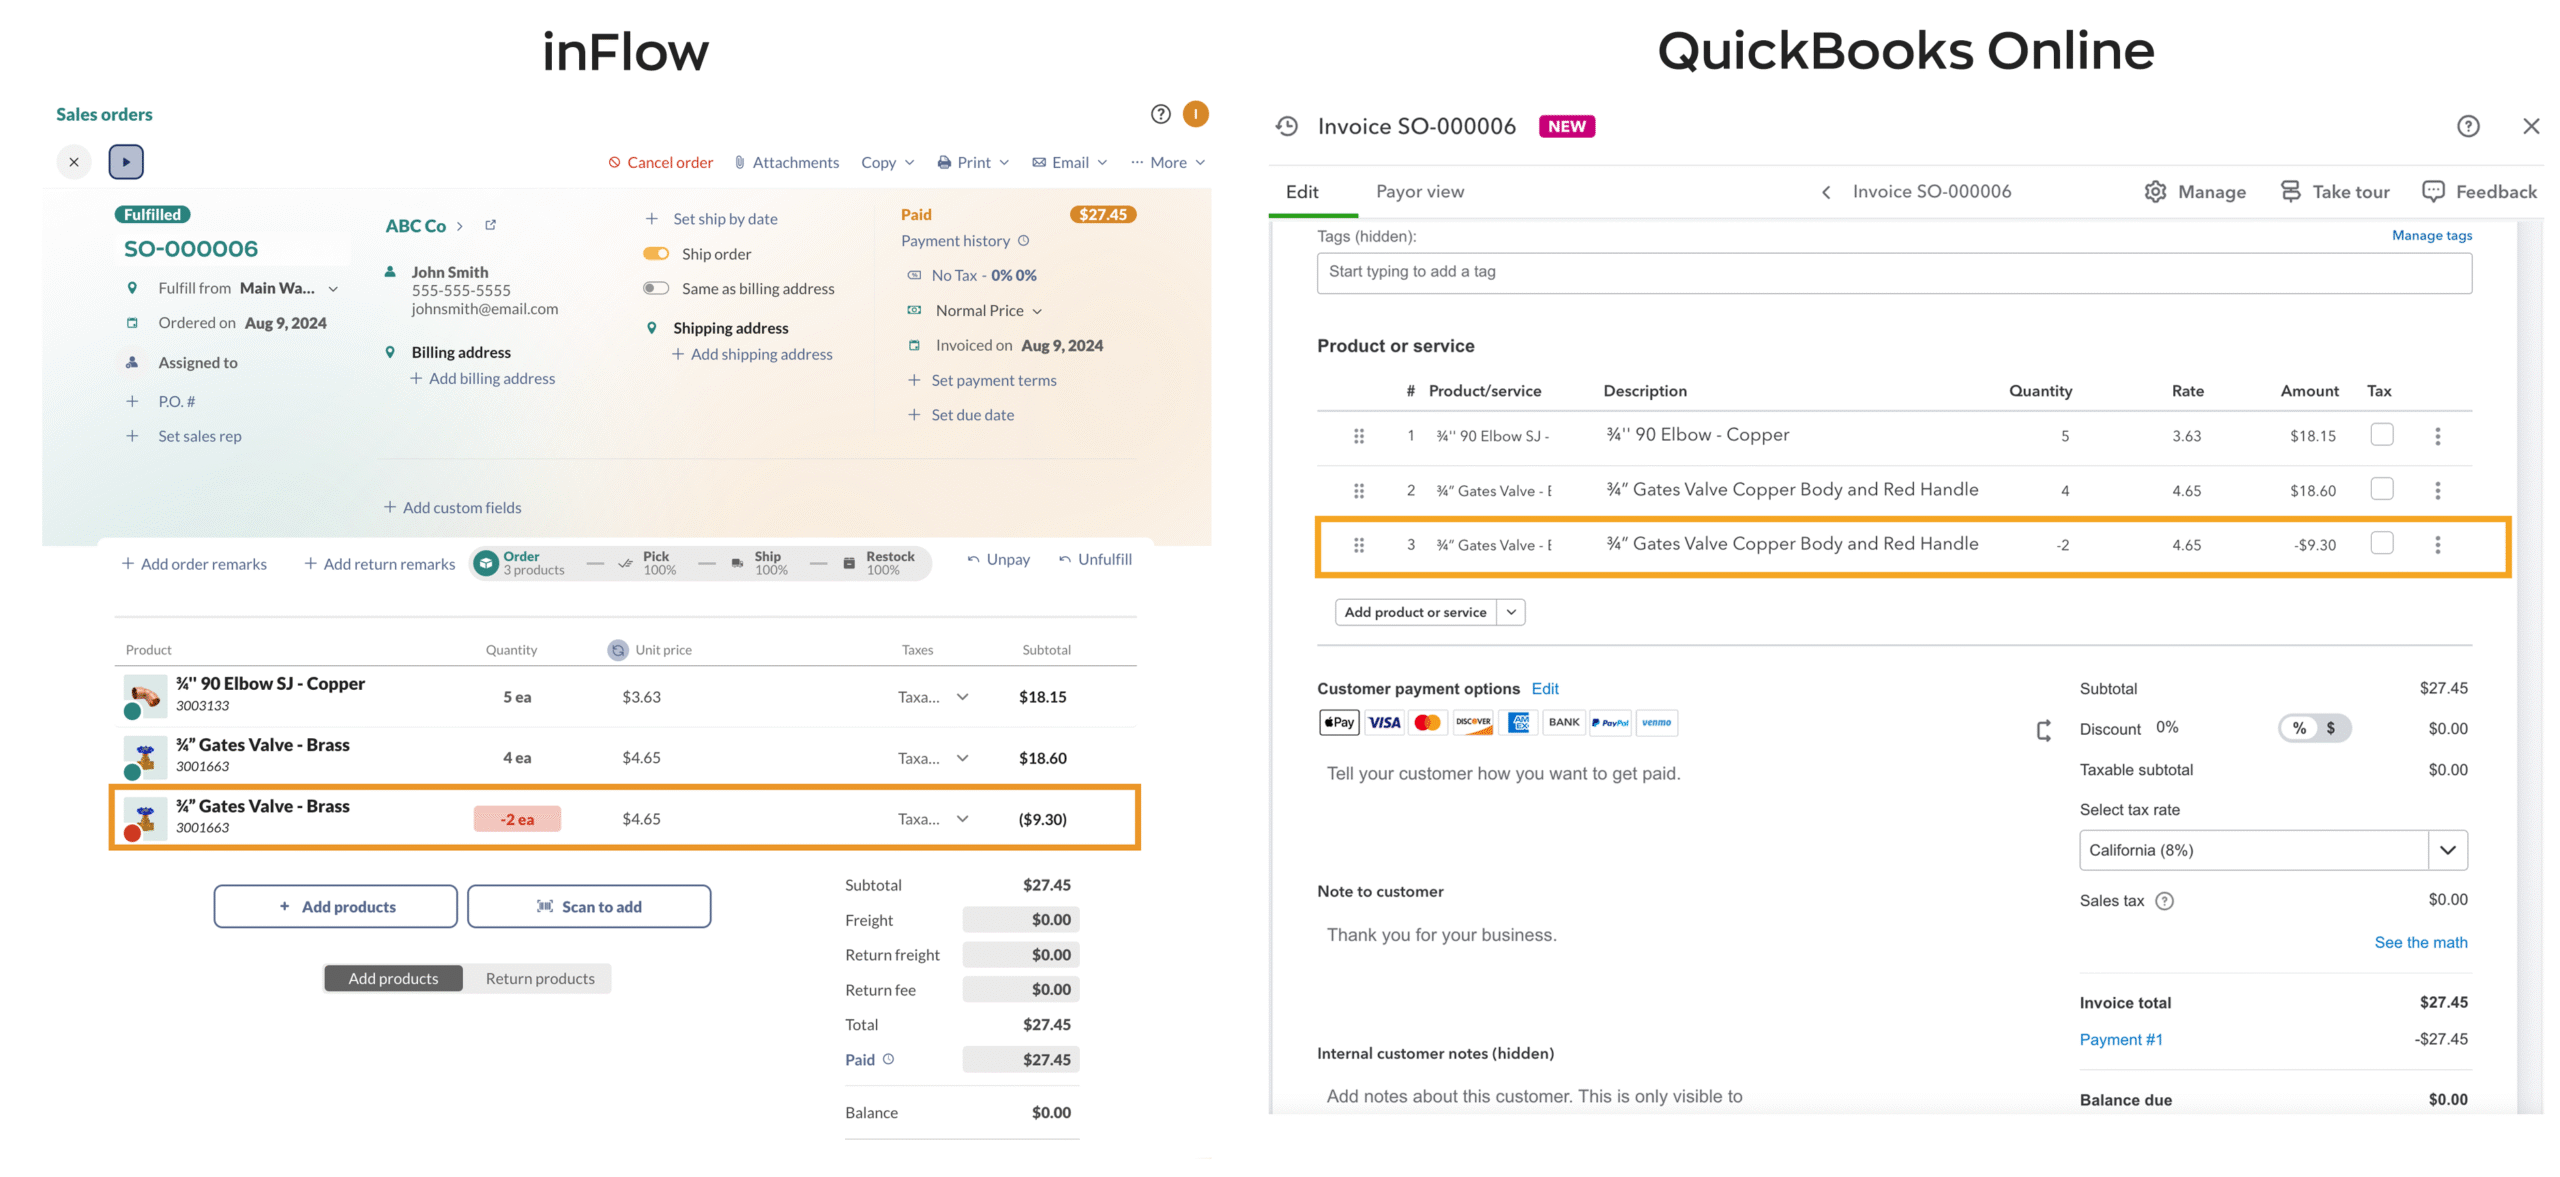
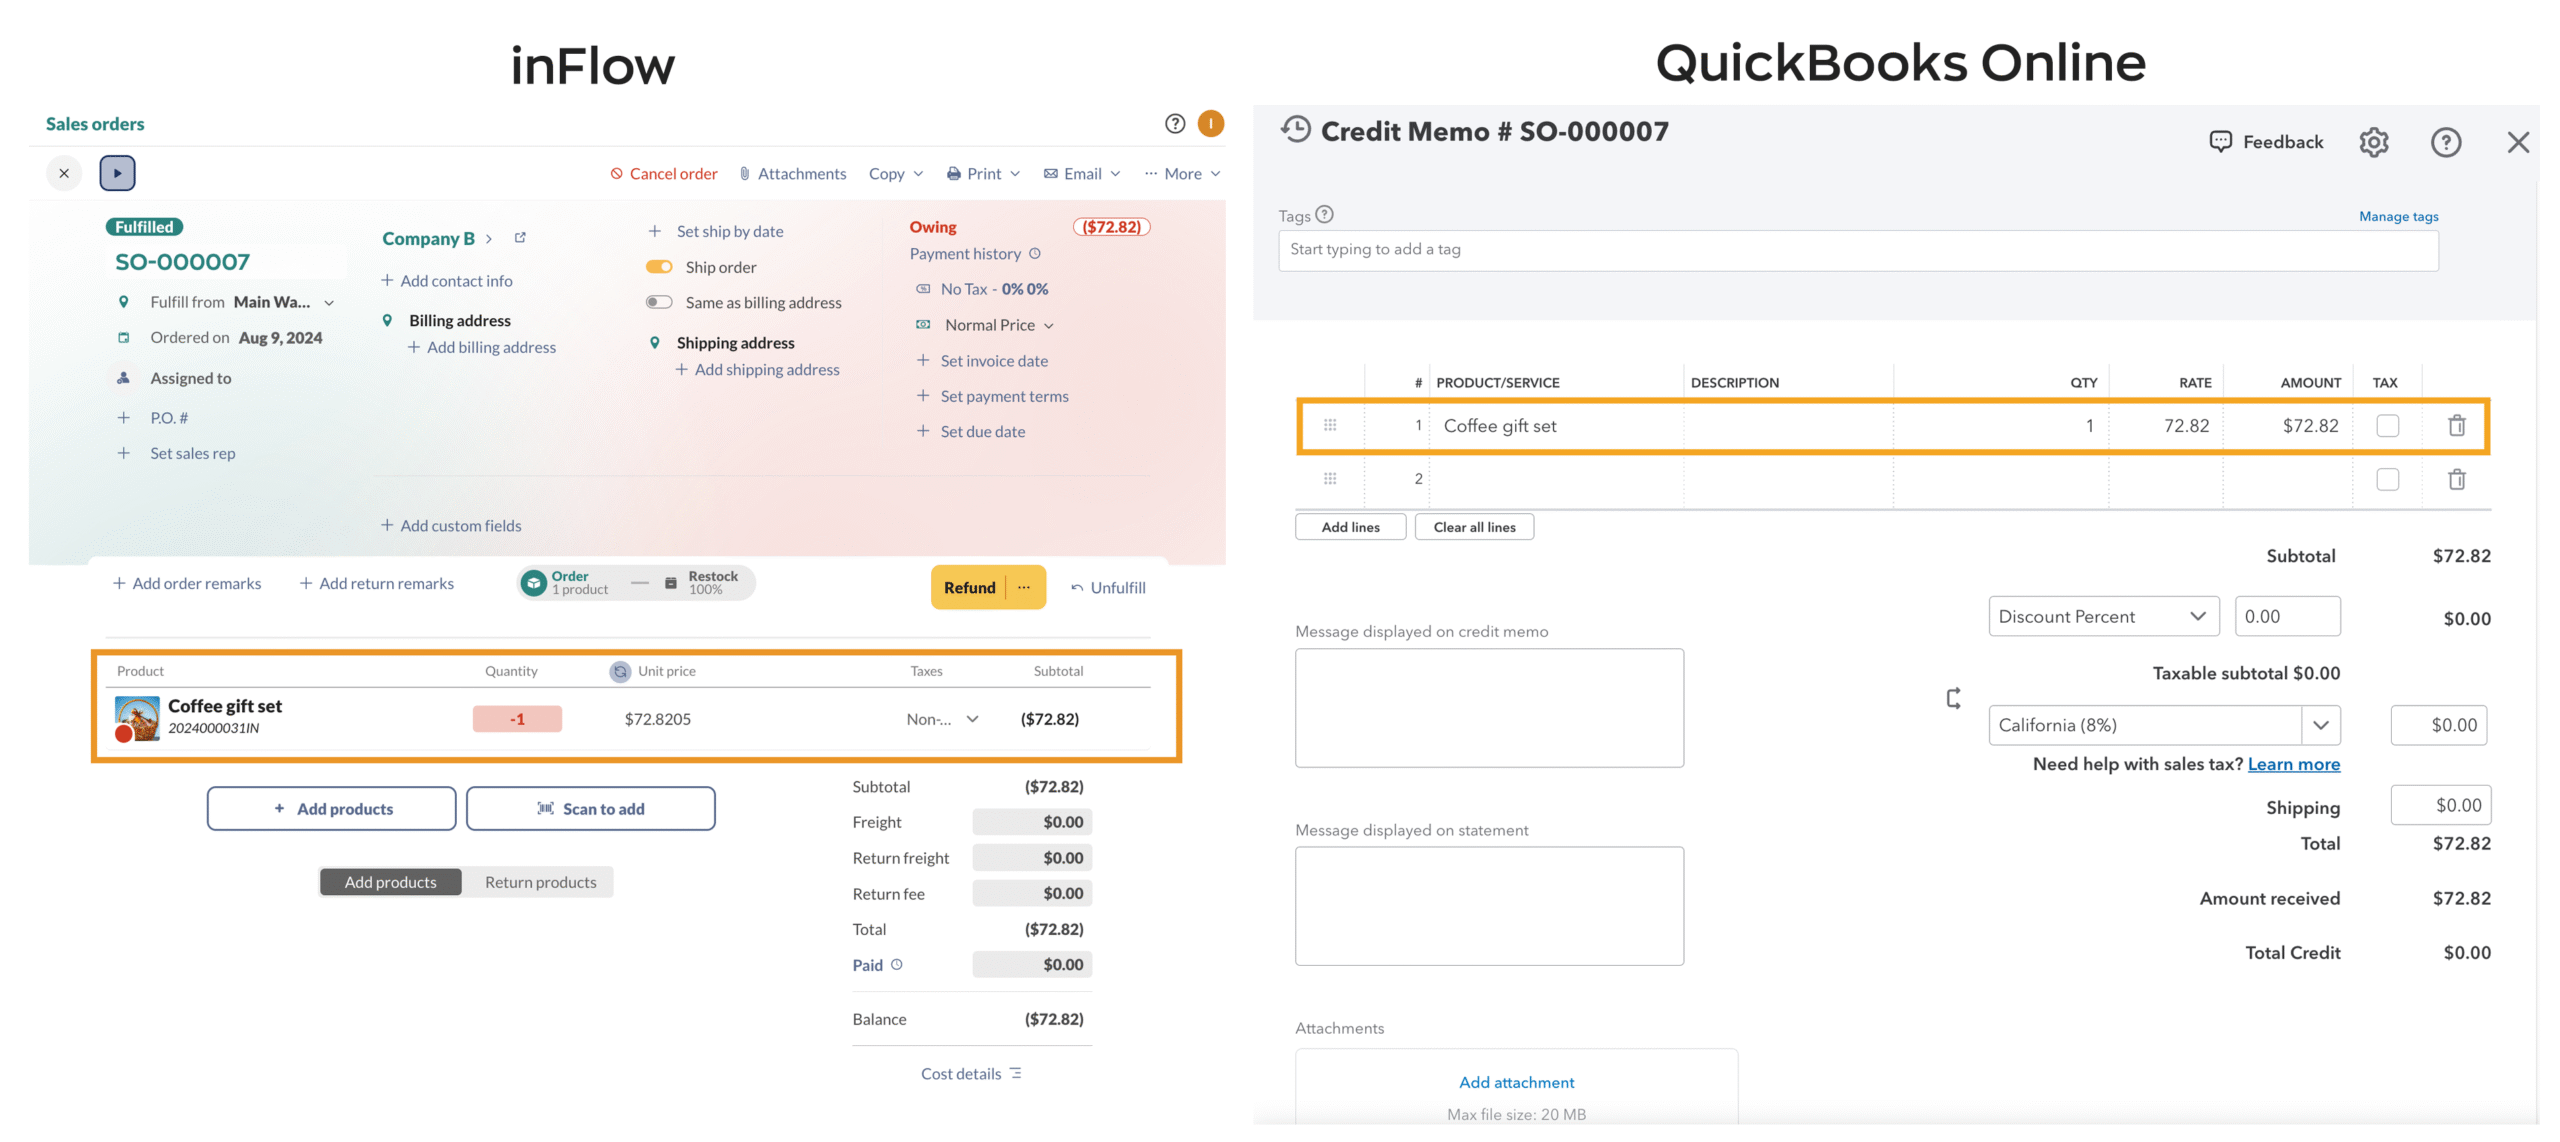
How are refunds handled?
With this integration, refunds need to be processed from the sales order in inFlow. How you process the refund changes the transactions that you’ll see in QuickBooks Online.
Refund options:
- Returning/refunding products on an existing paid sales order.
- Returning/refunding products on a blank, unpaid sales order.
Returning/refunding products on an existing paid sales order
When processing refunds on sales orders, inFlow will push that information, and QuickBooks will track it as a journal entry.
- To start, process the refund/return in inFlow.
- In QuickBooks, the matching invoice will show the refunded product, and the order total will be updated.
- When you look at your sales transactions, you’ll see both the original full payment and a journal entry for the refunded amount.
Returning/refunding products on a blank, unpaid sales order
If processing a refund on a blank, unpaid sales order, inFlow will push that information, and QuickBooks will track the refund as a QuickBooks credit memo.
- To start, process the refund/return in inFlow.
- In QuickBooks, a (debit) journal entry will be made with an accompanying credit memo, and the matching order number will be created with the refunded product and funds.
To learn more about debits and credits, take a look at this QuickBooks Online blog post.
Customer Credits
Credits used in inFlow sales orders cannot be pushed to QuickBooks Online. If you need to issue a credit on a sales order, you must manually adjust your invoice in QuickBooks.
This also applies when a customer pays for a sales order with a credit card. This information won’t be pushed and needs to be adjusted manually.
If a customer uses credit as payment in either inFlow or QuickBooks Online, the other system will only register the payment without noting that credit was used as the payment method.
Because inFlow and QuickBooks Online use different credit systems, both solutions may have different customer and vendor credits that need to be managed.
How does inFlow push the Cost of Goods Sold?
inFlow can update the Cost of Goods Sold (COGS) in QuickBooks Online only when purchase order sync is enabled.
inFlow calculates the Cost of Goods Sold using several factors. When a sales order is marked Fulfilled, inFlow will update QuickBooks’ Cost of Goods Sold account with the order’s Cost of Goods Sold value.
inFlow’s Cost of Goods Sold will update the QuickBooks Cost of Goods Sold account.
If sales order push isn’t enabled, the invoice will not be created in QuickBooks, but the Cost of Goods Sold will still be pushed if you have purchase order & inventory value push enabled.
Which date will be used when updating the Costs of Goods Sold?
If a sales order does not include shipping, the COGS date pushed to QuickBooks Online is the order date, not the pick date. Once the order is invoiced, the COGS push date will be overwritten by the invoice date on the QBO end.
If the sales order includes shipping, the COGS are determined by the ship date.
Push purchase orders
Now that inFlow and QuickBooks Online are connected, you can start processing purchase orders and pushing them to QuickBooks Online.
How to push purchase orders and inventory value to QuickBooks Online
When a purchase order is received in full or in part, inFlow creates a bill in QuickBooks Online. In addition to sending this information, your inventory value will also be pushed.
- To push a purchase order, click the fulfill button, or select the Receive tab to partially receive the order.
- Once the purchase order is received in full or in part, it will be sent to QuickBooks Online as a bill.
When a purchase order is unfulfilled and is partially or fully paid in inFlow creates an expense until the purchase order is fulfilled.
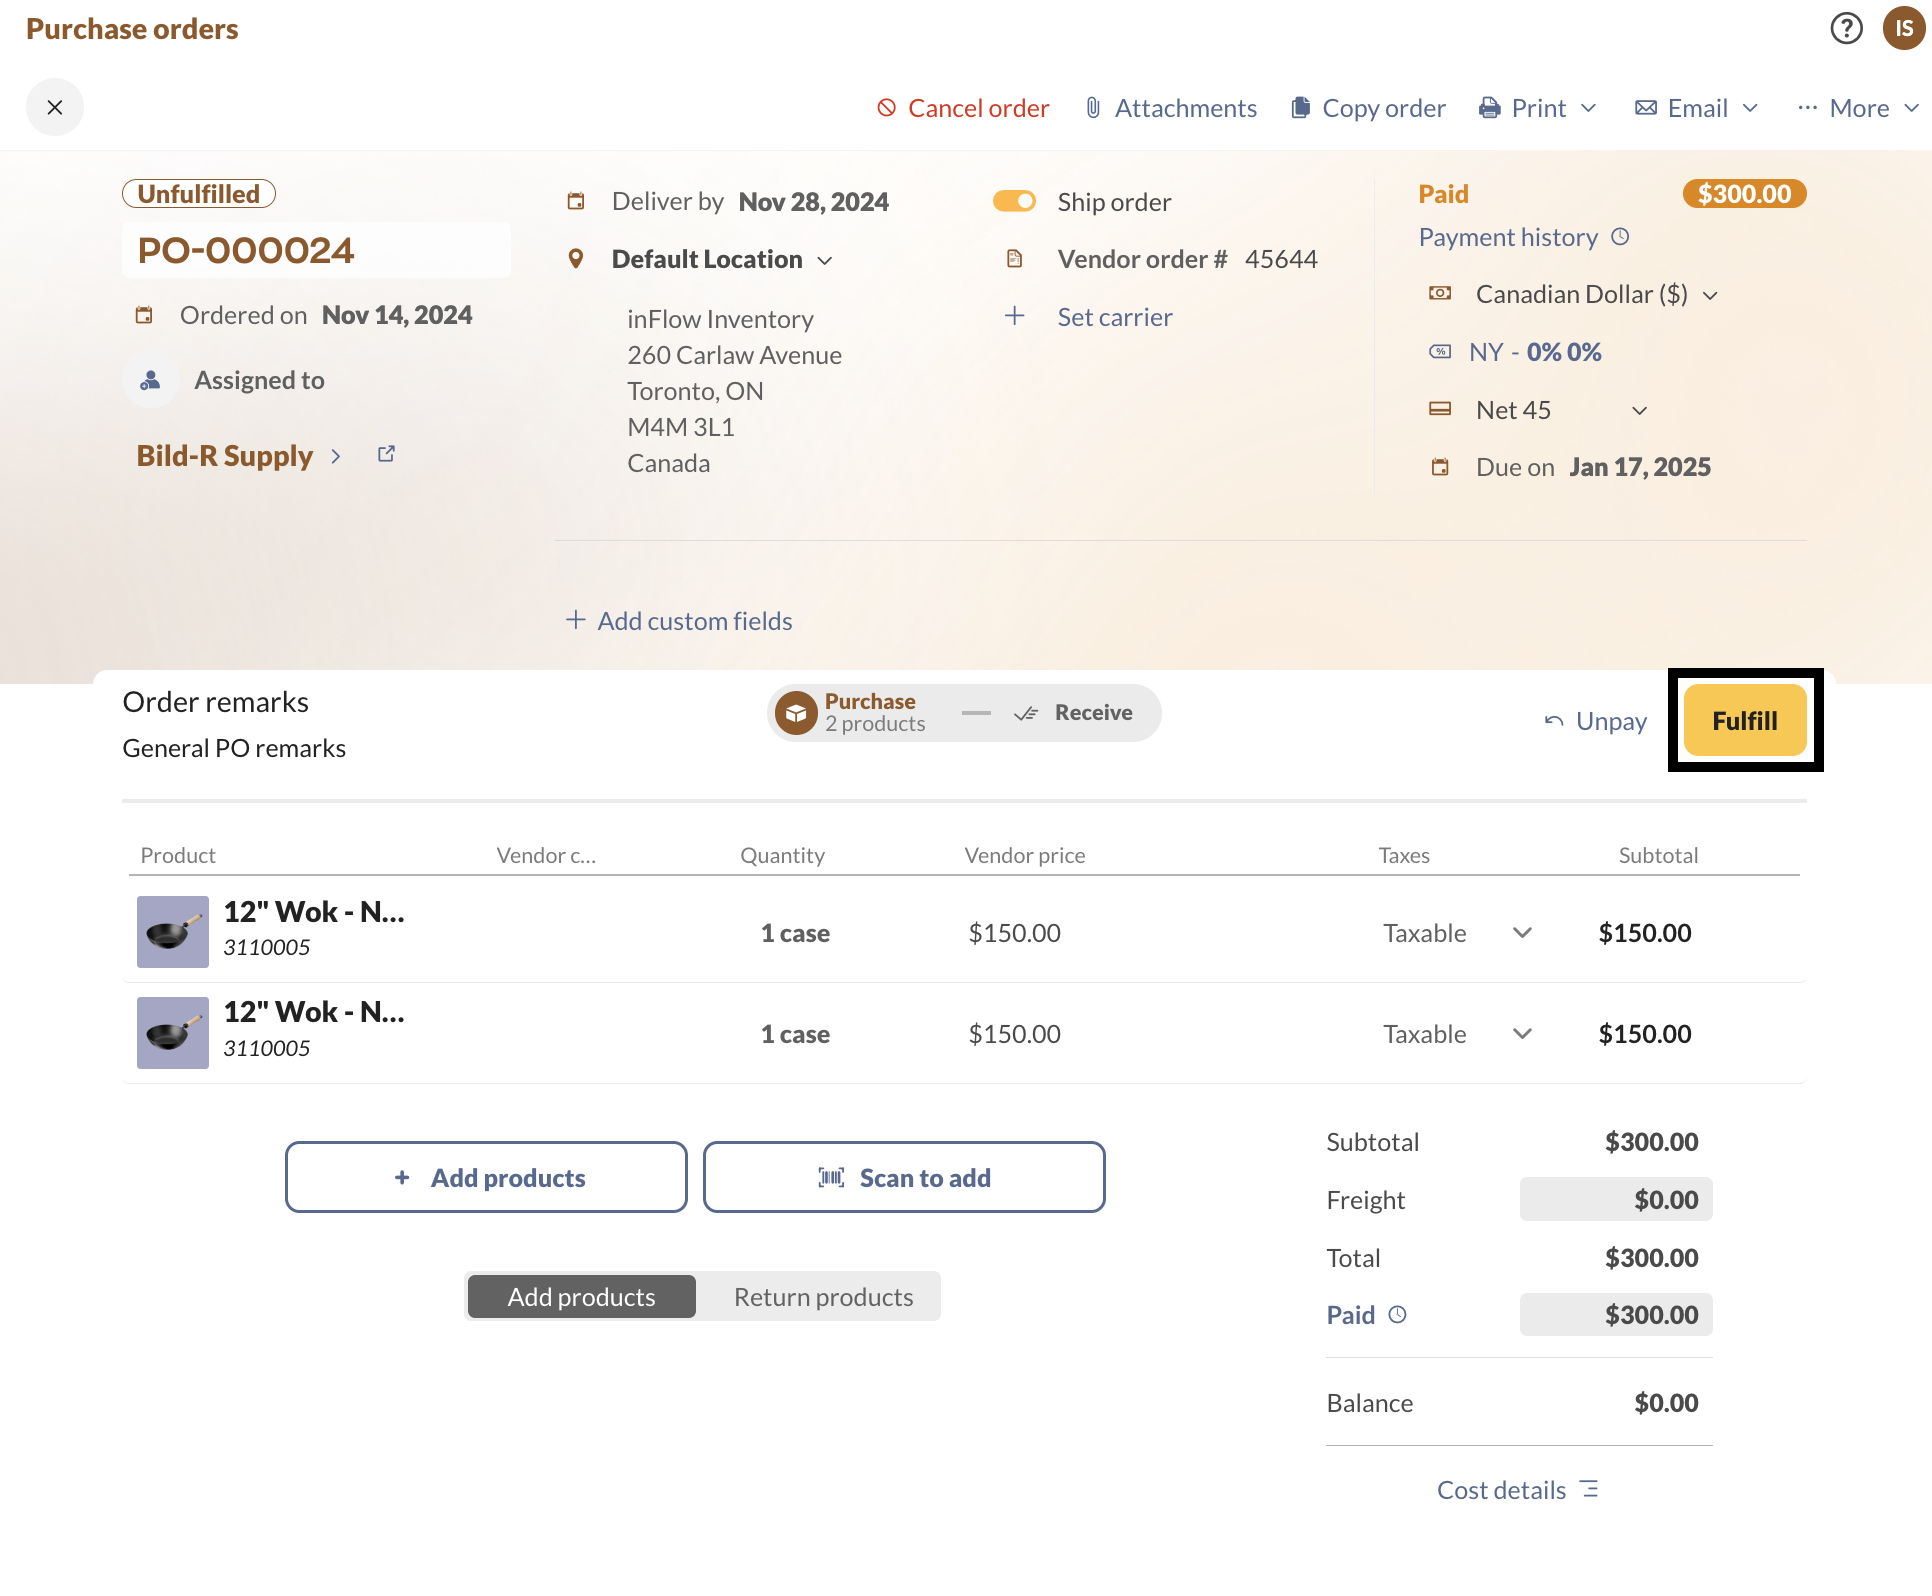
Partially received purchase orders
For partially received orders, when the order is pushed to QuickBooks, it will only include items that have been received. As the remaining items are marked as received in inFlow, the same QuickBooks Bill will be updated to include those items.
If you’d like to create separate QuickBooks bills when partially receiving items in inFlow, you’ll need to split the order by received items to create two separate purchase orders in inFlow.
Which purchase order fields are pushed to QuickBooks Online?
- Vendor name
- Purchase order number
- Purchase order date
- Products/SKUs sold
- Quantity of products purchased
- Payment details
- Payment terms
- Due date
- The subtotal on the purchase order
- Balance left on the purchase order
- Freight
- Taxes on the Purchase order
- Purchase order remarks
Which purchase order fields won’t push to QuickBooks Online?
- Vendor billing address (QuickBooks will use the address in the QuickBooks vendor profile)
- Shipping address
- Vendor order #
- Location of items
- Non-Vendor costs
- Credits
- Payments made by credit
- Custom fields
- Requested ship date
Why don’t I see my vendor address in QuickBooks Online?
When inFlow sends vendor information to QuickBooks Online for the first time, it transfers most of the vendor details from inFlow. However, inFlow isn’t able to update vendor records in QuickBooks. If inFlow sends vendor information without an address the first time, that address will stay blank in QuickBooks. You will have to add the address to your vendor records manually.
Pushing total inventory value
inFlow calculates the inventory value by summing the costs of the items you currently have in stock. When a purchase order is pushed from inFlow to QuickBooks, inFlow will update QuickBooks’s inventory asset account with the new inventory value.
As soon as the purchase order sync is enabled, inFlow will sync the inventory value. It’s important that your inventory value is accurate in inFlow before enabling the sync. Otherwise, the inventory value that is synced to QuickBooks Online will be inaccurate.
To check the current inventory value in inFlow, run the Inventory Details report with “Total Cost Value” selected as a column. Take a look at this guide for how you can adjust the report to add the Total Cost Value column.
Your total inventory value in inFlow is affected by:
| Purchasing/selling items | As you build finished products and use up components, your total inventory quantities change, which affects your inventory value. |
| Stock adjustments/count sheets | Adjusting your inventory quantities will increase/decrease the inventory value accordingly. |
| Manufacture orders | As you build finished products and use up components, your total inventory quantities will change, which will affect your inventory value. |
| Cost adjustments | When the cost of your items changes, so does the total inventory value. |
How does inFlow push the Cost of Goods Sold?
inFlow calculates the Cost of Goods Sold (COGs) using several factors. When a sales order is marked Fulfilled, inFlow will update QuickBooks’ Cost of Goods Sold account with the order’s Cost of Goods Sold value.
inFlow’s Cost of Goods Sold will update the QuickBooks Cost of Goods Sold account.
Which date will be used when updating the Costs of Goods Sold?
If a sales order does not include shipping, the COGs date pushed to QuickBooks Online is the order date, not the pick date.
If the sales order includes shipping, the COGs are determined by the ship date.
If sales order push isn’t enabled, the invoice will not be created in QuickBooks, but the Cost of Goods Sold will still be pushed if you have enabled purchase order & inventory value push.
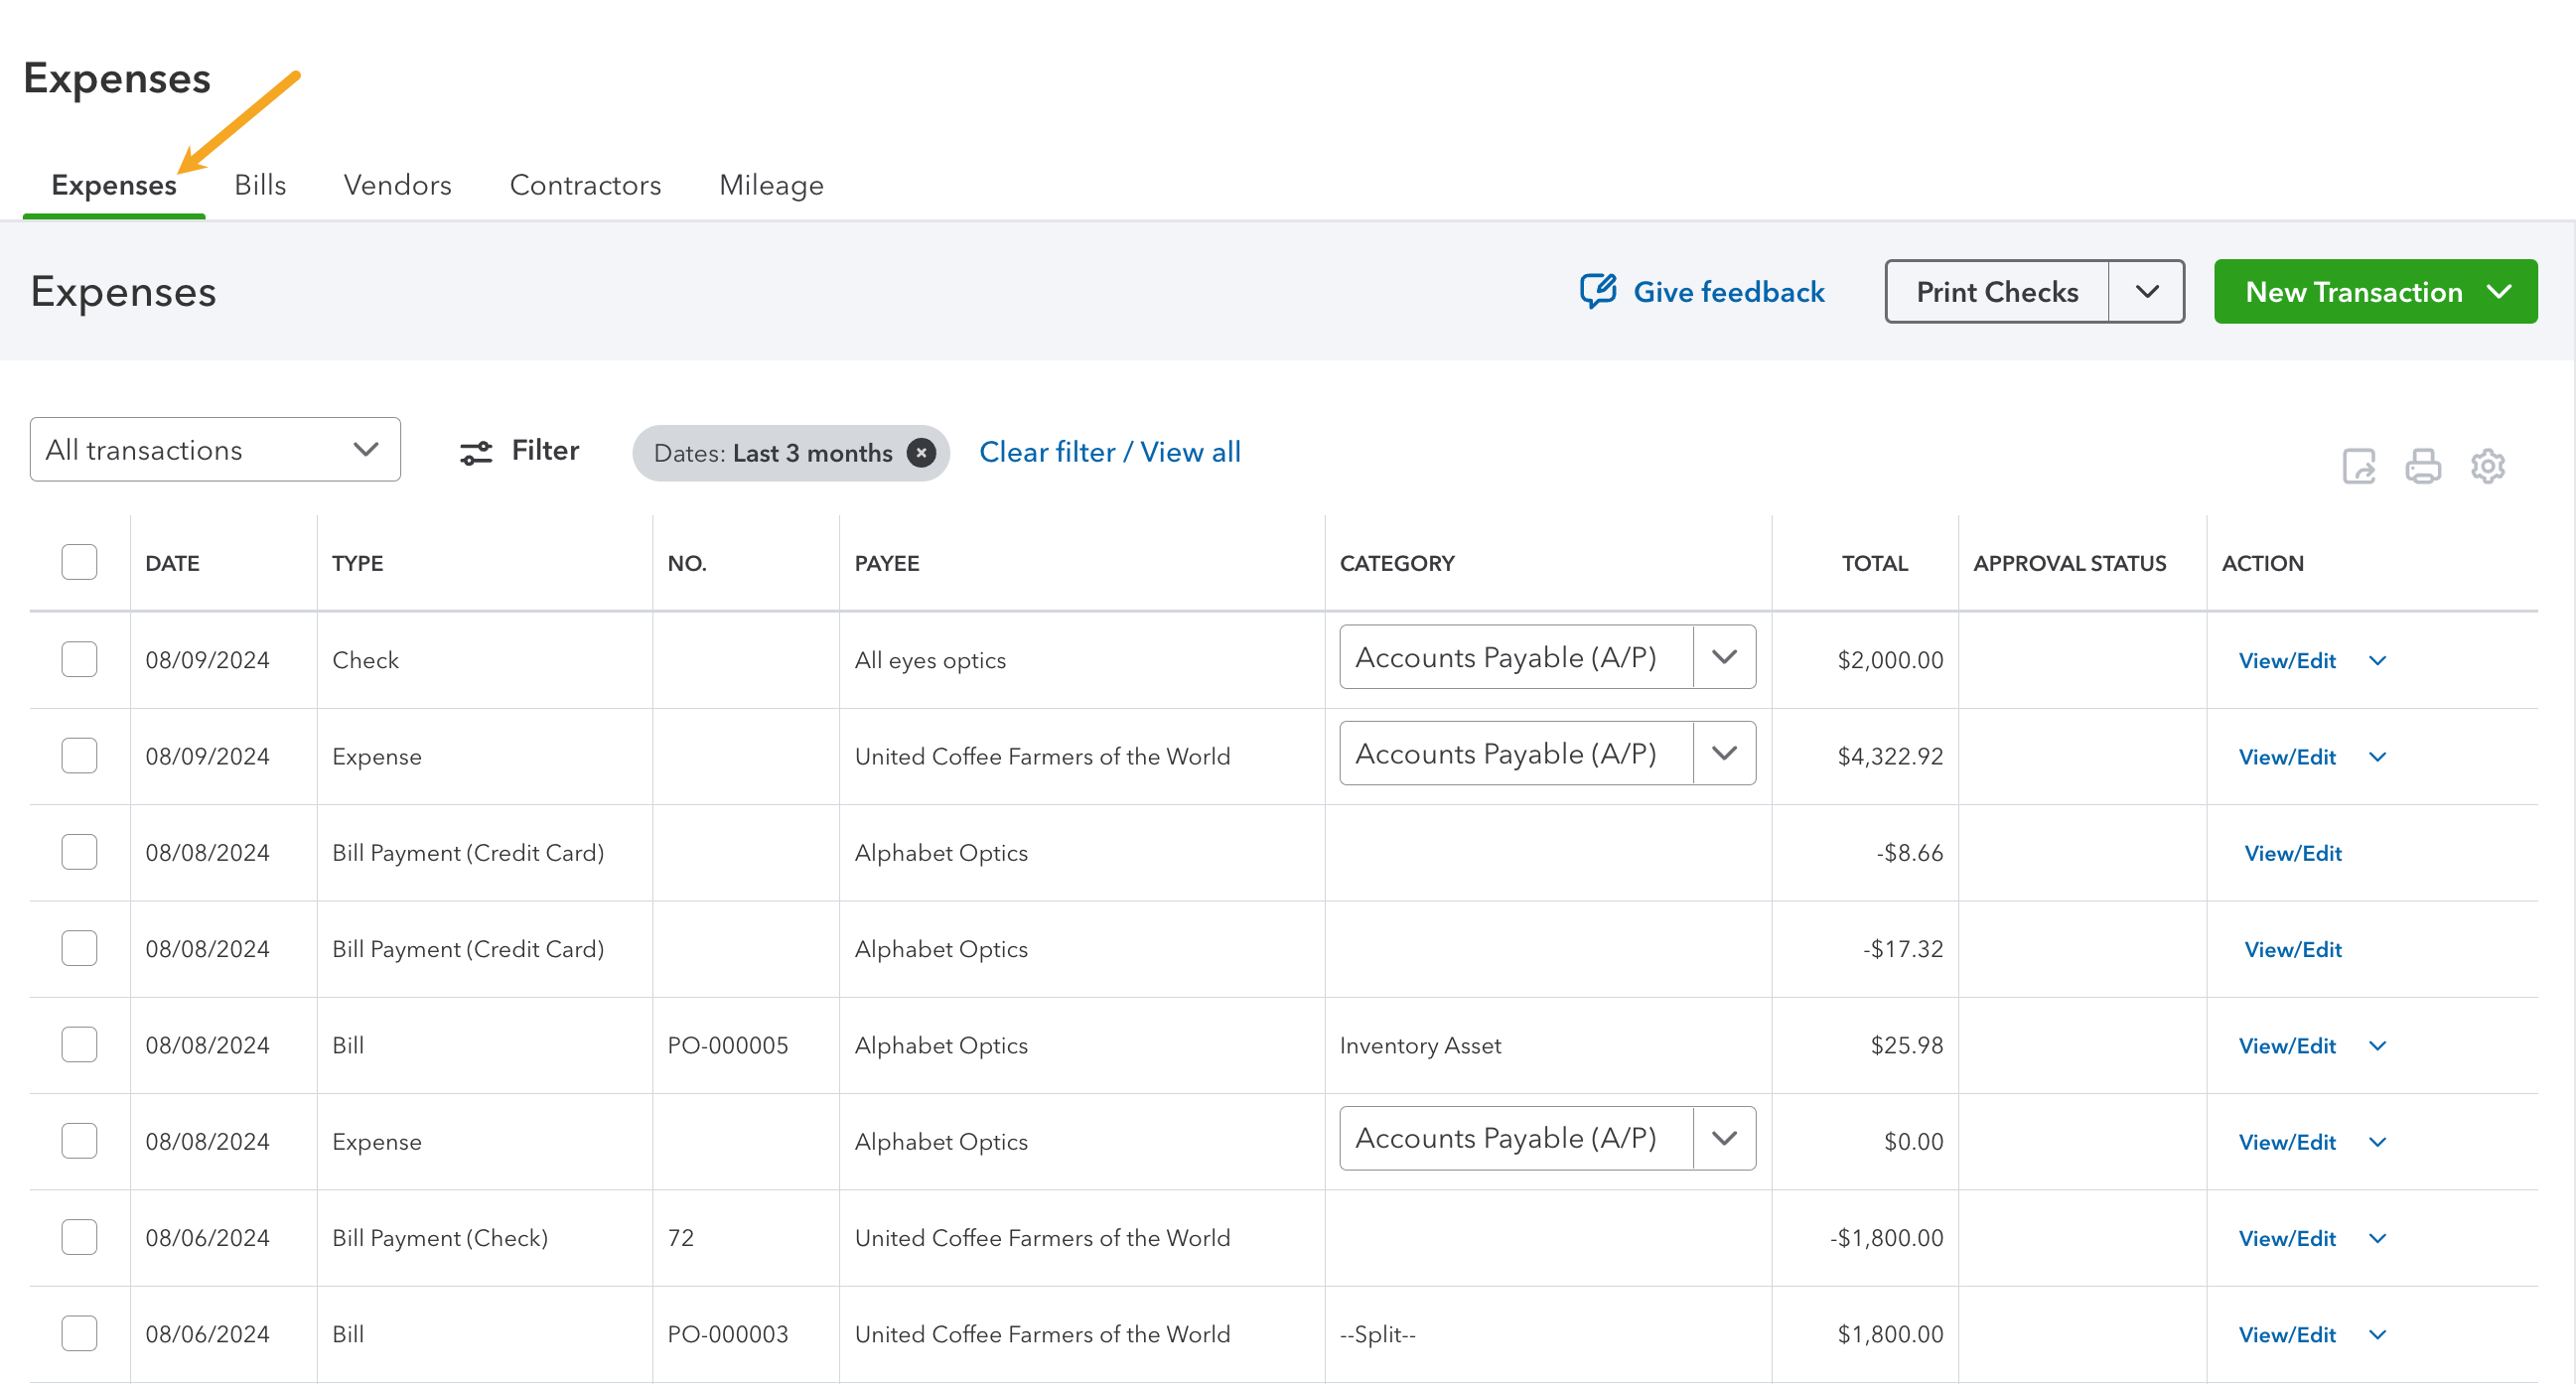
Which transactions will inFlow purchase orders be in QuickBooks Online?
Purchase orders pushed from inFlow will be created in QuickBooks Online as bills and bill payments or expenses if the payment is made on an unreceived purchase order.
To make the inFlow integration available to most of our customers, inFlow creates a bill instead of a purchase order. Purchase orders are available on select QuickBooks Online plans.
| Order/transaction in inFlow | Order/transaction in QuickBooks Online |
| Partially or fully received purchase orders | Bills |
| Payments made on partially or fully received purchase orders that have been pushed to QuickBooks Online | Bill payments |
| Unreceived paid purchase orders | Expense |
| Refunds on partially or fully received purchase orders that have been pushed to QuickBooks | Journal entry |
Where can I find bills and other transactions in QuickBooks?
When purchase orders are partially or fully received, inFlow pushes them as a bill, which you can find in the Expenses section of QuickBooks Online.
You can click any table heading to sort your orders. Select Edit or View to look at the invoice.
How will the products sync to QuickBooks Online?
The way products sync to QuickBooks Online will depend on the information available for the product in inFlow and QuickBooks Online.
The product matching priority happens automatically, but it goes as follows:
- Matching by inFlow SKU to a QuickBooks Online SKU.
- Matching by inFlow Product Name to a QuickBooks Online Product (SKU must be empty in at least one system)
- If there is no match, inFlow will create a new non-inventory product in QuickBooks Online, matching your product name and SKU field (if a SKU exists in inFlow)
Processing payments
When setting up the inFlow to QuickBooks integration settings, you can choose whether to process payments with the purchase order push integration settings.
If the Sync payments setting is active, there are three payment options to choose from:
- Push and pull payments
- Push payments
- Pull payments.
Take a look below to learn how to apply payments in each payment setting.
Push and pull payments
This is a two-way payment sync option. You can process payments in inFlow or QuickBooks Online, and the payment will be pushed to the other system for you.
Paying multiple orders/invoices
In inFlow, you can pay for multiple purchase orders at once, and the payments will be pushed to QuickBooks Online.
When using QuickBooks Online, paying multiple bills with a single payment isn’t supported. Each bill must have its own payment.
Push payments
With this payment option, payments can only be made on inFlow purchase orders, and the payment information will be sent to the matching QuickBooks Online bill.
If a payment is added to the QuickBooks Online bill, inFlow will not receive the payment information on the matching purchase order.
Pull payments
With this setting, payments are added only to the QuickBooks Online bill, and the payment information is sent to the matching inFlow purchase order.
If a payment is added to an inFlow purchase order, QuickBooks Online will not receive the payment information on the matching bill.


is inflow premium working QuickBooks Online?
Prepayment of unreceived items is a balance sheet transaction, not income statement.
Even if it might be corrected at some point, (maybe), it is already creating a nightmare in financial statements.
Invalid bundle id 535 passed to SalesItemLineDetail.ItemRef. Please use GroupLineDetail with bundles.
Error stopping an invoice from being passed to QuickBooks Online, I can’t understand this error
Hey Jonah,
Thanks for reading. Unfortunately, I can’t help you with that error. Your best bet is to contact Intuit directly. They should be able to give you some insights. Good luck!
Cheers,
Jared
I have more questions regarding exactly what data is being pushed to QuickBooks from inflow with total Cost of Goods Sold, and total Inventory value from inFlow to QuickBooks Online. I need to know how Inflow comes up with these numbers.