How to import data to inFlow
You can import data into inFlow, but first, you’ll need a file! This guide will show you all you need to know about importing into inFlow.
Import file
If you’re looking to get started with importing into inFlow, then take a look at this quick introduction video below! Don’t forget to check out the rest of the Importing Data to inFlow playlist for even more helpful tips.
Check out the Importing Data playlist for more importing videos!
Creating a CSV import file
For a quick tutorial on creating a Product CSV and importing your inventory, take a look at the video below.

inFlow needs data to be in a specific format so it knows where to place all your information when importing. You’ll also need to ensure you have a .csv file (spreadsheet) too.
For all Import types, there is only one required field: product, vendor, or customer name. All other fields are optional.
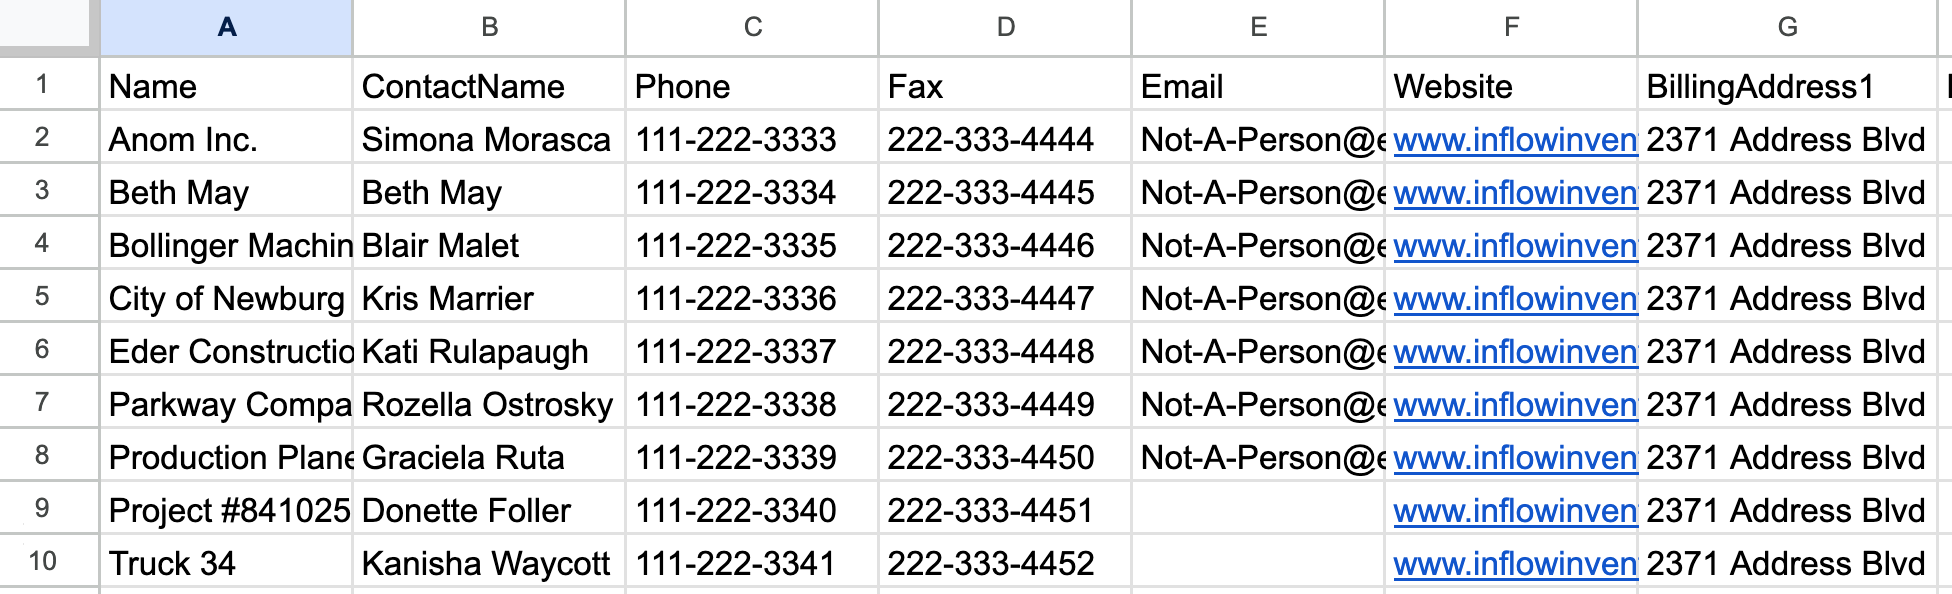
Product details CSV import example
You can add more columns to import more information. The template pictured below doesn’t include stock levels, as they are imported separately.

Customer CSV import example
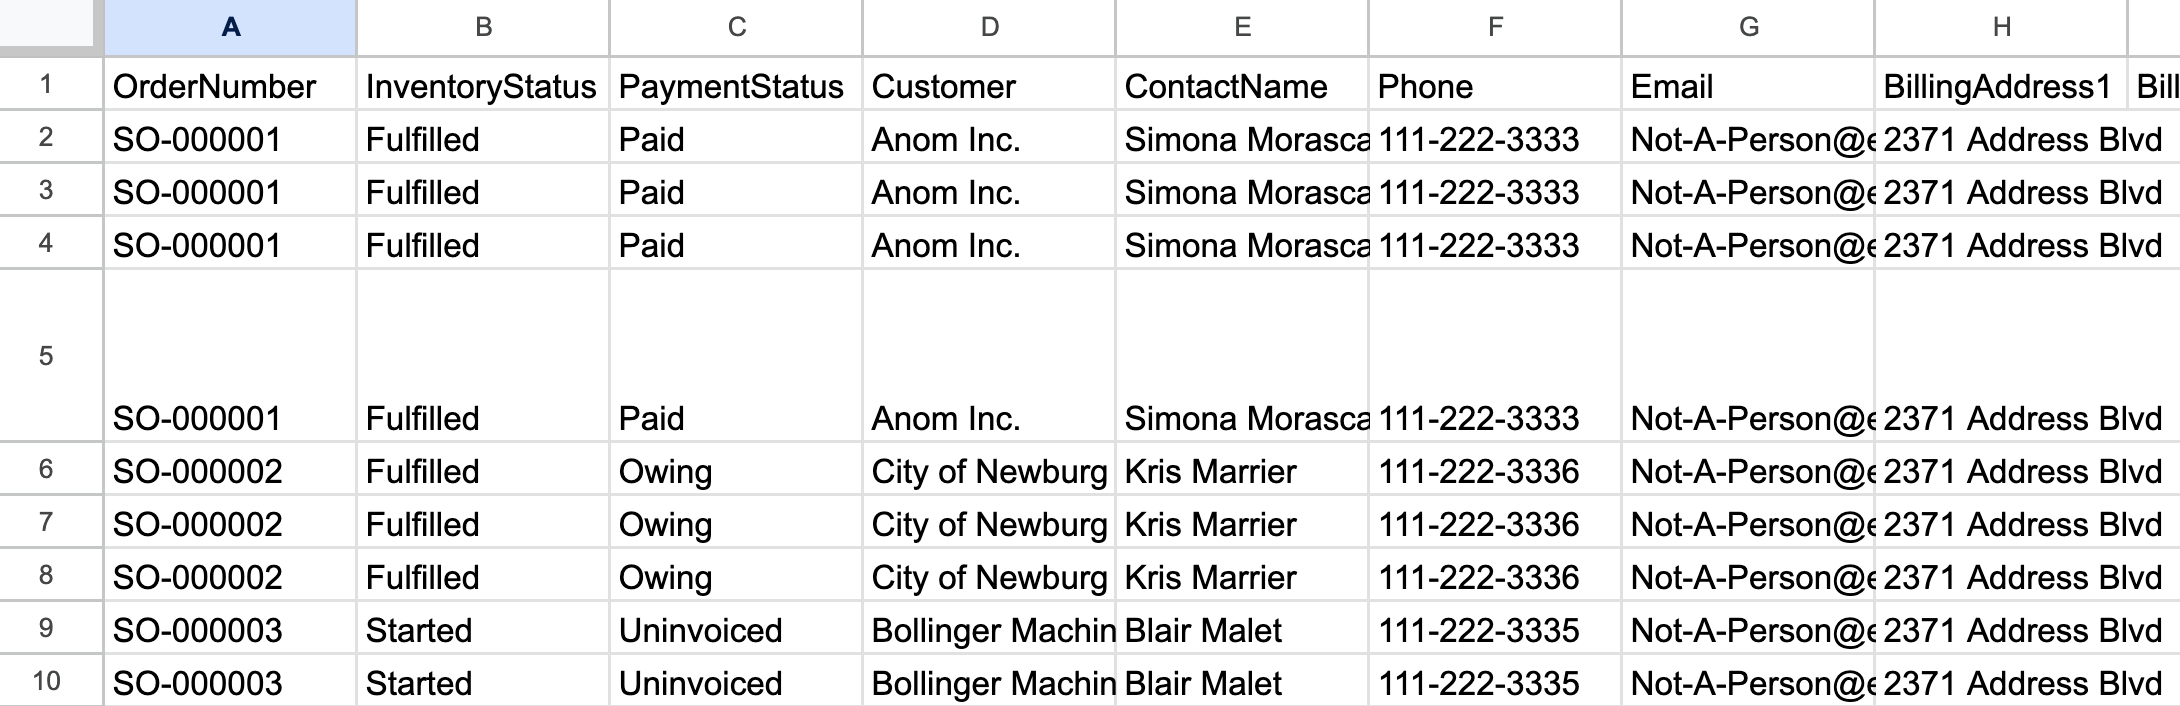
Sales order CSV example
For sales and purchase order import CSVs the customer/vendor name is the required field.
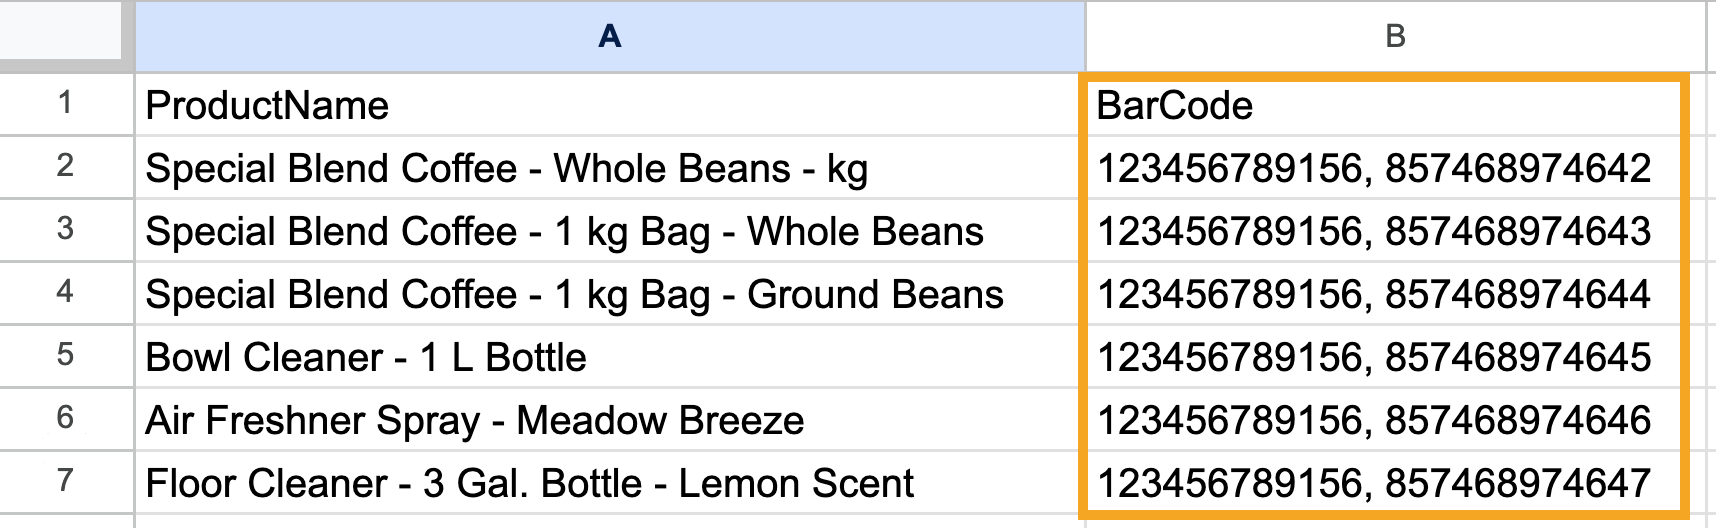
Multiple barcodes on a CSV import file
Should your products have multiple barcodes, use a comma to separate the barcode numbers.
Importing special characters
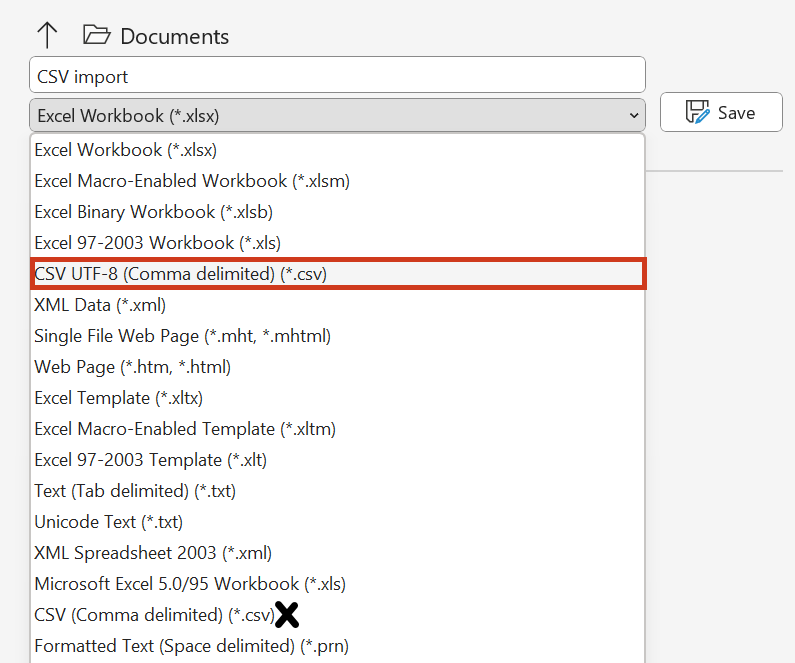
To import data with special characters, save it as CSV UTF-8 (Comma-delimited). You can do this by choosing “Save As” and selecting the file type in your spreadsheet software, such as Excel.
Creating a CSV import file from inFlow
To create a CSV that inFlow will recognize when importing, you can start by exporting a CSV file from inFlow.
- From the Main Menu, hover over Settings > Export.
- Select one of the options from the Data type list, then click Export.
- When your CSV is ready, a window will pop up asking you where you want to save the CSV file on your computer.
CSV file guides for inFlow
Every program reads CSV files differently, so to make things easy, you can find guides below relating to how to import different types of data to inFlow.
- Product details (product name/description/prices) import
- Bundle products (product details) import
- Stock levels (product name/quantities/locations) import
- Purchase orders/sales orders import
- Vendor/customer import
- Bill of materials (BOM) import
- Manufacturing operations import
- Reorder settings import
- Product image import
It’s not possible to have one file containing all of the above at a time, so depending on what type of data you’re looking to import, please select the corresponding article for further detail.
Are you thinking of using an integration with inFlow? Before you import products and other information you might want to make sure your product names match your other system. Check to see if you can export a csv from your other system and you can use that to create new products in inFlow.
Other resources
Here are some example files available for download if you’d like to use a template or try an import yourself:
Web
Importing products video
For a quick tutorial on creating the CSV and importing your inventory, take a look at the video below.
Check out the Importing data playlist for more importing videos!
How to import a CSV file to inFlow
If you have your import file ready to go, read on how to import it to inFlow.
- In the Main Menu, hover over settings, then click Import.
- In the Data type drop-down menu, select the type of data you’ll be importing to inFlow.
- Below, select the CSV file from your computer, then click Next.
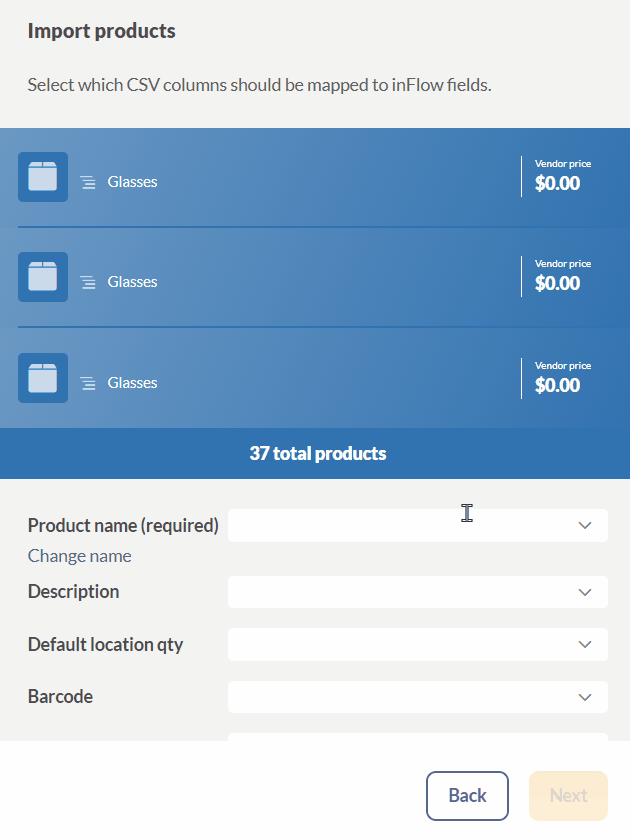
- A preview of your import file will appear and will let you know how many line products you have in your file.
- If you don’t see any fields below, click on Edit data mapping.
- Match the inFlow fields on the left to the fields to the matching fields in your CSV file (drop-down menus.)
- Once you’re satisfied that all the fields you need match, click Import.
- A confirmation message noting that your import is in progress will be displayed. Once the import is complete, the team member who started the import will receive an email with the results.
If you need to import a file that uses semicolons as the decimal separator, or if you’re using a CSV file that doesn’t have headers, please import your file in inFlow for Windows to select these additional options.
Other resources
Here are some example files available for download if you’d like to use a template or try an import yourself:
Having trouble importing? Try the steps in our troubleshooting importing problems article.
Windows
Video
Take a look at this video for a guide on how you can import Product details and Stock levels to inFlow.

How to import a CSV to inFlow
If you have your import file ready to go, read on how to import it to inFlow.
- Click Main Menu > General > Import Data.
- Select the data type at the top of the screen.
- Click the Browse button to select the file you’d like to import, and then click Next.
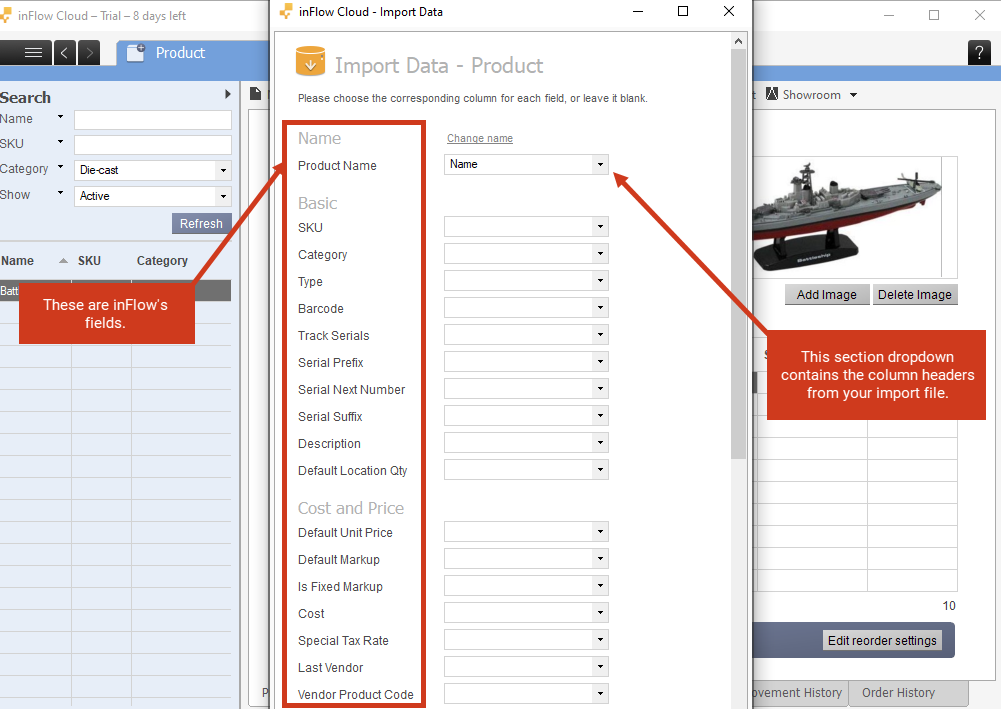
- In this screen, match the inFlow field name to the right column in your file by selecting it from the drop-down list (see screenshot below).
- Once you’re satisfied with your matches, click Next.
inFlow will import the data from your file and let you know what has been updated!
You will have to close your CSV file to allow inFlow to import your document.


you did not provide a template about product image.