


inFlow Cloud Companion App: Full Guide
So you’re on the go and still want to manage your inventory? Not to worry, inFlow’s got you covered with our mobile app!
Here’s a quick guide to some of the most useful features of the inFlow Cloud Companion App.
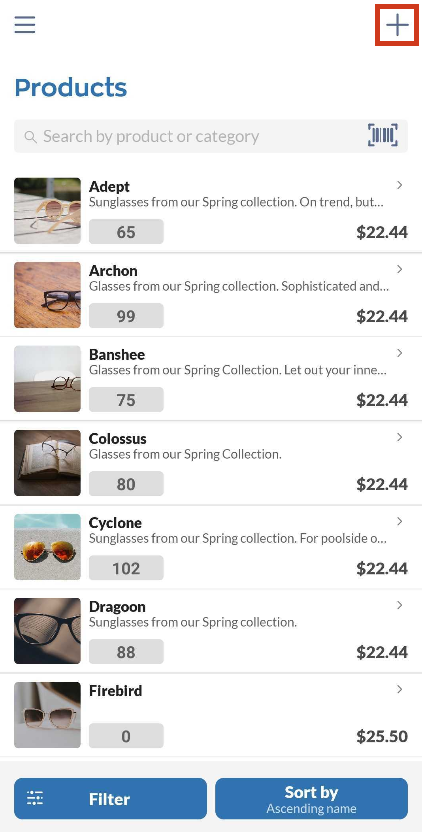
Products
Products in inFlow
This two-minute video will show you just a few of the things you can do in the mobile app:

You can quickly add products to your database using the inFlow Cloud Companion App! The mobile app also lets you scan barcodes without any special equipment.
Click below to jump to a specific section in this guide.
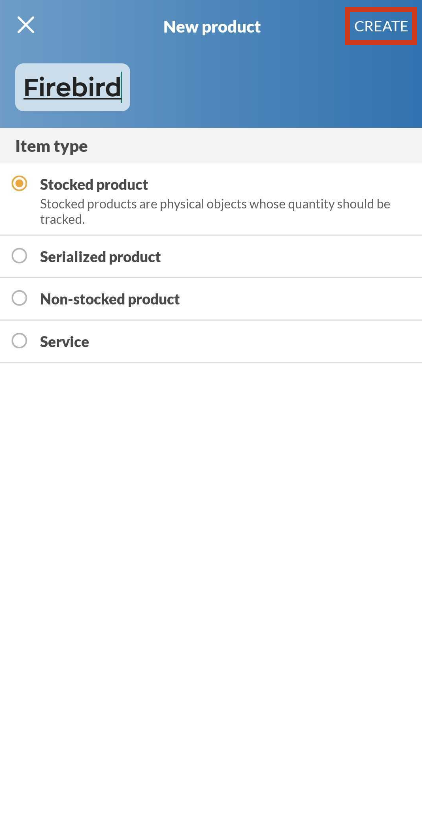
Create a product
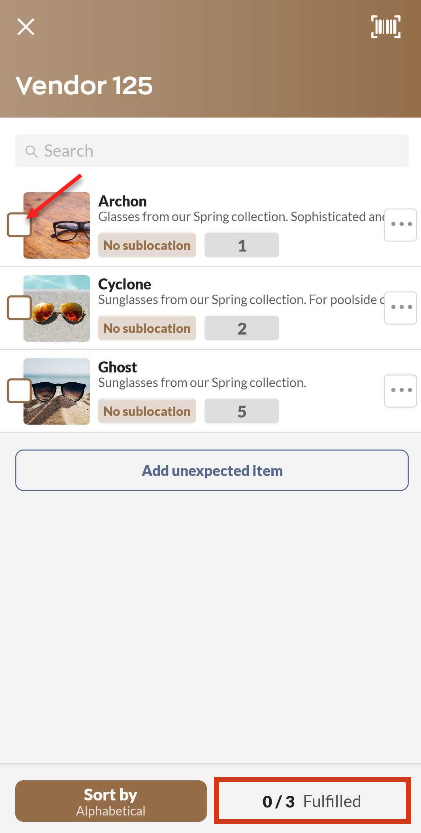
- Tap on the Main Menu button (the 3 horizontal lines at the top left of the screen) and select Products (or directly tap on Product list on the homepage).
- Tap on the + symbol.
- Enter a Product Name, then choose an item type (stocked products are generally physical products and is the most common option). If you tap on the different items, inFlow will give you a brief summary of each.
- Tap the Create button.
- You will now be on the product page where you can add an image, price, description, and many more. You can also add or scan a barcode using your smartphone’s camera.
- When done, click Save.
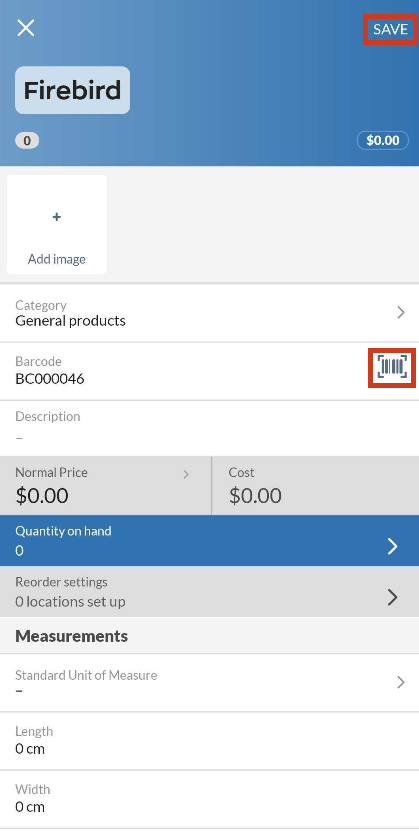
Images
You can add several images to a product using the inFlow Cloud Companion App.
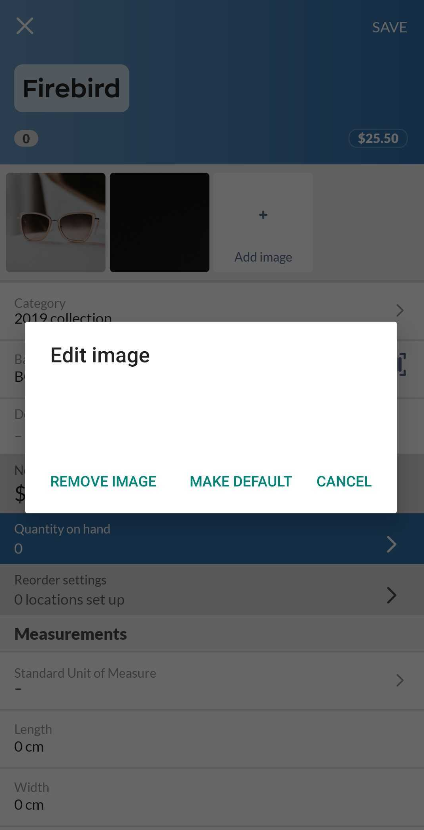
Adding images
On the Product page, tap on the + Add image tile and either take a picture or select one from your smartphone’s library.
Editing images
If you have more than one picture for your product and wish to choose a main one, long press on the picture you want to make your default and tap on Make default.
You can also delete a picture by selecting Remove image.
Purchase orders
Purchase orders
Click below to jump to a specific section in this guide.
- How to create and complete a purchase order in the mobile app
- Additional actions
- Adding serialized products
How to create a purchase order
The following are the basics – we’ve packed a lot of functionality into mobile purchase orders, so be sure to check out the other sections in this guide to learn more about specific actions and screens.
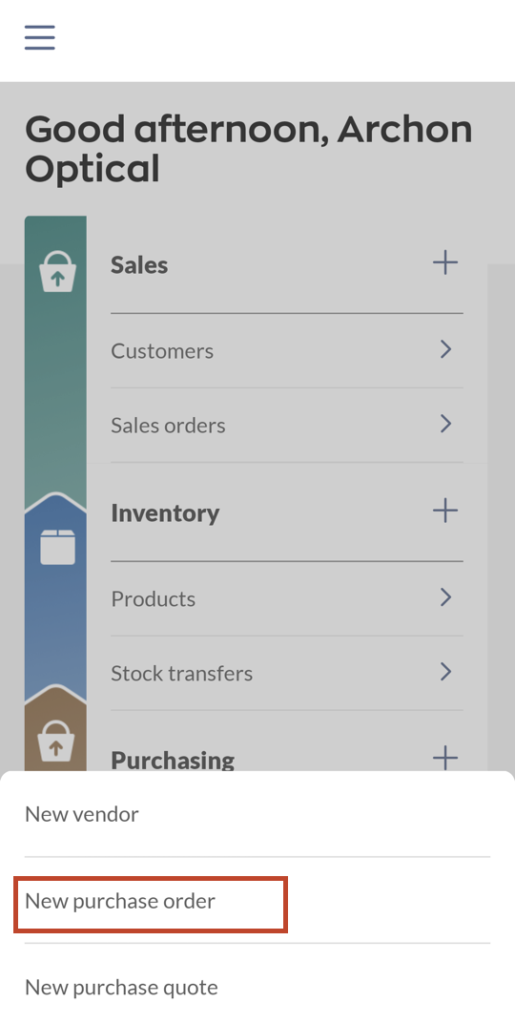
- From the Homepage > tap on the plus sign (+) next to Purchasing > New purchase order.
- Select a vendor, or use the search bar to locate the vendor you’re purchasing from.
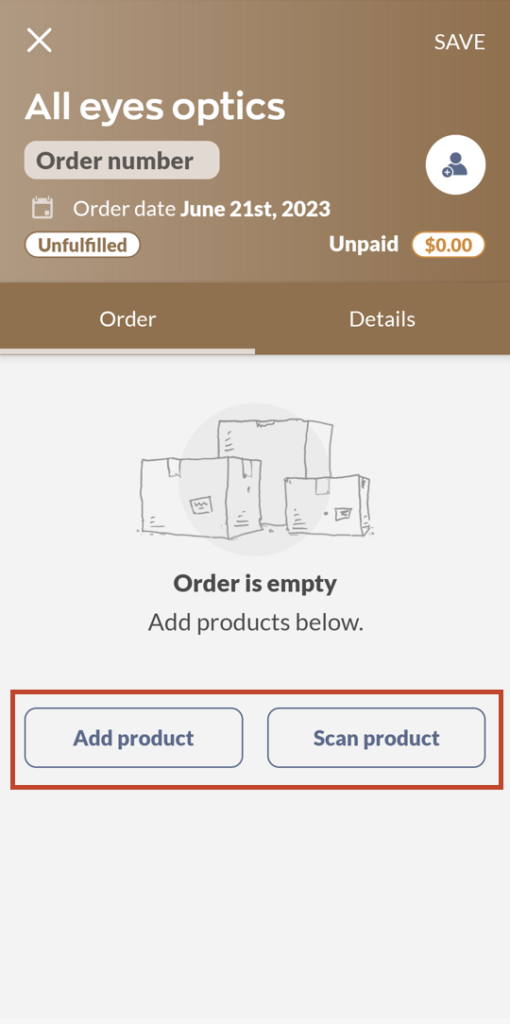
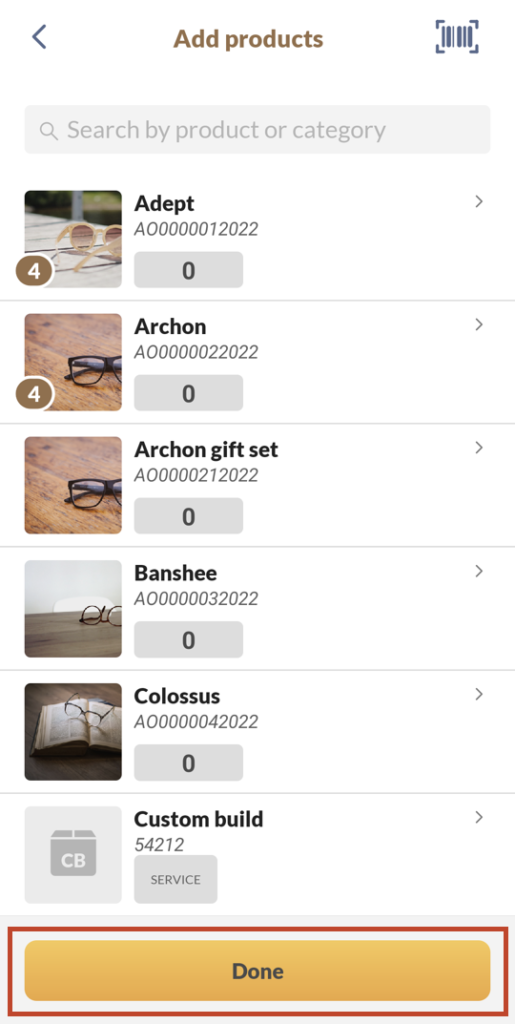
- Tap on Add product or Scan product to add products to the purchase order.
- Tap Done when you’ve added all products.
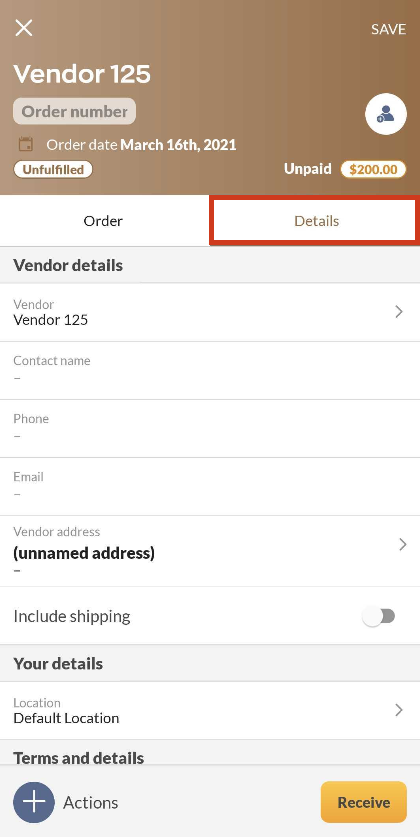
- Tap on the Actions button to continue working on the purchase order, or tap Save at the top right corner to save and close the order.
Receiving purchase orders
- When the products arrive, you can tap the yellow Receive button.
- Select the items you’re receiving from the order – if you didn’t receive the entire quantity of a product, you could partially fulfill it by tapping the ellipsis on the right.
- Tap the X in the top right to go back to the main purchase order screen, then Save in the top right to save your order.
If you received all your items at the same time, you can simply tap the Fulfilled button in the bottom right and then select Autofill. This will lead you back to the main purchase order screen.
Additional actions
Adding products by scanning their barcodes
If your products have barcodes, you can quickly add them to your order using your phone’s camera!
- On the Order tab, tap on Scan item.
- Position the barcode within the frame. When the camera detects a barcode, the Scan item button will turn orange.
- Tap the Scan item button or the camera view to scan the barcode:
- Scanning the same barcode more than once will increase that product’s quantity by 1 for each additional scan.
- You can scan different items all at once from the barcode scanning screen!
- When you’re done scanning your items, tap Done to add these items to the order.
Editing products
Tapping on an item on the purchase order will take you to the Item details screen, where you’ll be able to edit the following:
- Quantity: you can tap into the field directly and type in a value, or use the ‘+’ and ‘–’ buttons instead.
- Unit of measure (UoM)
- Unit price
- Item discount
- Taxing scheme
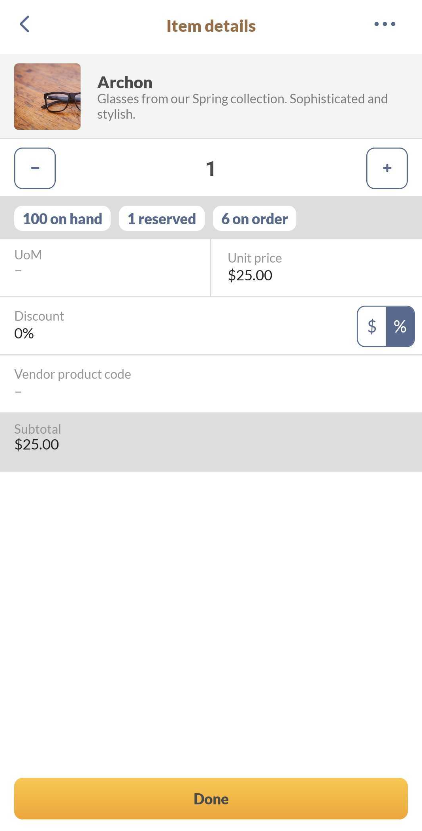
To save your changes, make sure to tap the yellow Done button. Going back using the ‘<‘ button in the top left will close the window and discard your changes instead!
Adding serialized products
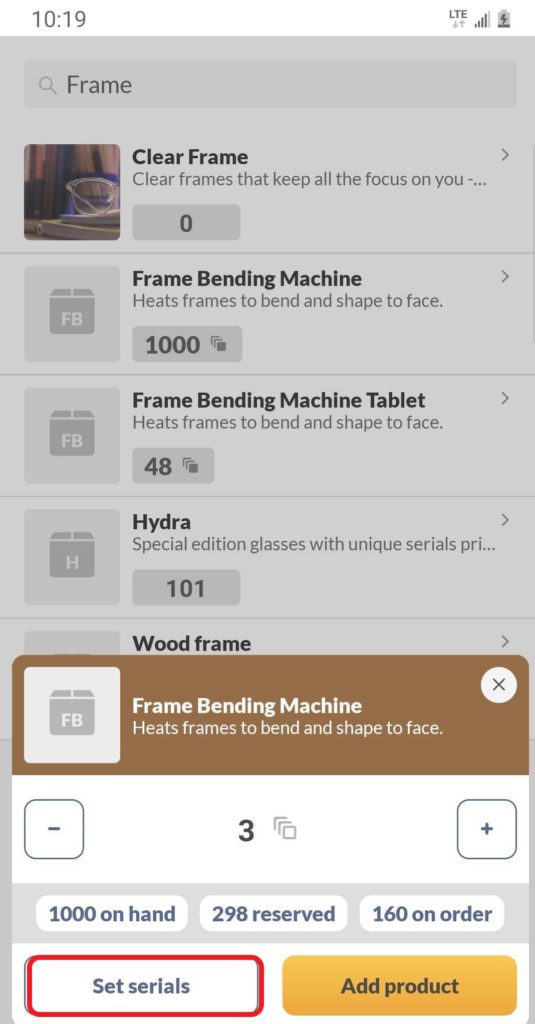
If your products are serialized, you can set or generate the serial numbers when purchasing the products.
- Click Add product or Scan product and select the serialized product you want to add.
- You can increase/decrease the quantity by using the +/- buttons or by clicking into the quantity field and typing out the number of units you would like to purchase.
- You can either fill in your serials before you’ve received your products or wait until they are received to enter the serial numbers. If you know the serial numbers you will be receiving, you may enter them by clicking on the Set serials button.
- If you decide to set your serial numbers right away, you can either:
- Enter your serial numbers manually;
- Let inFlow generate them for you.
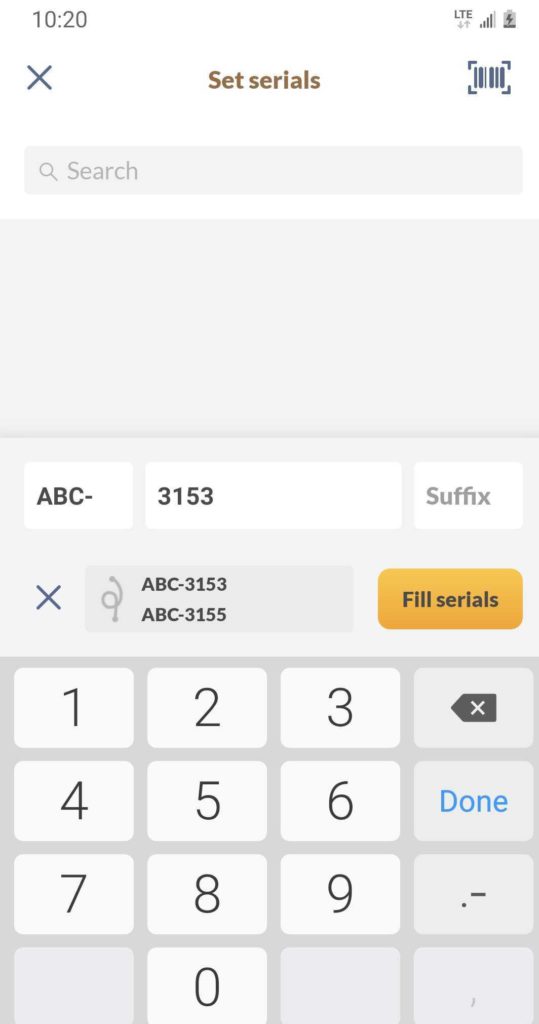
- If you’re going to have inFlow generate your serials: Click the gear icon to the left of the empty field. You may add a prefix (left field), suffix (right field), or starting value (middle field), which will then display a preview below, or you could leave it blank and use inFlow’s formatting. If you are happy with how it looks, click Fill serials, then click Done.
- If you would like to manually enter your serials, type the first serial number in the empty field and click Set serial. Repeat the steps for the rest of the serial numbers. You will notice a progress bar showing how many serial numbers you have left to enter. If your product serials are barcoded, you may click the barcode icon at the top left of the screen to scan the serial numbers.
Click Done when all the serial numbers have been added.
Removing products
Did you add a product to an order that you’d like to remove? Here’s how to do it:
- Tap on the Edit button above the item list in the Order tab.
- Tap the x symbol in the top left corner of the product/s you’d like to remove.
Sales orders
Sales orders
Click below to jump to a specific section in this guide.
How to create and complete a sales order
The following are the basics – we’ve packed a lot functionality into mobile sales orders so be sure to check out the other sections in this guide to learn more about specific actions and screens.
- Tap on the Main Menu button (the 3 horizontal lines at the top left of the screen) and select Sales Orders (or directly tap on Sales orders on the homepage).
- On the sales order list, tap the ‘+’ symbol in the top right of the screen to create a new sales order.
- Select a new or existing customer to add to your order.
- If you create a new customer, the only required field is Customer Name – you can edit their information later by tapping the Main Menu button > Customers.
- Tap Add item to add products to your sales order (or scan your product barcode instead by tapping Scan item). You can tap on the product you want to add to the order, then tap Add at the bottom of the screen.
- You can search your item list by tapping the search bar at the top.
- Once you’ve chosen all the items you want to add, tap Done to return to your sales order.
- Tap or swipe left to the Details tab to edit the order details, including customer information, shipping, and edit inventory details (where inFlow should remove inventory from), add payment terms, remarks, etc.

- When you’re ready to pick the order, tap the yellow Fulfillment button (or Pick order if you have shipping turned on). Here you can select which items to pick to fulfill your order. The sales order will become fulfilled once all products are selected.
- Add any payments to the order by tapping or swiping right to the Order tab and tapping into the Paid field.
- Finally, tap Save in the top right to save your order.
How to create a sales quote
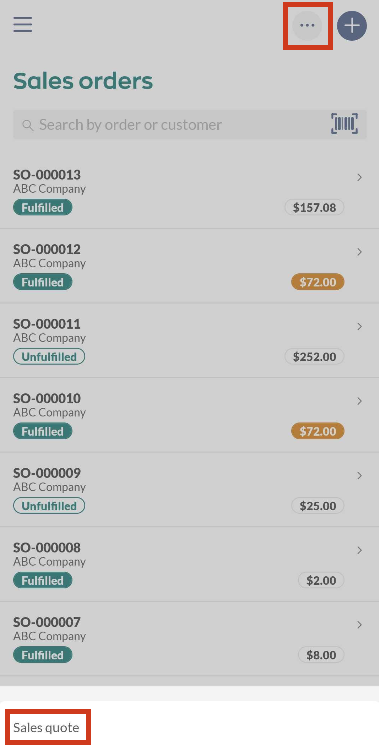
- Tap on the Main Menu button (the 3 horizontal lines at the top left of the screen) and select Sales Orders (or directly tap on Sales orders on the homepage).
- On the sales order list, tap the ellipsis (‘…’) in the top right of the screen. Tap Sales quote.
- Select a new or existing customer to add to your order.
- If you create a new customer, the only required field is Customer Name – you can edit their information later by tapping the Main Menu button > Customers.
- Tap Add item to add products to your sales quote (or scan your product barcode instead by tapping Scan item). You can tap on the product you want to add to the quote then tap Add at the bottom of the screen.
- You can search your item list by tapping the search bar at the top.
- Once you’ve chosen all the items you want to add, tap Done to return to your sales quote.
- Tap or swipe left to the Details tab to edit the order details, including customer information, shipping, edit inventory details (where inFlow should remove inventory from), add payment terms, remarks, etc.
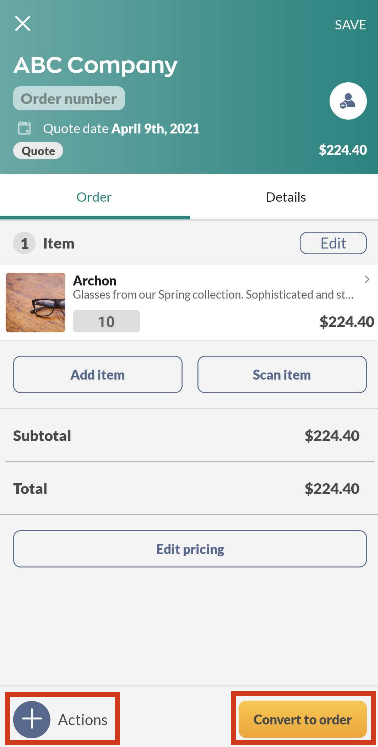
- When your quote is completed, you can either email or share it by tapping on the + Actions button in the bottom left corner. Here you can also cancel your sales quote.
- When you’re ready to turn the quote into a sales order, tap on Convert to order.
Additional actions
Adding products by scanning their barcodes
If your products have barcodes, you can quickly add them to your order using your phone’s camera!
- On the Order tab, tap on Scan item.
- Position the barcode within the frame. When the camera detects a barcode, the Scan item button will turn orange.
- Tap the Scan item button or the camera view to scan the barcode:
- Scanning the same barcode more than once will increase that product’s quantity by 1 for each additional scan.
- You can scan different items all at once from the barcode scanning screen!
- When you’re done scanning your items, tap Done to add these items to the order.
Editing products
Tapping on an item on the sales order will take you to the Item details screen, where you’ll be able to edit the following:
- Quantity: you can tap into the field directly and type in a value or use the ‘+’ and ‘–’ buttons instead.
- Unit of measure (UoM)
- Unit price
- Item discount
- Taxing scheme
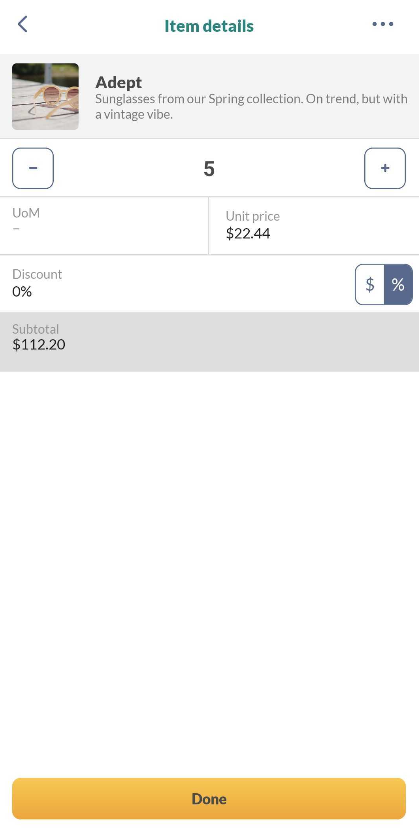
To save your changes, make sure to tap the yellow Done button. Going back using the ‘<‘ button in the top left will close the window and discard your changes instead!
Adding serialized products
- Click Add product or Scan product and select the serialized product you want to add.
- You can increase/decrease the quantity by using the +/- buttons or by clicking into the quantity field and typing out the number of units you would like to sell.
- Once you have entered the quantity, you can either:
- Select the serial numbers right away by clicking the Set serials button and choose from your existing serial number list; or
- Add the product to the order and set the serial numbers once you are picking them for fulfillment.
Click Done when all the serial numbers have been added.
Removing products
Did you add a product to an order that you’d like to remove? Here’s how to do it:
Note: If you’d like to return an item that was previously purchased, please see here for steps!
- Tap on the Edit button above the item list on the Order tab.
- Tap the X symbol in the top left corner of the product/s you’d like to remove.
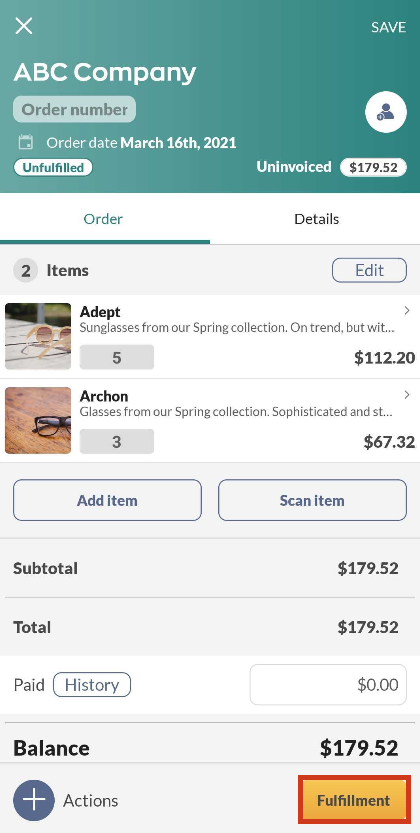
Fulfilling/picking products
Once you’ve added your products to the order, you can start fulfilling/picking it!
Click the yellow Fulfillment button in the bottom right when shipping is turned off.
Click the yellow Pick Order button in the bottom right when shipping is turned on.
There are several ways to fulfill/pick items on your order:
- To auto fulfill/pick all items on the order, tap on the picking progress button in the bottom right and select Autofill.
- To mark an entire item line as fulfilled/picked, tap on the empty checkbox on the left side.
- To partially pick an item line, click on the ellipsis (three dots) on the right side to open the more actions menu and select Partial fulfill/pick.
- You can also fulfill/pick your items by scanning them! Tap on the barcode icon in the top right to open the camera barcode scanner.
To unfulfill/unpick an item:
- To auto-unfulfill/unpick all items on the order, tap on the picking progress button in the bottom right and select Unpick all.
- Tap on the gray checkmark on the left side of the item line OR the ellipsis (three dots) on the right side to open the actions menu and select Unfulfill/Unpick or Partial fulfill/pick to adjust the number of fulfilled/picked items.
More actions menu
Next to each item line on the Fulfill/Picking screen, tapping the ellipsis (three dots) on the right side will open the more actions menu. Here you’ll be able to:
- Edit the location where the product will be fulfilled/picked from.
- Edit the fulfilled/picked date for products that have been fulfilled/picked.
- Partially fulfill/pick items.
- Unfulfill/unpick items.
Shipping
To include shipping an order, swipe left to get to the Details tab. When the shipping toggle is ON, the shipping address, required ship date and PO number will appear.
In the mobile app, all picked and unshipped items on an order will be shipped in the same box. The box number and the contents of the box cannot be edited from the mobile app, however you can remove an item from a shipment.
Ship all items on an order
When all items are picked on the order, a Ship order button will appear in the bottom right:
- Tap the Ship order button to open the Shipping details screen.
- Enter your shipping details and tap Complete shipment to mark the items as shipped.
Edit/remove a shipment
You can edit your shipments in the Shipping details screen:
Note: it’s not possible to see what items were shipped in a specific shipment in the mobile app.
- Tap on the + Actions button in the bottom right corner and select Ship.
- In the Shipments screen, tap on the shipment you’d like to edit to open the Shipping details screen.
- Here, you can edit the shipped date, add shipping remarks, carrier, and a reference number or delete the shipment.
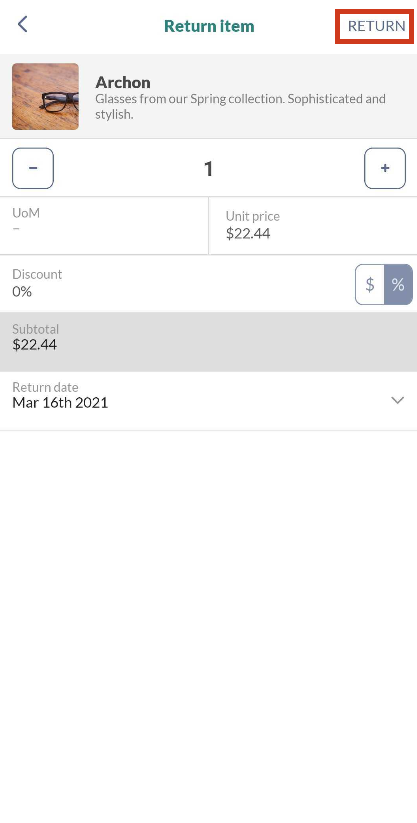
Returning products
Similar to the desktop app, a returned item in the mobile app will appear as a separate line item.
There are a couple of ways to return items in the mobile app:
Returning an existing item on an order:
- Tap on the item on the order you’d like to return.
- On the Item details screen, tap the ellipsis in the top right and select Return item.
- In the Return item screen, enter the quantity you’d like to return and tap Return in the top right to complete the transaction.
Returning an item that is not on an order:
Sometimes, you may need to return an item from a customer that wasn’t on an order to begin with. You can do this on the mobile by adding the item as a returned item:
- On the Order screen, tap Add item and select it from your product list (or scan its barcode by tapping Scan item).
- In the Add item screen, set the quantity to a negative amount to mark that this item will be a return (ie, if you want to return 2 items, you’ll add ‘-2’ quantity).
- Tap Return in the top right to complete the transaction.
Invoicing
How to send a sales order
From the mobile app, you can share or email the sales order to your customer.
- Tap on +Actions.
- Select Email order or Share order.
- Select which document from the sales order you want to send (Sales order, Receipt, or Invoice).
- Then continue to share via your phone’s email or sharing app.
For complete details take a look at the emailing invoices article.
Marking the order as invoiced
If you’ve sent your customer the invoice outside of inFlow, then you can manually mark the order as invoiced. To do that:
- Tap on + Actions at the bottom left
- Then select Invoice.
Payments
At the bottom of the Order tab, you’ll find the subtotal, tax amounts, freight, the order total, the paid amount, and the order balance.
- If you’d like to mark the entire order as paid, you can use the + Actions menu in the bottom left and select Mark paid.
- To record a partial payment, tap into the Paid field and enter the amount paid.
- You can also add payment via the Payment History screen (see below).
Payment history
You can tap on History next to the Paid text to access the payment history for the order.
- Tapping Add payment will open a Payment details screen where you can enter a new payment.
- Tapping on an existing payment will open the Payment details screen.
Payment details
The Payment details screen allows you to edit the details of a specific payment, such as:
- The amount applied (this will be negative when making a refund)
- The refund toggle – this will mark the amount applied as a refund.
- Payment method
- Date
- Reference number
- Remarks (per payment)
Pricing, currency, taxing scheme, and non-customer costs
You can edit which pricing scheme, currency, and tax to apply to the order, as well as add non-customer costs from the Pricing screen. Swipe to the very bottom of the Order tab and tap on Edit pricing.
It is not possible to create a new pricing scheme or taxing scheme from the mobile app.
Remarks
In the mobile app, all your sales order remarks can be added from the Details tab. You’ll be able to edit:
- Sales remarks (in the desktop app, these would be found in the Sales tab).
- Pick remarks (Windows app: these would be found in the Pick tab).
- Ship remarks (Windows app: these would be found in the Ship tab).
- Return remarks (iWindows app: these would be found in the Return tab).
- Restock remarks (Windows app: these would be found in the Restock tab).
To add a remark:
- Swipe left or tap on the Details tab from the Sales Order details screen.
- Scroll to the Remarks section at the bottom and tap into the remark field you’d like to edit.
- Tap Save in the top right to save your changes.
Receiving payments from emailed orders
If your business is located/registered in the United States or Canada, you can sign up for inFlow Pay to accept credit card payments from orders you email from inFlow! For complete details on this, take a look at our inFlow Pay article here.
Transfer Stock
Transfer Stock
If you need to transfer stock from one location to another on the go, or move your products around if you’re reorganizing your warehouse, this feature is available on inFlow Cloud for Mobile!
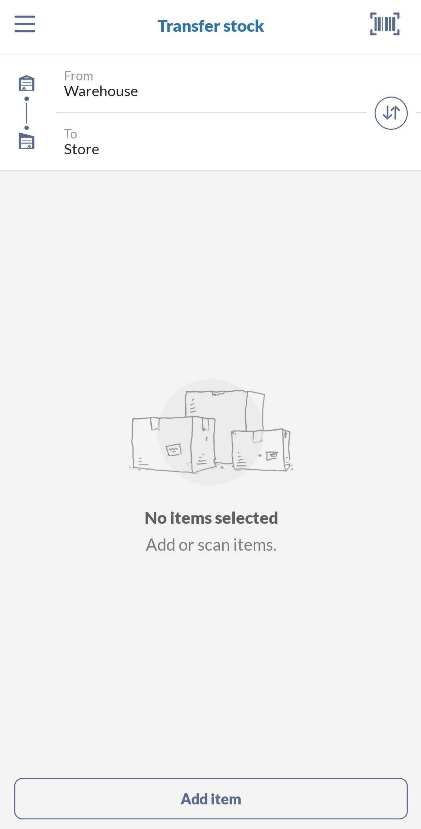
To transfer stock from one location to another:
- Go to Main Menu > Transfer Stock.
- Select the location you’re transferring stock to.
- inFlow will assume the user’s default location as the location the stock is leaving from. If you’d like to take stock from another location, tap From and choose the correct one (if you’re only transferring products between sublocations, then set it to be the same location as the From location).
- Once you’ve done that, you can start adding items by tapping the Add Item button, or scan them by tapping the barcode icon at the top right (pictured above).
- A list of your items and quantities should appear. Note that the quantity displayed is only for the From Location, not the total quantity across all locations.
- When you’re done selecting your items, tap Transfer Stock.
- Confirm by tapping Transfer Now.
That’s it! You should see a confirmation screen with a stock transfer number which you can reference back on the inFlow Cloud for Windows app. You can also start a new transfer from here if you wish.
What do I do if I’ve got sublocations?
If you have sublocations enabled in your database, then when you select an item to be transferred, you can also set the sublocation you want it to be taken out of or transferred to.
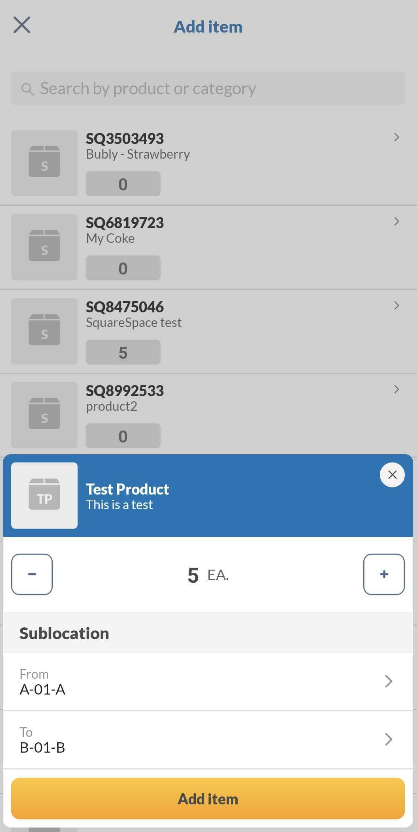
inFlow will autofill from the sublocation that contains the most quantity to the default sublocation for that product (if there is one set). If there’s no default sublocation for that product, then the To sublocation will be set to the empty/no sublocation.
In all cases, you can change the sublocations simply by tapping on the From or To fields.
What do I do if I’ve got serialized products?
If you want to add serialized products to your stock transfer, you will have to choose from your existing list of serial numbers before you can transfer the product. To do so, select the product you want to transfer, set the quantity, and click Set serials to choose from that product’s existing serial numbers.
How do I save a stock transfer before completing it?
You might have noticed that there isn’t a Save button while you’re doing a stock transfer. Not to worry though, if you navigate away from this screen and come back to Transfer Stock later on, you’ll have the option to Restart transfer or Continue transfer (pictured below).
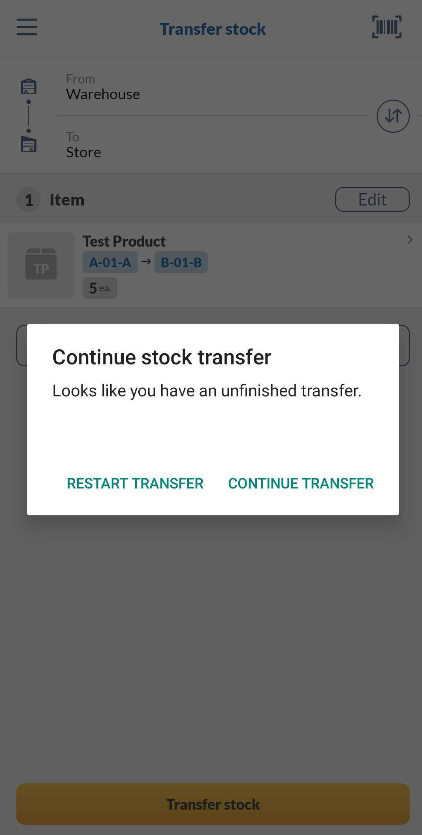
Note that this is not an autosave feature; a stock transfer number is only assigned upon completion of a transfer, so you won’t be able to start a transfer from the mobile app and finish it via the Windows app.
Minimum Specs
Minimum Specifications
You can find the inFlow Cloud Companion App in Google Play and in the App Store.
Android OS:
- Android – 8.0 Oreo is supported.
iOS:
- iOS 9 or later is supported.
- Compatible with iPhone, iPad, and iPod touch.
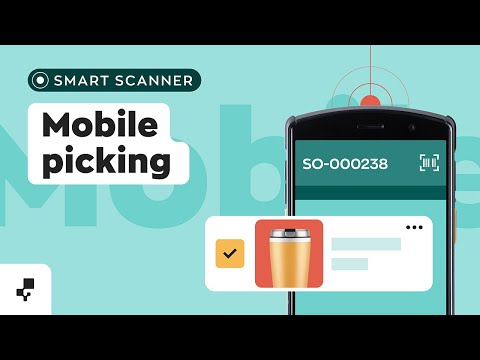
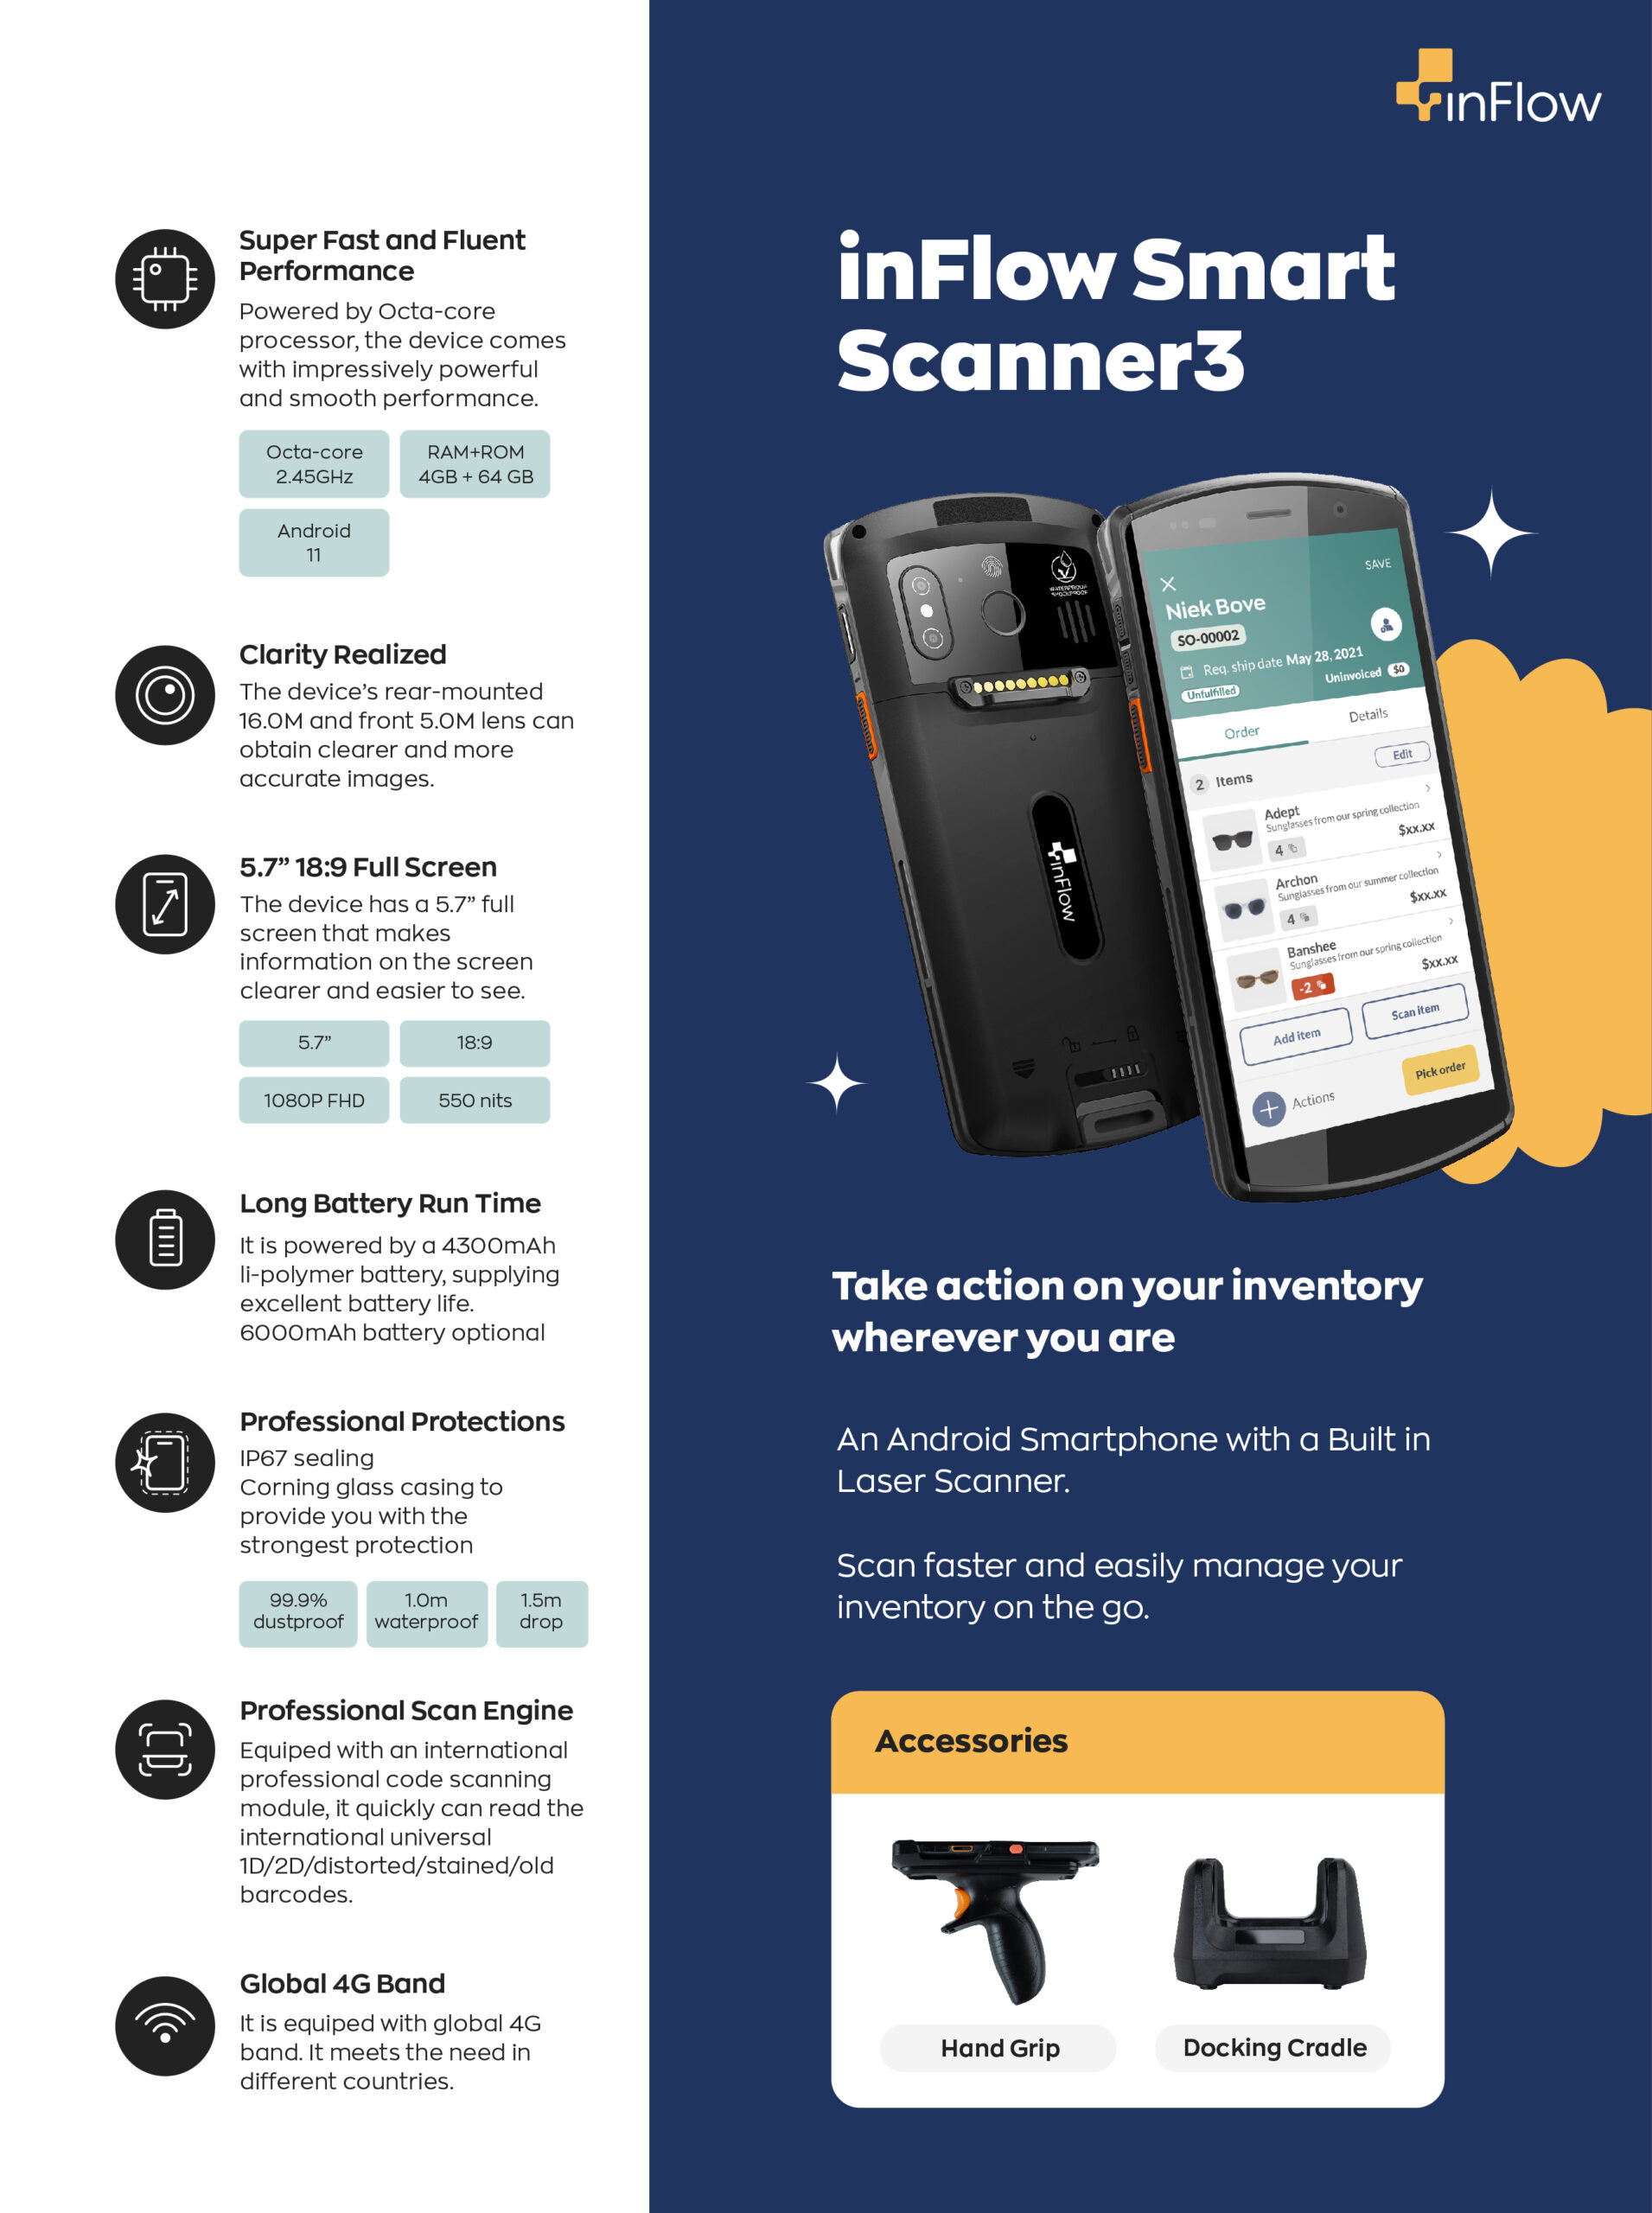
Smart Scanner 3
Smart Scanner 3
inFlow’s very own smart scanner is here! Featuring a built-in dedicated barcode scanner, you’ll be able to instantly scan your items at least 2x faster and more accurately than any camera app.
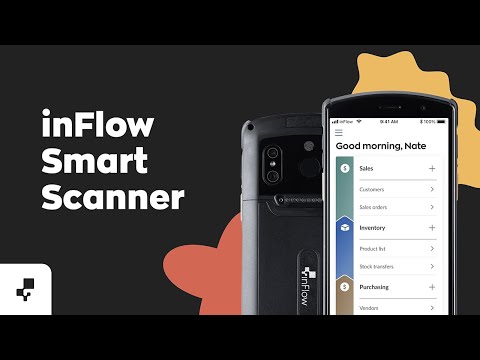
Here’s a two-minute overview of the Smart Scanner and its accessories:
Take a look at the following article to learn more about the inFlow Smart Scanner.


0 Comments