
How to adjust stock levels in inFlow
Web
Adjusting one product
- Open the product record of the item you would like to adjust.
- Click the quantity of stock in the Inventory section and enter the corrected number.
- Click Save.

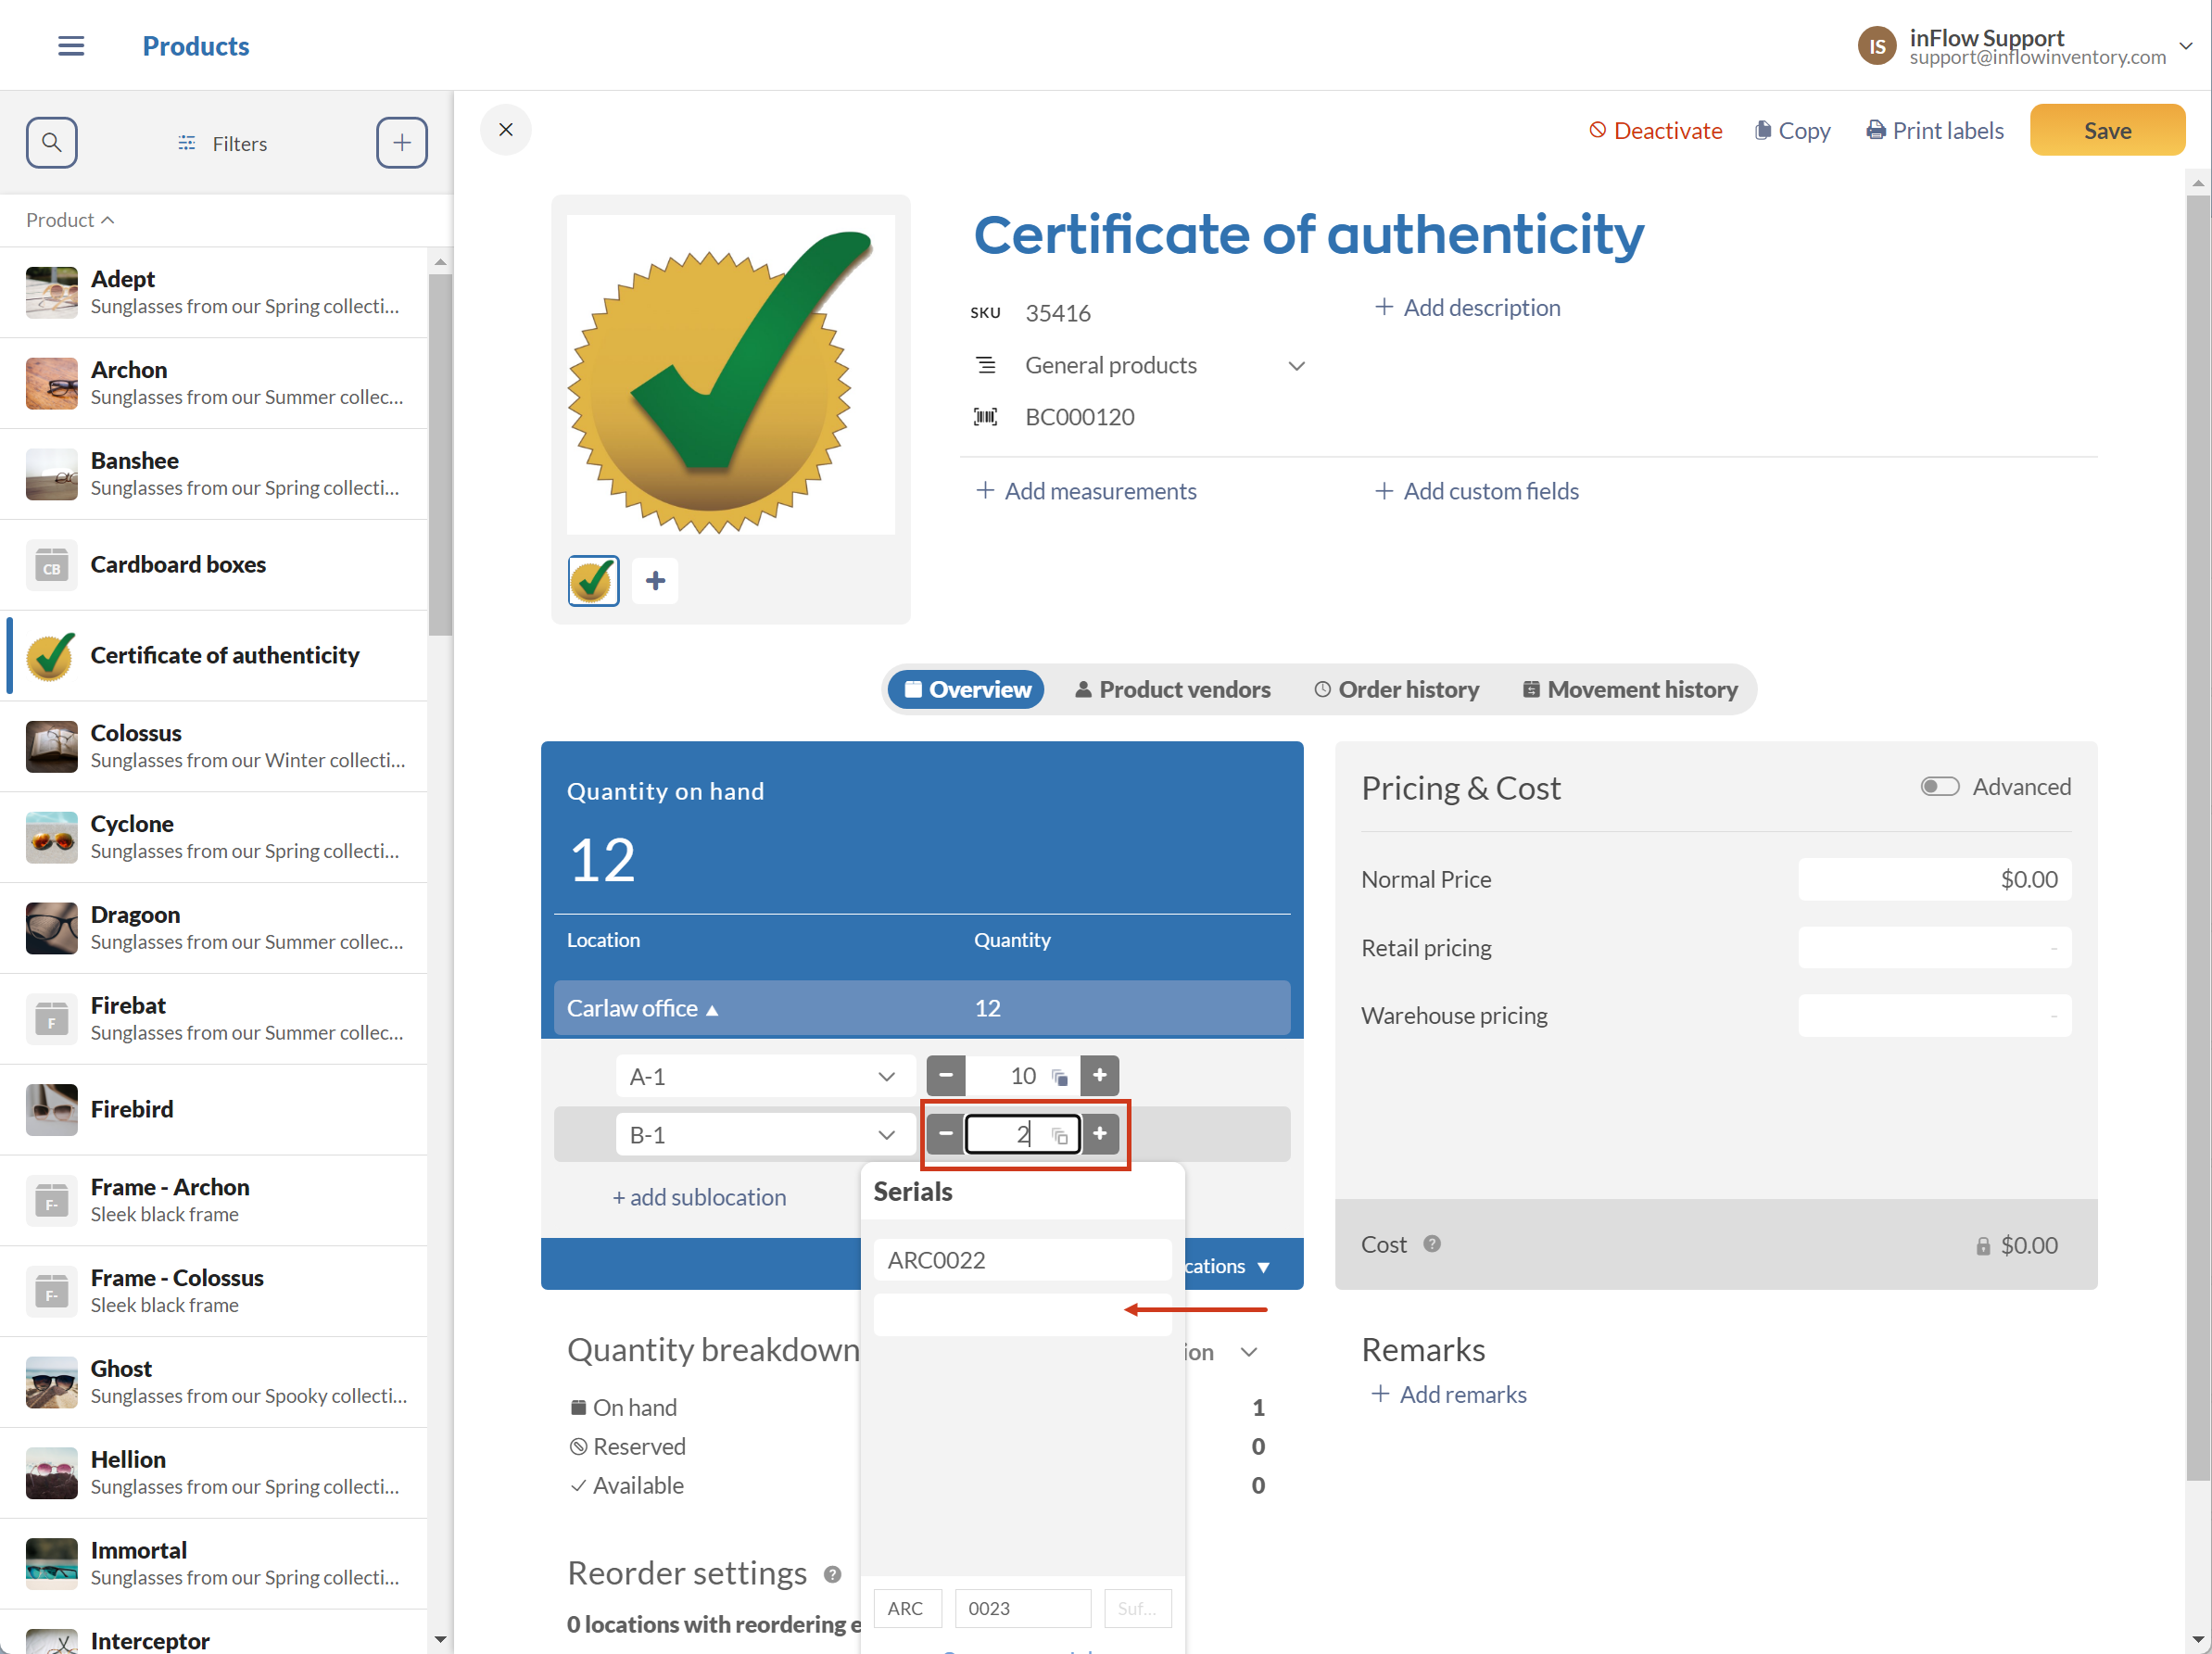
If you are adjusting the stock level of a serialized product, you’ll need to enter the serial numbers manually or click the Generate Serials button at the bottom of the drop-down, as shown below.
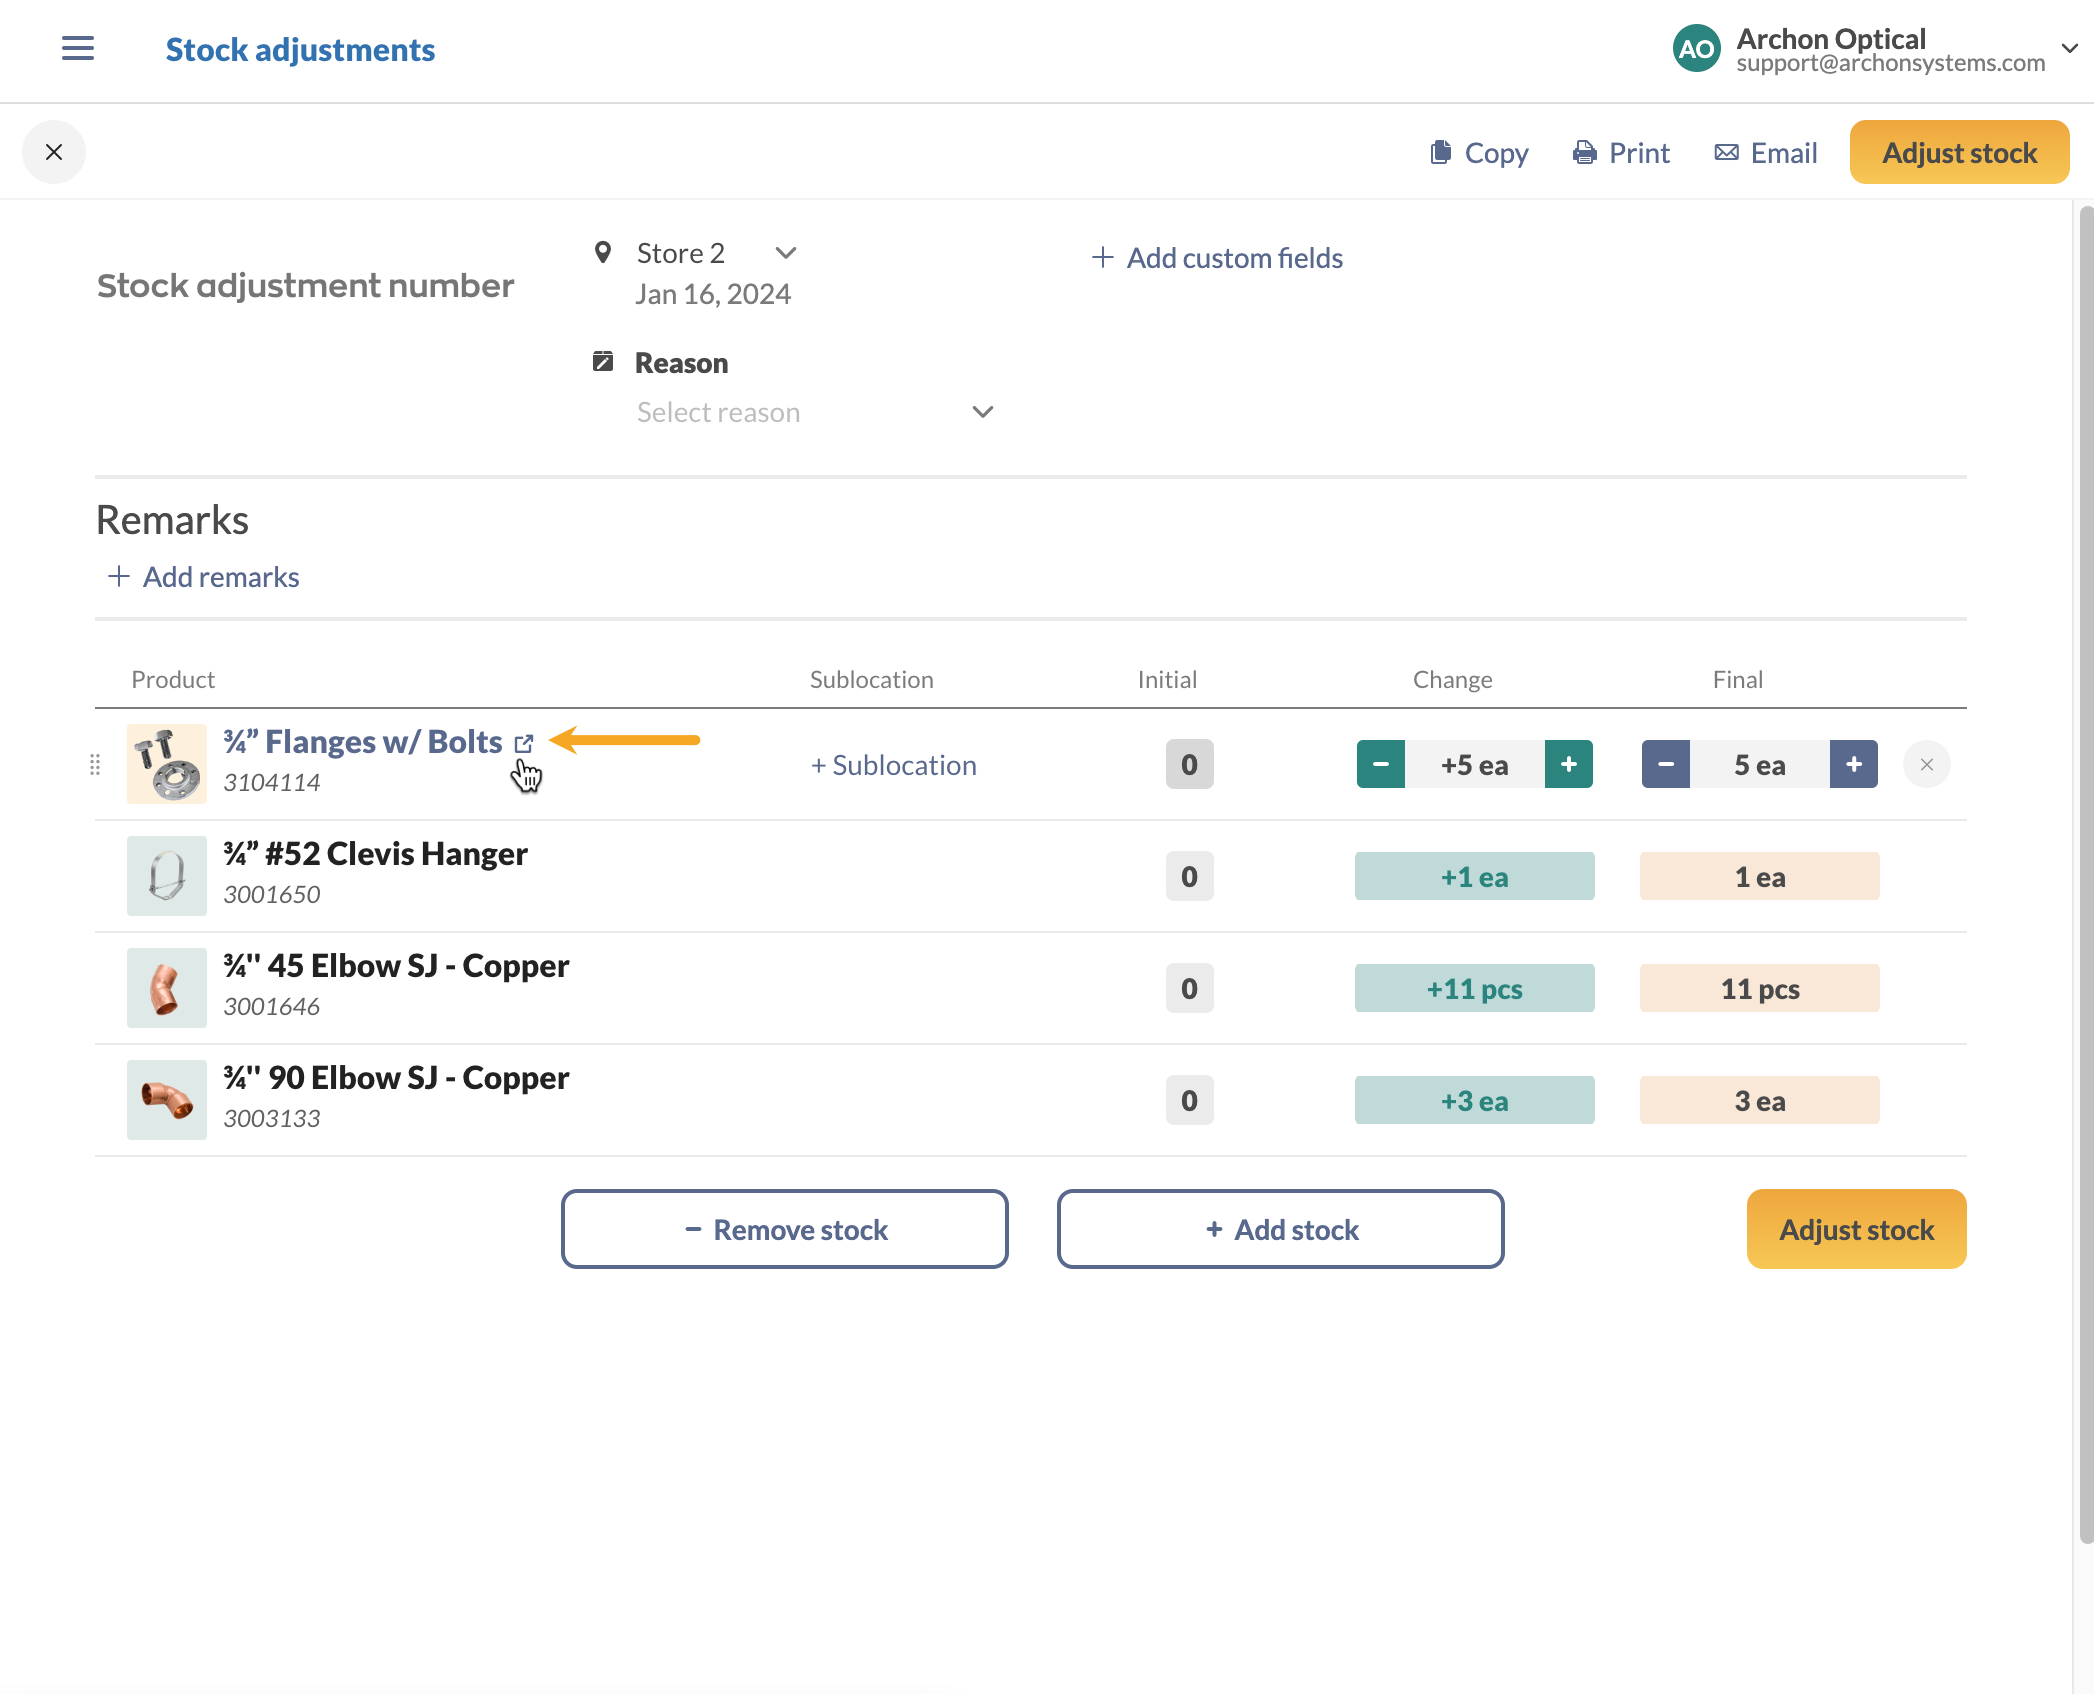
Adjusting several products (Stock adjustments)
Creating a stock adjustment
- Go to Main Menu > New stock adjustment.
- Select the location of the products you’re adjusting.
- Click the Remove stock or Add stock button to select products.
- The product list will stay open on the screen until you click outside of the product list. If you click or scan a product more than once, it will increase the quantity you’re adjusting. You can also type in the adjustment quantity.
- You can also add a new product to inFlow by clicking on Create new product at the bottom of the product picker.
- While the product picker is open, you can toggle to Remove stock or Add stock. Doing this will let you add and subtract stock in the same adjustment order.
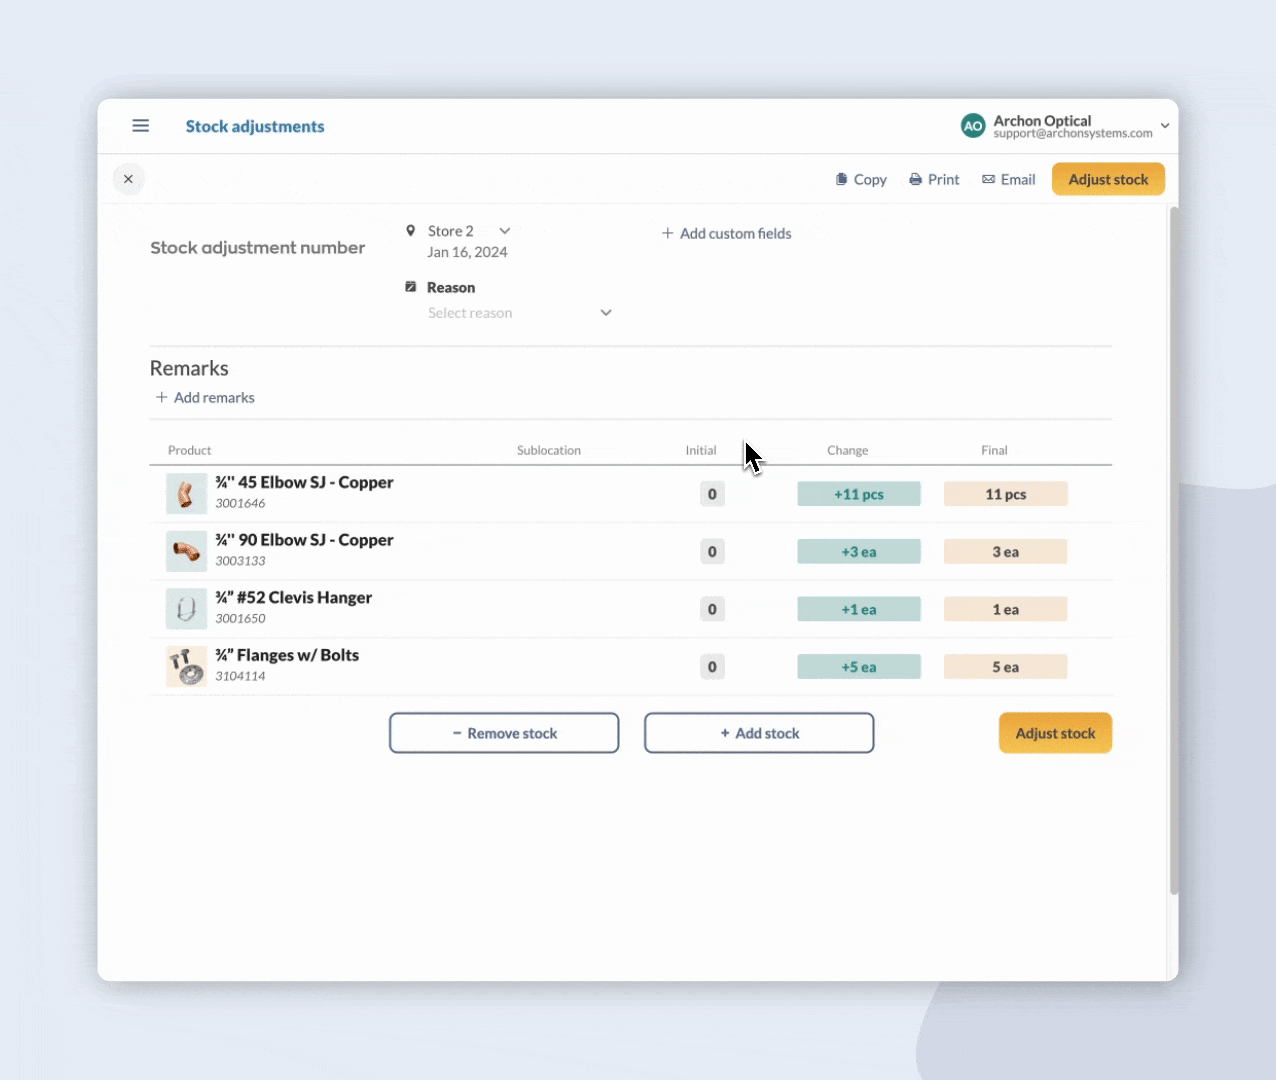
The stock levels can be adjusted in the Change and the Final column.
Stock adjustment columns
If you need to make more adjustments to the products you’ve selected, you can edit them from the product table. See below for an explanation of some of the columns on the product table.
| Column | Explanation |
|---|---|
| Sublocation | If products are listed in a sublocation, they will be shown in this column. |
| Initial | This displays the stock levels that inFlow sees in the system before the stock adjustment is saved. |
| Change | This is where you can enter the stock level change from the initial quantity. |
| Final | This column shows the stock level that inFlow will have of your products once the stock adjustment is saved. |
Customizing the stock adjustment product list
Sorting products
To apply a filter, click the table headers that match your needs.
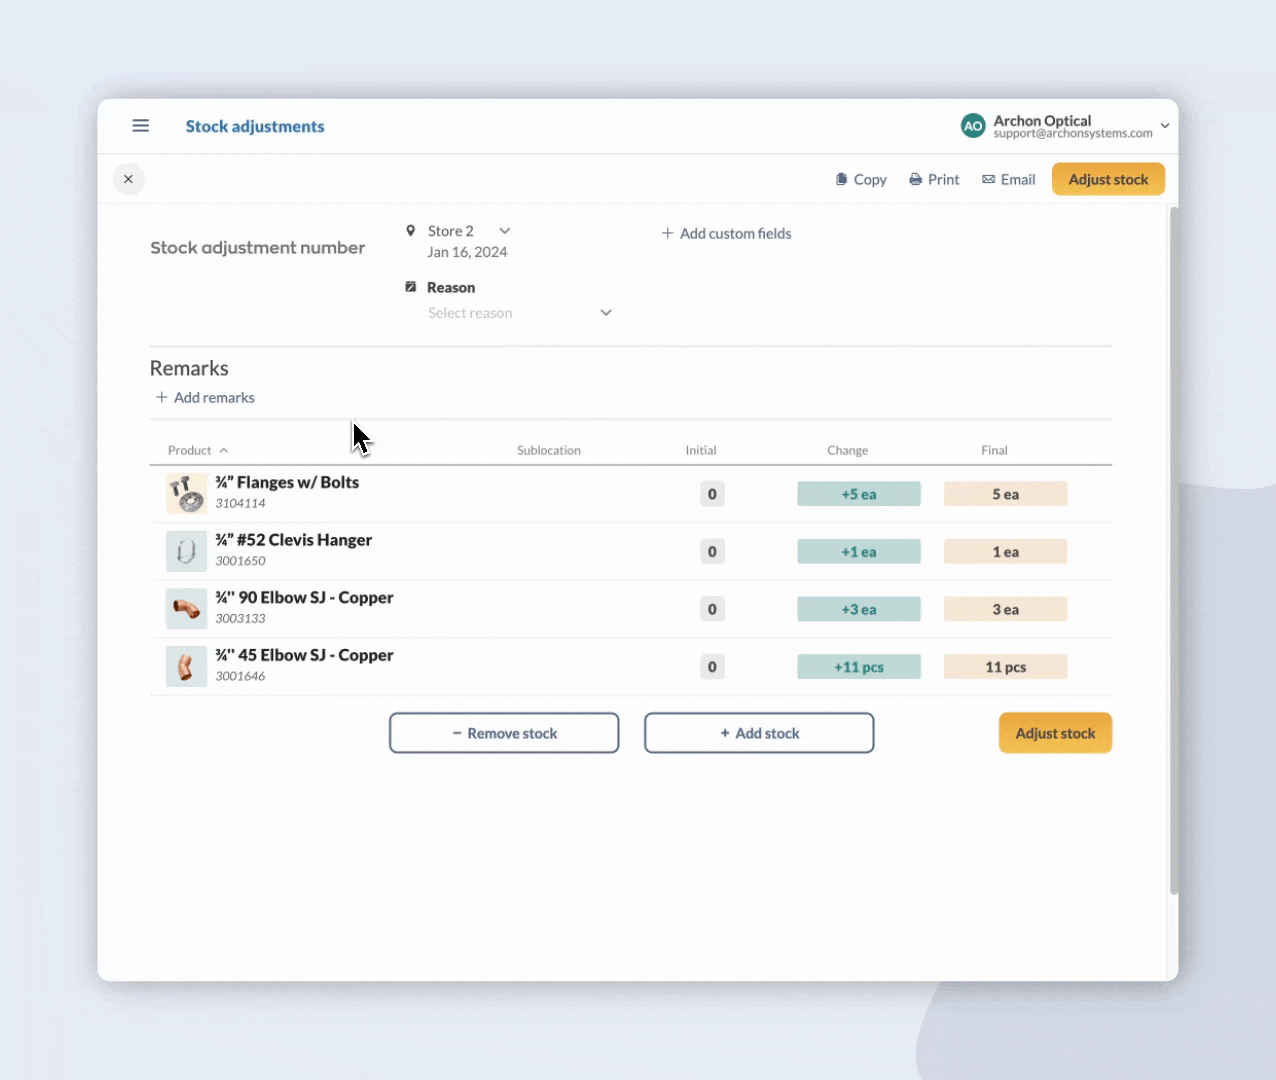
Rearranging products
Rearrange the products on the product table by clicking and dragging the grab handles located on the left side of each product.
Viewing product records
If you want to look at a product that is on the product list, hover over it and click the link to open it in a new tab.
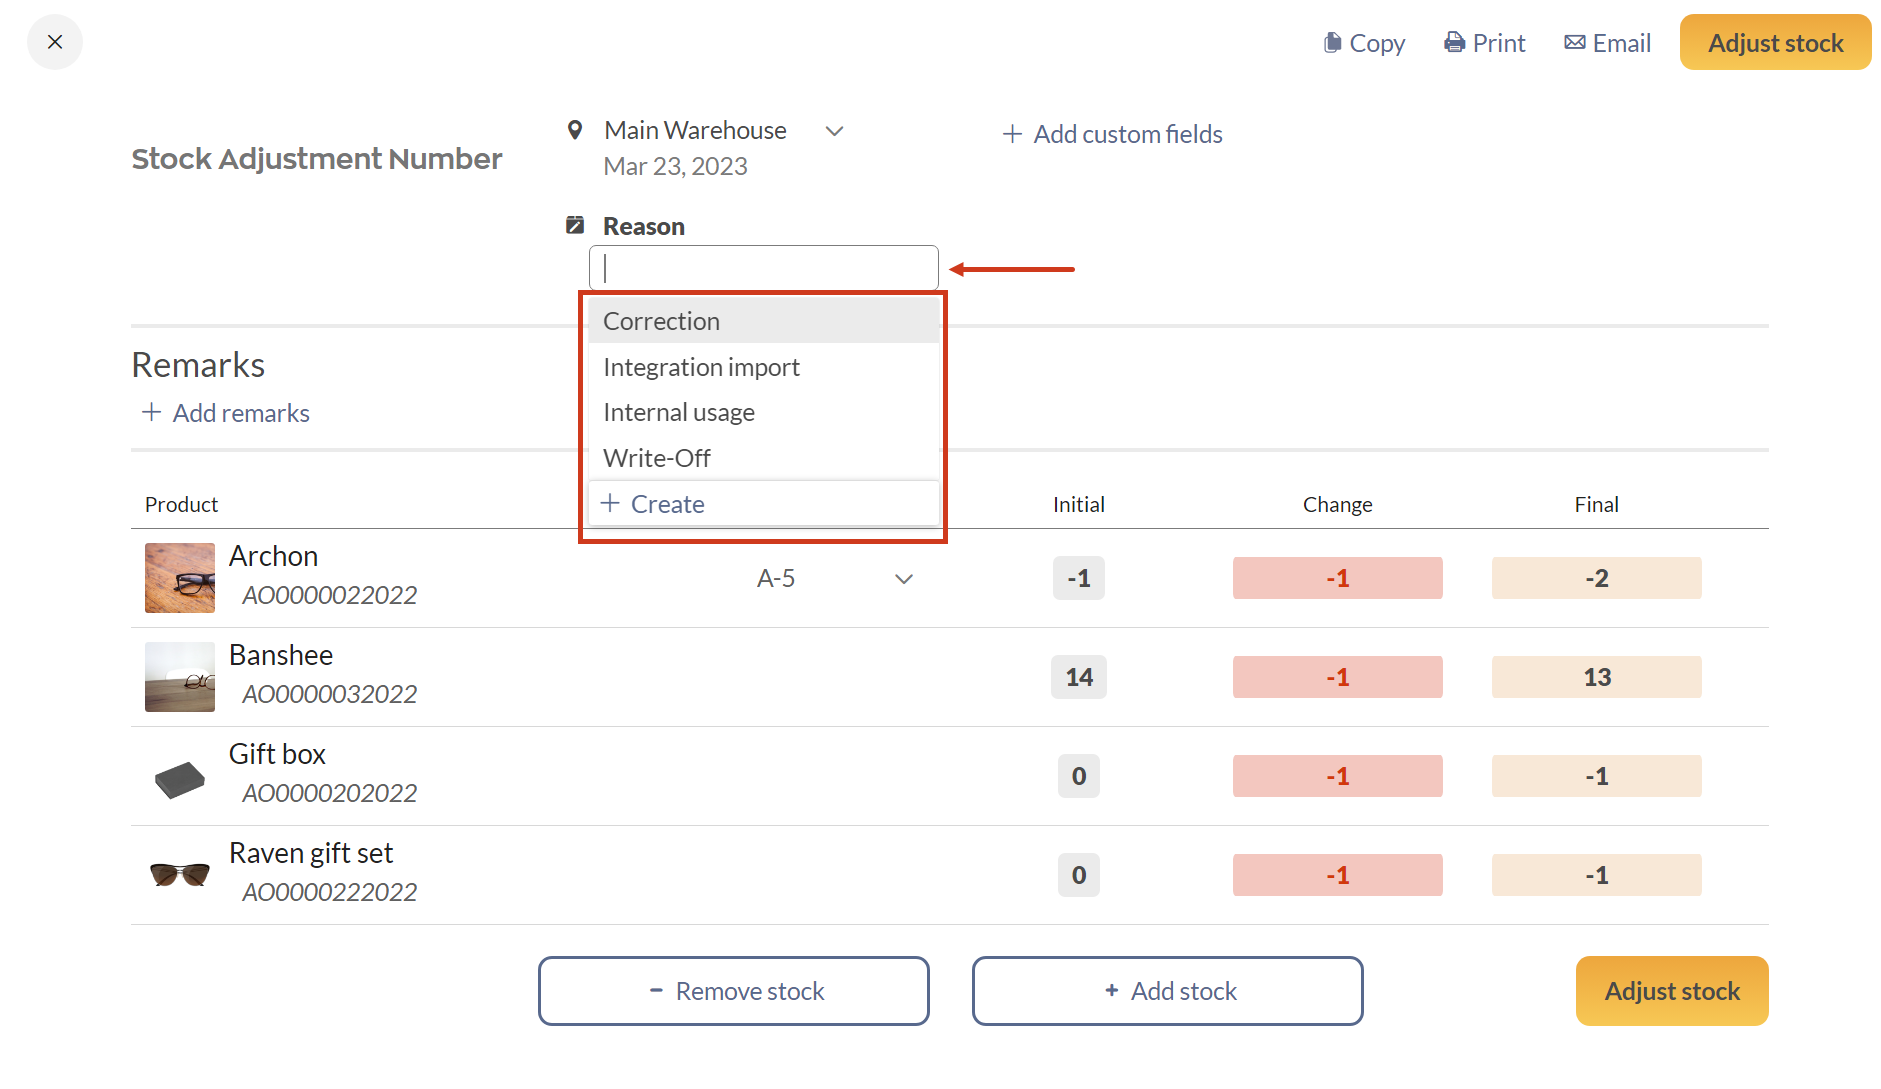
Stock adjustment reasons
You can add an explanation for the stock adjustment. This is helpful for auditing purposes when you want to look up why changes were made in your inventory.
- Select the Reason drop-down menu.
- Select one of the options from the list. If the reason you need isn’t there, click on Create to add a new one. You can also adjust the Reason drop-down options in the Adjustment reasons section of the Inventory settings in inFlow.
Stock adjustment remarks
To leave comments on the stock adjustment, click on the Remarks field. There’s no character limit, so you can write all the details needed here.
Completing the stock adjustment
When done, you can click on the Adjust stock button. The stock adjustment will say Completed above the order number.
Stock adjustments and FIFO/LIFO costing methods
To ensure the most accurate costs, it’s recommended to add new products to your inventory using a purchase order that reflects the latest costs.
However, if you want to make a quick stock adjustment, inFlow will apply the current cost for products added through a stock adjustment using FIFO or LIFO costing methods.
Stock adjustment options
Changing the location
Next to the order number, you’ll see the location where you’re adjusting your product stock. You can click on the drop-down menu to select another location.
Custom fields
If your team tracks information that inFlow doesn’t have fields for, you can use custom fields to create the tracking that you need. You can name custom fields, and in the type-in field, you can add your information.
How to add new custom fields from the stock adjustment
- Click on +Add custom fields.
- Enter a name next to Field 1. If you want this field to show up on printed documents, put a checkmark next to the Print option.
- On this screen, click on Add custom field if you have more custom fields to add.
- Click on Save when done.
- Next to the new custom field, enter the information you want to track next on the order.
- Click either the Adjust stock or Save button.
Canceling a stock adjustment
If you want to cancel a completed stock adjustment, click on Cancel adjustment.
Copy, print, & email
At the top right of the adjustment screen, you’ll find the Copy, Print, and Email buttons. These functions are only available once the stock adjustment is completed.
Copying stock adjustments
To copy a stock adjustment, click on Copy. All details on the stock adjustment will be copied, including the location, products, custom fields, and remarks.
Printing stock adjustments documents
- To print a stock adjustment, click the Print button at the top right side of the screen.
- A new tab will open where you’ll see a preview of the printout.
- Click on the Print button.
- Select your printing preferences, then click the Print button. Depending on your browser, you can remove the headers and footers.
Emailing stock adjustments
- Click the Email button at the top right side of the screen.
- A new window will load with your email address in the Reply-to field. Enter the recipient’s email addresses into the fields.
- In the Message field, you can add any information you need for the recipients.
- Click on Preview document to look at what the printed document will look like.
- When done, click the Send button.
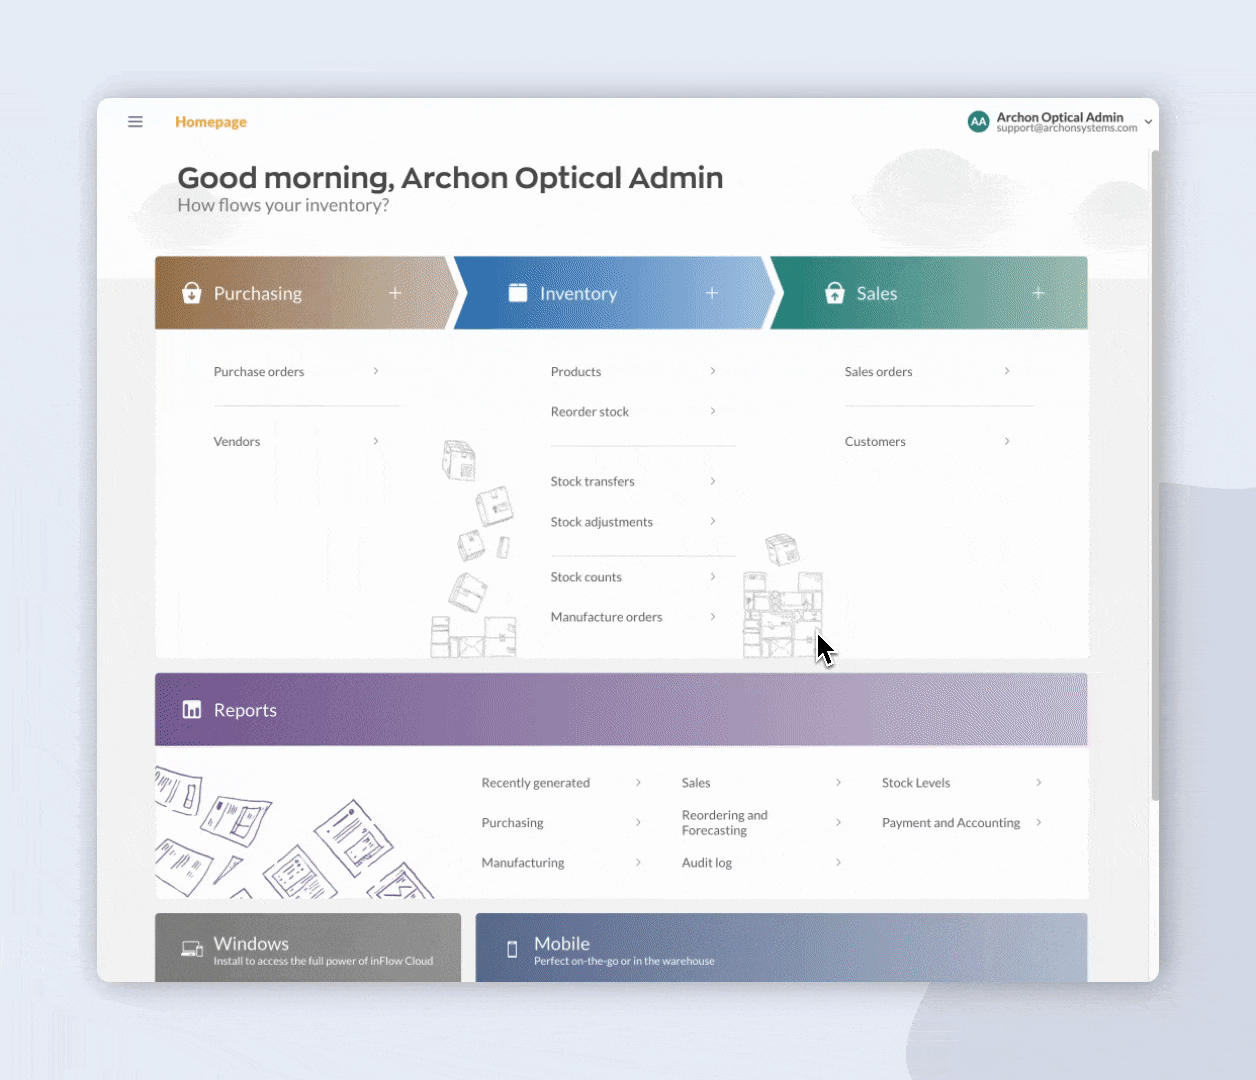
Windows
There are a number of ways you can adjust stock. inFlow Inventory will automatically adjust your stock when you complete a sales or purchase order, but if you’re going to manually update your stock levels, there are two ways to do so.
Adjusting one product
- Open the product record of the item you would like to adjust.
- Click the quantity of stock in the Inventory section and enter the corrected number.
- Press the Tab key on your keyboard.
- Click Save.

NOTE: If you are adjusting the stock level of a serialized product, you’ll need to enter the serial numbers manually, or click the Generate Serials button at the bottom right of the window. This applies to both the Adjust Stock function and changing the quantity in the product record.

Adjusting several products
- Go to Main Menu > Inventory > Adjust Stock.
- The location will automatically populate depending on your default settings. Choose the location for the item you are adjusting.
- Select the items you’d like to adjust in the main table. inFlow will automatically set a New Quantity, Old Quantity, and Difference for each item you select. You will need to change this in the next step.
- There are two ways you can enter adjustments on this screen. This depends on whether you are doing a count (knowing your total stock level) or if you are adding/removing stock (knowing the difference). For example:
- a) If you are doing a count of Item 10201 and you’ve found that you’ve only got 10 of them, enter 10 into the New Quantity column. inFlow will calculate the difference between your old quantity and the new quantity automatically.
- b) If you are removing 5 units of Item 10201 because they have been damaged, enter “-5” into the Difference column. inFlow will calculate your new quantity automatically based on the old quantity and the difference.
- Once you’re satisfied—enter a remark if you would like to—click Save and Complete.

NOTE: If you do need to make adjustments across multiple locations, you’ll need to start separate documents for each location (since you can only specify one location per document).
By default, the quantity of items added to this screen will either add or subtract 1 from your item’s stock.
To change the default behavior, click on the Scan to remove stock button and select the option you prefer.

To cancel a stock adjustment
- Click the Cancel button located at the top toolbar on the stock adjustment screen. Note that the cancellation means that all adjustments for each listed item are reversed.
- If you only want to cancel the adjustments for specific items instead, simply right-click on the row you want to remove and click Delete selected rows.
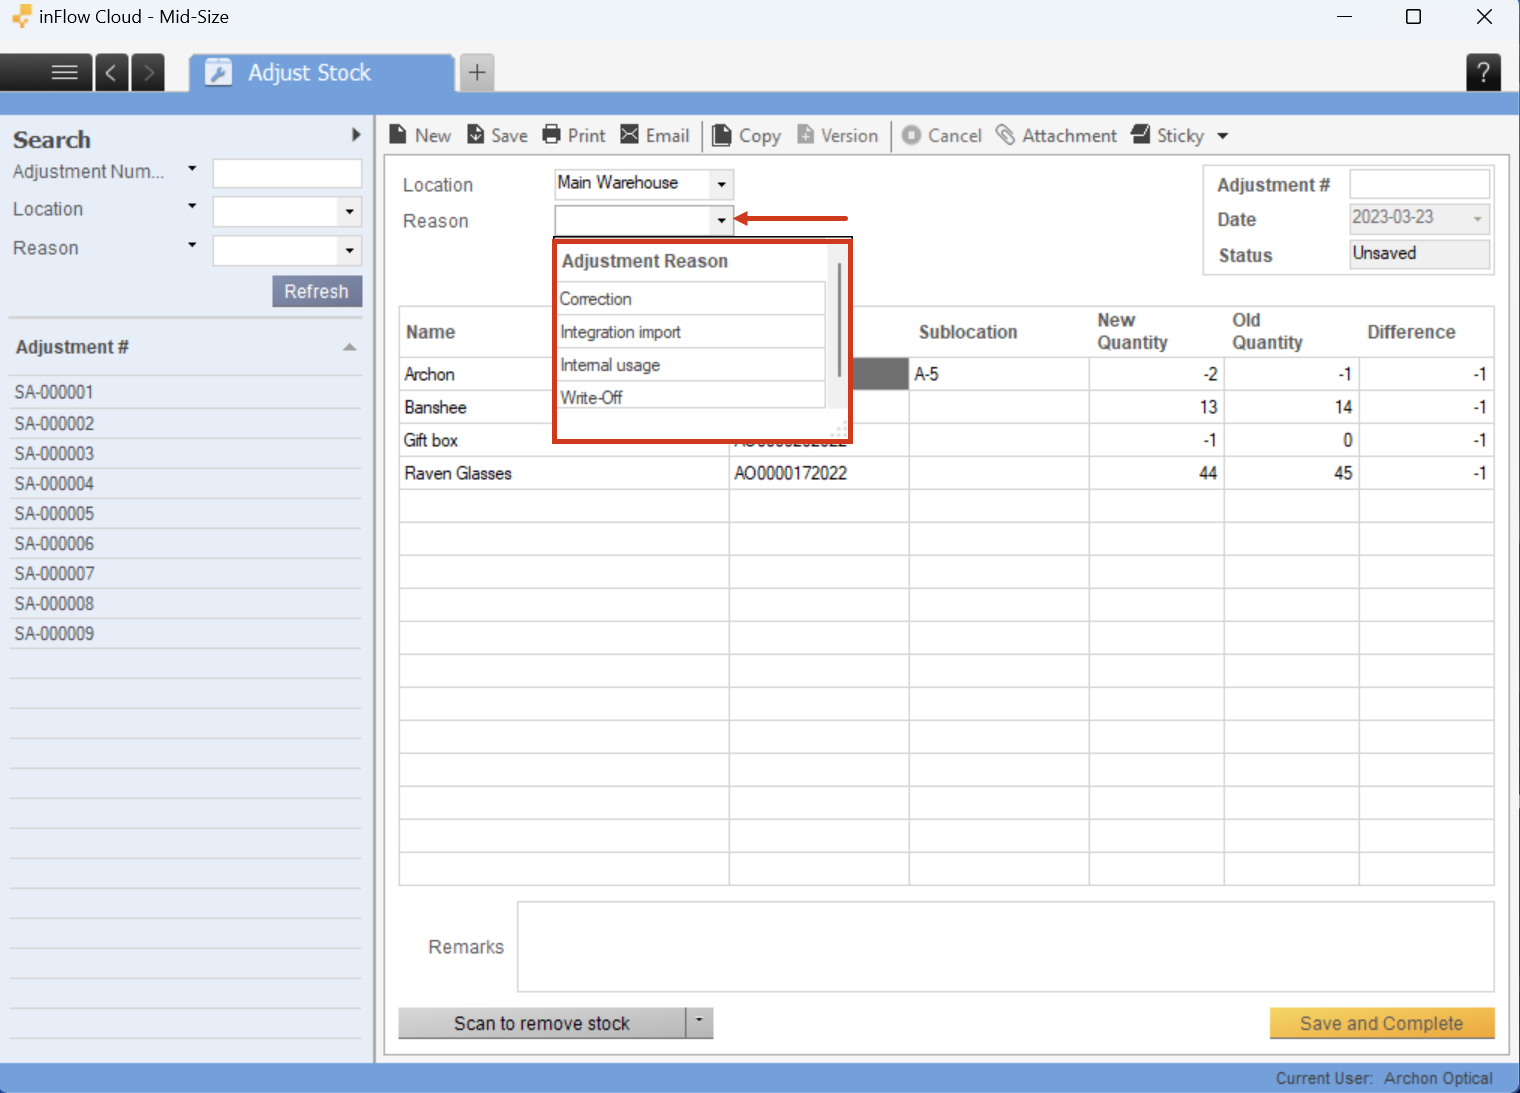
Stock adjustment reasons
You can add an explanation for the stock adjustment. This is helpful for auditing purposes when you want to look up why changes were made in your inventory.
- Select the Reason drop-down menu.
- Select one of the options from the list. If the reason you need isn’t there, you can adjust the Reason drop-down options in the Adjustment reasons section of the Inventory settings of the inFlow web app.
Mobile
You can make stock adjustments in the inFlow Inventory mobile app too! See below for the steps.
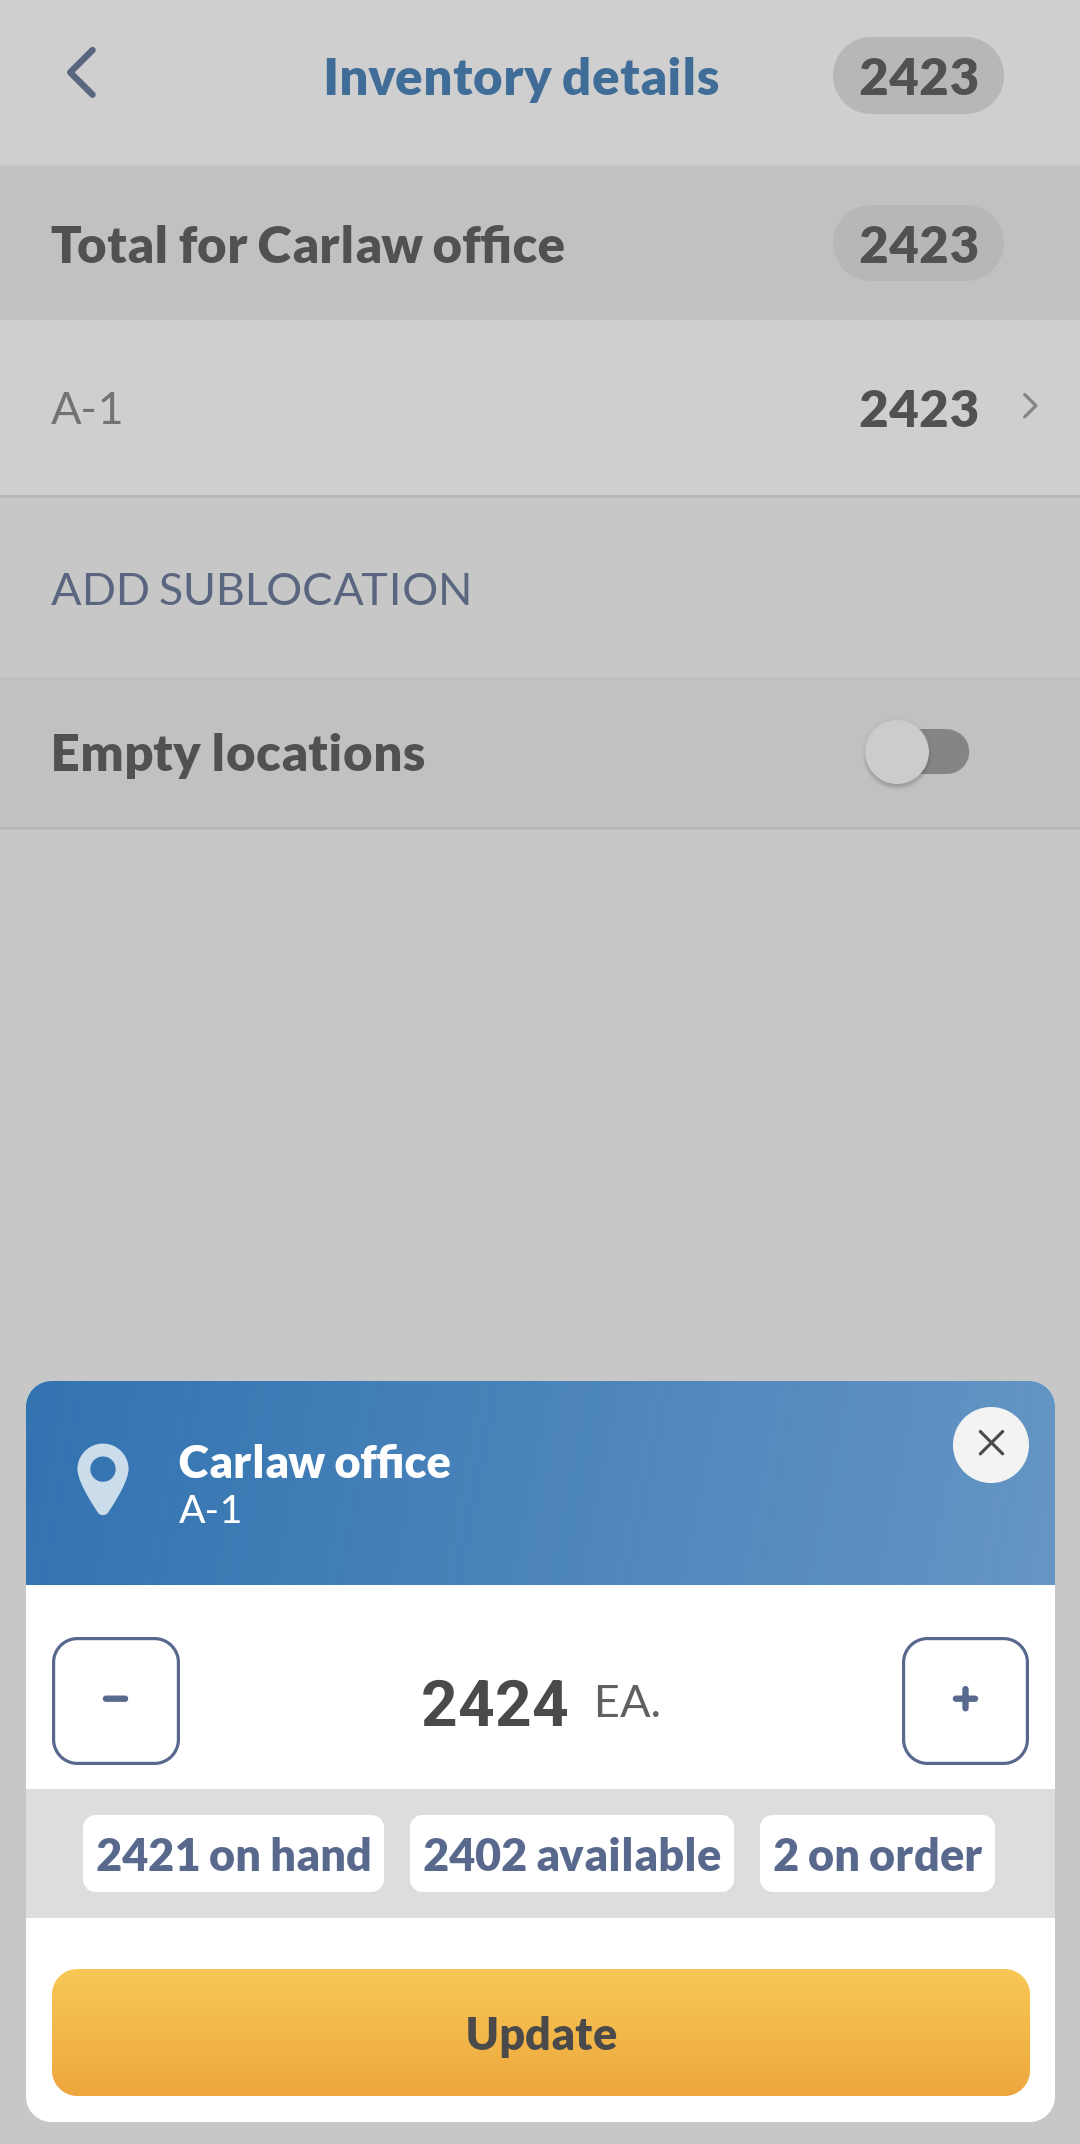
Adjusting one product
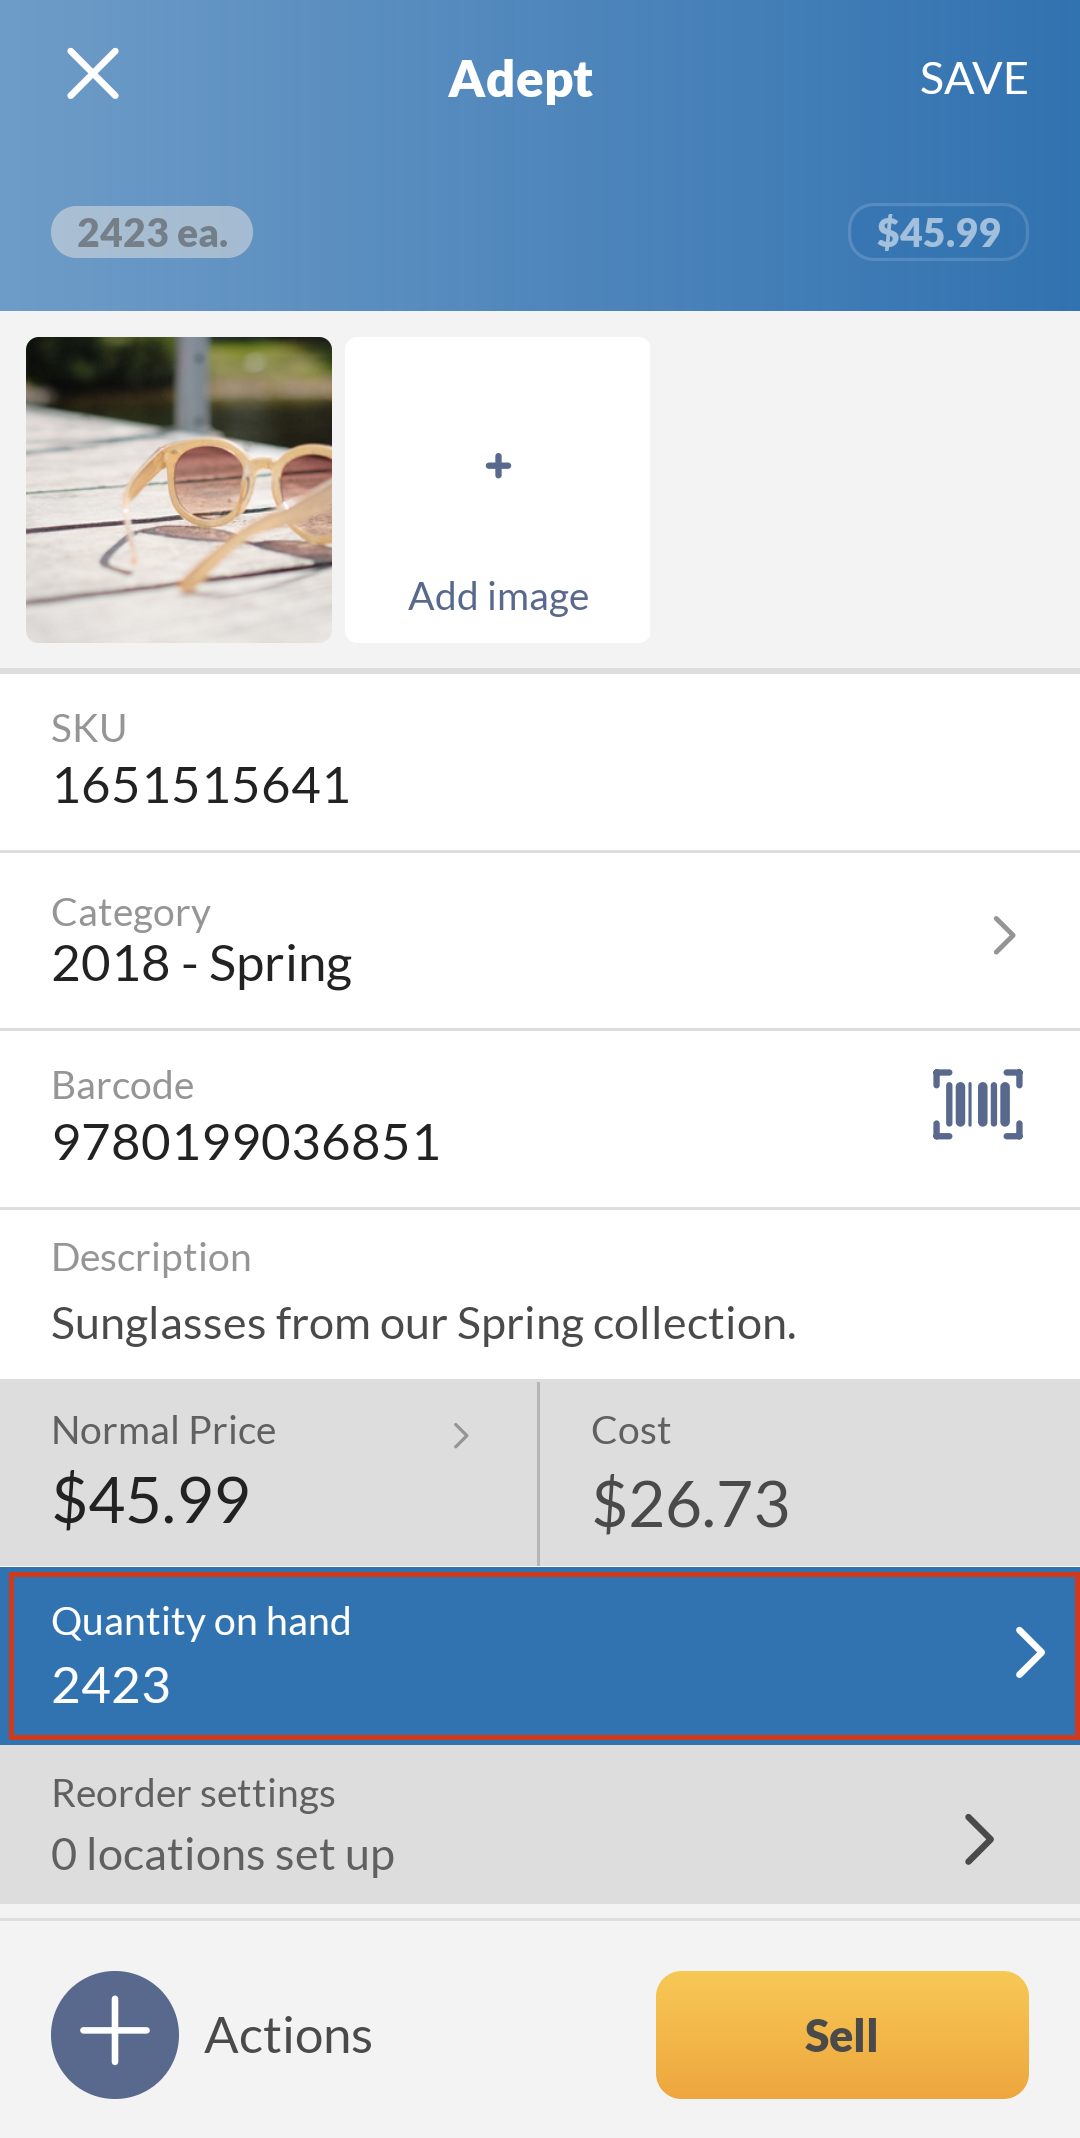
- From the Homepage, tap on Products (or go to Main Menu> Products.)
- Select a product from the list.
- Tap on Quantity on hand, then tap on the quantity next to Sublocation or No sublocation.
- Enter the new quantity, then tap Update.
Adjusting several products
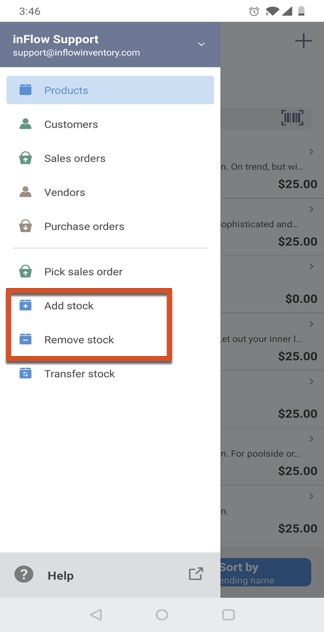
Creating a stock adjustment
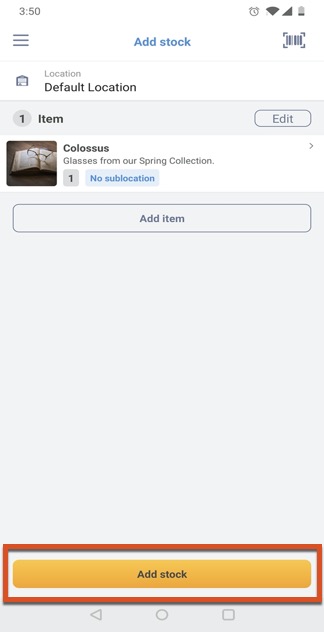
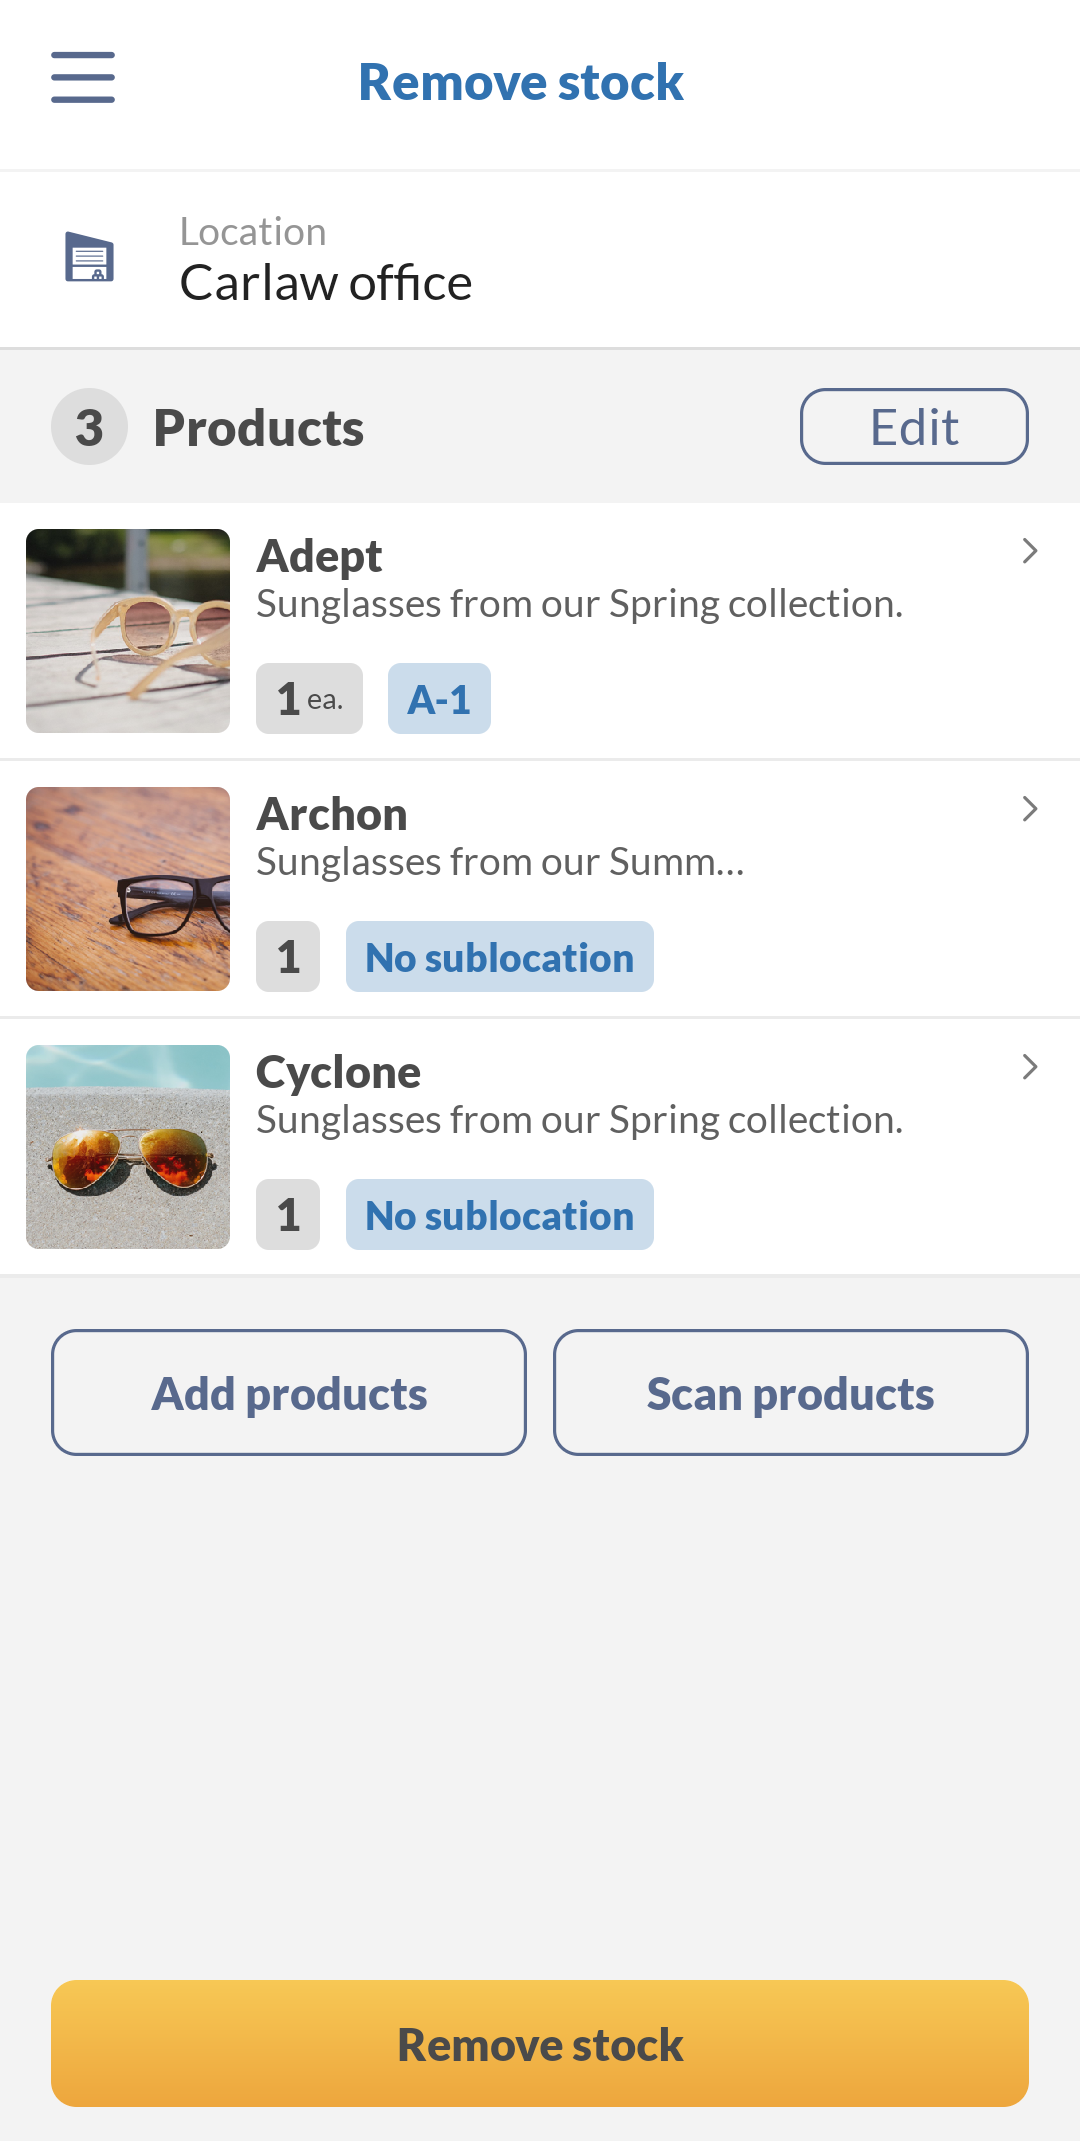
Tap on the Main Menu button. Towards the bottom of the menu, click on either Add stock or Remove stock.
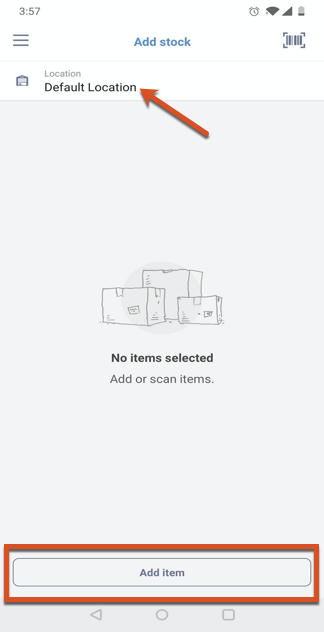
Select your location (if your database only has one location, then this will be pre-selected). Then click on Add Item.
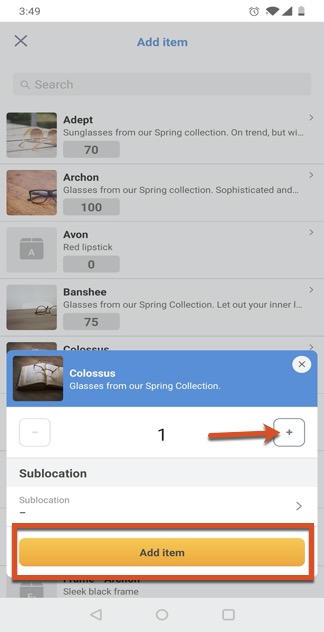
Tap on the items you want to add or subtract the inventory for. When you select the item, you can choose how much to make the adjustment with the arrows at the bottom of the screen. Then tap on Add item.
When done, you can click Add stock or Remove stock at the bottom of the screen.

Stock adjustment reasons
You can add an explanation for the stock adjustment. This is helpful for auditing purposes when you want to look up why changes were made in your inventory.
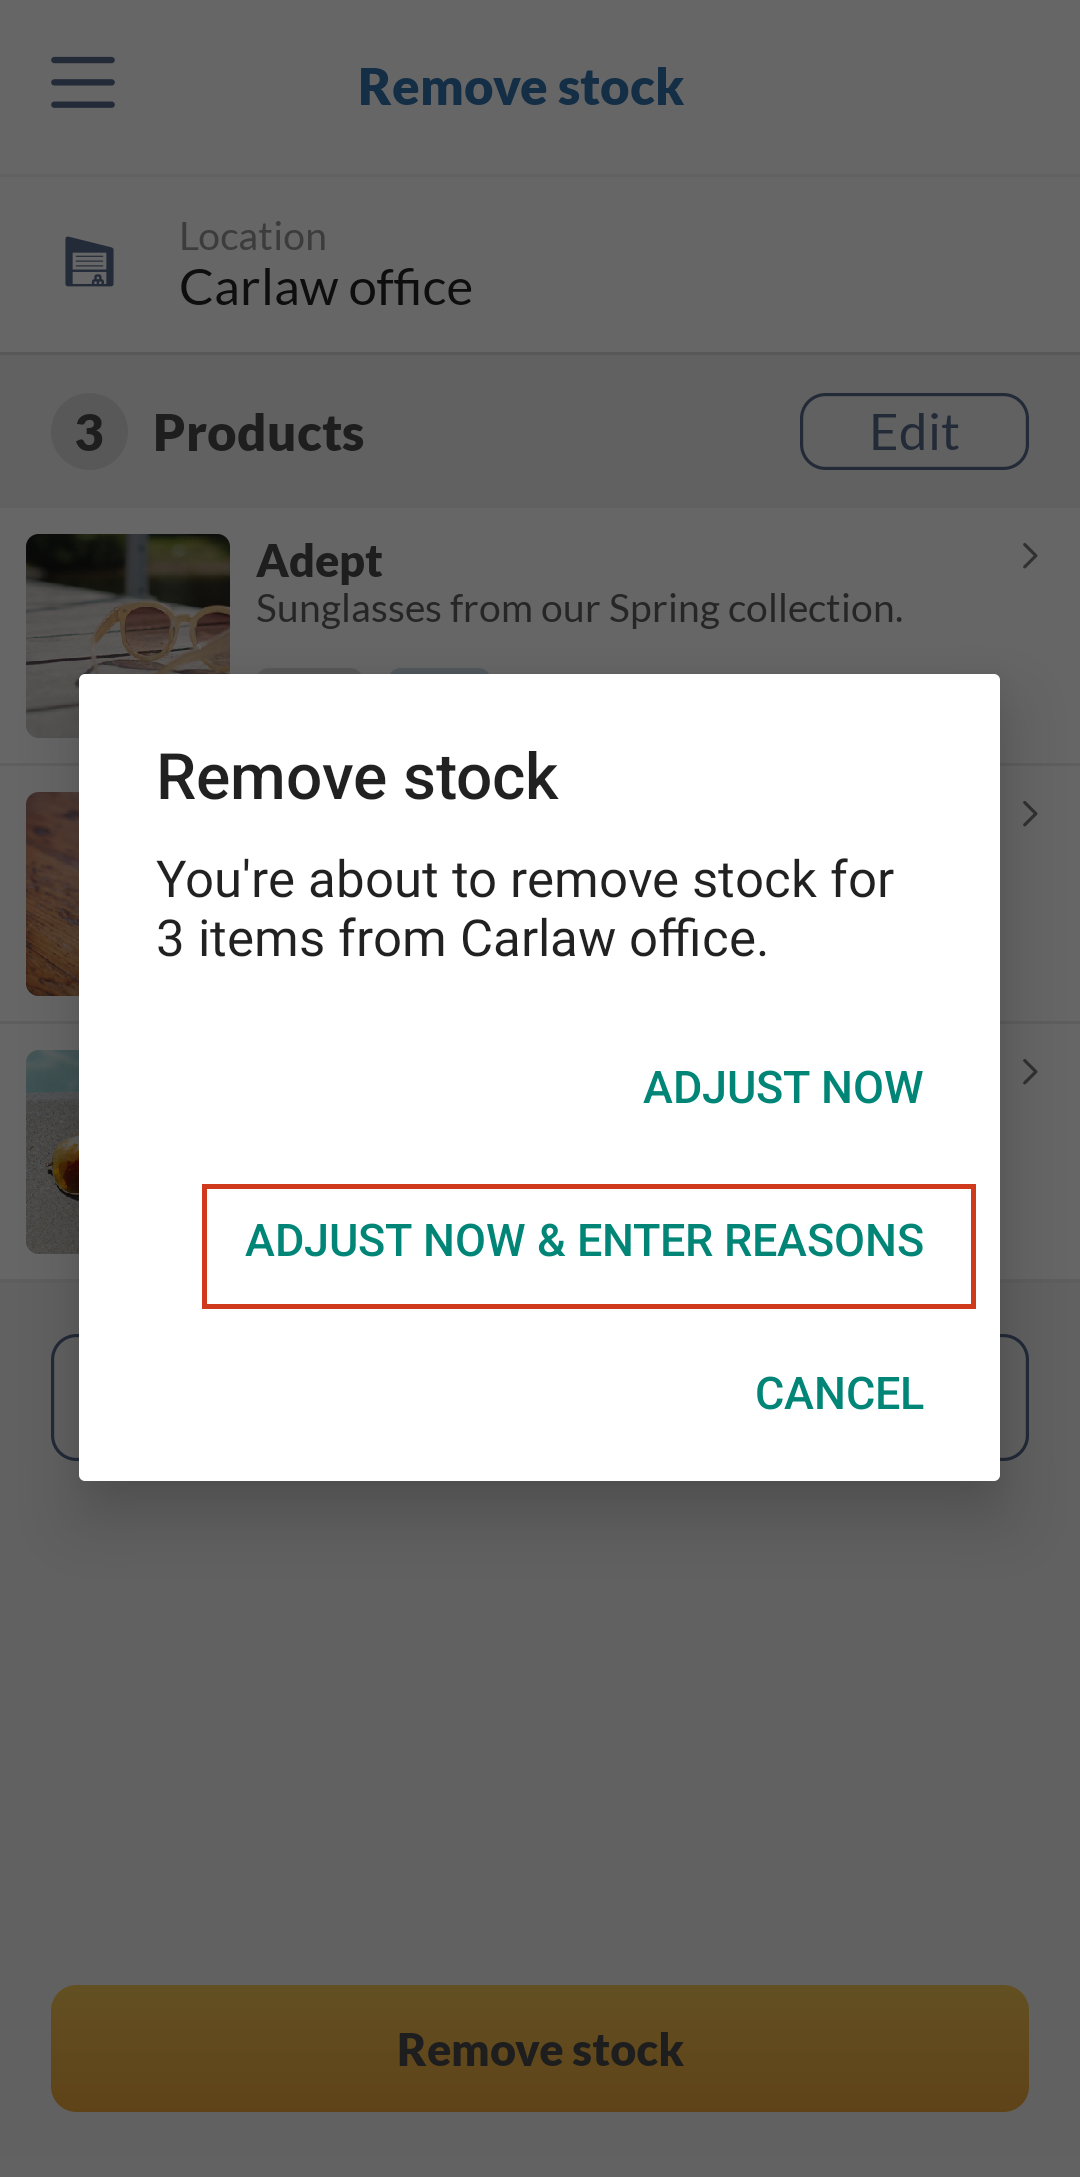
- Process the stock adjustment, when done, tap on the Remove stock or Add stock button.
- On the next screen, tap on Adjust now & enter reasons.
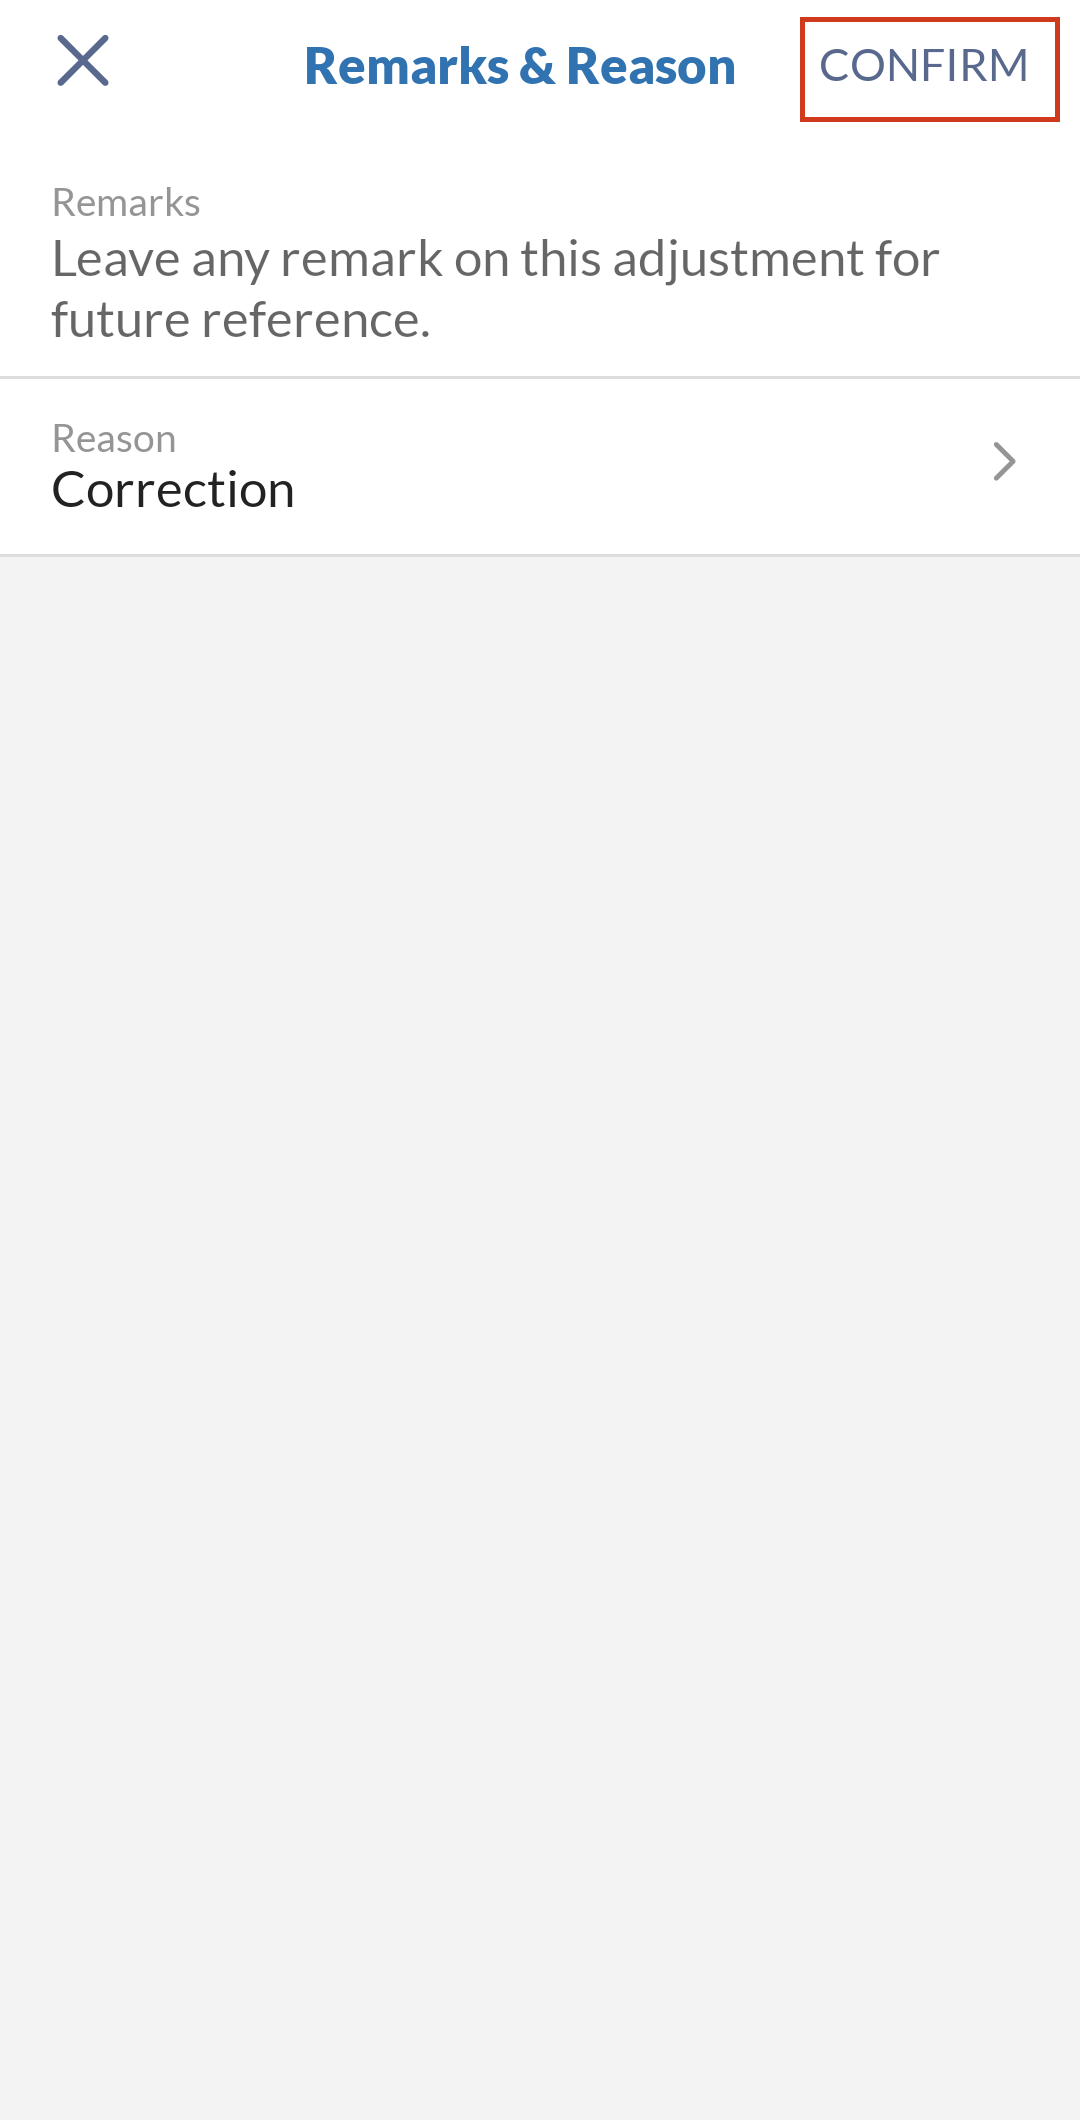
- Select one of the options from the list. If the reason you need isn’t there, you can adjust the Reason drop-down options in the Adjustment reasons section of the Inventory settings of the inFlow web app.
- Tap Confirm when done
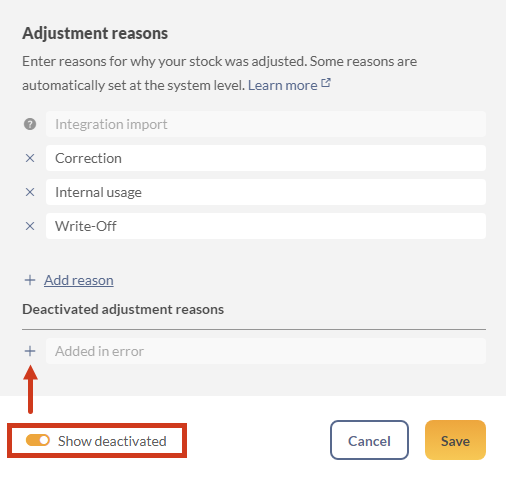
Adjustment reasons
Adjustment reason settings
You can customize the stock adjustment reasons in inFlow to terms your company uses.
- Go to the Inventory settings in inFlow (Main Menu>Options>Inventory.)
- Select Adjustment reasons.
- You can click X to remove any of the existing reasons, or you can change the current reasons.
- When done, click Save.

How to reactivate deactivated reasons
- Under the reason fields, toggle on Show deactivated.
- Click on the + sign next to the inactive reasons to reactivate them.
- Click Save when done.


0 Comments