
How to create and track serial numbers
inFlow simplifies serialized product management by enabling easy creation, purchase, and sale of products with unique serial numbers, ensuring accurate inventory tracking and visibility.
Please note: This feature is only available on select plans or add-ons.
Web
Creating your serialized product
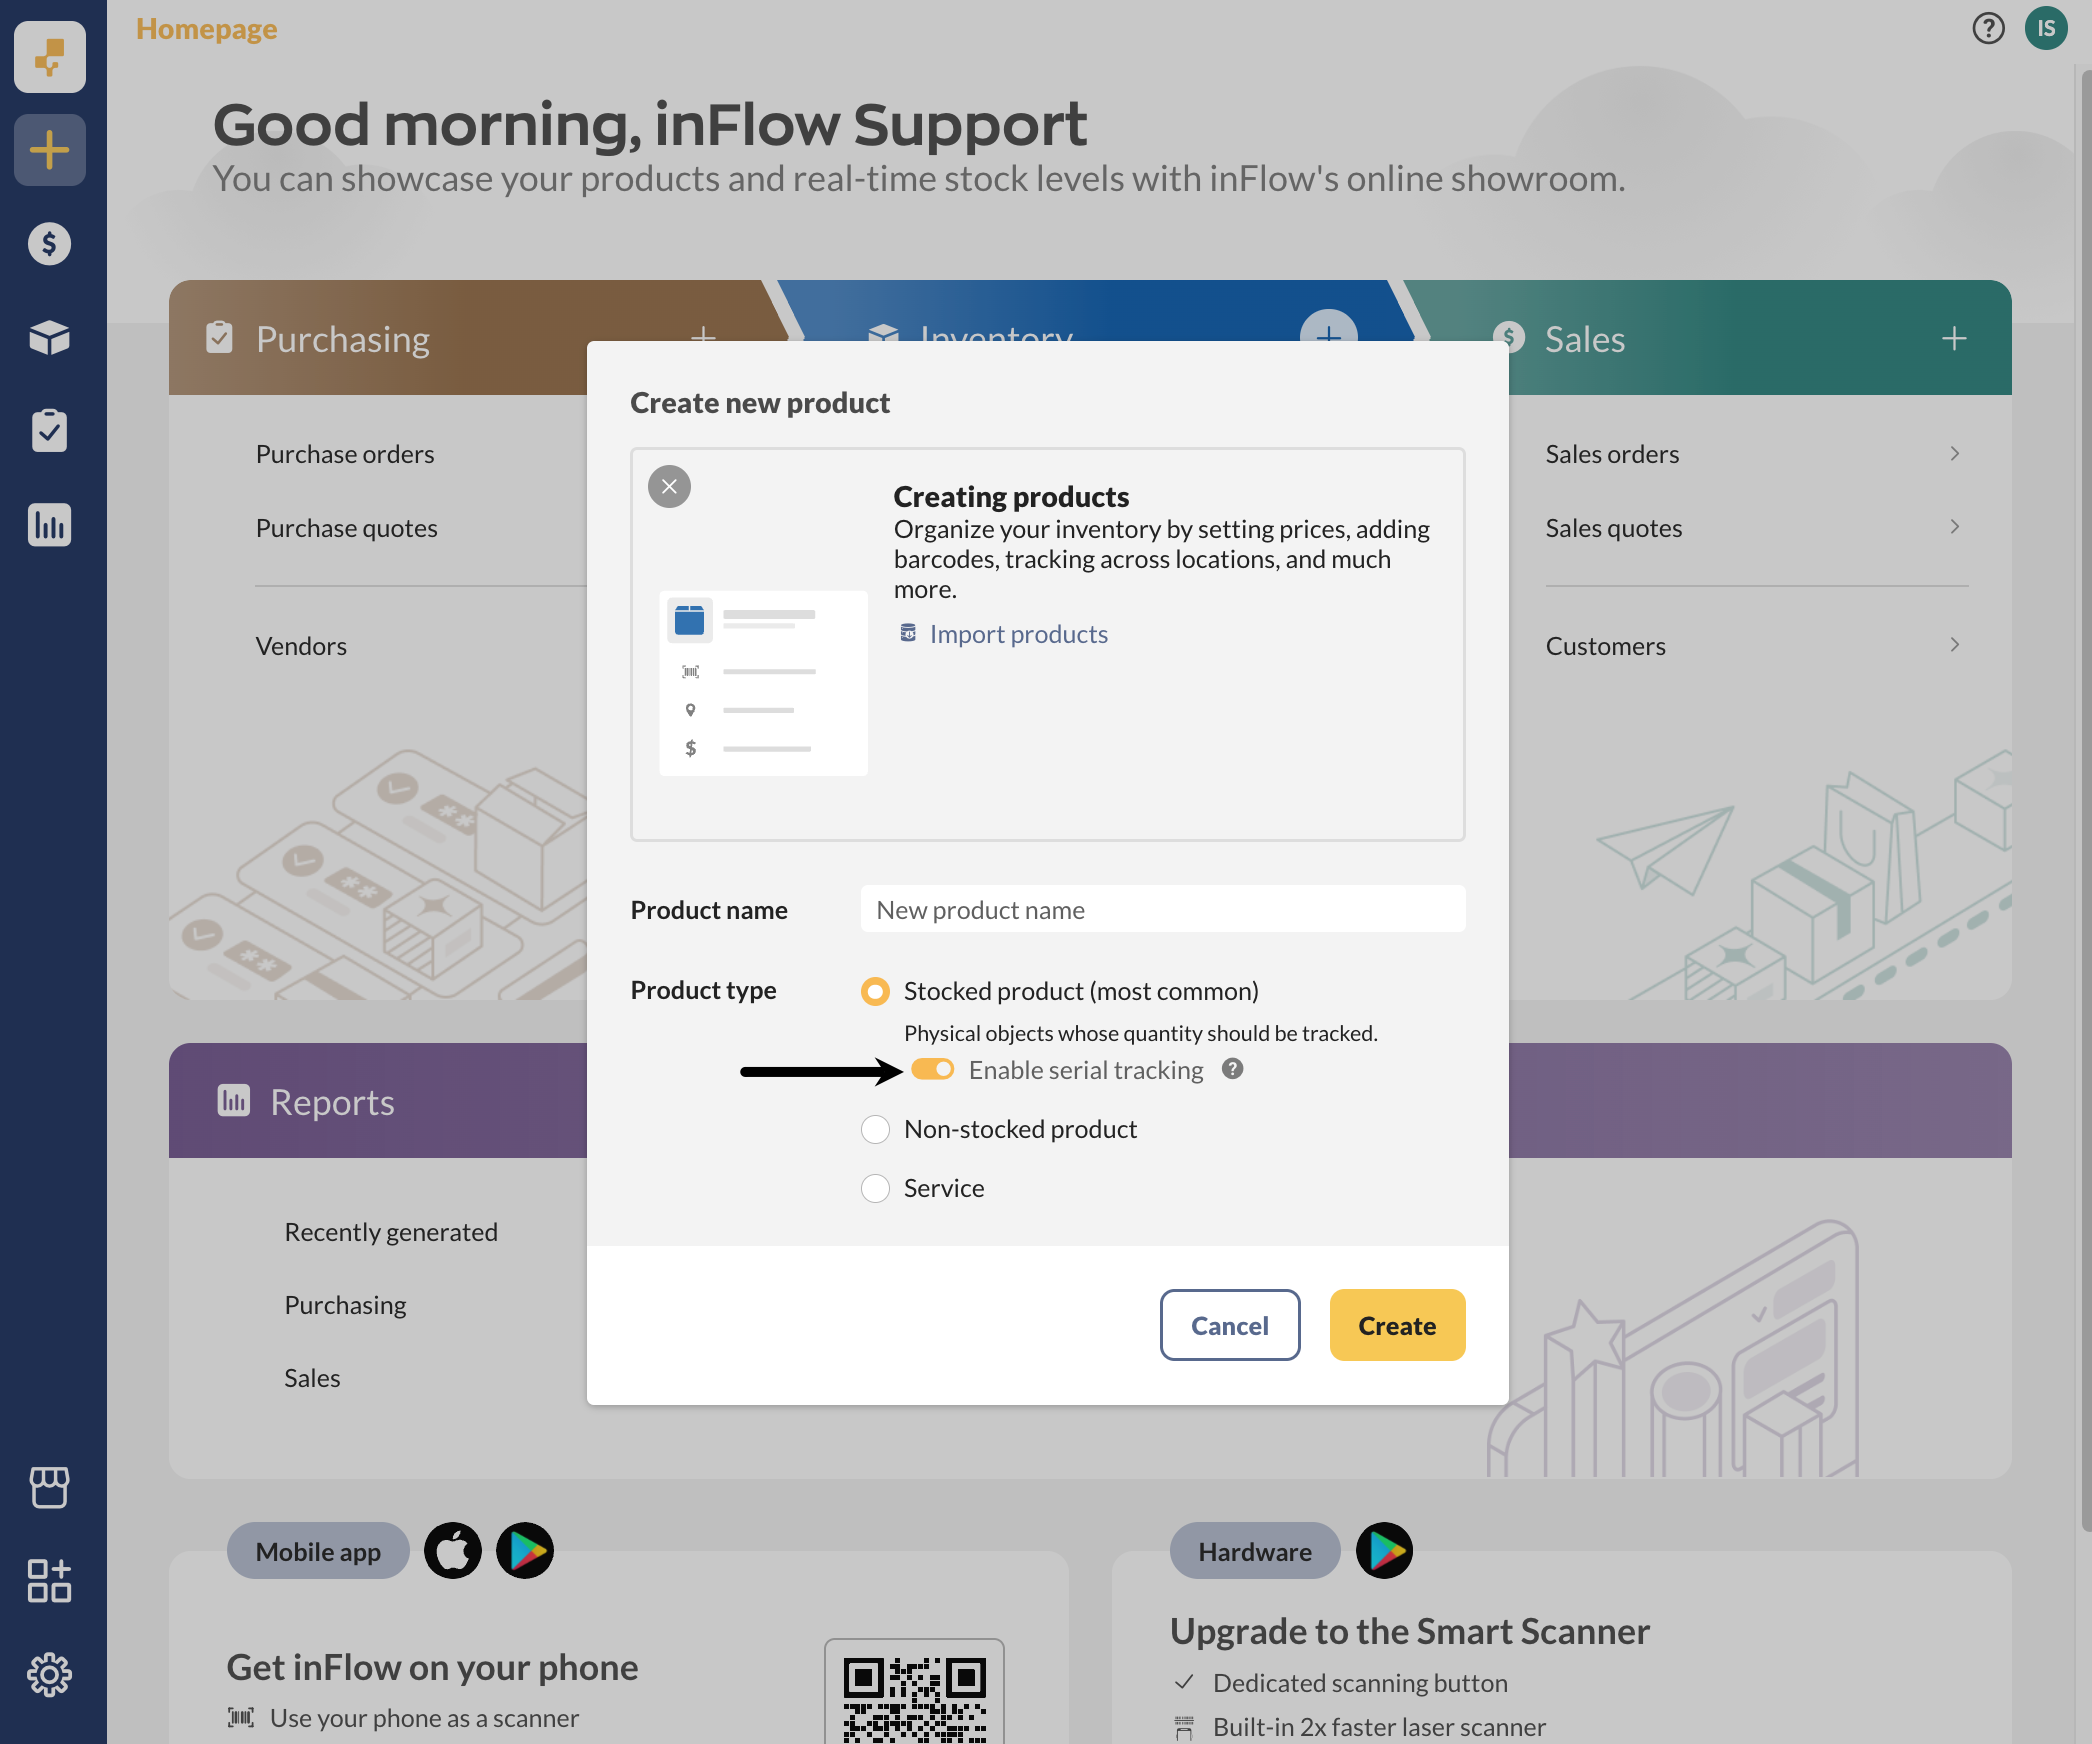
- From the Main Menu, select the Create button, then click Product.
- Enter the name (or part number) in the Product name field.
- Under Stocked product, toggle Enable serial tracking.
- Next, select Create.
A product’s type becomes permanent once saved, so it’s crucial to set up your product and enable serial tracking before receiving stock.
Purchasing your serialized product
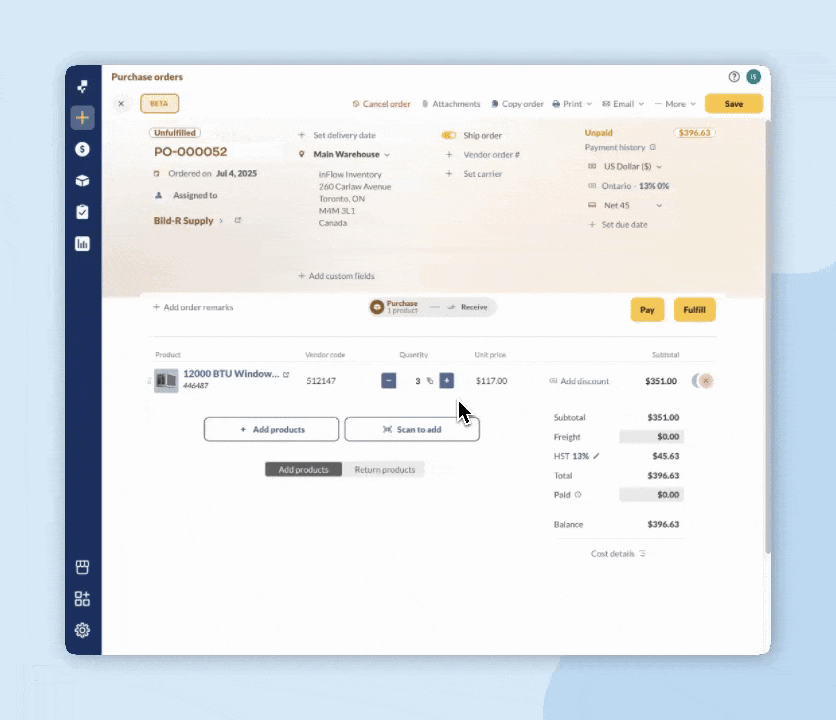
Purchasing serialized products is similar to purchasing other stocked products, with one exception: you’ll want to enter — or have inFlow create — serial numbers.
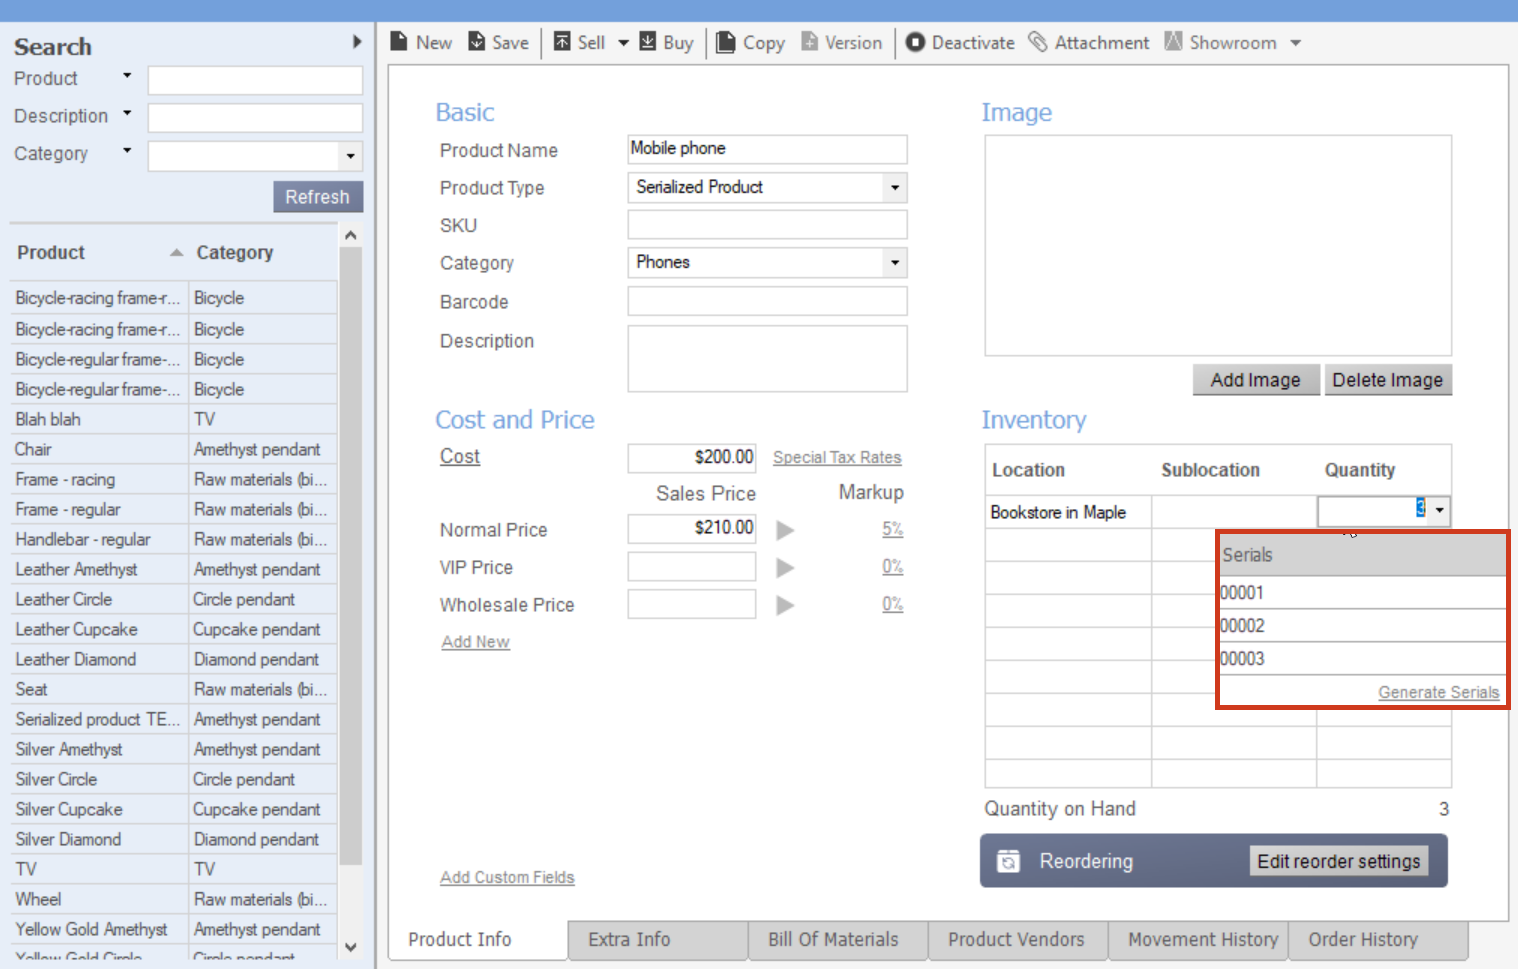
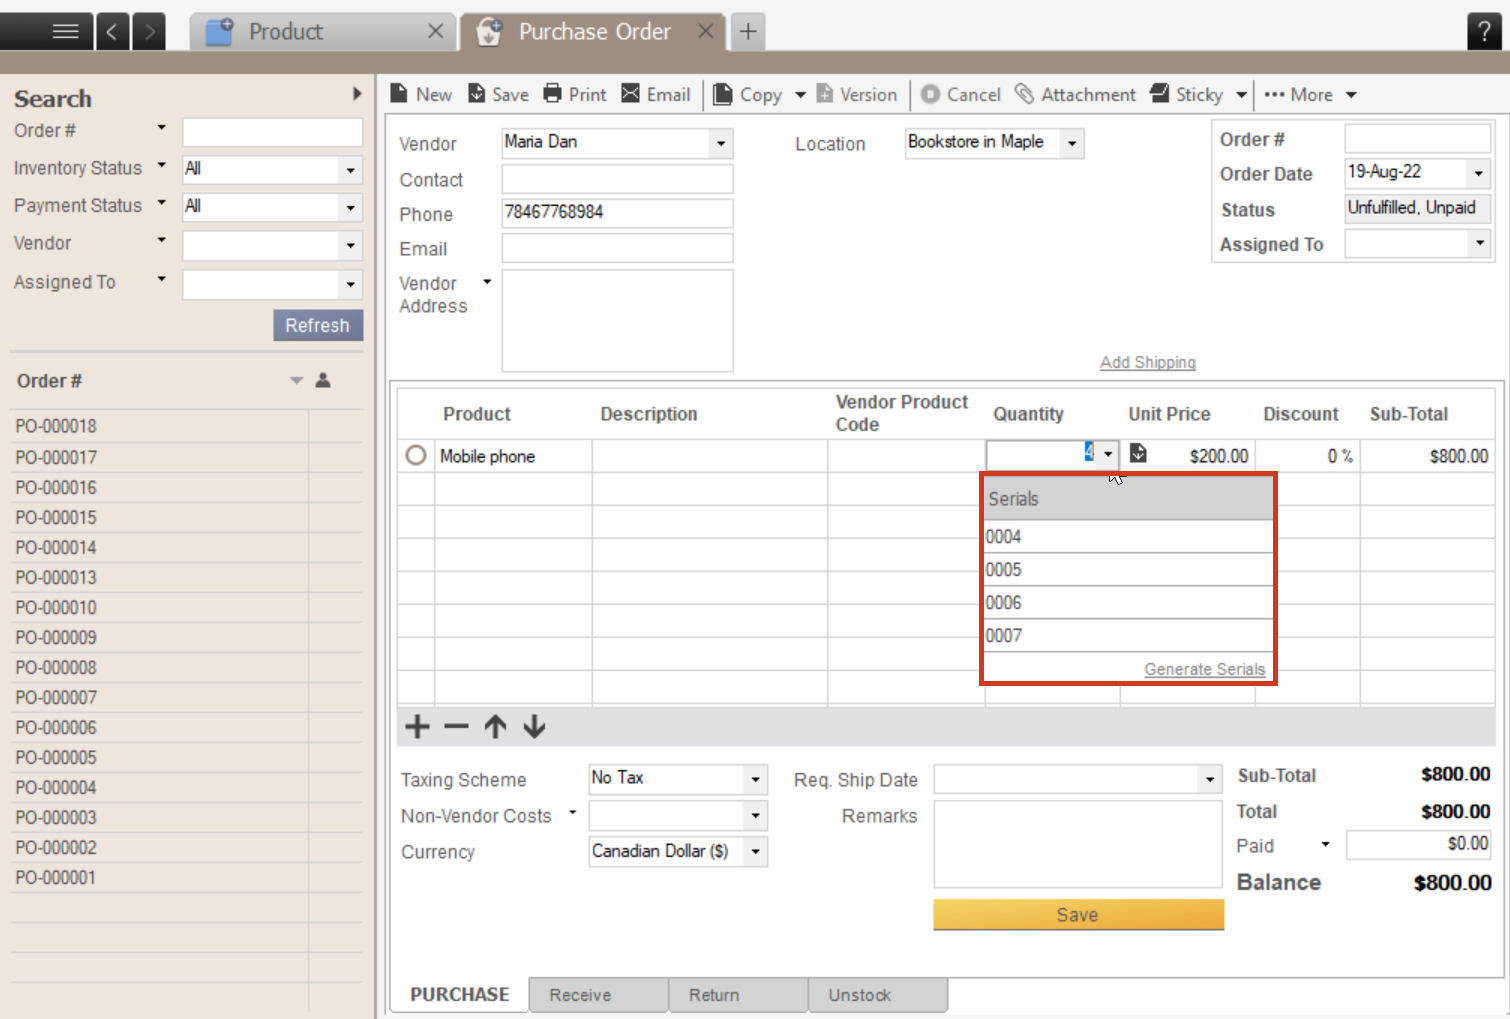
- In a purchase order, select the serialized product from the product list
- Click into the Quantity field to enter the quantity you’ll be buying. When no serials are selected, the icon next to the quantity will remain white.
- On the Purchase or Receive tab, click on the icon in the Quantity field.
- Click Set serials to enter serial numbers manually. Or select Auto-fill for inFlow to generate serial numbers for you. Once all serials have been added to the purchase order, the icon will be solid blue.
Setting serials on the purchase vs receive tab
If you know the specific serial numbers in advance and want your team to select those particular serial numbers during fulfillment, be sure to enter them in the Purchase tab.
This ensures that the exact serial numbers are required in the Received tab. If you don’t need to specify serial numbers, you can skip this step in the Purchase tab.
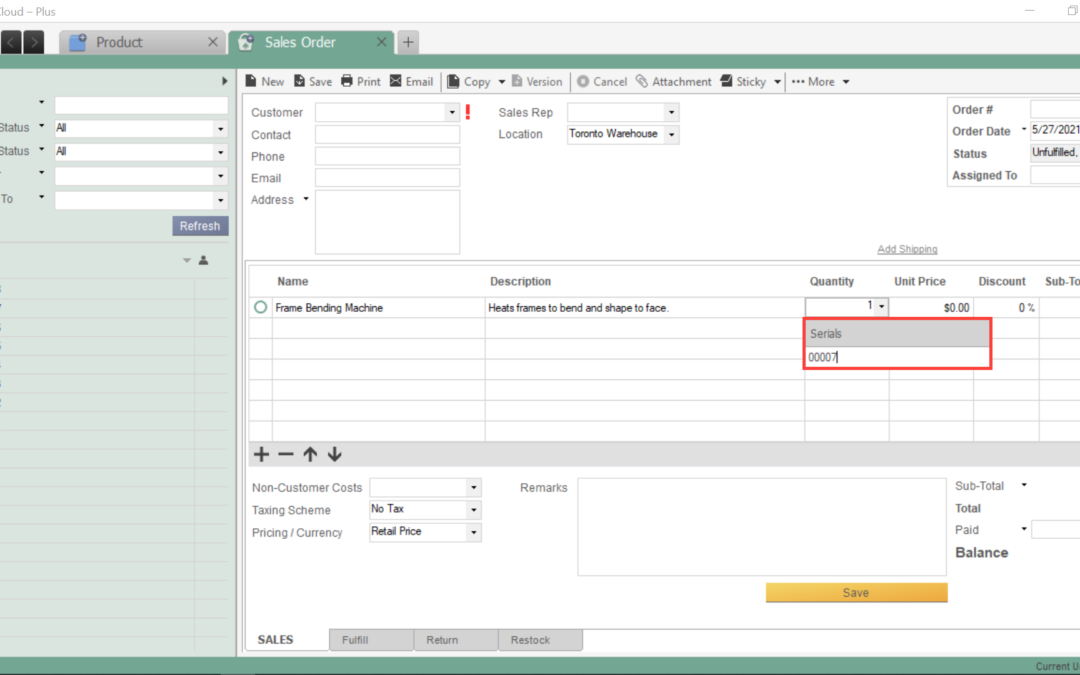
Selling your serialized product
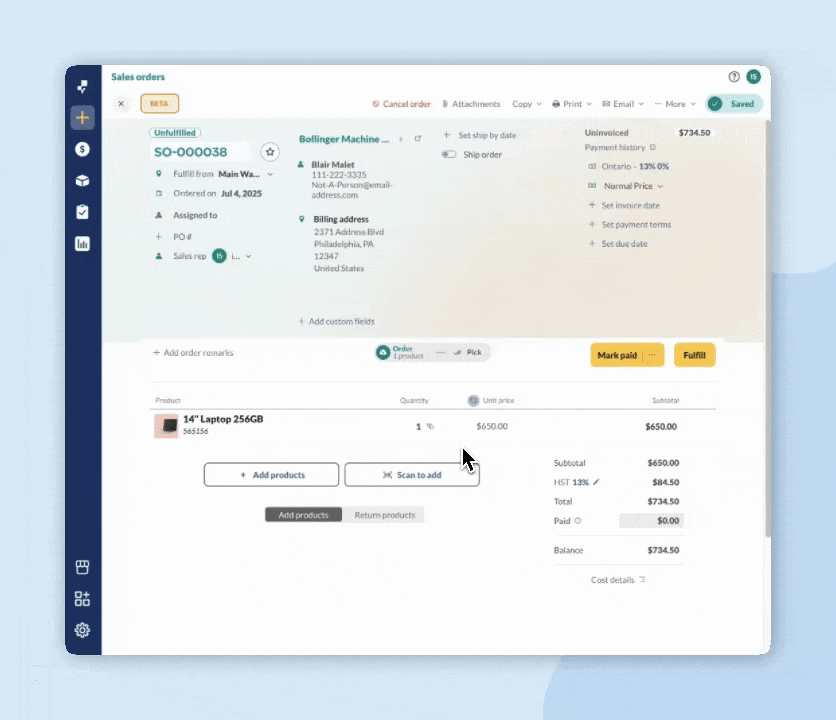
Selling serialized products is similar to selling other stocked products, with one key exception: you must enter the serial numbers for the items you’re selling.
- Create a sales order and select a serialized product.
- Click into the Quantity field to enter the quantity you’ll be selling. When no serials are selected, the icon next to the quantity will remain white.
- On the Order or Pick tab, click on the serial icon in the Quantity field.
- Click Set serials. Select the serial numbers or click Scan to set to scan serial numbers in order.
- Click Save, then save the order when done.
Setting serials on the order vs pick tab
If you know the specific serial numbers in advance and want your team to select those particular serial numbers during fulfillment, be sure to enter them in the Order tab.
This ensures that the exact serial numbers are required in the Pick tab. If you don’t need to specify serial numbers, you can skip this step in the Order tab.
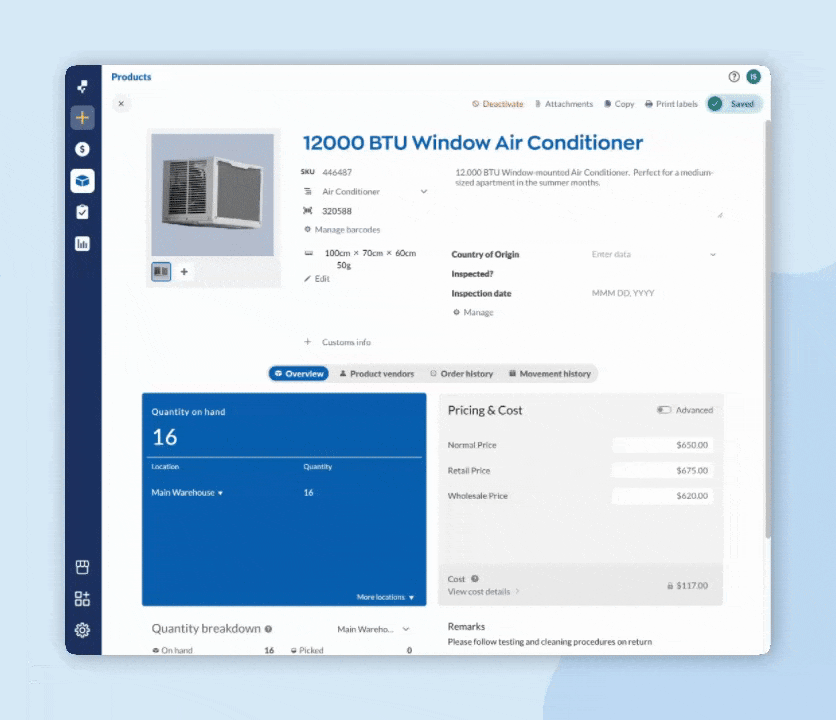
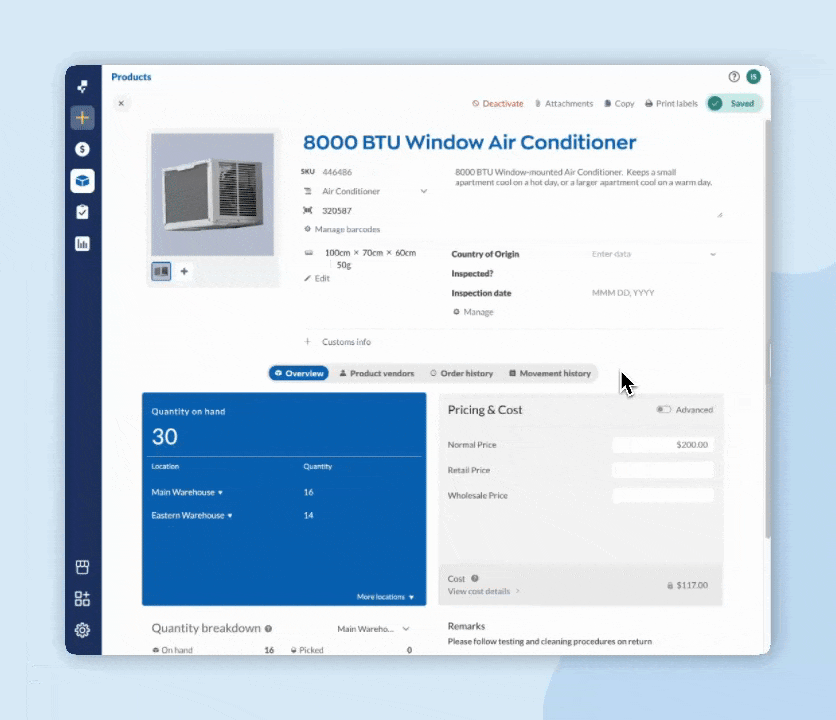
Tracking serials on the product record
Overview tab
On the product record, you can view the serial numbers in stock alongside the product quantities.
Movement history tab
- Open a product record (Main Menu> Inventory).
- Click on the Movement history tab.
- Use the filters to sort serial numbers in the list or to search for one.
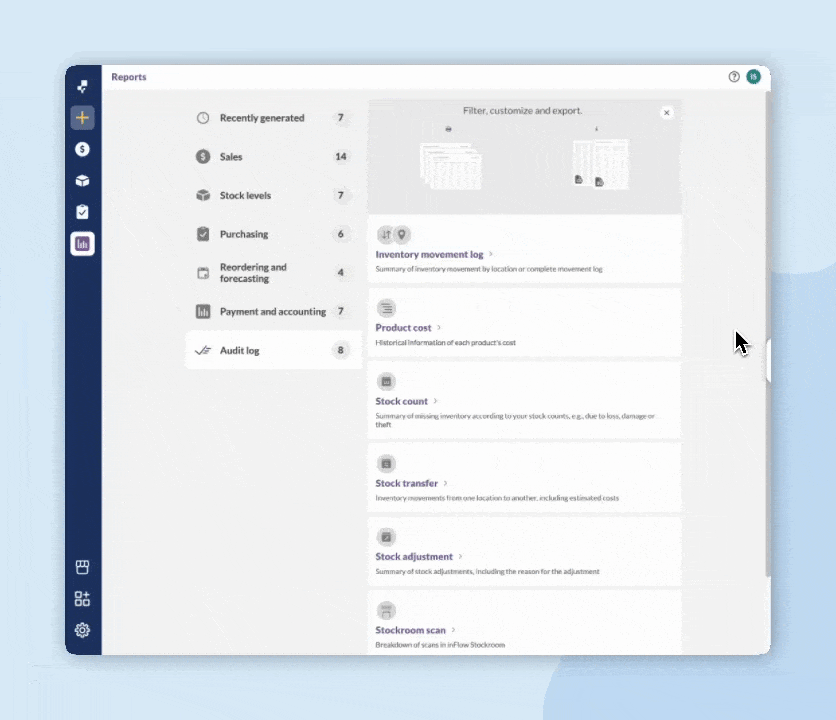
Tracking serials with reports
- Go to Main Menu > Reports.
- Click on Audit log.
- Select Inventory movement log > Details >Select.
- Add the filters you’d like to use, then click Generate to create the report.
Windows
Creating your serialized product
- Create a new product by navigating to Main Menu > Inventory > New Product.
- Enter the name (or part number) in Product Name field.
- Select “Serialized Product” from the Type dropdown.
- Click Save.
- Add serial numbers or generate them automatically (if the items are already in your inventory).
A product’s type is permanent once saved so it’s important to set up your product and choose to make it “serialized” before you start receiving stock.
Now you can move on to purchasing, selling, or tracking your serialized item.
Purchasing your serialized product
Purchasing serialized products is just like other stocked products with one exception you’ll want to enter–or have inFlow create–serial numbers.
To purchase/receive a serialized product
- In a purchase order, choose your product.
- Click into the Quantity field to enter the quantity you will be buying.
- If you click the quantity box, you’ll see a dropdown with a number of boxes corresponding to the quantity you typed in. Here’s where you can either:
a) Enter your serial numbers manually; or
b) Let inFlow generate them for you. - If you’re going to have inFlow generate your serials: Click the link to Generate Serials, where you can specify a Prefix, Next Number, and Suffix for your serial numbers right from this window.
- Complete your purchase order as usual to update your inventory.
You’ll notice that once selected, your serialized item has three dots in its Quantity field. If the dots are colored grey, your serials have not been entered, and you’ll need to follow the steps above. Otherwise, the dots will be colored black, indicating that the serials have been entered.
Selling your serialized product
Selling serialized products is just like other stocked products, with one exception; you’ll want to enter the serial numbers for the items you’re selling.
To sell/ship a serialized product
- In your sales order, choose your serialized item (you’ll see the three dots appear in the Quantity field)
- Click into the Quantity field to enter the number of serialized units you’ll be selling.
- Next, you will have to select the serial number for each unit. To do so, either
a) Click into the box that pops up and start typing in your serial number(s); or
b) Click into the box and begin scanning your serial number (s). - Complete your sales order to update your inventory.
Tracking serials
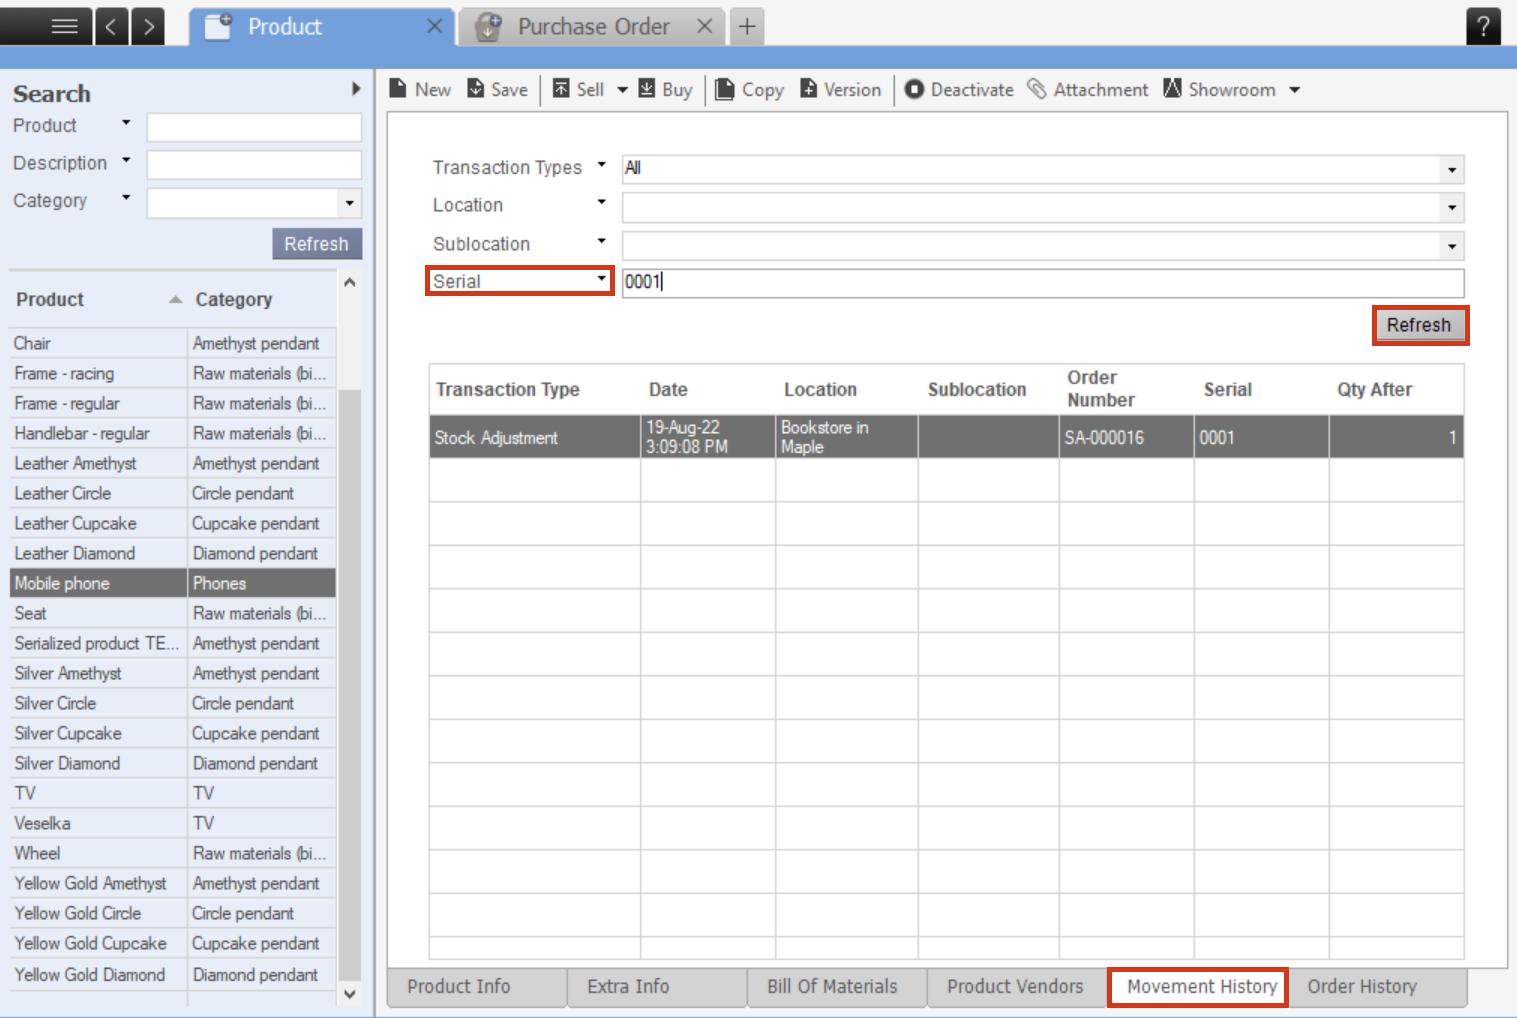
Product record – Movement History tab
Because each serial can have its own movement, we’ve included a Serial filter in the Movement History tab of a product record so you can easily track its movement. You can get to this screen from the Product Record > Movement History tab. Enter in the serial number you want to track in the Serial field and click Refresh.
Movement History screen
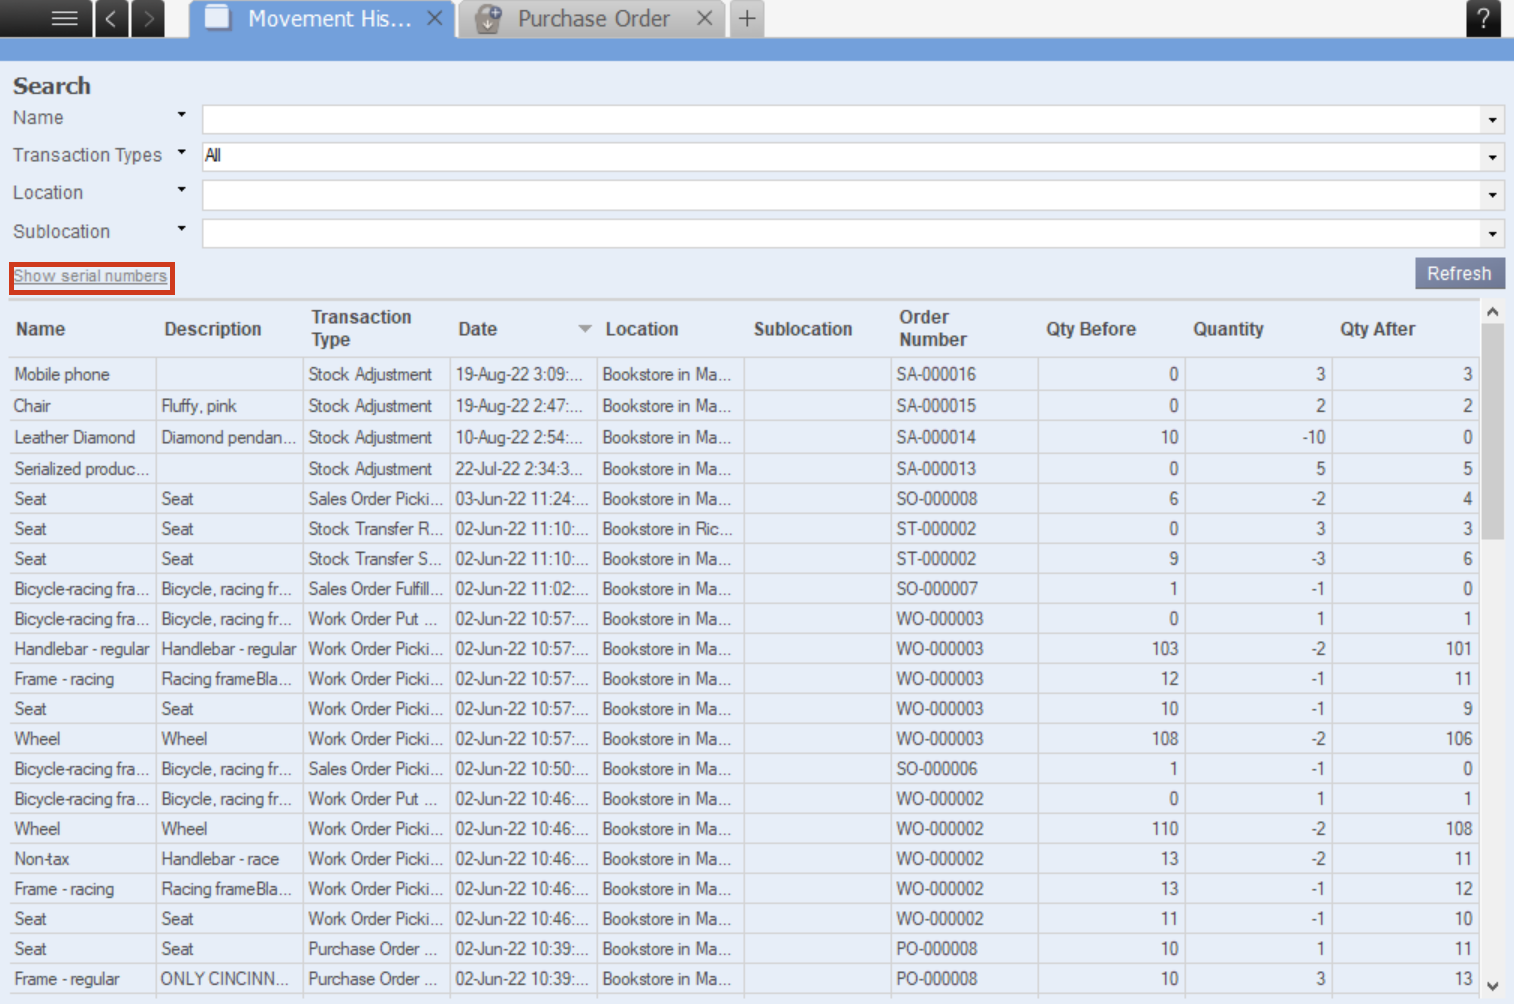
You can also track your serial in the Movement History screen. You can get to this screen by going to the Main Menu > Inventory > Movement History.
Click Show serial numbers to display and filter for the movement of specific serial numbers.
From the Current Stock screen
The Current Stock screen can quickly show you what you have in stock, and you can further break down serialized products by serial number. You can get to this screen by going to the Main Menu > Inventory > Current Stock.
Click Show Serial Numbers to display and filter your quantity on hand by serial number.
Mobile
inFlow Inventory for Mobile
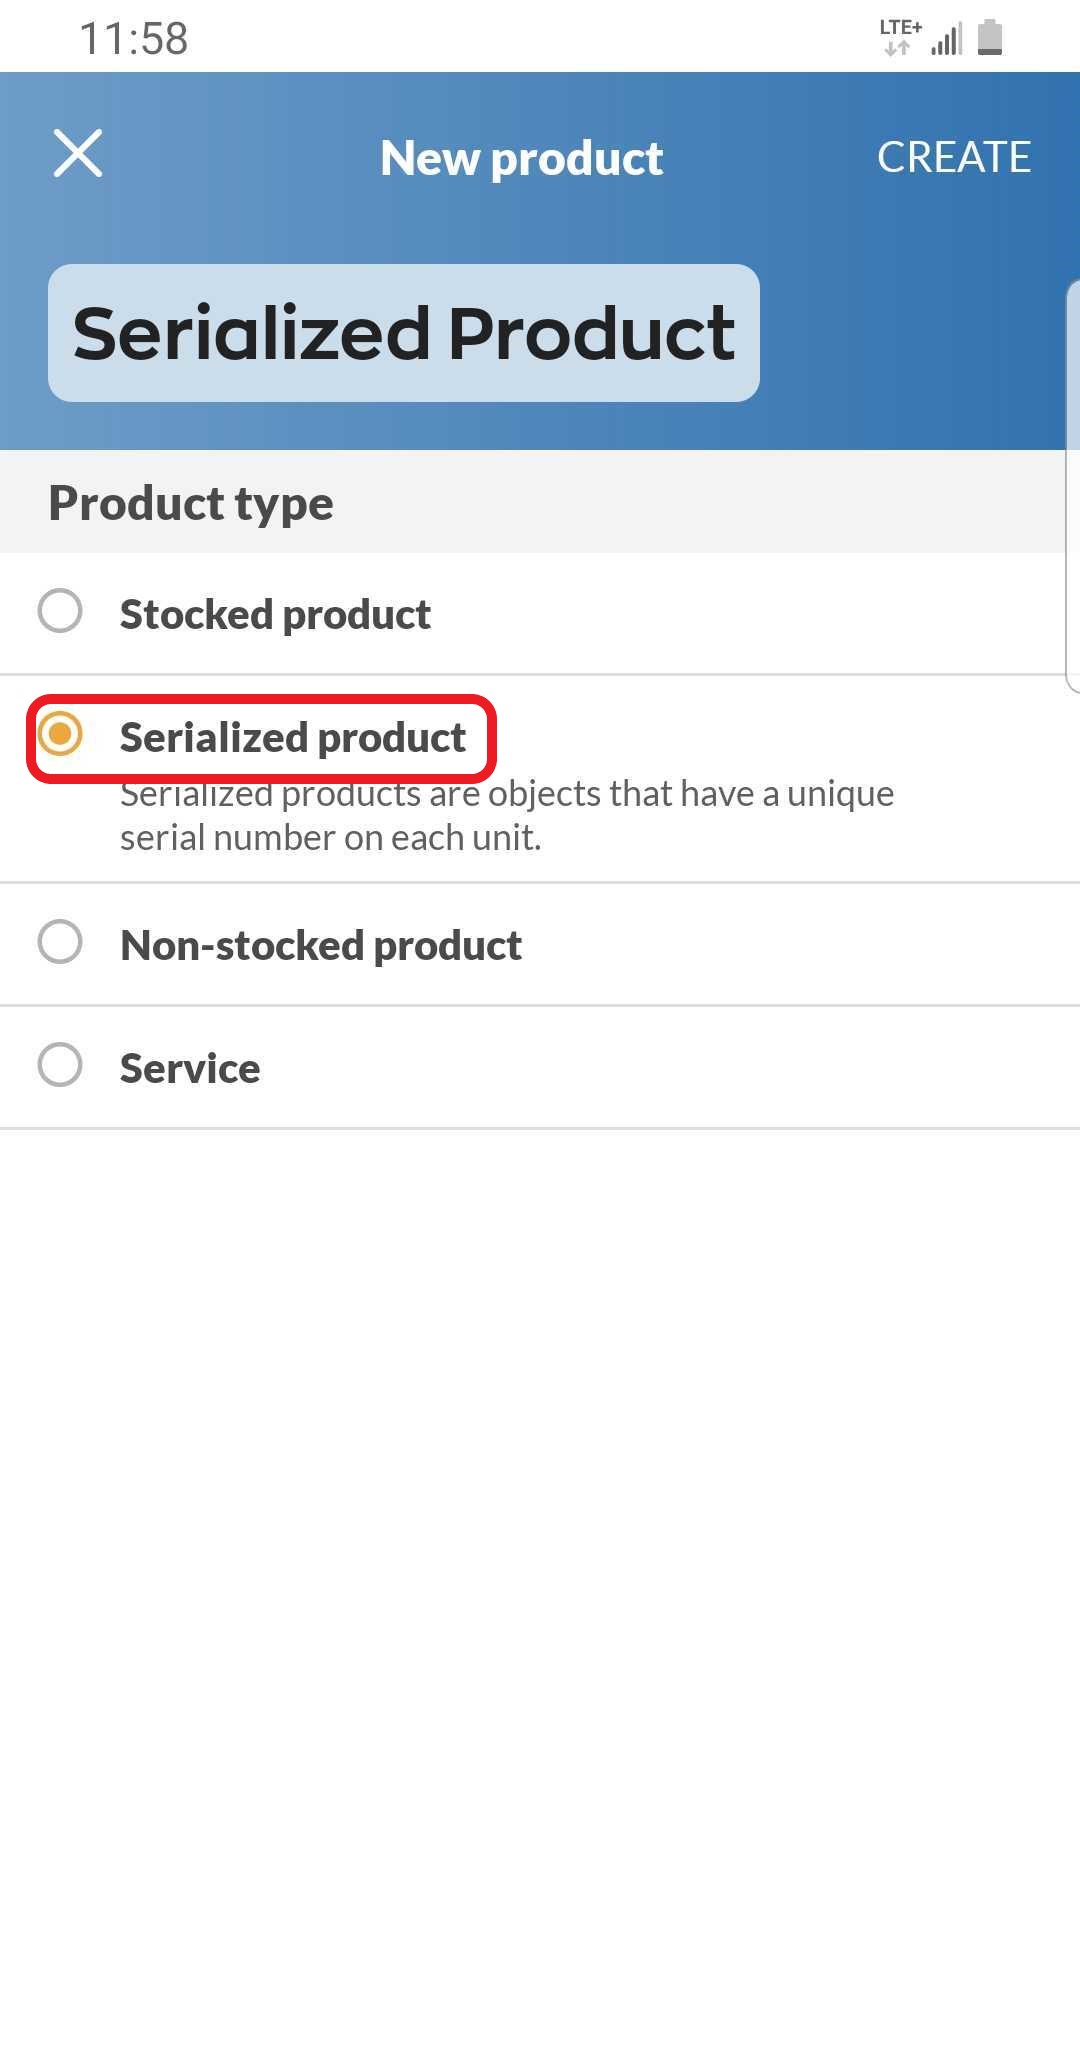
Creating your serialized product:
- Create a new product via the Main Menu > Products > Tap on the + symbol.
- Enter the name (or part number) in the Product name field.
- Select “Serialized Product” from the Product type dropdown.
- Click Create.
A product’s type is permanent once saved, so it’s important to set up your product and choose to make it “serialized” before you start receiving stock.
Now you can move on to purchasing, selling, or tracking your serialized item.
Purchasing your serialized product
Purchasing serialized products is just like other stocked products, with one exception. You’ll want to enter–or have inFlow create–serial numbers.
To purchase/receive a serialized product
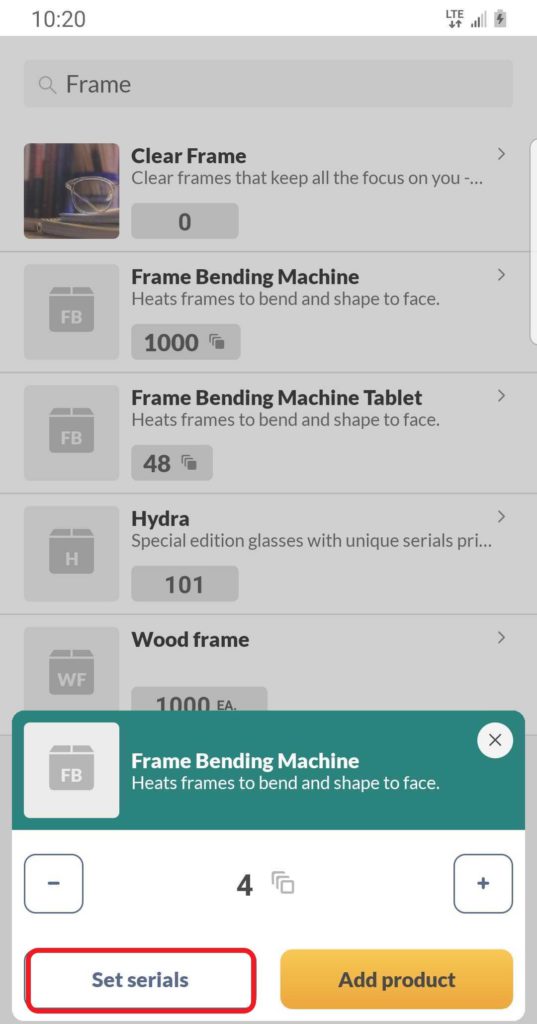
- You can create a new purchase order via the Main Menu > Purchasing > Tap on the + symbol > Create purchase order.
- Select your vendor.
- Click Add product or Scan product and select the serialized product you want to add.
- You can increase/decrease the quantity by using the +/- buttons or by clicking into the quantity field and typing out the number of units you would like to purchase.
- Once you have entered the quantity, you can either fill in your serials before you’ve received your products or wait until they are received to enter the serial numbers. If you know the serial numbers you will be receiving, you may enter them by clicking on the Set serials button.
Note: You can quickly tell which products have their serial numbers set by the color of the icon next to the quantity field. If the icon has a filled-in grey square, that would mean that your serials have been set, but if the square is unfilled, that means the serials have not been set. - Here’s where you can either:
- Enter your serial numbers manually; or
- Let inFlow generate them for you.
- If you’re going to have inFlow generate your serials: Click the gear icon to the left of the empty field. You may add a prefix (left field), suffix (right field), or starting value (middle field), which will then display a preview below, or you could leave it blank and use inFlow’s formatting. If you are happy with how it looks, click Fill serials, then click Done.
- If you would like to manually enter your serials, type the first serial number in the empty field and click Set serial. Repeat the steps for the rest of the serial numbers. You will notice a progress bar showing how many serial numbers you have left to enter. If your product serials are barcoded, you may click the barcode icon at the top left of the screen to scan the serial numbers in.
- Once you are ready to receive the products, tap on the yellow Receive button in the bottom right corner. From here, you can either check off the products one by one or scan their barcodes to receive them. If you haven’t already set your serial numbers, you will be required to do so in the receiving step.
- Click Save once you’re finished with your order.
Selling your serialized product
Selling serialized products is just like other stocked products, with one exception; you’ll want to enter the serial numbers for the items you’re selling.
To sell/ship a serialized product
- You can create a new sales order via the Main Menu > Sales > Tap on the + symbol > Create sales order.
- Select your customer.
- Click Add product or Scan product and select the serialized product you want to add.
- You can increase/decrease the quantity by using the +/- buttons or by clicking into the quantity field and typing out the number of units you would like to sell.
- Once you have entered the quantity, you can either:
- Select the serial numbers right away by clicking the Set serials button and choose from your existing serial number list; or
- Add the product to the order and set the serial numbers once you are picking them up for fulfillment.
Note: You can quickly tell which products have their serial numbers set by the color of the icon next to the quantity field. If the icon has a filled-in grey square, that would mean that your serials have been set, but if the square is unfilled, that means the serials have not been set.
- Once you are ready to pick the products, tap on the yellow Fulfillment button in the bottom right corner. From here, you can either check off the products one by one or scan their barcodes to receive them. If you haven’t already set your serial numbers, you will be required to do so in the fulfillment step.
- Click Save once you’re finished with your order.


we have the serialised products but cant see a list of them anywhere – how would we do a stock check?
How can I modify an existing stocked product into a serialized product like in the inFlow Cloud app?
Thanks