 Fellow Canadians: All inFlow plans are available in Canadian dollars





Key takeaways
- Migrating from QuickBooks to dedicated inventory software doesn’t mean replacing QuickBooks. The inventory system handles stock and orders, while QuickBooks remains the accounting system.
- Clean data is critical to a smooth migration. Audit products, vendors, SKUs, costs, and stock counts before importing, and leave obsolete records behind.
- Back up your QuickBooks data before making changes, and understand exactly what information syncs between the two systems and in which direction.
- With inFlow and QuickBooks Online, orders and inventory values flow from inFlow to QuickBooks, while payments sync both ways. Records created directly in QuickBooks do not sync back to inFlow.
- Before going live, validate inventory values, product data, and test transactions across both systems. Continue focused audits during the first few weeks to catch discrepancies early.
Migrating from QuickBooks to dedicated inventory software means moving stock tracking into a purpose-built system, while QuickBooks continues to handle your accounting, connected via an integration that syncs orders and inventory values between the two.
QuickBooks handles accounting well, but its inventory features are basic by design. As order volume grows, teams hit walls: barcode scanning, lot and serial tracking, mobile stock updates, and multi-warehouse control are all missing or limited. You don’t have to abandon QuickBooks to solve this. Pairing it with a dedicated inventory system lets each tool cover what it handles best. This guide covers the full migration, from deciding what data to move through validating the books after setup.
Why move inventory off QuickBooks?
Businesses move inventory off QuickBooks when manual stock updates, disconnected sales channels, and missing warehouse features start causing real errors, even though QuickBooks remains the right tool for accounting.
QuickBooks inventory tracks quantities and costs well enough for a young business. The limits show up in three places as you scale:
- Warehouse operations. QuickBooks isn’t designed to scan barcodes, run pick/pack/ship workflows, or update stock from a mobile device on the floor. Staff end up retyping item details into a desktop system, which is slow and error-prone.
- Advanced tracking. Serial numbers, lot numbers, and expiry dates matter in regulated categories like food, cosmetics, and medical supplies. QuickBooks doesn’t track them natively, which creates compliance and recall risk.
- Multi-channel stock. When Shopify, Amazon, and eBay each update independently, stock levels drift apart and overselling spikes during busy periods. A dedicated system maintains one source of truth and keeps listings current.
A dedicated inventory platform closes those gaps, then pushes the financial results back into QuickBooks so your books stay accurate without double entry.
Note: QuickBooks Desktop Enterprise’s Advanced Inventory add-on does support barcode scanning, serial or lot tracking (though not both at once), and multi-location control natively. However, it’s available only on Enterprise’s higher tiers and it’s part of the QuickBooks Desktop line Intuit is in the process of winding down.
What does “migration” actually involve?
Migration involves moving your product and stock data into a dedicated inventory system, connecting that system to QuickBooks, and shifting your day-to-day inventory work into the new tool while QuickBooks continues to own the accounting record.
People often assume you “replace” QuickBooks. You don’t. The inventory system takes over day-to-day stock work, while QuickBooks keeps the accounting record. After migration, you manage products and orders in the inventory system, and it sends invoices, bills, and inventory values into QuickBooks.
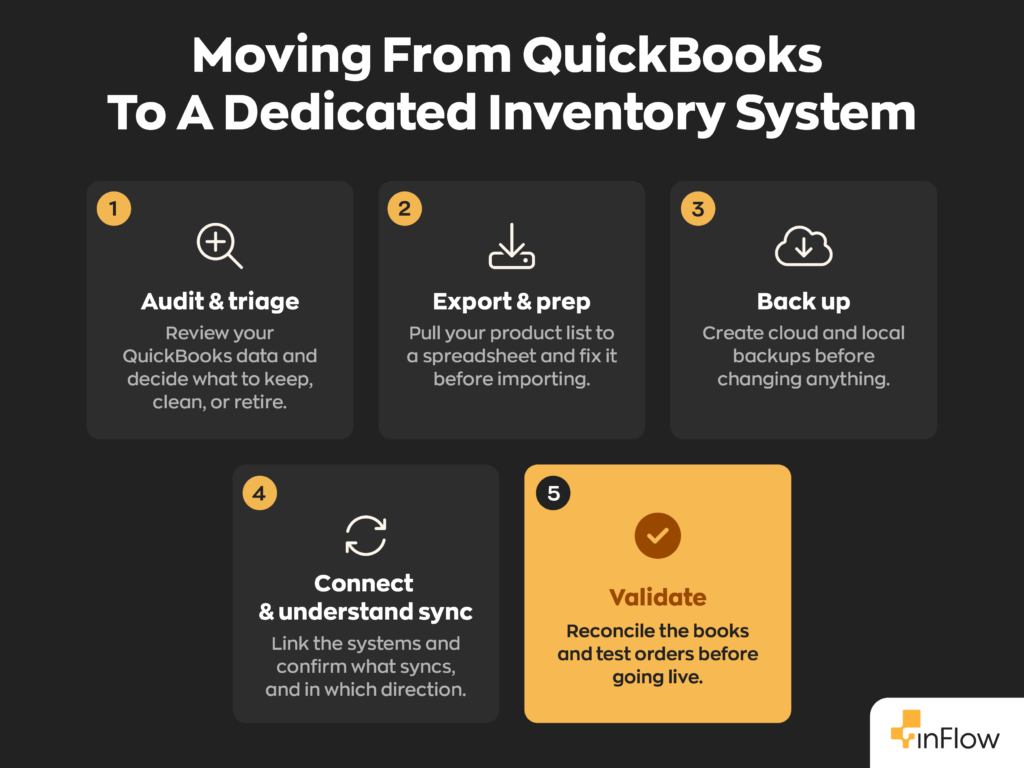
Step 1: Audit and triage your QuickBooks data
Start by reviewing your current QuickBooks records and deciding what to keep, what to move, and what to retire. Clean data going in is the single biggest predictor of a smooth migration, which is the main reason one inFlow migration finishes in 4-8 weeks and another drags on.
Old products, inactive vendors, and inventory counts that don’t match the physical shelf will all cause problems on import. Before exporting anything, get your file in order: reconcile your accounts, review your item and vendor lists for duplicates or inactive records, and confirm on-hand totals against a physical count. QuickBooks Desktop users can also run QuickBooks’ built-in Verify Data utility to surface any underlying file issues first.
To make the cleanup decision-friendly, sort every record into one of three buckets:
| Bucket | What goes here | Action |
| Keep | Active products, current vendors, accurate stock counts | Export and import as-is |
| Move (clean first) | Products with messy SKUs, duplicate entries, or stale costs | Fix in a spreadsheet, then import |
| Retire | Discontinued products, dead vendors, obsolete records | Leave behind; don’t carry clutter forward |
Carrying forward only “Keep” and cleaned “Move” records keeps your new system lean from day one.
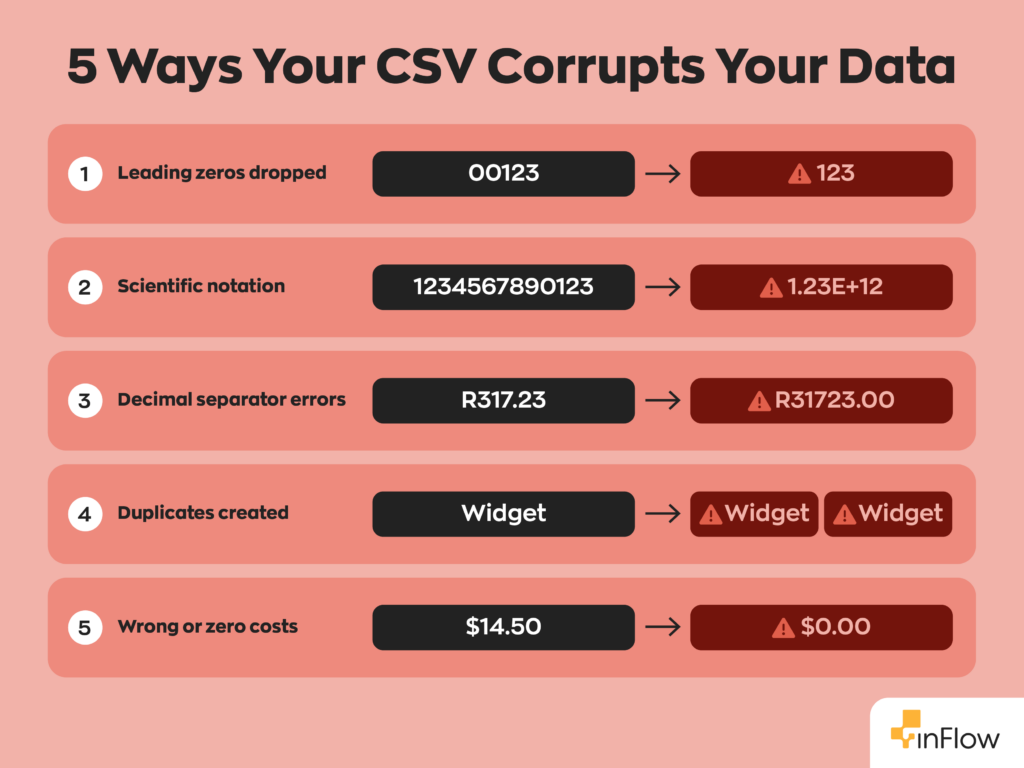
The five data problems inFlow’s support team sees most
These are the most frequent import issues inFlow’s support team encounters:
- Duplicate products: created by re-imports or spreadsheet errors.
- SKU corruption: Excel strips leading zeros or converts long SKUs to scientific notation (e.g., 1.23E+11).
- Wrong or zero costs: costs that import blank or incorrect.
- Decimal-separator errors: international formatting like R317.23 importing as R31723.00.
- Leading-apostrophe artifacts: Excel’s CSV export adds a hidden apostrophe that spawns unintended duplicate products.
Catch these in the spreadsheet during your “Move (clean first)” pass, before import.
Step 2: Export and prepare your product data
Export your “Products and Services” list from QuickBooks to a spreadsheet, then organize product names, SKUs, costs, and vendor details before importing into the new platform. Careful preparation here prevents mapping errors later.
One detail trips up most migrations: product type. Dedicated inventory systems that integrate with QuickBooks Online generally require products to be set as non-inventory types in QuickBooks, so the inventory system, not QuickBooks, owns stock tracking. This sounds alarming, but it doesn’t mean QuickBooks stops accounting for your stock.
The inventory system becomes the source of truth for item-level quantities, and it pushes the total inventory value back to QuickBooks, so your books stay accurate even though QuickBooks no longer counts units itself. If your QuickBooks products are currently inventory-type, they will conflict with the integration and can cause double entries as both systems try to update stock value. Convert them before connecting the two systems, not after.
With inFlow specifically, you don’t need every product set up in both systems first. The platform generates the non-inventory products in QuickBooks as needed, so you can centralize in inFlow and let it backfill QuickBooks.
Step 3: Back up everything before you change anything
Create both a cloud and a local backup of your QuickBooks data before migrating, covering customers, inventory, invoices, and financial reports. As you stop running inventory in QuickBooks and start running it in the new system, create a backup in case anything goes wrong during the migration.
As of early 2026, QuickBooks Online Advanced stores backup tools under Gear Icon → Back up company. Desktop users can create a local backup file directly. Make at least two copies in two locations. The time this takes is small against the cost of reconstructing lost records.
Step 4: Connect the inventory system to QuickBooks and understand what actually syncs
Connect the two systems through the inventory platform’s QuickBooks integration, then confirm exactly which records sync and in which direction. This is the step where overpromised “two-way sync” claims cause the most confusion, so it’s worth getting precise.
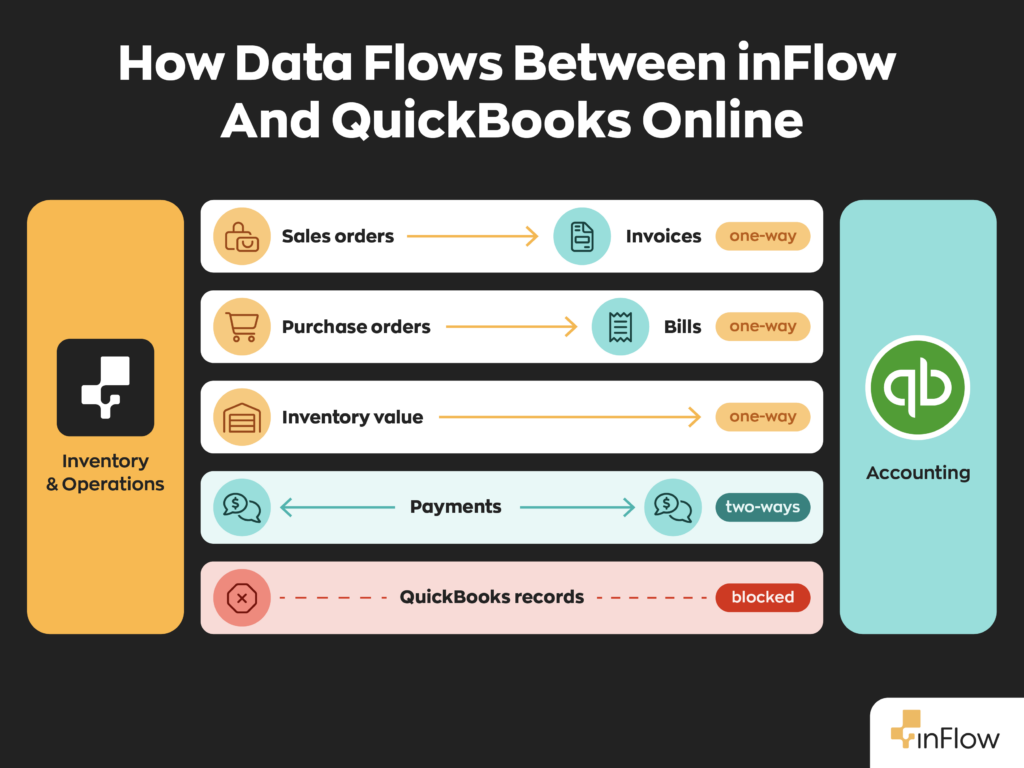
Most QuickBooks Online integrations run in one direction rather than both. Using inFlow as an example, here’s the honest breakdown:
| Sync type | Direction | Notes |
| Sales orders → invoices | inFlow → QuickBooks Online | A sales order marked invoiced in inFlow becomes an invoice in QuickBooks |
| Purchase orders → bills | inFlow → QuickBooks Online | Also updates the Inventory Assets and Cost of Goods Sold accounts, the two ledger accounts that track what your stock is worth and what it costs you when sold |
| Inventory value | inFlow → QuickBooks Online | inFlow’s stock value sets QuickBooks’ total inventory value |
| Payments | Two-way (push and pull) | Pay in either system; the payment syncs to the other |
| Records created in QuickBooks | Does not sync back to inFlow | QuickBooks-side records can’t be pushed into inFlow |
The takeaway: the dedicated inventory system becomes the system of record for inventory and orders, and it feeds QuickBooks. This is also what keeps your balance sheet right after you switch products to non-inventory type. The inventory value flowing from the new system is how QuickBooks knows what your stock is worth. Changes you make directly in QuickBooks won’t flow backward. Knowing this up front prevents the most common post-migration support tickets.
Step 5: Validate the books before going live
After importing data and connecting the systems, run a trial balance in both QuickBooks and the new inventory system and compare the totals before you rely on the connection. The figure that should agree is your inventory asset total: if it matches across both systems, your data carried over cleanly, and a gap points to records that didn’t transfer. Catching mismatches now is far cheaper than untangling them after weeks of live transactions.
Watch for records that don’t carry over cleanly: a missing invoice, an unmapped purchase order, a stock adjustment that didn’t land. These create reporting gaps between accounting and inventory. To validate:
- Run a Trial Balance in both systems and reconcile the totals.
- Confirm your inventory value matches between the inventory platform and QuickBooks.
- Spot-check a handful of products: do on-hand counts, costs, and SKUs match the source data?
- Push one test sales order and one test purchase order, then confirm they appear correctly in QuickBooks.
Run focused audits during the first few weeks after migration. Small discrepancies caught early rarely become month-end reconciliation headaches.
What to expect after migration
After migration, expect better reporting, faster warehouse workflows, and an adjustment period for staff as daily routines shift from desktop entry to mobile-first scanning.
Dedicated systems offer inventory reporting that goes well beyond accounting records, such as movement history, cost logs, and in many cases reorder-point suggestions based on sales history. The operational win is on the floor: scanning to receive, transfer, and fulfill replaces manual notes and after-the-fact spreadsheet updates. The payoff can show up in the numbers, too: one solar company cut its COGS by 20% after moving to a dedicated system.
The human side matters most. Staff who’ve used an older system for years need a short ramp. Mobile-first apps shorten it, because scanning is faster and more intuitive than typing once the habit forms. Plan for a week or two of parallel patience rather than an overnight switch.
Why this migration is more urgent in 2026
QuickBooks Desktop 2023 reached the end of Intuit’s support on May 31, 2026, prompting many businesses to reassess their setup now rather than later.
Per Intuit’s official policy, the software still opens after that date, but connected services stop. This includes QuickBooks Desktop Pro Plus, Premier Plus, Mac Plus, and Enterprise Solutions 23.0, and payroll, bank feeds, payment processing, and Intuit support all lose support on this date. For businesses on that version, it’s a sensible point to move inventory into a dedicated cloud system rather than patch an aging desktop setup.
Across inFlow’s own sales calls and onboarding notes, QuickBooks (both Desktop and Online) is by far the most common system new customers are leaving for inventory, while keeping it for accounting. The pattern holds across food and beverage, manufacturing, cosmetics, industrial, and HVAC.
FAQ
Do I have to stop using QuickBooks to use dedicated inventory software?
No. The standard setup keeps QuickBooks as your accounting system and adds a dedicated inventory platform on top. The inventory system manages stock and orders, then syncs the financial results into QuickBooks.
Is the QuickBooks integration a true two-way sync?
Usually not. With inFlow and QuickBooks Online, orders and inventory value push from inFlow into QuickBooks, and only payments sync two-way. Records created directly in QuickBooks don’t push back into inFlow. Always confirm the specific sync directions for your tool before going live.
How long does a QuickBooks inventory migration take?
For inFlow customers, migrations typically run 4–8 weeks, depending mainly on how clean the existing data is. Data cleanup drives the timeline more than the technical import. Businesses that audit and triage their records first (Step 1) consistently land at the faster end of that range.
What’s the most common migration mistake?
Carrying over dirty data and leaving products as inventory-type in QuickBooks. Both cause sync errors and double entries. Clean your data and convert products to non-inventory types before connecting the systems. If you’re still weighing systems, it’s worth comparing your options before you commit.
0 Comments