

Key takeaways
- Cycle counts help maintain continuous inventory accuracy by physically counting inventory to ensure levels match those in your system.
- Cycle Counting can be done in small subsets to avoid shutting down operations.
- Common causes of inventory discrepancies include breakage, misplacement, data-entry errors, and general warehouse chaos.
- Successful cycle counting requires clear objectives, choosing the right method (like ABC or random sampling), and maintaining a consistent schedule.
- Best practices include using inventory software and barcodes, prioritizing high-value or fast-moving items, and regularly reviewing counting procedures.
- Common cycle counting methods include ABC analysis, random sampling, control group counting, and spot checking, and many businesses combine multiple methods.
- inFlow streamlines cycle counts with printable count sheets, item selection tools, split-count workflows, and automated adjustments based on counted quantities.
As one of the most common and effective tools to audit inventory accuracy, cycle counting is where a small subset of inventory is counted on a specific day, allowing for continuous stock accuracy without the need for total inventory shutdowns. This method identifies discrepancies, improves accuracy, and ensures inventory records match physical counts. Cycle counting is commonly used to maintain inventory control and improve demand forecasting by regularly verifying inventory levels, reducing errors, and enhancing operational efficiency in warehouses and retail settings.
The value of cycle counting
Even on a perpetual inventory system, there are a lot of things that can happen to your stock levels. Stuff can break inside your warehouse, items can get lost while reorganizing, and people can make mistakes while recording quantities. These factors can cause your records to deviate from what’s actually on the shelf.
As such, cycle counts can improve accuracy and organization and streamline workflows. Cycle counts are ways for your business to fight back against the chaos that can bungle inventories and set the record straight.
General steps for successful cycle counting
The following are some essential steps to ensure successful cycle counting and maintain accurate inventory records:
- Define objectives: Establish clear goals for the cycle counting process, such as improving inventory accuracy or identifying discrepancies.
- Select cycle counting method: Choose a method that fits your operation, such as ABC analysis, geographic counting, or random sampling.
- Determine frequency: Decide how often different inventory items should be counted, based on factors like sales volume or item value.
- Schedule counts: Develop a manageable schedule that minimizes disruption to daily operations.
- Prepare environment: Ensure the counting area is organized and accessible; remove obstacles and hazards to streamline the process.
- Train staff: Provide comprehensive training to staff involved in counting, focusing on accuracy and consistency.
- Conduct counts: Execute the physical count, ensuring data is collected systematically and entered accurately into the inventory system.
- Analyze discrepancies: Compare physical counts to system records, investigate variances, and adjust records if necessary.
- Report findings: Document results and share with relevant stakeholders to inform decision making.
By following these steps for cycle counting, businesses can achieve more accurate inventory records, which ultimately leads to improved operational efficiency and customer satisfaction.
Best Practices for Cycle Counting
Implementing a robust cycle counting process involves several critical best practices that help maintain inventory accuracy and streamline operations. Best practices include:
- Implementing technology: Utilize inventory management software and barcode systems to enhance accuracy and efficiency. Barcodes really are your best friend when it comes to inventory management.
- Focusing on high-impact items: Prioritize items with high value or turnover for more frequent counts.
- Regularly reviewing processes: Continuously assess and refine cycle counting procedures to improve accuracy and efficiency.
- Integrating with broader inventory management: Ensure cycle counting is part of an integrated approach to overall inventory control.
These steps and practices lay the foundation for robust inventory management, fostering reliability and cost efficiency in operations.
Cycle Counting Methods
Notable cycle counting methods include the following:
- ABC Analysis: Inventory items are classified into three categories—A, B, and C—based on their importance and value. ‘A’ items are counted more frequently than ‘C’ items to ensure high-value products are accurately tracked.
- Random Sample Counting: Inventory is counted at random intervals and involves selecting diverse items for counting. This method helps in identifying discrepancies across varied inventory without predictable patterns.
- Control Group: A specific group of items is consistently counted throughout the year. This helps in tracking ongoing accuracy improvement over time for selected inventory sections.
- Spot Checking: Triggered by discrepancies or anomalies, spot checking involves immediate recount of specific items to ensure accuracy and troubleshoot potential issues in inventory counts.
Some organizations may also choose to use a combination of these methods to ensure accuracy.
How to use inFlow Inventory Software for cycle counting
To start out, it’s feasible to use an Excel count sheet template to manage inventory. However, eventually, you’ll likely benefit from upgrading to a more comprehensive system such as inFlow’s software.
Like our other workflows, you’ll ideally have a few people to help with counting. We suggest having one person, likely a supervisor, who prints and completes the count sheets in inFlow. In addition, you should have at least two people to help with counting. This can help speed the task up and allow you to double-check the counting process.
Otherwise, all you’ll need is:
- inFlow Inventory for Windows;
- A few pens;
- A printer that supports A4 and Letter paper for printing out the count sheets.
We suggest counting overnight with staff on a night shift. This will cause fewer disruptions to your operation. Also, you can consider hiring an external team to count your inventory (yep, there are specialists whose job is to help other businesses count). If you don’t have a team of three, then the acting supervisor can do double-time and also help with the counting themselves.
Stage 1: Decide which products or locations to cycle count
In this process, if you’re acting with two counters and a supervisor, the supervisor should create a new count sheet in inFlow and then select the “Add Items By…” button. From this window, they should:
- Add all the items to the count sheet (if you count everything in one session).
- Add a subset of items, either by location or category (if you can’t count everything at once).
Once the supervisor makes a selection, the items should be added to the count sheet and then saved.
If you can’t complete everything on the count sheets, that’s okay too. inFlow Inventory can split out the counted items and prepare a new count sheet with just the uncounted items from this session. If you’d like to do this, the supervisor should use the “Copy” button in the action bar and then select “Split Count.”
Stage 2: Preparing the warehouse for a cycle count
The most crucial aspect of the process is that no physical inventory movements should occur during a cycle count. Once you start the process of counting, the warehouse should stop order picking, order receiving, and stock transfers.
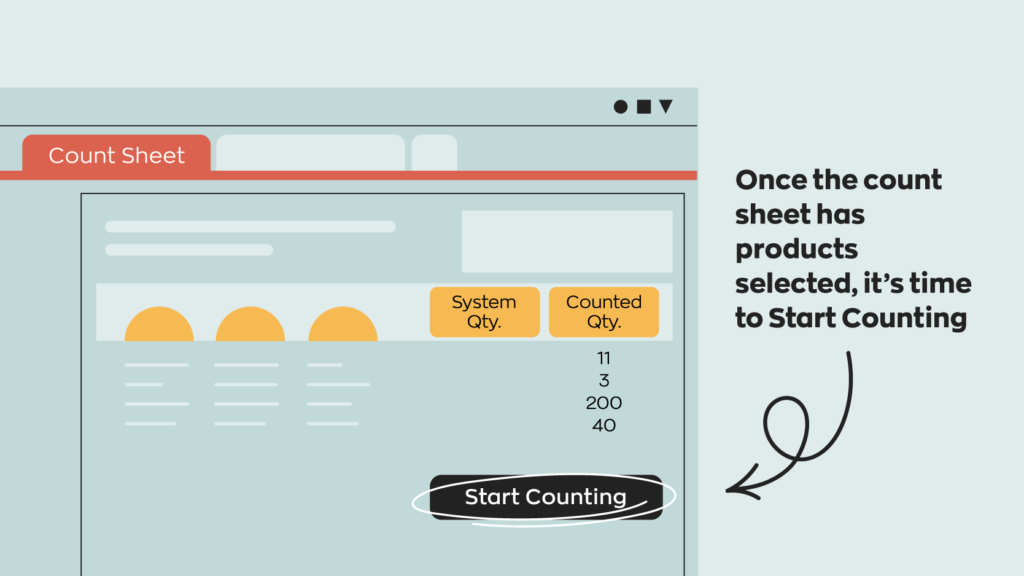
The supervisor should communicate this information to the warehouse teams before the cycle count begins. When it’s time to start, the supervisor selects the “Start Counting” button inside of the count sheet in inFlow Inventory for Windows.
Then the supervisor should print two copies of the count sheet; we suggest placing the second copy aside for now. The first counter should take one or two pages, starting from the top of the stack (e.g., the first page).
The second counter should also take one or two pages, starting from the back of the stack (e.g., the last page). This guarantees that the pickers don’t start on the same products and get in each other’s way. It also allows you to increase the accuracy of a count by double-checking — more on this later.

We recommend starting the count before you print the count sheets so that the “System Quantity” is displayed on the printout. This gives the counters some idea of how much inventory should be there. We don’t recommend blind counts (no quantities on the printed page) because the counters won’t have any idea if products are missing.
Stage 3: Starting your cycle count
Each counter must then head to the warehouse with their pages and count the products. The quantity that they count should be written into the “Counted Quantity” column.
As each page is completed, the counters should return the completed sheets to the supervisor and receive new sheets to count (if applicable).
Optional stage for increased accuracy
When all pages are completed, the supervisor should bring up the second copy of the count sheet.
The goal of this step is to get the counters to double-check one another’s work. As such, the first picker should be given one or two pages from the bottom of the stack, and the second picker should be given pages from the top of the stack
Once this second copy of the count sheet has been completed, the supervisor and counters should review the “Counted Quantity” column for each item. If there are any discrepancies, these should be resolved by counting those items again.
At this point, we recommend consolidating the final numbers onto a single copy of the count sheet and treating that as the master version.
Stage 4: Completing the cycle count in inFlow
At this point, the job of the counters is done, and it’s up to the supervisor to enter the “Counted Quantity” values. If the counting was completed in time, the supervisor should select “Complete & Adjust.”
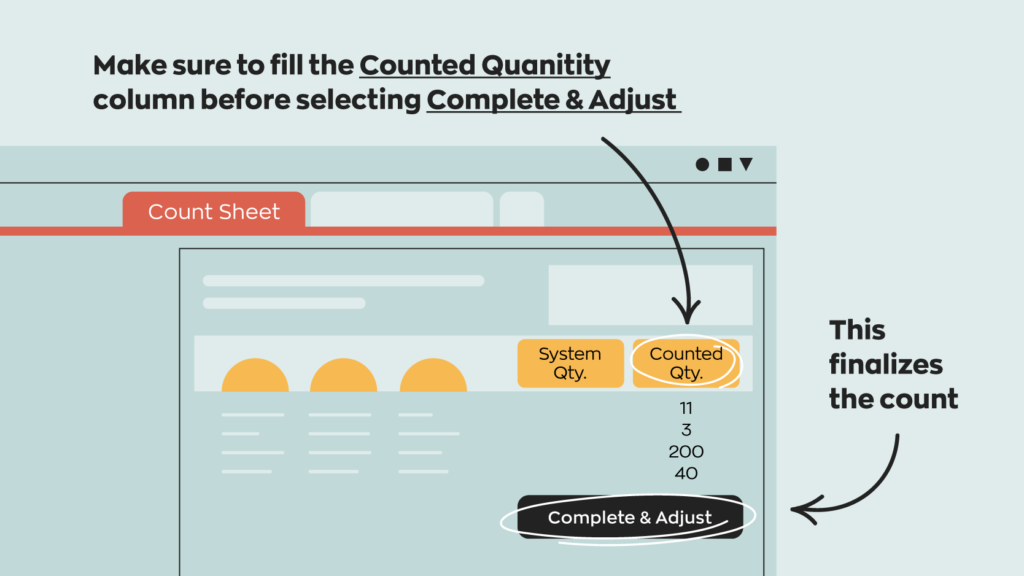
This will ensure that records reflect precisely what was counted on the warehouse shelves. If there is still counting left to be done, the supervisor should select the “Copy” button in the action bar and select “Split Count” sheet by “Counted.”
As described earlier in this article, splitting a count sheet will only apply changes to the counted items. Any leftover items will be automatically copied to a new count sheet to make it easier to continue next time.
Extra tip: Report on cycle counts vs. physical inventory
After the count is done, the supervisor could also run a “Count Sheet Report.” The value for “Finish Date” should be set to the date the count was completed.
“Group by” should be set to “None,” and “Sort by” should be set to “Adjustment Value.” This will display a report with the highest discrepancy products at the top. These are the products that differ the most from records, so it’s good to keep an eye on them to ensure they stay accurate in the future.
Nice article on cycle counts.
When using the stock count sheets, If I counted stock on 31/07/20 and now want to use the adjust function Inflow is just looking at the stock as of today not back to 31/07/20 which will cause some issues as we have sent orders out since then, will it not look back at historical stock levels.